
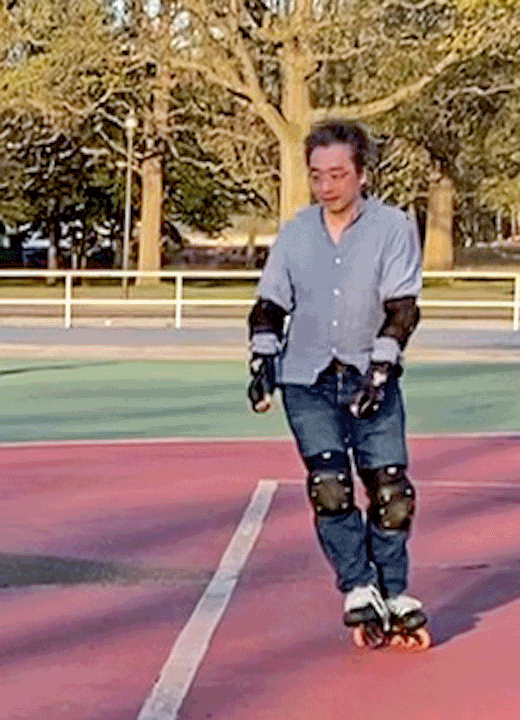
Since the pandemic of 2019, I’ve been regularly inline skating at Eisenhower Park after work. In these last two years, I’ve seen a large number of new skaters show up with a box of new rollerblades at the park. They put on their new inline skates, and struggled around for a while. Most tried to walk around the rink by holding onto handrails at the outermost track. The brave tried to skate and fall. Very few approached me to ask for advise.
So a large number of first-time newbies showed up every week. But I almost never saw them a second time. Perhaps they went to a new park to skate. Perhaps they didn’t hang out around the rink after getting their footing, so to speak. But I suspect that a majority of them gave up.
This article is for those who attempt to learn to inline skate. This article is what I wished someone had written for me, when I was just learning to skate. If you want to talk to other inline skaters online, head to r/inline_skating at Reddit. If you live on Long Island and are interested in connecting with your local skaters, consider joining r/NassauBladers at Reddit.
I learned to cruise around on level biking trails years ago, before YouTube tutorials were a thing. I figured out skating by trial and error, or I thought. I remember thinking that I knew how to inline skate.
This illusion lasted for years, until I saw skillful ice skaters at the Bryant Park ice rink one winter. Mesmerized, I picked up ice skating, and it changed how I saw inline skating as well.
Here I will share a few basic but crucial skills I’ve since learned. Hopefully this article will help beginners progress faster, and cut down significantly their frustration level. But I am under no illusion about my own abilities. I am merely an intermediate skater. I have my own next sets of barriers to overcome. Perhaps more articles will follow in time.
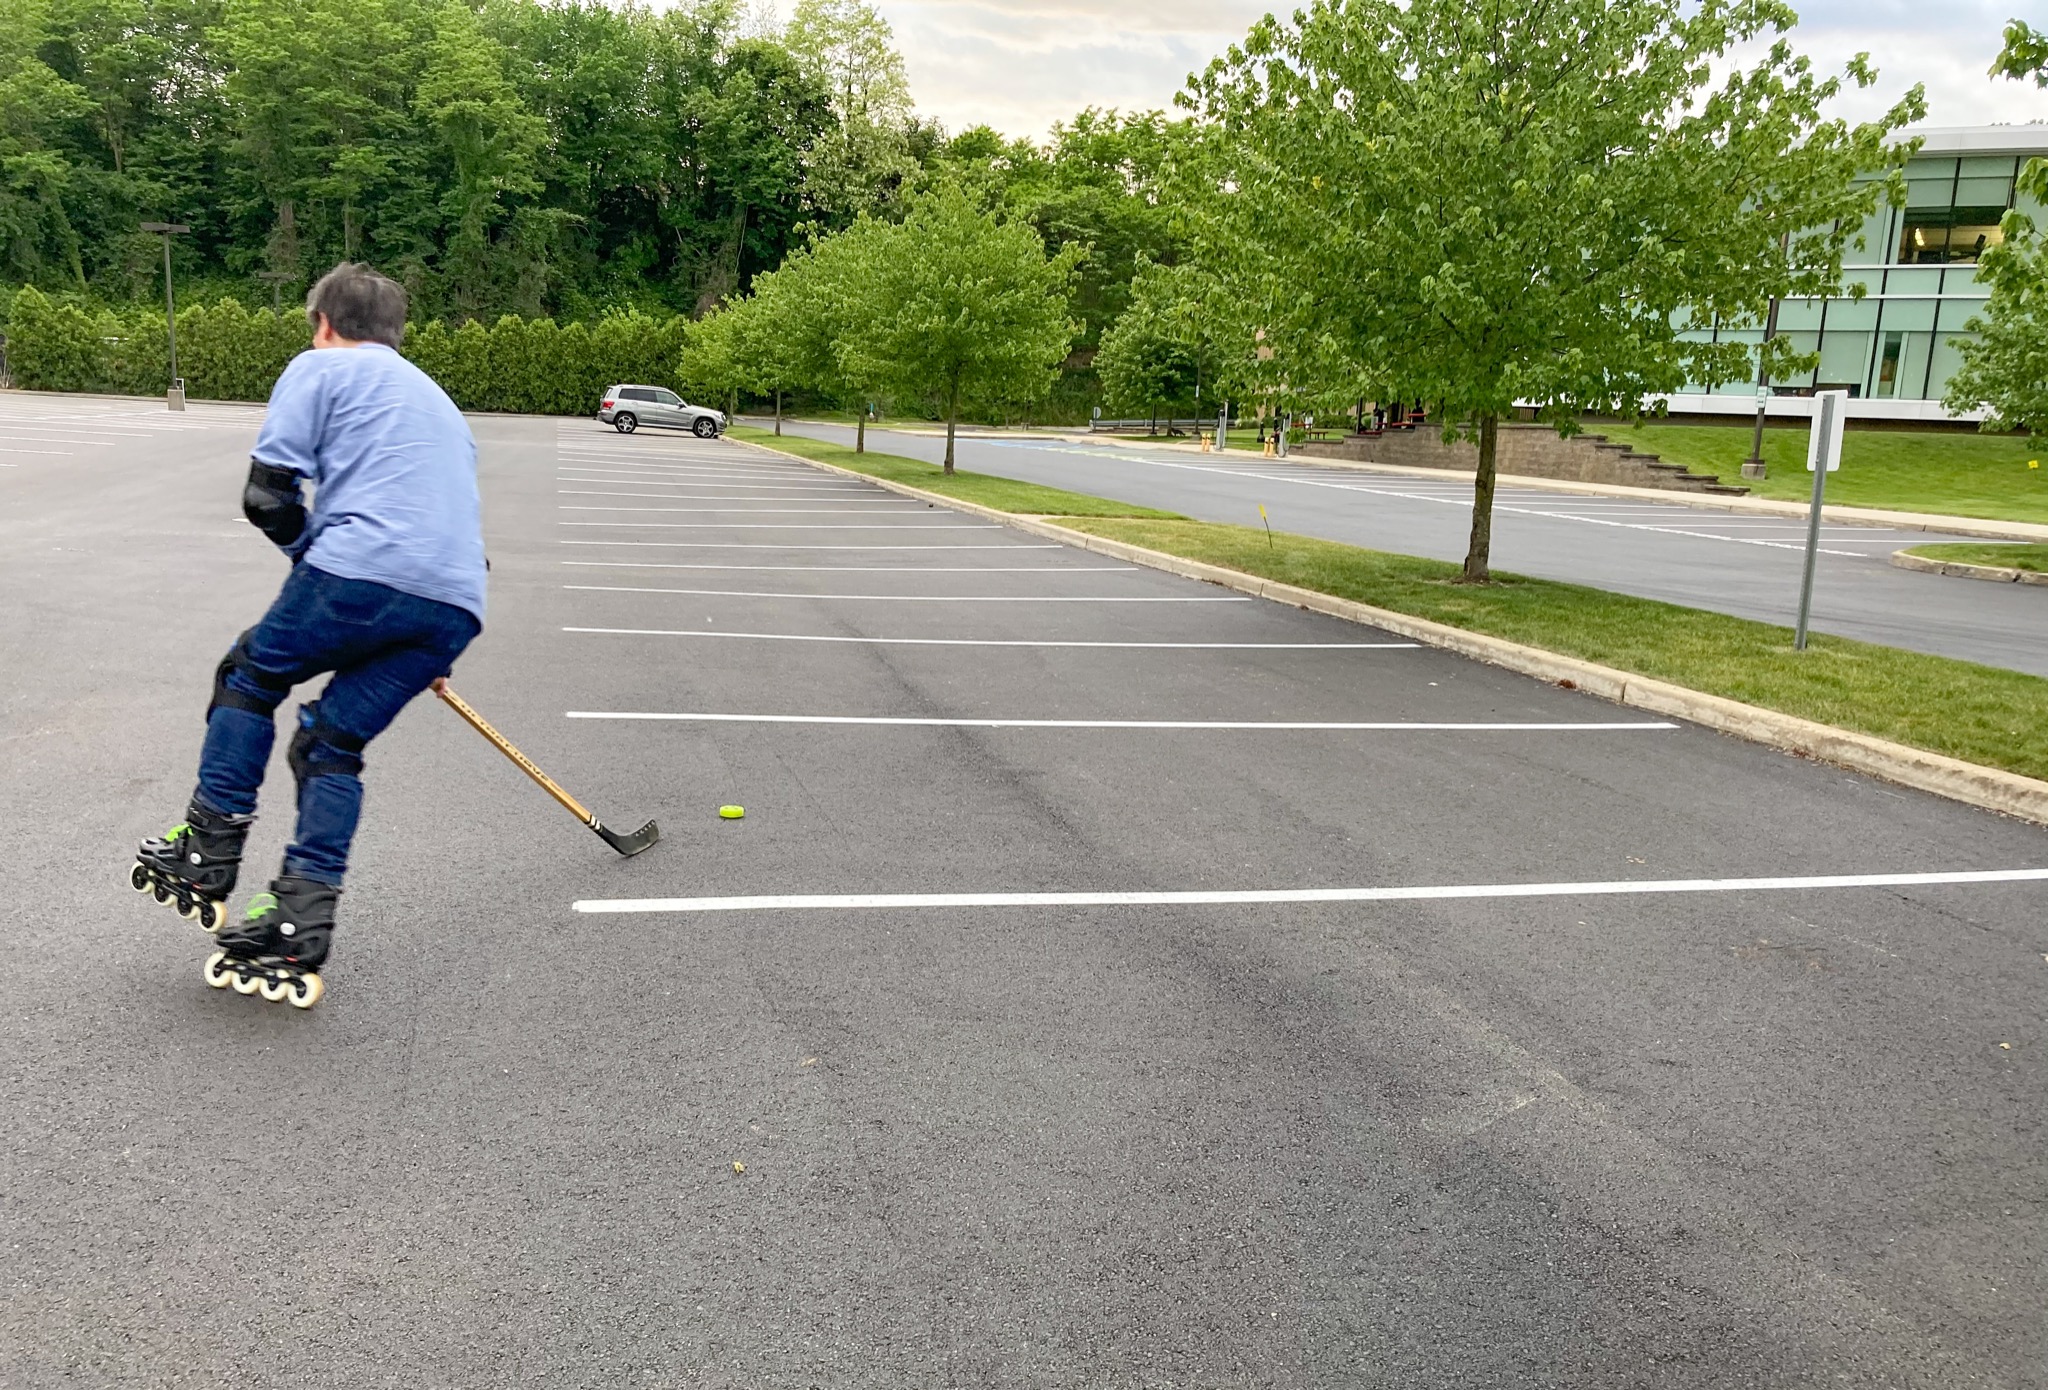

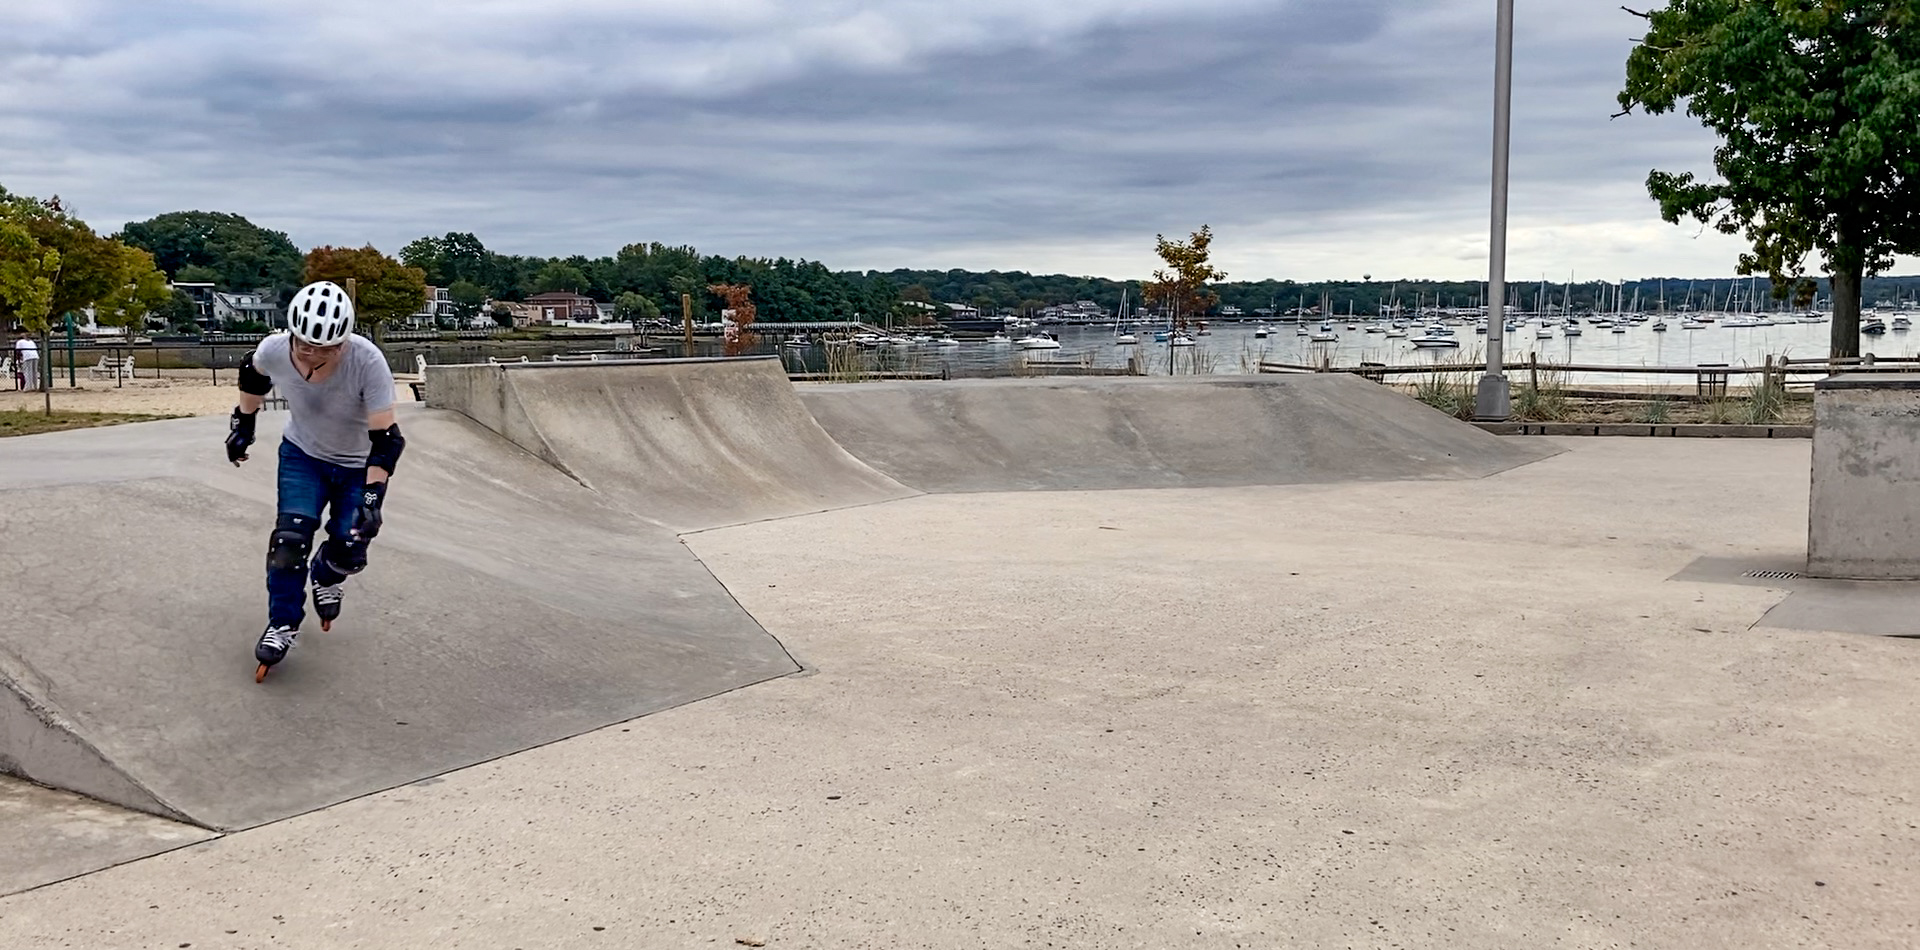


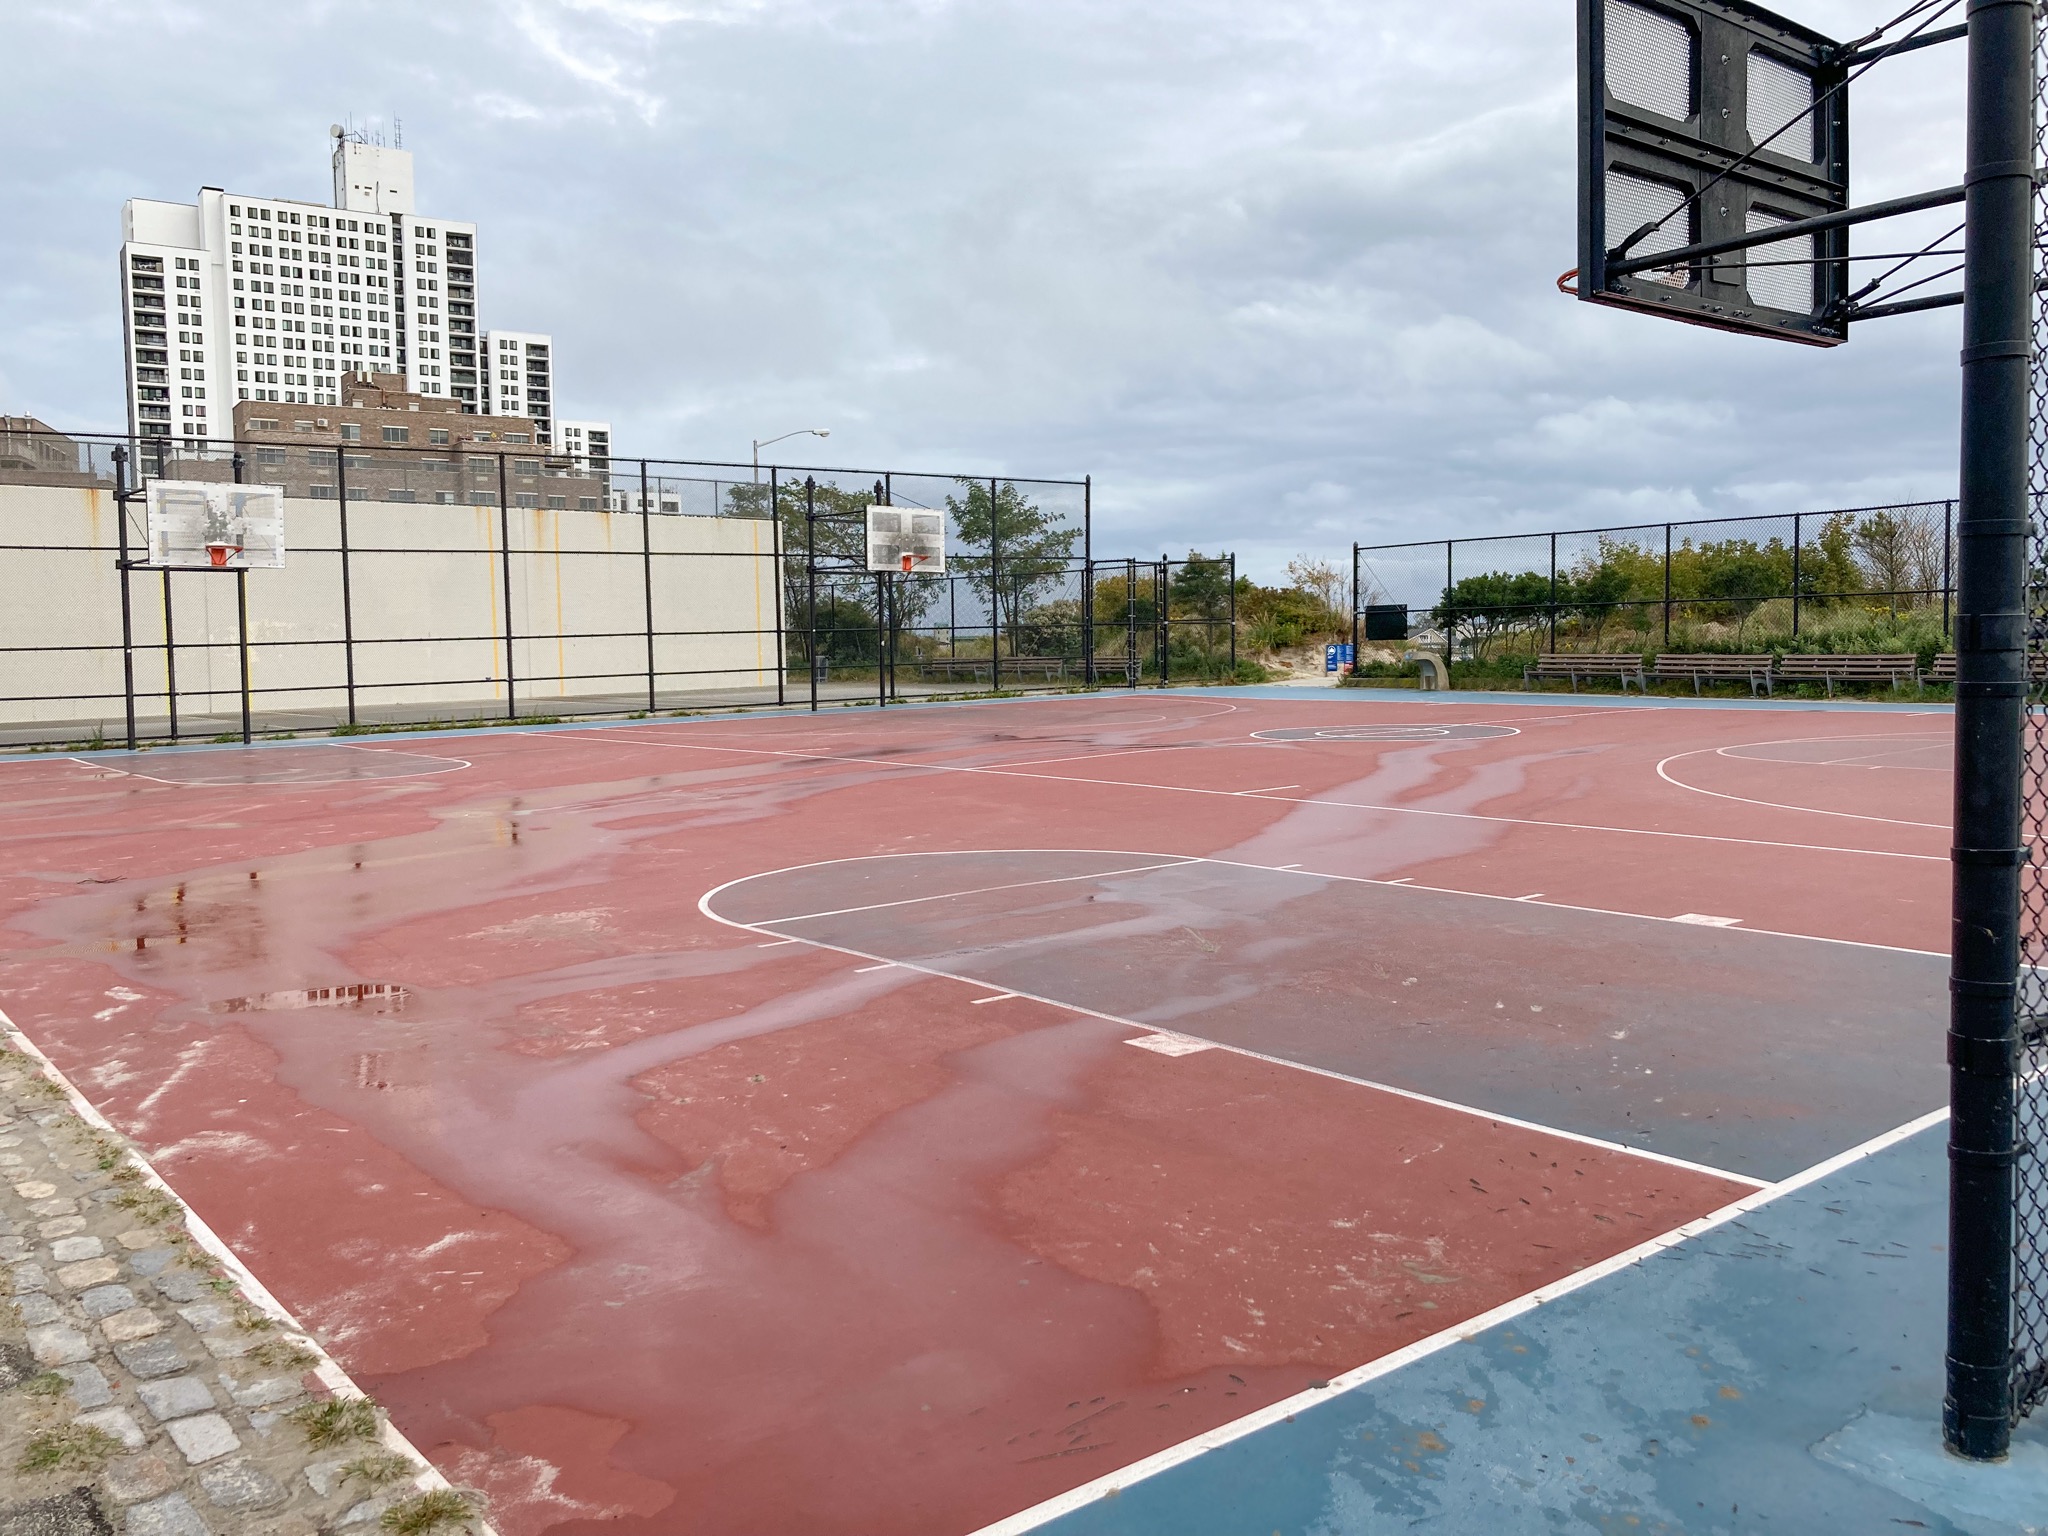


Table of Contents
- What to bring to your first skating session
- Why protections, if I can already skate?
- Learn your first move
- Learn your second move
- Practice V steps on grass
- How most beginners skate
- Why am I unstable on inline skates?
- Why must I bend my ankles?
- The squatting posture
- Benefits of the squatting posture
- Ankle-bending enables far reaches
- Asha of Freshskate fame
- Support for your ankles and shins
- Scissor posture and stable glides
- Squatting posture vs ankle-cast posture
- My muscles don’t play along
- Why can’t I glide?
- Standing on the projected center
- Skating as a sequence of falls and recoveries
- Pronation and outside edge, again
- Zig-zag gliding
- To sum it all up
- Protection equipment
_
What to bring to your first skating session
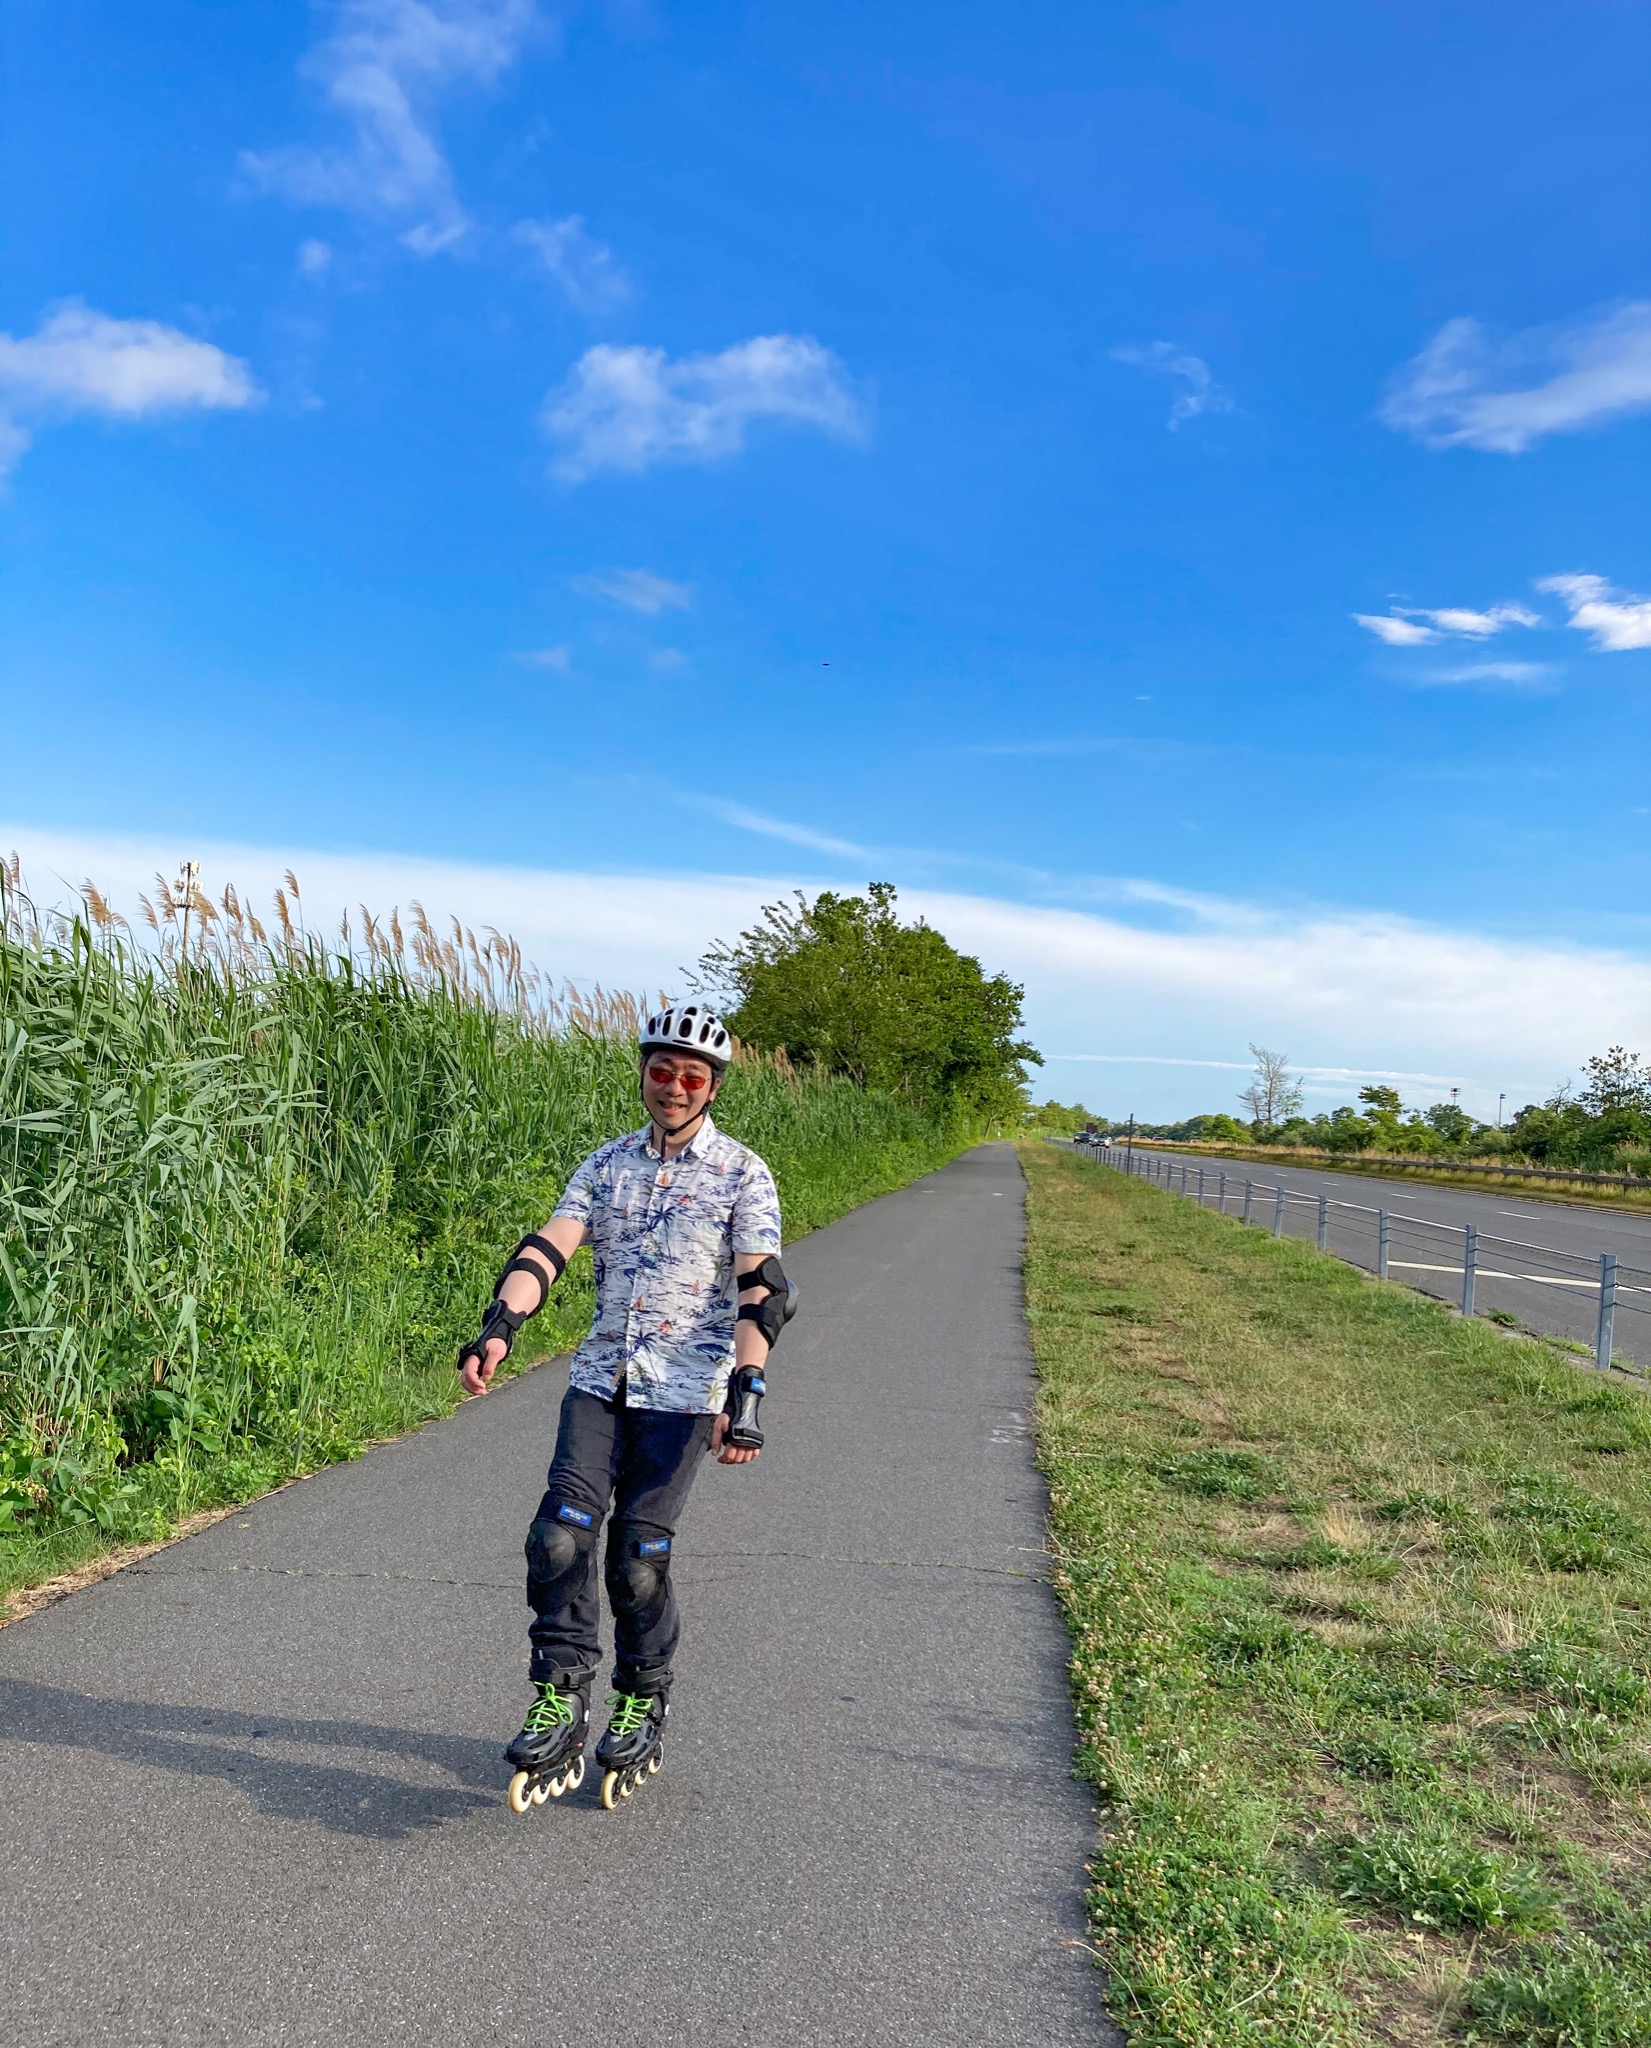
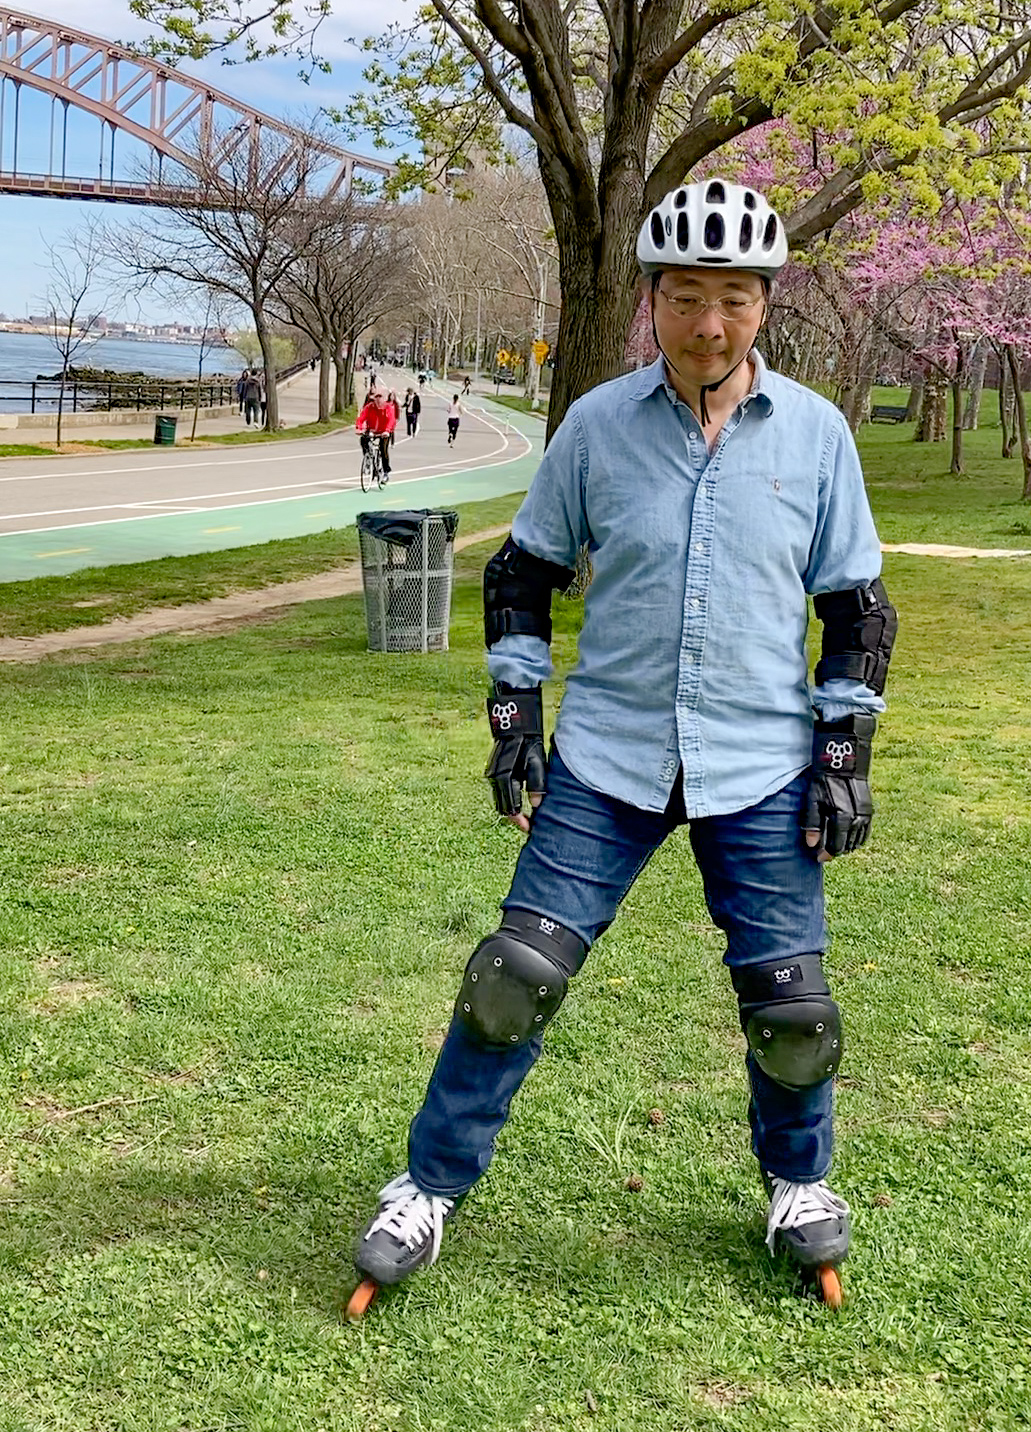
You bring your new pair of inline skates to your first skating session. That is obvious. I have more to say about your first pair of skates, and how they should fit you, later.
But if that’s all you bring to your first skate, then you are not going to have a good time. You will be making a common mistake I see at the rink, at Eisenhower Park. About 60% of newbies show up with skates alone.
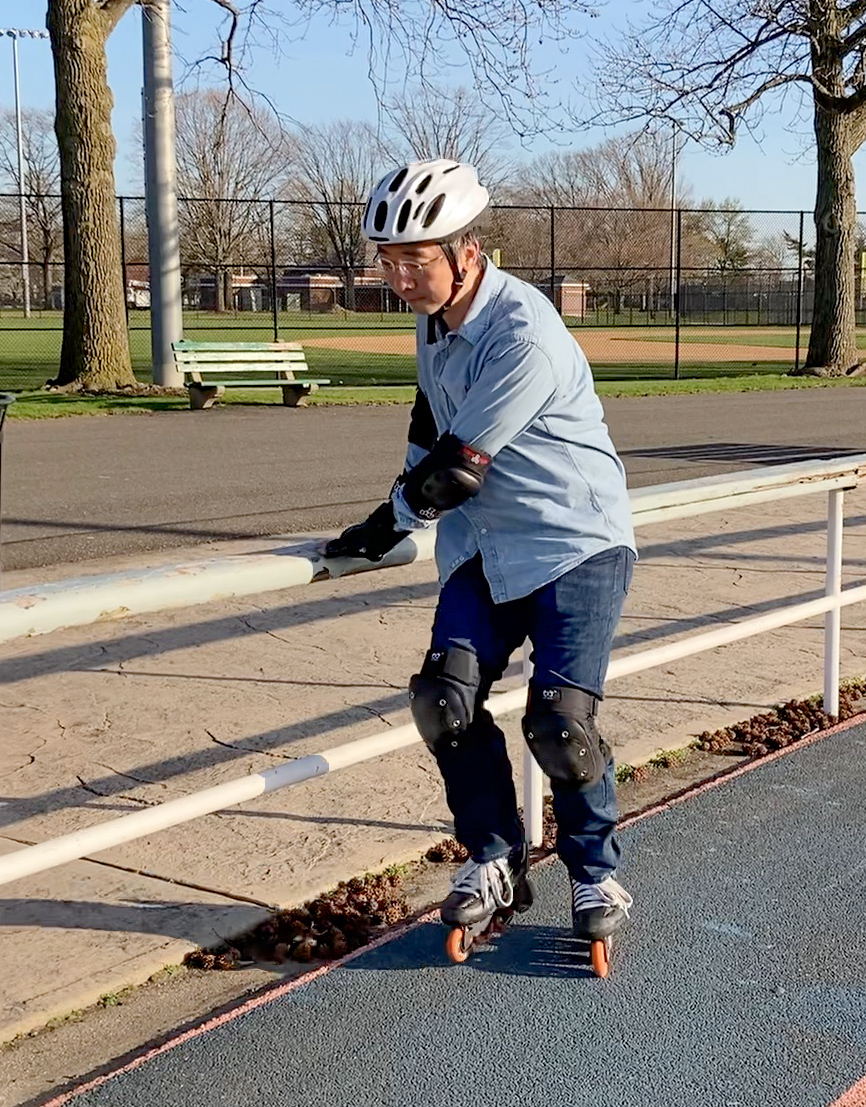
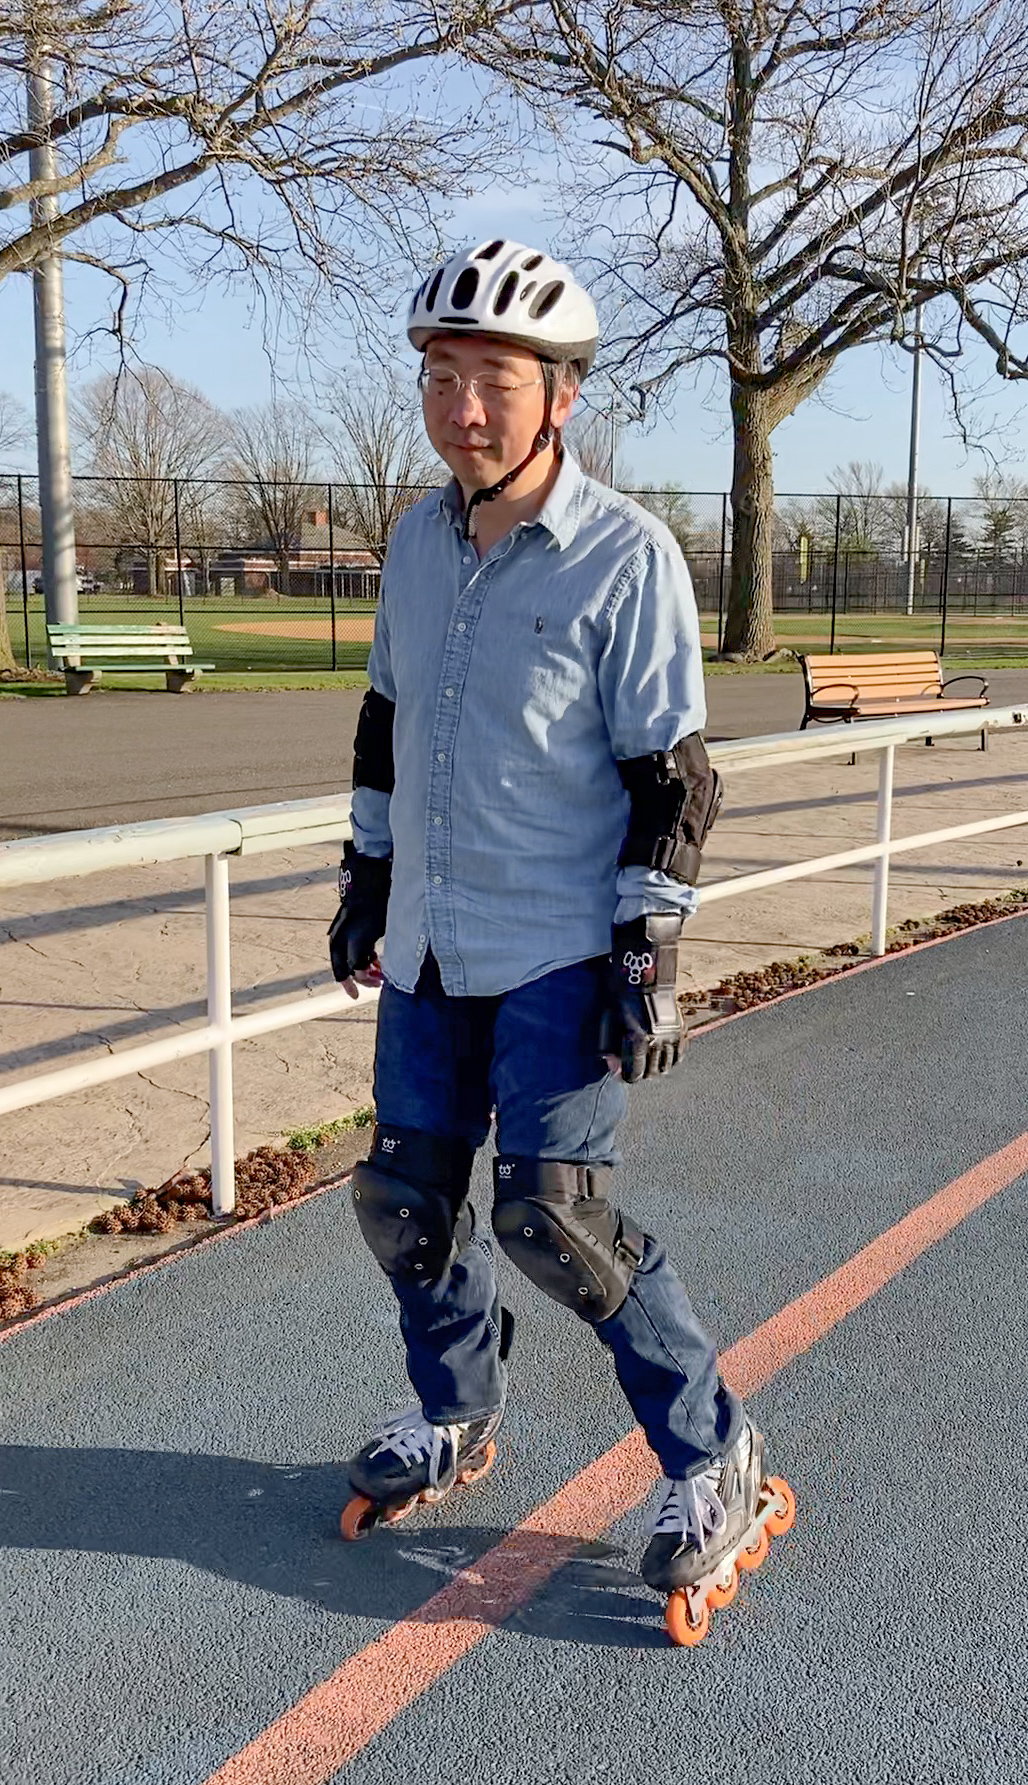
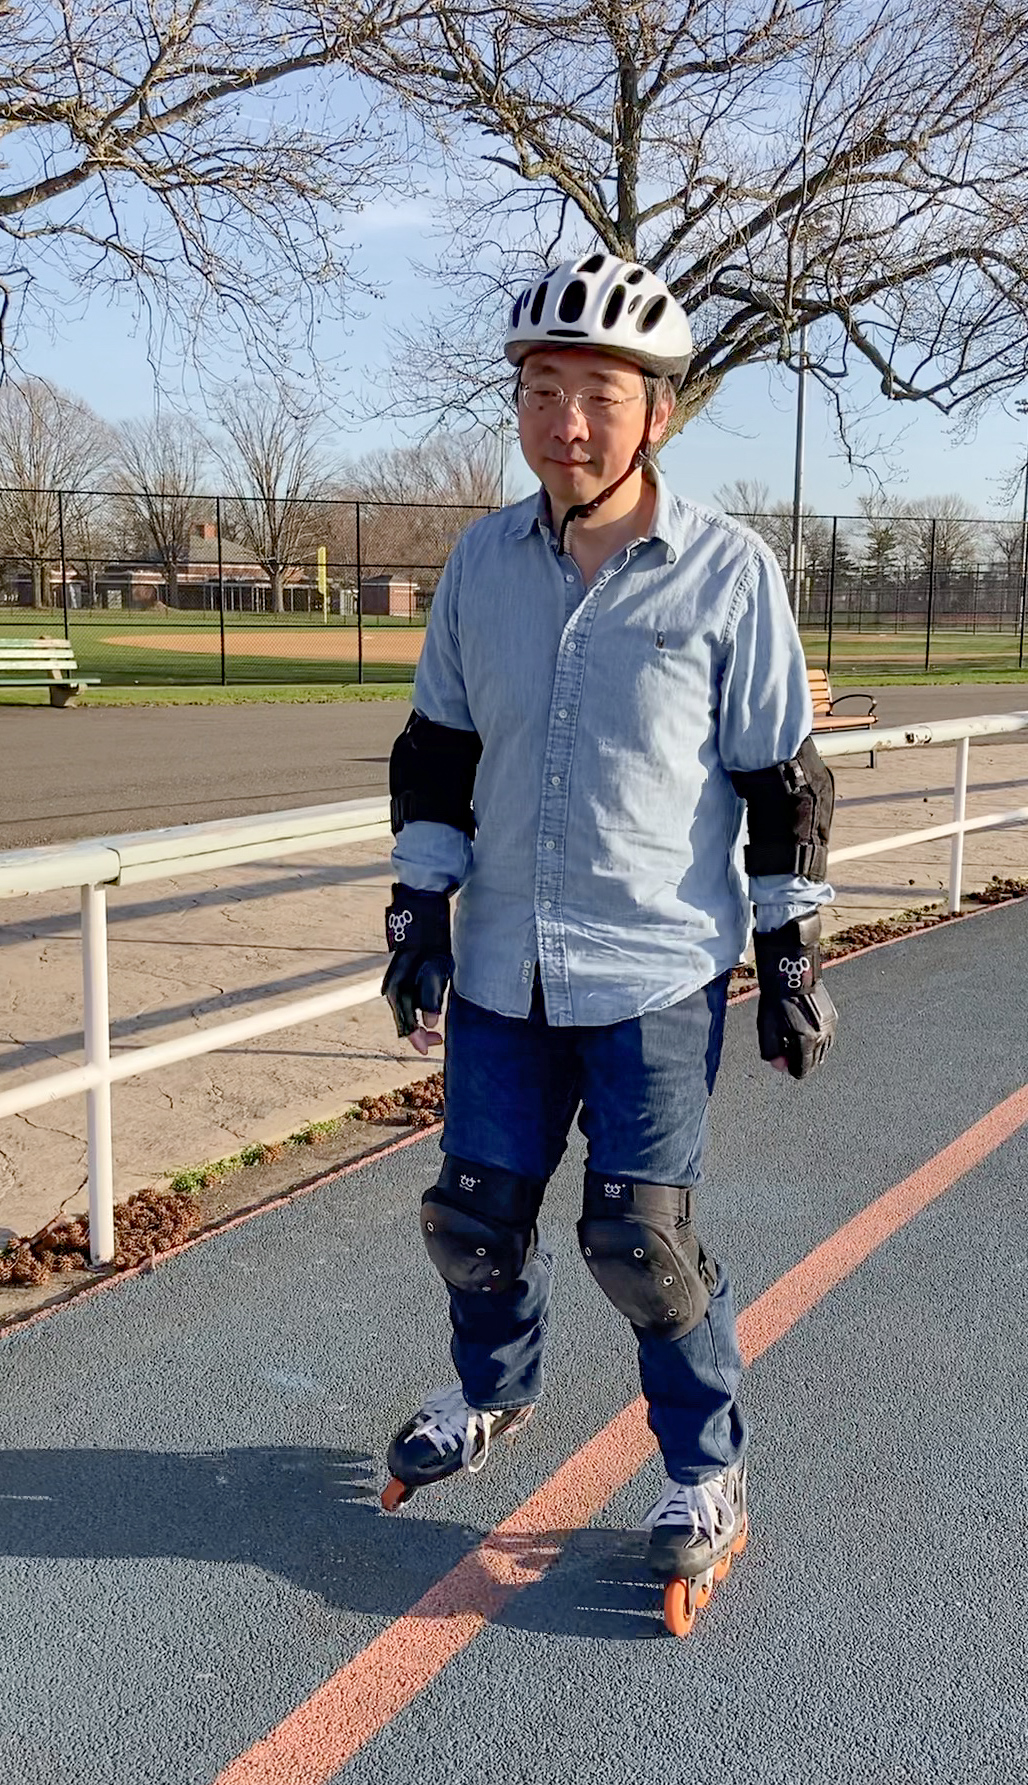
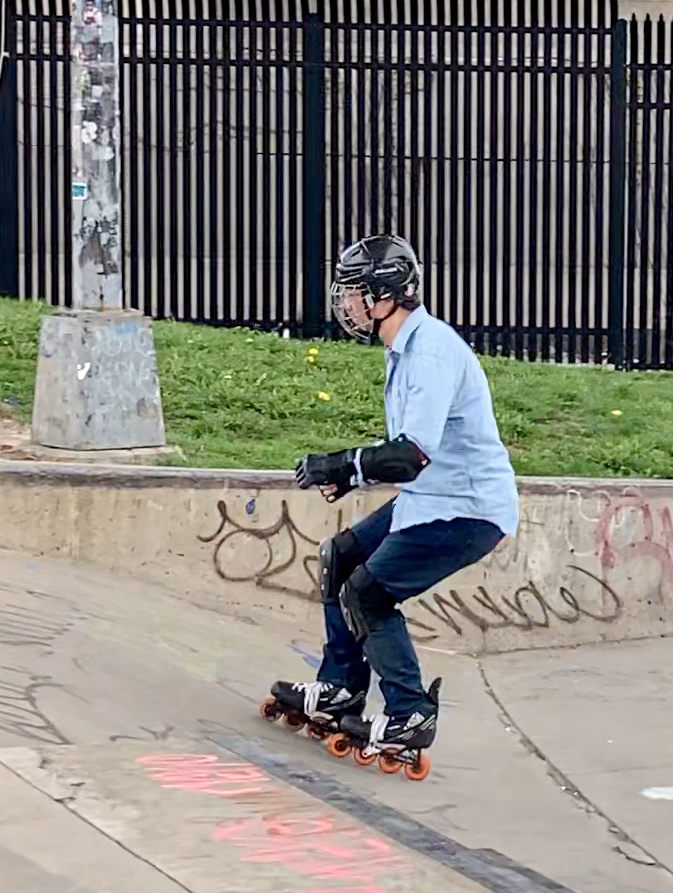
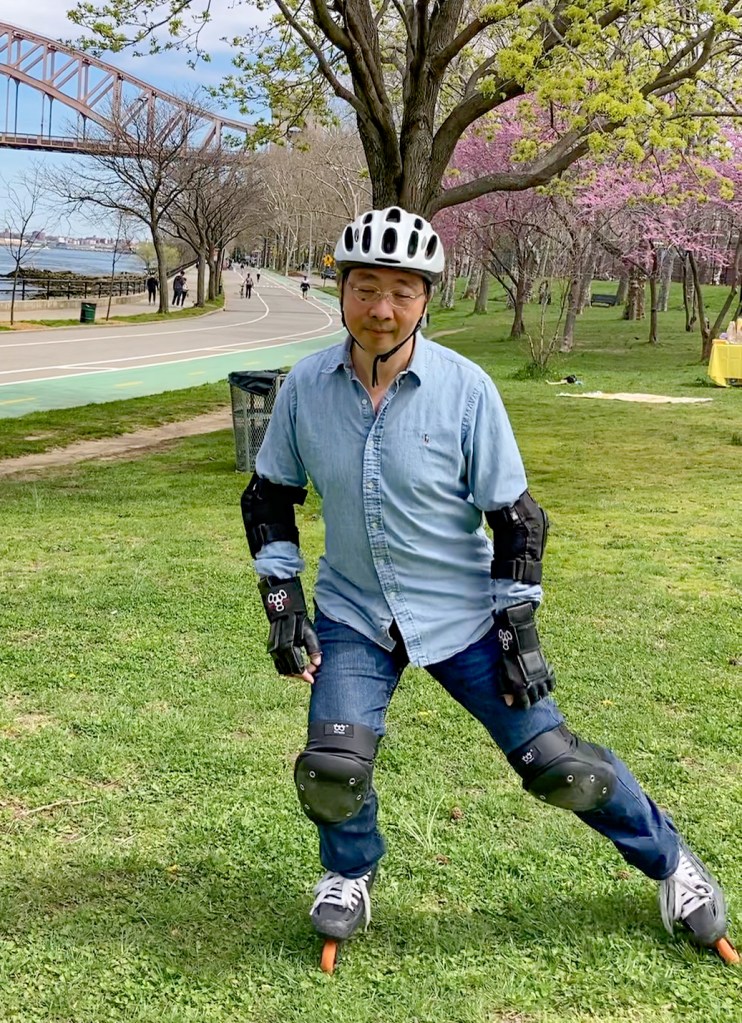
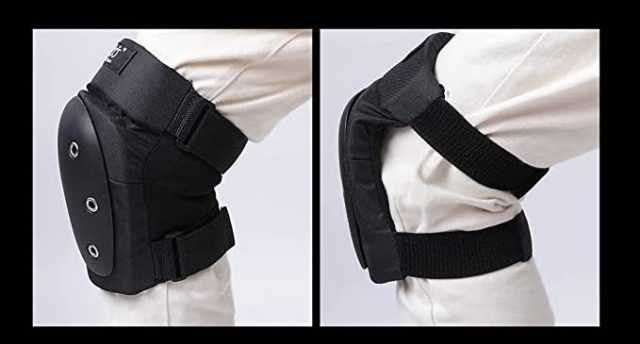
So what else do you bring? Let’s zoom in on that picture from earlier. Notice the helmet? Those ugly knee pads? Unsightly elbow pads? And the most unfashionable wrist guard looking like a dog bone?

The protection equipment you see, plus what you can’t see in the picture, are what you need, on day one. I wear padded underpants. You will find them online by searching for padded underwear favored by skateboarders.
_
Why protections, if I can already skate?
Most newbies misunderstand why protection equipment is important.
Protection equipment is ostensibly for reducing bodily injuries, when you fall. But all activities including getting out of your bed incur risks. People have the right to skate without protections. It’s a risk you can assume yourself without anyone else feeling the need to meddle in your life.

The truth is that most people can walk on inline skates without falling, even the first-timers. Like I mentioned, most first-timers at the rink hold onto a handrail, and try to walk on skates for 20 minutes until they get bored, or tired, whichever comes first. Then they head back home and never return. This is true for ice skating as well. For this type of “skating”, protection equipment is not really needed.

Those few who manage to stand without holding a handrail proceed to walk with their skates. Most attempt to emulate regular walking on skates, with knees extended fairly straight, and with severe pronation where wheels touch the ground on their inside edge. I have more to say about pronation later.
For now, my point is: this type of “skating” is fairly safe, and you will not easily fall and injure yourself. That’s especially true if you heed my number one creed of inline skating: bend your knees and ankles. Many a skater remains stuck at this level of “skating” where they cannot glide on a single skate. Without the ability to glide, most skating moves are beyond these skaters. Then they get bored. And they don’t come back.

In my opinion, falling is a prerequisite for a skater to progress from holding a handrail, to walking on skates, to gliding on one skate, and then to all sort of tricks most of which are still beyond me. In my learning journey, every fall led me to understand a move better. Nobody can master a move intellectually by just watching a video. Even the best teacher can’t singlehandedly enable you to balance on one skate. You the skater must try, and fail many times, before you build up your muscle memory.
Protection equipment is what affords a skater the luxury of falling in style, and without hurts. You always overtax yourself trying to learn a move. You will fall. And that is OK, because you are protected. Of course you should also know how to fall in style, and without hurts. More on that later. But get your protection equipment first.

Yeah. That was a hockey helmet I wore, in images shown above. I didn’t want to lose my teeth. Did I mention that I also wore padded underpants? I didn’t want to break my tailbone.
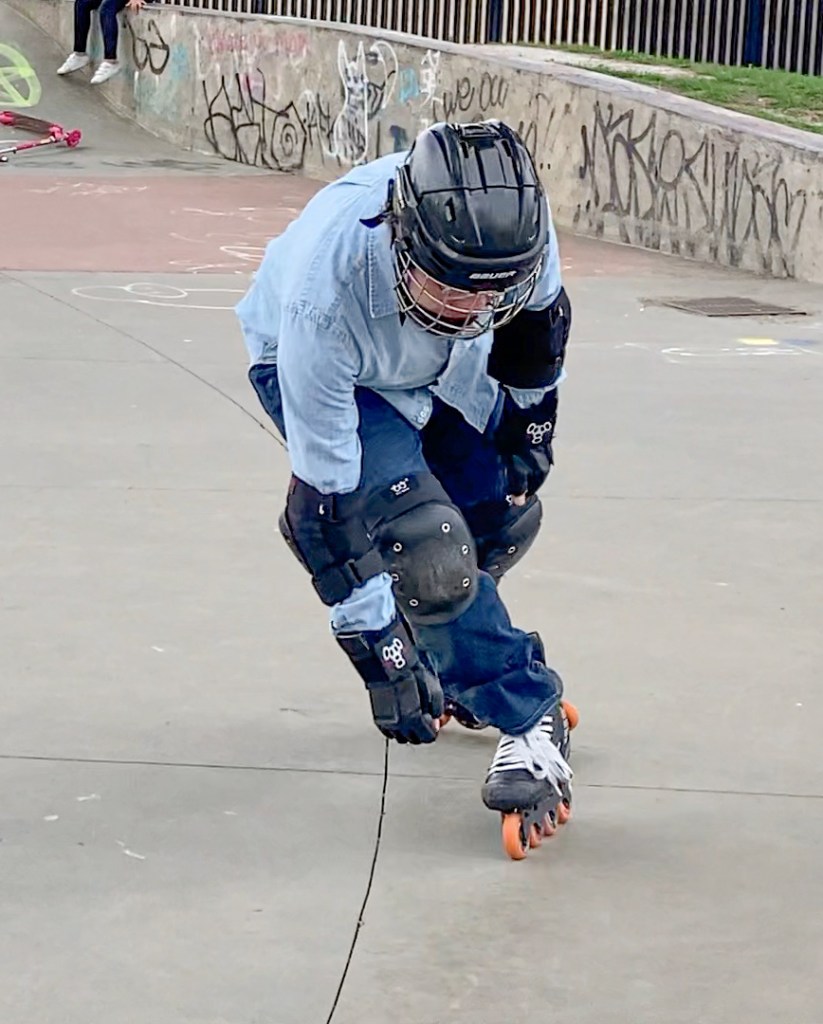
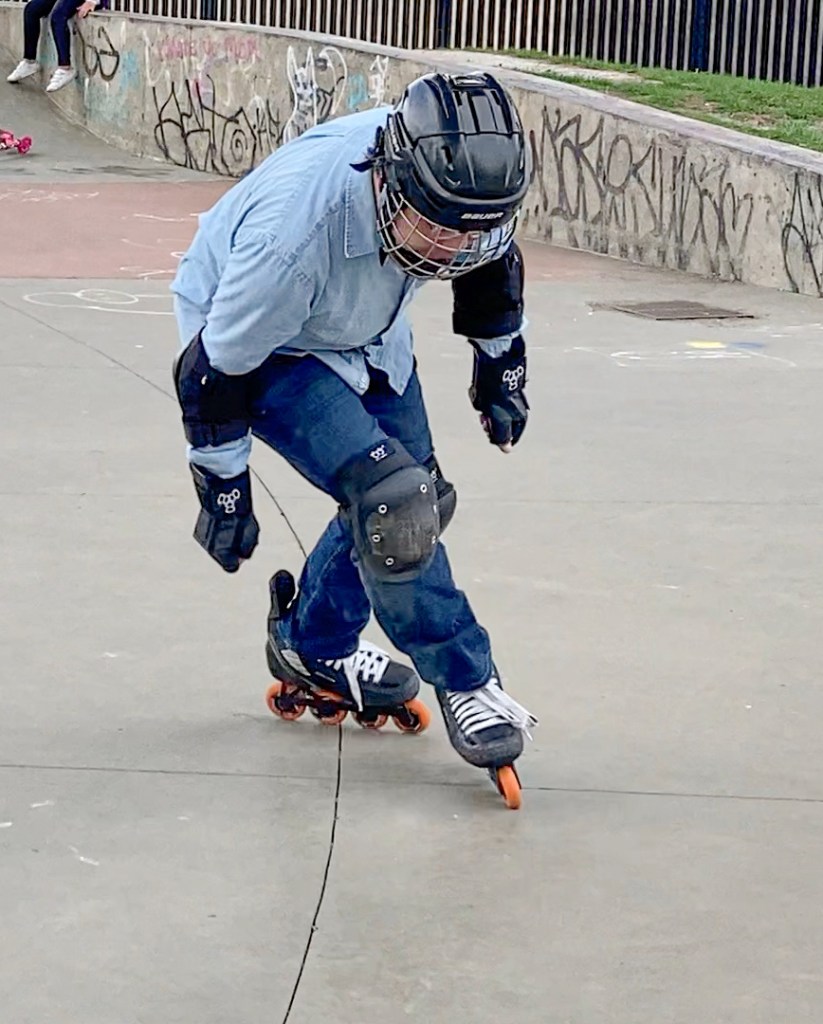
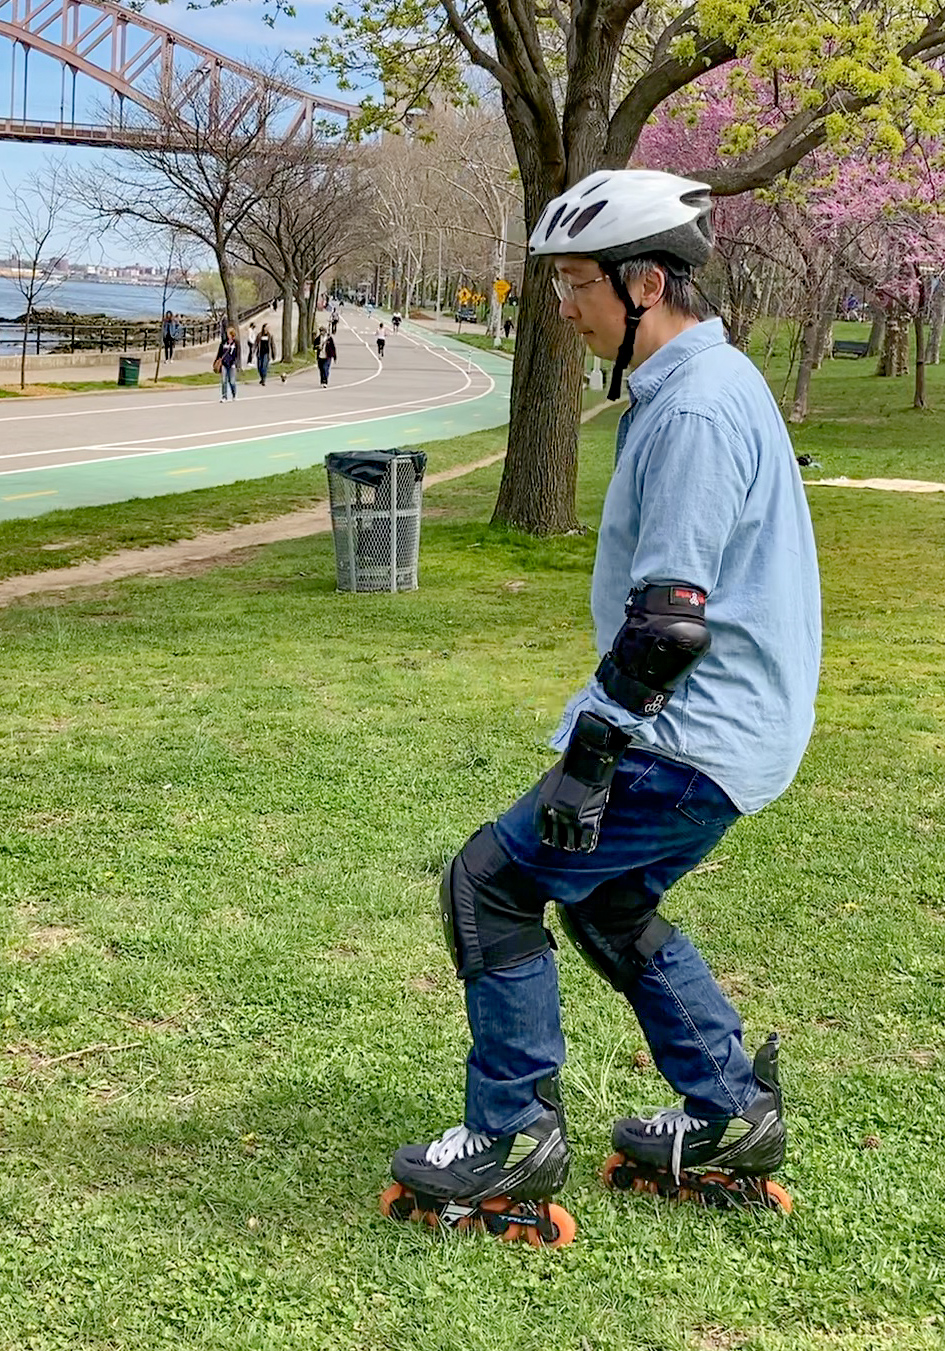
Without protection equipment, I never would have stepped into a skatepark, and I never would have fallen on my back. But I would also never have experienced the thrill of skating up a quarter pipe. See how repeated falls eventually lead to success later at a different skatepark, shown below. At 1:45, I finally mustered the courage to skate up a quarter pipe at the Maloof Skatepark. Sorry about the camera shake – I held my phone in my hand as I skated.
Readers with a keen eye would notice that skateboarders don’t seem to wear protections. Of course most of these folks are proficient already. But a skateboarder always has the option to bail out, and regain their footing with actual human feet. As for us inline skaters, it’s a different story. There is no bailing out of your skates.
Don’t mind people who sneer at ugly protection equipment. Just ask yourself, whom do you admire, of these two? One, someone in full protection equipment, executing a flawless grapevine move. Or two, someone in stylish clothing devoid of any ugly protection equipment, who struggles to inch forward despite months of skating, because they are afraid to fall and thus never make progress?
_
Learn your first move
The first move you practice at an inline skating rink is… drum rolls please… how to fall in style.
You didn’t expect anything else, after the last section, right?
I recommend several great YouTube channels to get you started. One of many tubers I admire is SkaMiDan. This is how Daniel teaches falling in style.
Go to Daniel’s channel SkaMiDan – Skating School, and subscribe.
_
Learn your second move
So now you have conquered your fear of falling. You can finally learn your second move. Everyone has a different idea about what your second move should be. Daniel’s recommendation is for you to learn to take steps with the two skates forming a V-shape. The following video starts with a quick intro on choosing skates, a good fit, protection equipment, and a short review on falling in style. You can skip to 5:25 for instructions on maintaining proper skating posture, and on making V-shape steps. This is the first video in a great tutorial series for beginners from Daniel.
You may wonder how these V steps differ from the “walking on skates” I mocked earlier. These V steps are ingenious instructions for beginners. They are counterintuitive. The “walking on skates” I mocked is an intuitive attempt by a beginner to emulate barefoot walking on skates. I have more to say about this “walking on skates” later.
It is very likely that you would fall when you try this second move, especially if you do this on concrete or pavement. But you’ve got falls covered, right? And you have proper protection equipment, don’t you?
_
Practice V steps on grass
I recommend that beginners try the V steps on grass. If you fall, it won’t hurt much. And you can better focus on maintaining the right skating posture, and on making those baby V steps on wheels. But make sure you are on dry grass, not wet grass. Your wheels will roll less on dry grass.


Check out this excellent video from InMoveSkates where Sonic demonstrates V steps on grass. This was shot at one of my favorite places, the Unisphere Fountain, now repurposed by skaters into a skating rink.
I also love the InMoveSkates channel. They, too, have a beginner tutorial. Check them out, and subscribe.
_
How most beginners skate
Unlike you, most readers rush into skating the moment they get a pair of inline skates. Unlike you, they have not bothered to read a blog or two on inline skating. They have no idea what V steps on grass are.
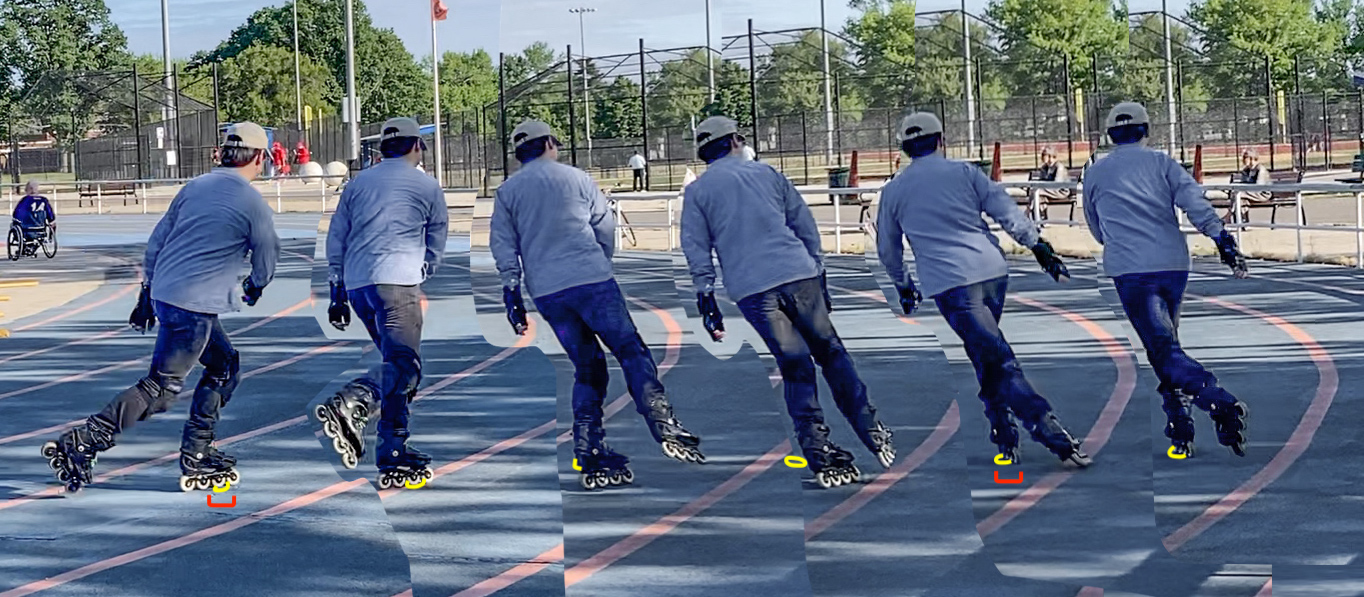
As a result, I see a lot of beginners attempting to emulate actual barefoot walking on wheels at Eisenhower Park. Here is my impression of how a typical beginner skates. For the purpose of illustration, I stepped in place, and turned around to show different view angles. Actual beginners would have tried to walk forward.
As the video illustrates, beginners often attempt to skate the same way they walk. Unless taught by someone or by online tutorials, a beginner would not think of starting with the V steps. V steps are not intuitive.
But this video illustrates additional issues as well. And I’ll now break them down for you.
_
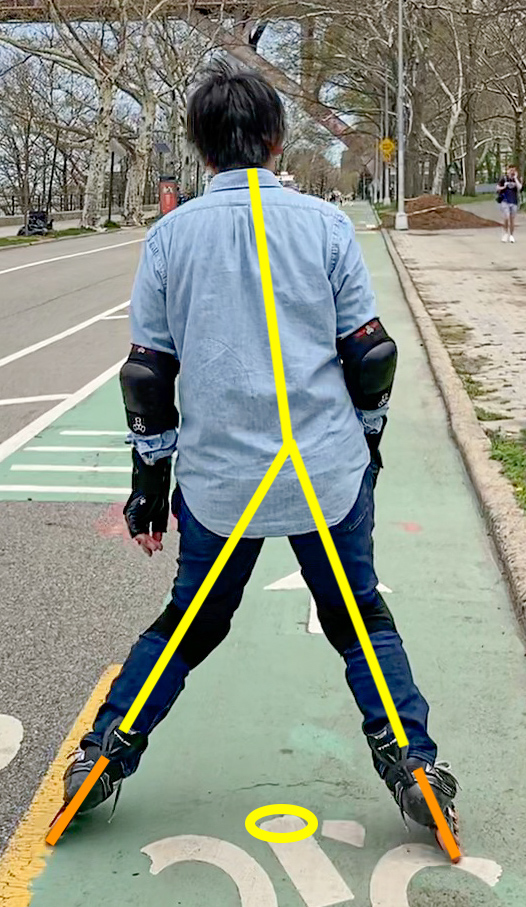
Why am I unstable on inline skates?
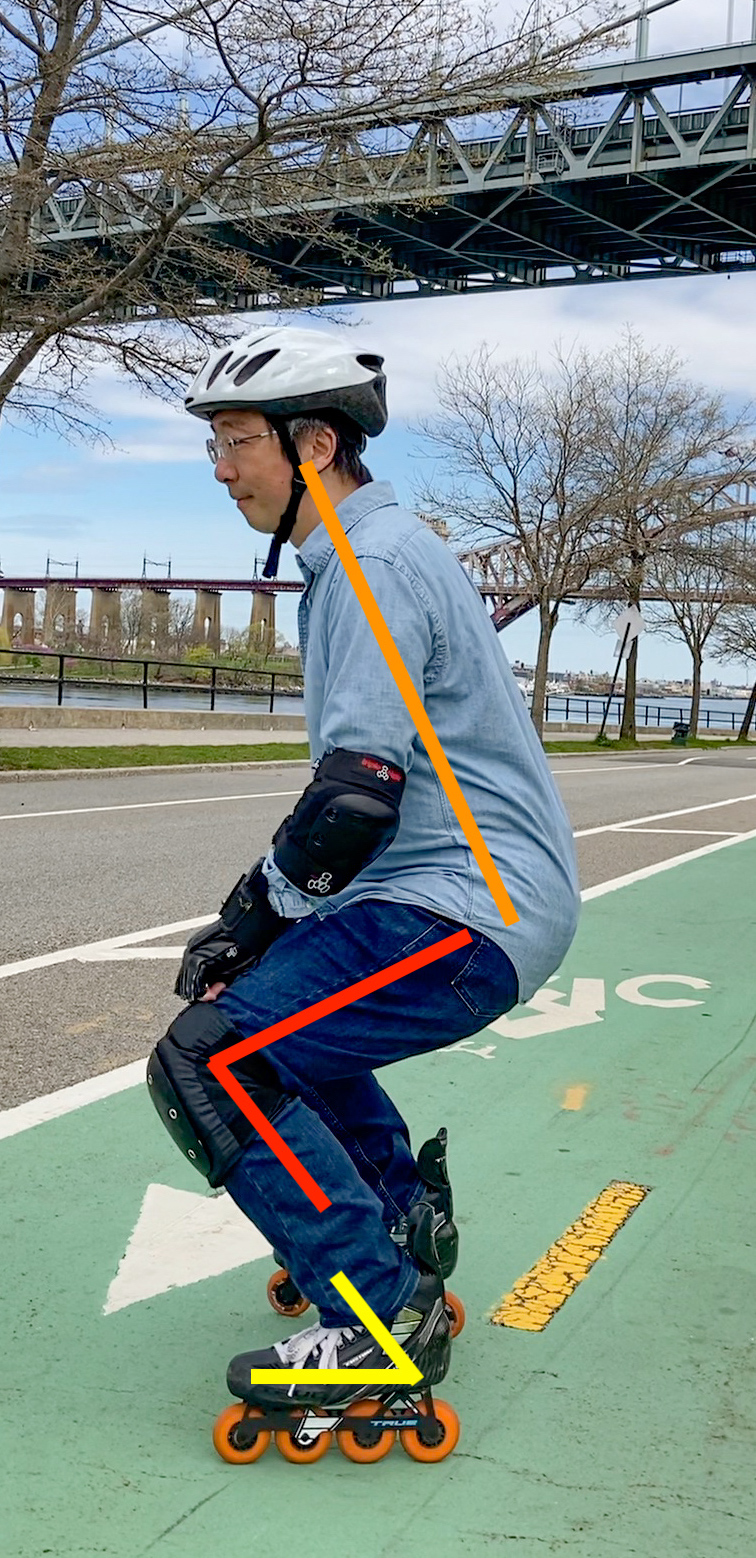
There are many issues in this “walk”. Look at pictures below showing a beginner kicking his left skate backward hoping to push himself forward. This type of kicking is not how skating works. But that is not the most urgent issue right now. We’ll deal with it later.
The most fundamental problem with the above “walking” is the posture of the skater. As the left leg kicks backward, lifting the left foot off the ground, the skater must balance his entire body on the right leg. As you recall from your physics classes, center of gravity is a thing. And you can only remain standing if your center of gravity is not too far forward, nor too far backward. You would topple over otherwise.

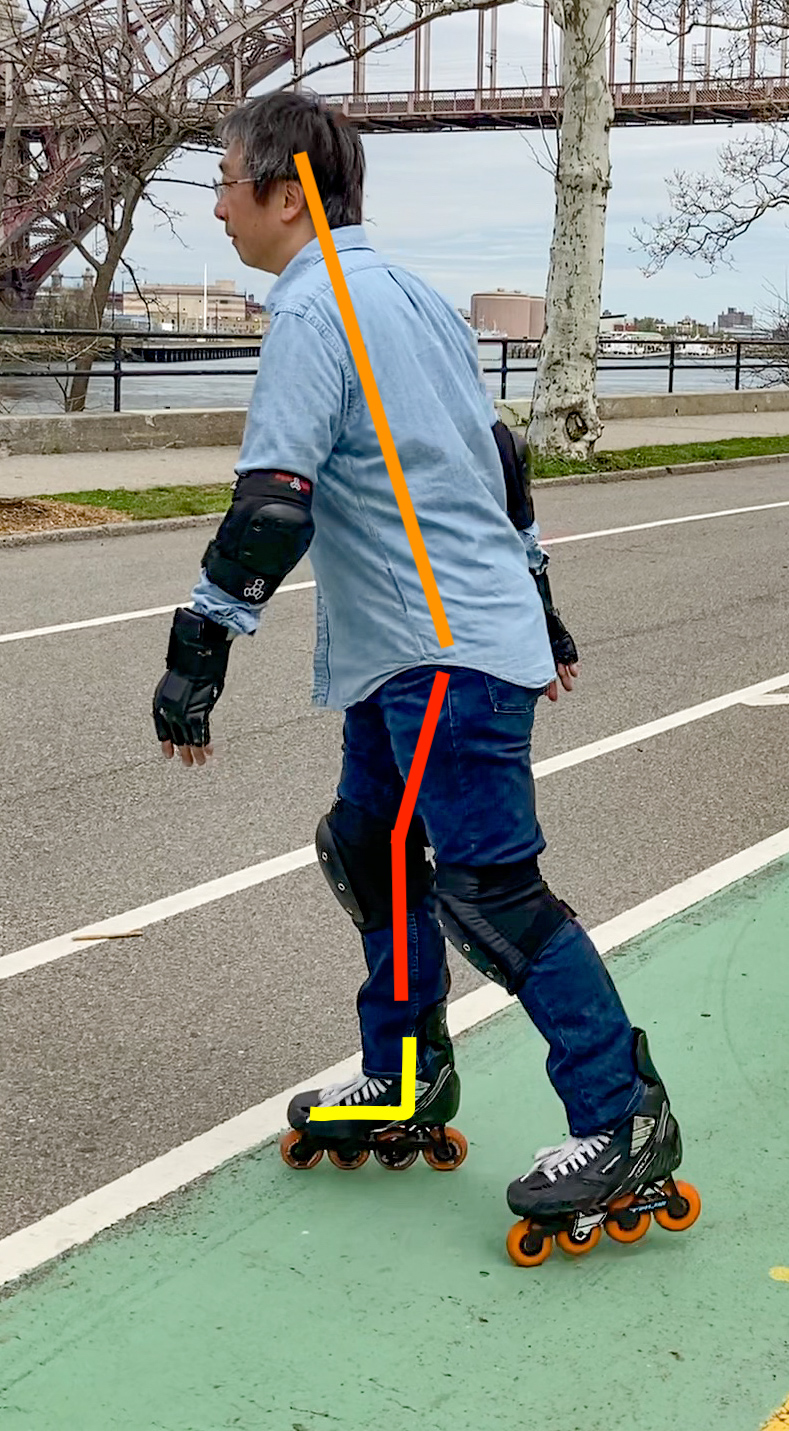
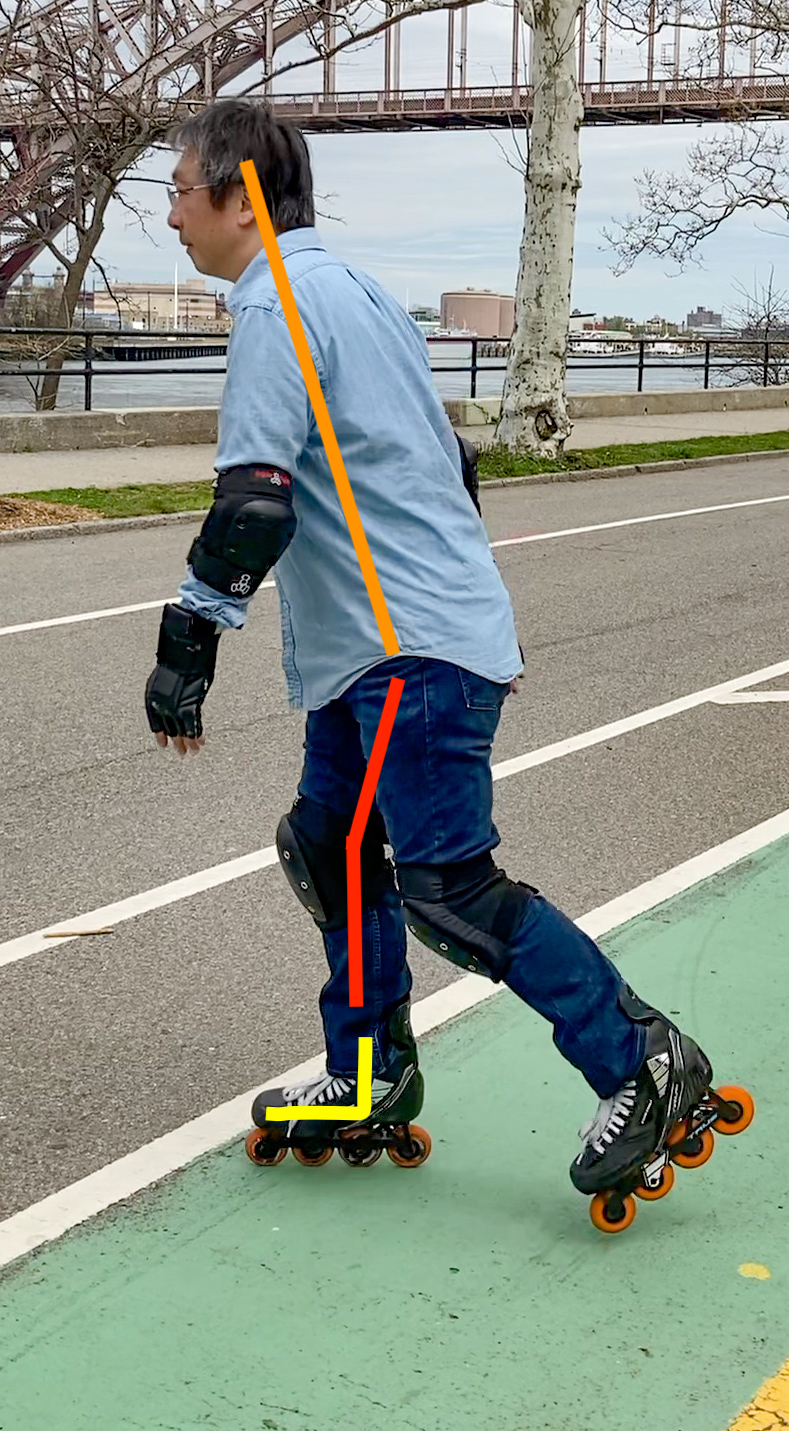
Most beginners tie their skates extremely tight, especially around their ankles and shins. As a result, their ankles cannot bend at all. The shin and the foot form a fixed, right angle indicated by yellow lines in above pictures.
Because you kick your left skate backward, you must tilt your head forward to counterbalance. Again, the center of gravity is at work here. The orange lines in the above pictures indicate substantial leaning of the entire upper body.
As you kick skates backward to try to walk, you will notice that you need to bend the knee of the standing leg a little. This allows the kicking skate to continue to hug the ground as you kick it back. Why the knee bending? Basic geometry. The angle of this slight knee bending is shown in red.
This posture is bad for skating.
First, if you tilt your upper body forward too much, you will trip forward when your wheels catch a piece of debris or bump over something.

After you fall forward a few times, you’ll try to reduce body leaning. That means you will also need to straighten the bending angle of your knees. You can’t have an upright orange line in the above picture, with a bent red line – your center of gravity will be too far back that you can’t even remain standing.
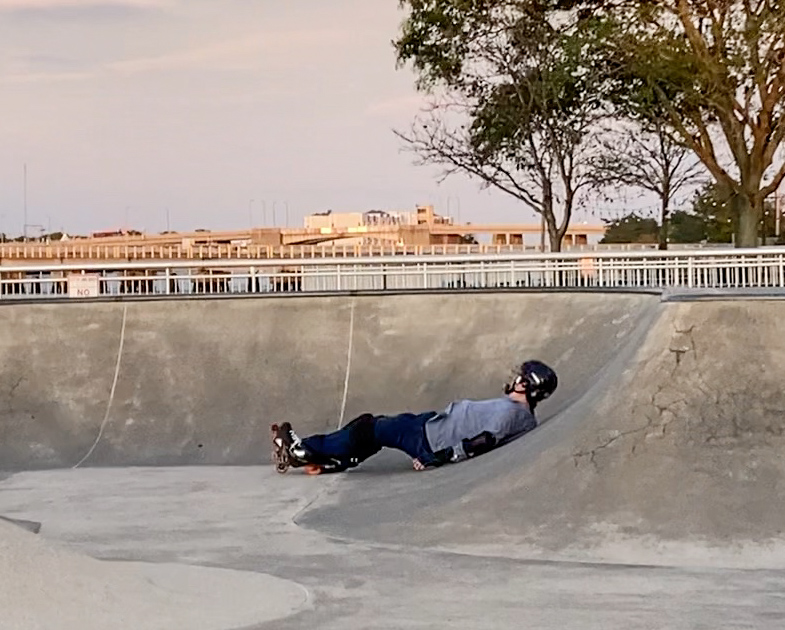
So you’ll end up standing almost completely straight, and your kicking leg will have a small range of motion. More crucially, standing tall and completely straight is taboo in inline skating. When standing straight on skates as shown below left, the slightest shift of you center of gravity backward will cause you to fall backward. You will have no recourse to stop this fall, except to cushion the fall with your fragile tailbone, as shown below right. Thankfully, I had my padded underpants when I fell.


_
Why you must bend your ankles
As demonstrated earlier, when you stand tall and straight on inline skates, you risk falling backward. As a result, you will hear this advise from every skater you talk to: “bend your knees!”
You will hear “bend your knees!” in every tutorial video you watch. And just when you think you have overbent your knees such that you have written a new Guinness world record, someone else will yell out, “bend your knees more!”
But the more you bend your knees, the more your upper body tilts forward, as shown below. And we have also established that leaning forward is no good. What an irony.
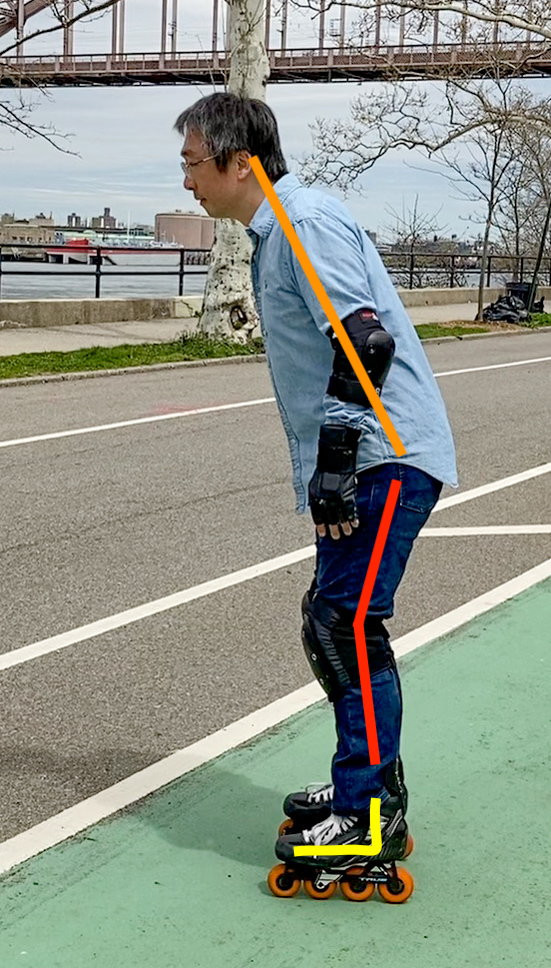
What I have never heard anyone say is: “bend your ankles!”
I believe that the most important lesson for beginners is learning to bend their ankles. All experienced skaters do this subconsciously. Bending your ankles is the only way to bend knees without leaning your upper body forward, as I’ll shortly explain. But even the most experienced skaters do not seem to appreciate that knee-bending is a secondary effect of ankle-bending, not a primary action.
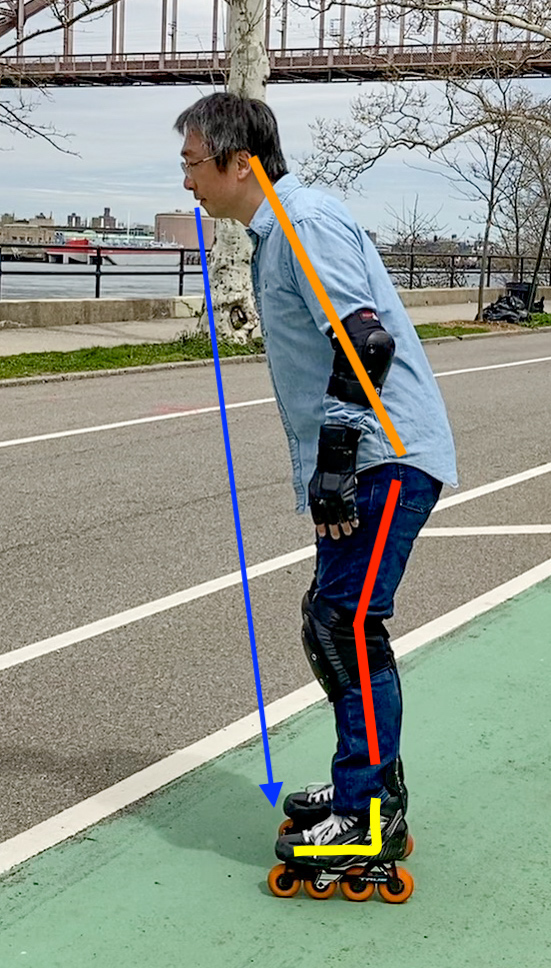
You will hear many tutorial videos urging you to “bend your knees deeply” such that when you look down at your toes, you can’t see them. Asha of the Skatefresh fame often talks about this, for instance. If you draw a blue line representing the eyes sighting the toes, you will find that in this pose, the skater can clearly see his toes.


Your toes should in fact be obstructed by your knees, if you have the right skating posture. Look at above pictures showing an incorrect posture, and think about it for a second. How do you change those orange, red, and especially yellow lines, to put your knees in between your toes and your eyes? Here is a hint: I have named this incorrect skating posture the “ankle-cast posture”.

You will soon realize that there is only one way to achieve that. You will need to bend your ankles instead, as illustrated below. Note how the ankle is bent at a 60° angle in all four pictures below, represented by yellow lines. The same degree of ankle bending allows you to change your posture from an upright standing stance all the way down to an Asian squat.
Throughout these posture changes, your center of gravity moves only in height, and not forward/backward, nor left to right. That is, you’ll feel completely stable as you stand up and squat down this way. If you do it right, you skates won’t budge either, even if you are on a smooth surface.
Now, compare the bad ankle-cast posture on the left, to the proper posture on the right, and confirm that the skater can no longer see his toes when skating with the proper posture.

_
The squatting posture
I haven’t heard anyone give a name to the proper inline skating posture. I am going to call it the “squatting posture”. Let’s revisit the four postures I showed earlier, from the proper stance, to the advanced, to the throne posture, and finally to the Asian squat.
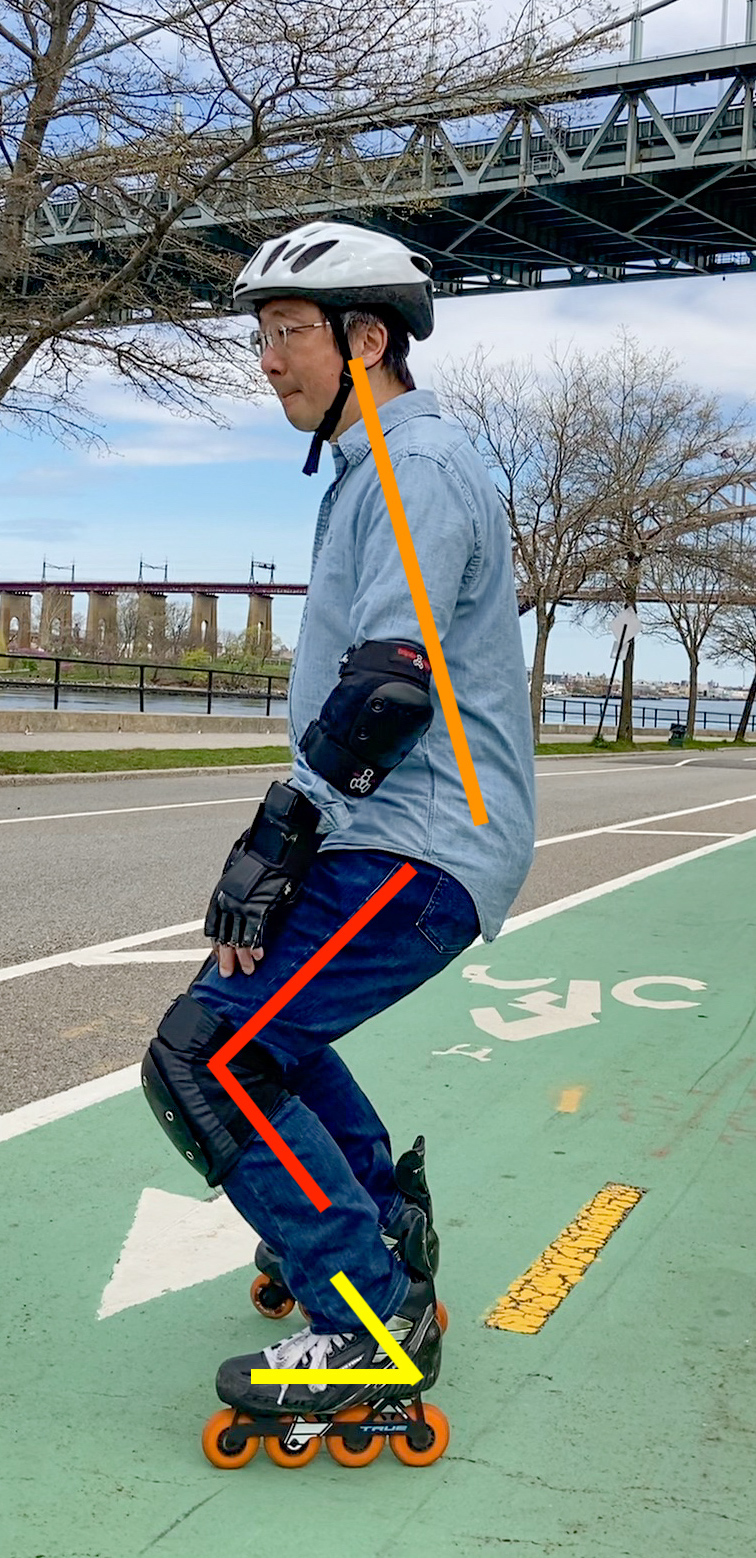

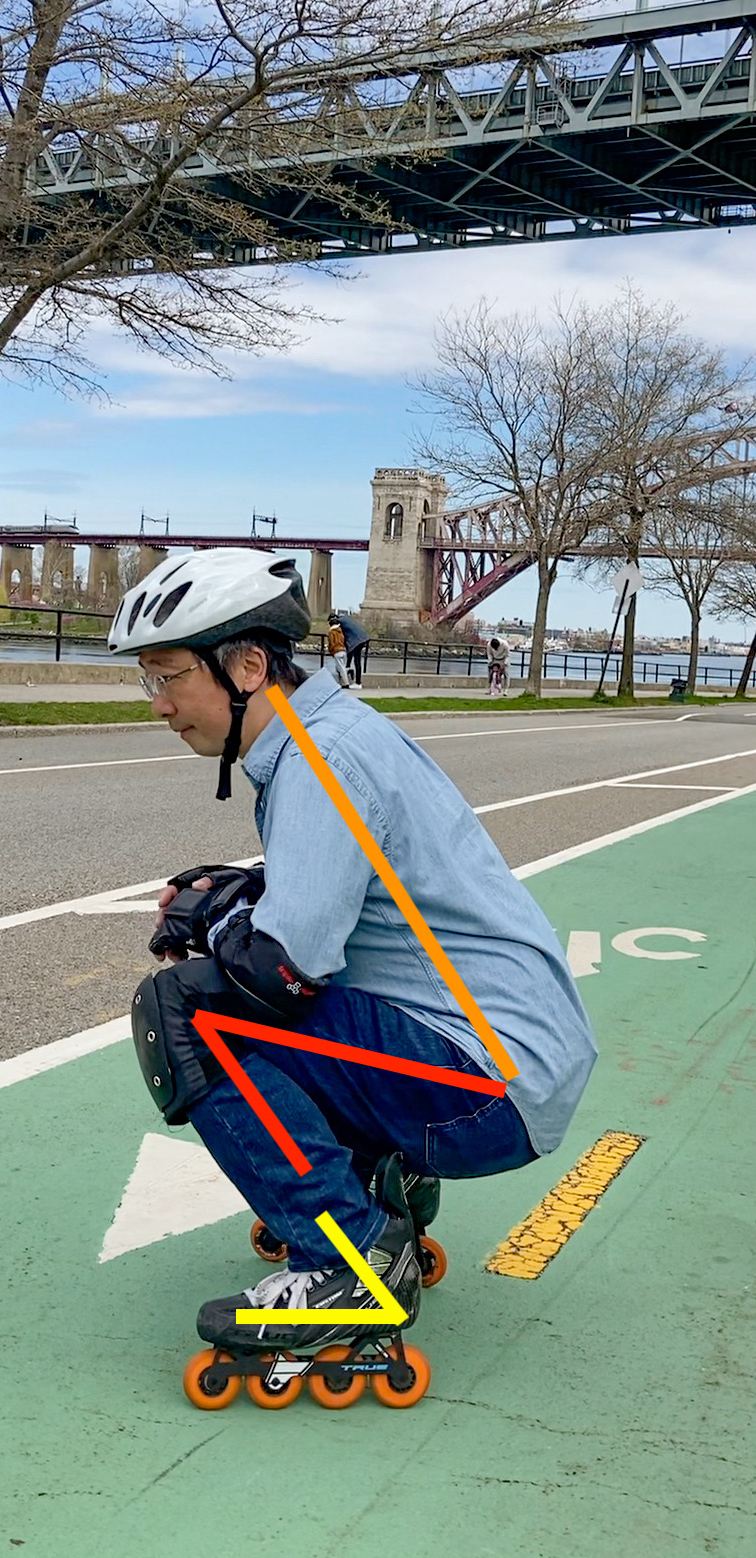
The leftmost picture shown above is an idealized squatting posture for inline skating. Actual postures you use when you skate will change based on many factors including whether you are going forward or backward, how fast you are going, whether your two skates form a scissor posture, whether you are turning, leaning to one side, etc. Usually your upper body will lean slightly more forward than shown here. If you manage to tilt just your head downward without changing your upper body posture, you will find it impossible to see your toes, because your knees, or rather your knee pads, will be obstructing your view. That is when you know you have a good skating posture.
Most skaters overestimate how much they bend their knees. While standing almost straight, most skaters estimate that they have achieved the proper posture with deep knee bending. If forced to lower themselves to the height of the proper posture, they think they are already at the toilet posture shown below. For this reason, I always tell beginners to skate as if they were sitting down on a toilet in a porta potty. In redditor /uSparxUK’s words: “like you’re squatting to do your business but you don’t want your behind touching the seat.” I think this is the only way to get them to bend their ankles at all.
Ask your friends to take pictures of you making what you believe to be a proper squatting pose. Better yet, ask them to take a video of you skating in what you believe to be the proper posture. You may be surprised at your overestimation of the level of your squattedness.


You can also try going from the standing stance to the Asian squat, and back. Do this on grass. Perhaps you find that you can’t completely squat down to an Asian squat. If you are unable to do that, check how much you actually bend your ankles. If you can’t bend your ankles much, then you will need to adjust how you lace or strap your skates. We’ll cover that later.
_
Benefits of the squatting posture
I already mentioned the balanced nature of the squatting posture. Another benefit of the squatting posture is its capacity as an energy store. Your leg muscles are tensioned in this position. They are able to absorb shocks as well as release stored energy at a moment’s notice.


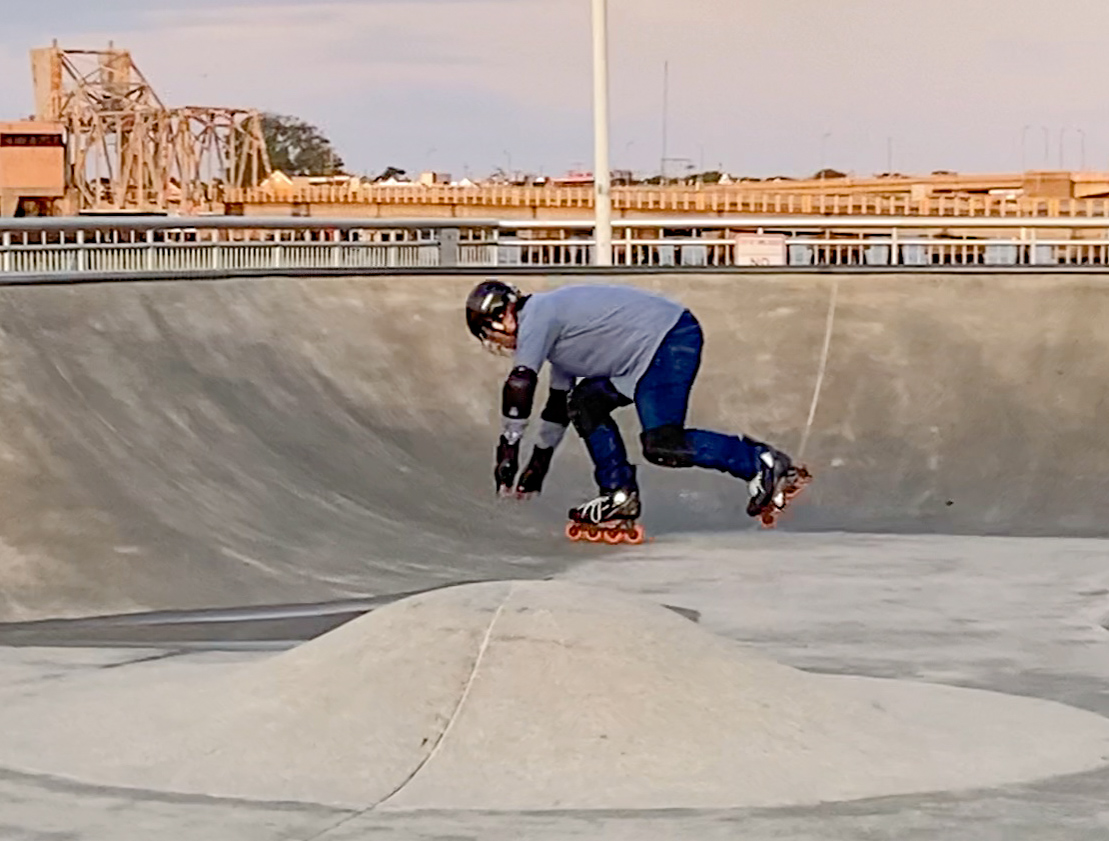
This video demonstrates various benefits of the squatting posture. It’s filmed at Astoria Skatepark. Energy absorption and release of this posture allows a skater to speed up while literally running on wheels. The squatting posture enables good jumps and good landings, because muscles are properly tensioned at all times to react to sudden changes. Finally, the squatting posture provides great recovery options to a skater when he is out of balance, which is almost all the time, since skating is really rhythmic falls and recoveries.
While running towards the ramp, the left leg releases stored energy from the squatting posture, allowing the right leg to cross over in a lunge.

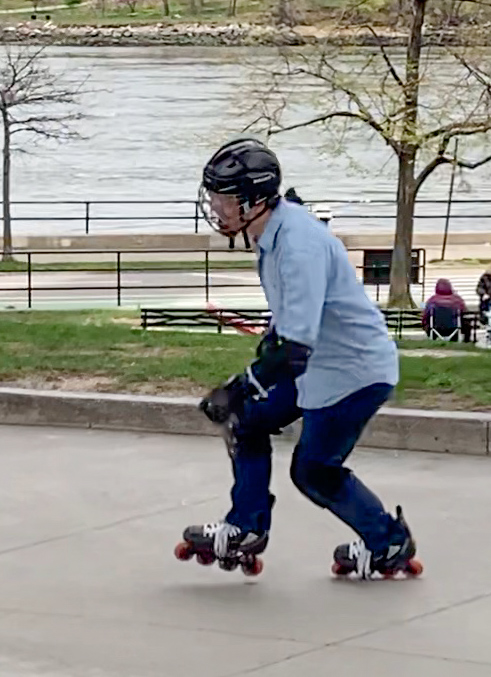

The right skate lands hard. The right knee and right ankle bend in order to absorb the impact.


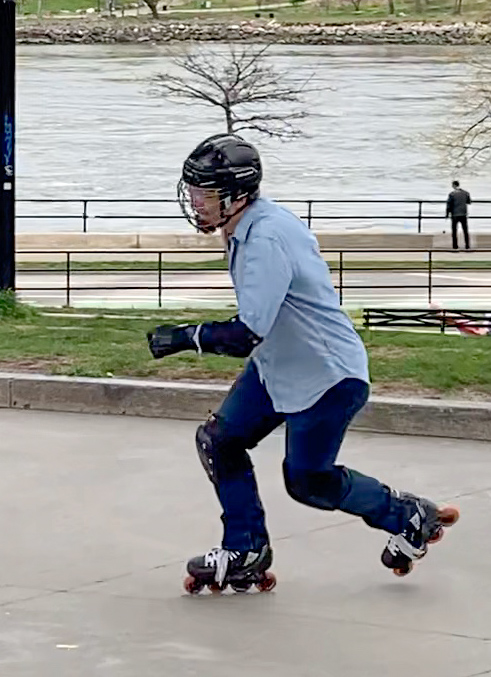
Both legs release stored energy to initiate the jump. As soon as skates lift off the ground, knees bend again to clear any obstacles during the jump.


Knees straighten now in preparation for the landing. Upon contact with the ground, muscles are already tensed to absorb the impact. Nonetheless, knees and ankles are forced to bend further until the impact is fully absorbed.


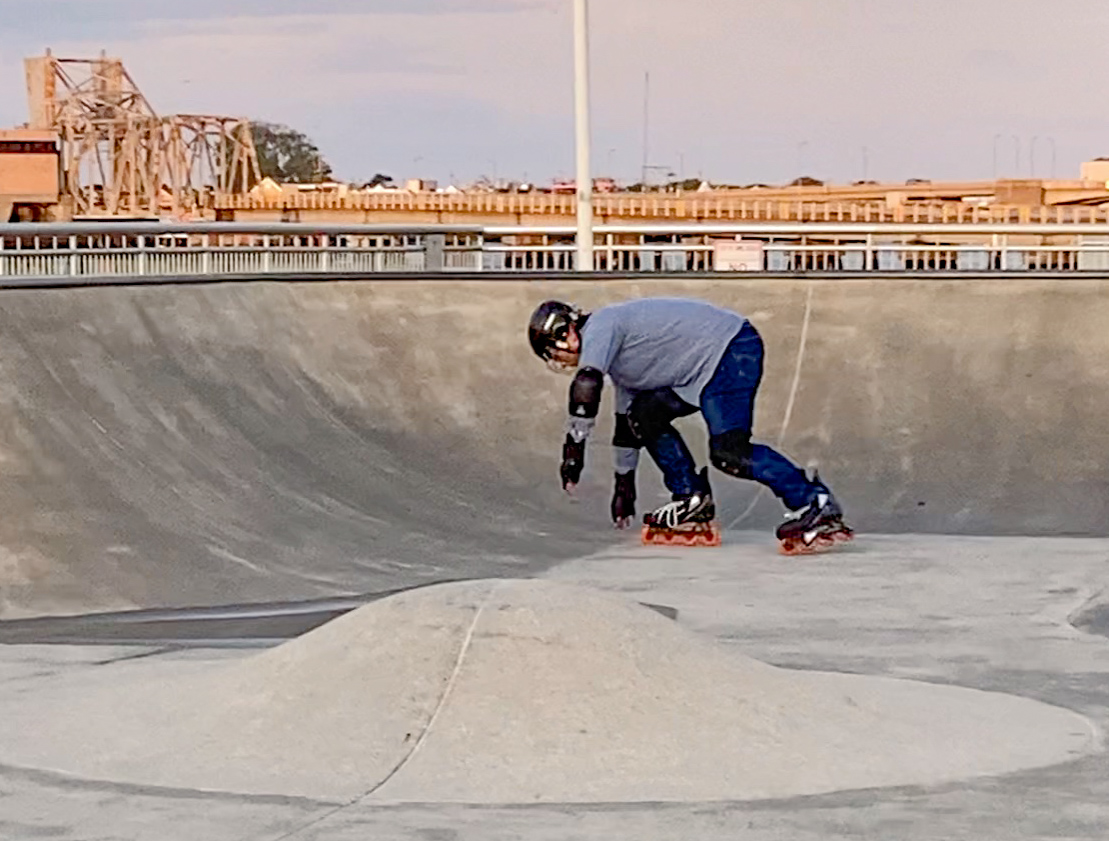
You may notice that the skater is leaning forward too much, in the picture below right. In fact, the skater is in the process of toppling forward, due to the momentum from the jump carrying the upper body forward, while the ground drags skates back. But the skater is able to recover from the impending fall by simply straightening his upper body and his knees. The coiled configuration of the squatting posture affords the skater options in recovery.


In the following pictures, the skater is skating backward, and is about to topple forward again. Like the previous landing situation, because of the squatting posture, the skater’s center of gravity is low, and his muscled are primed to respond. He has many choices for recovery. In this case, he plants his left skate down behind orthogonally to stop the right skate from gliding further backward. He is then able to straighten both his upper body and his right knee to move the center of gravity of the upper body backward, to counteract the forward toppling.


I know that running, going up a ramp, jumping and skating backward seem like daunting and faraway goals for a beginner. But I want to point out that they all require the same squatting posture. Almost all skating moves, basic or advanced, require the squatting posture to function properly. This is why I spent so much time talking about it. The squatting posture unlocks all kinds of basic skating skills. Without it a beginner will plateau after being able to drag himself on wheels without immediately falling.
_
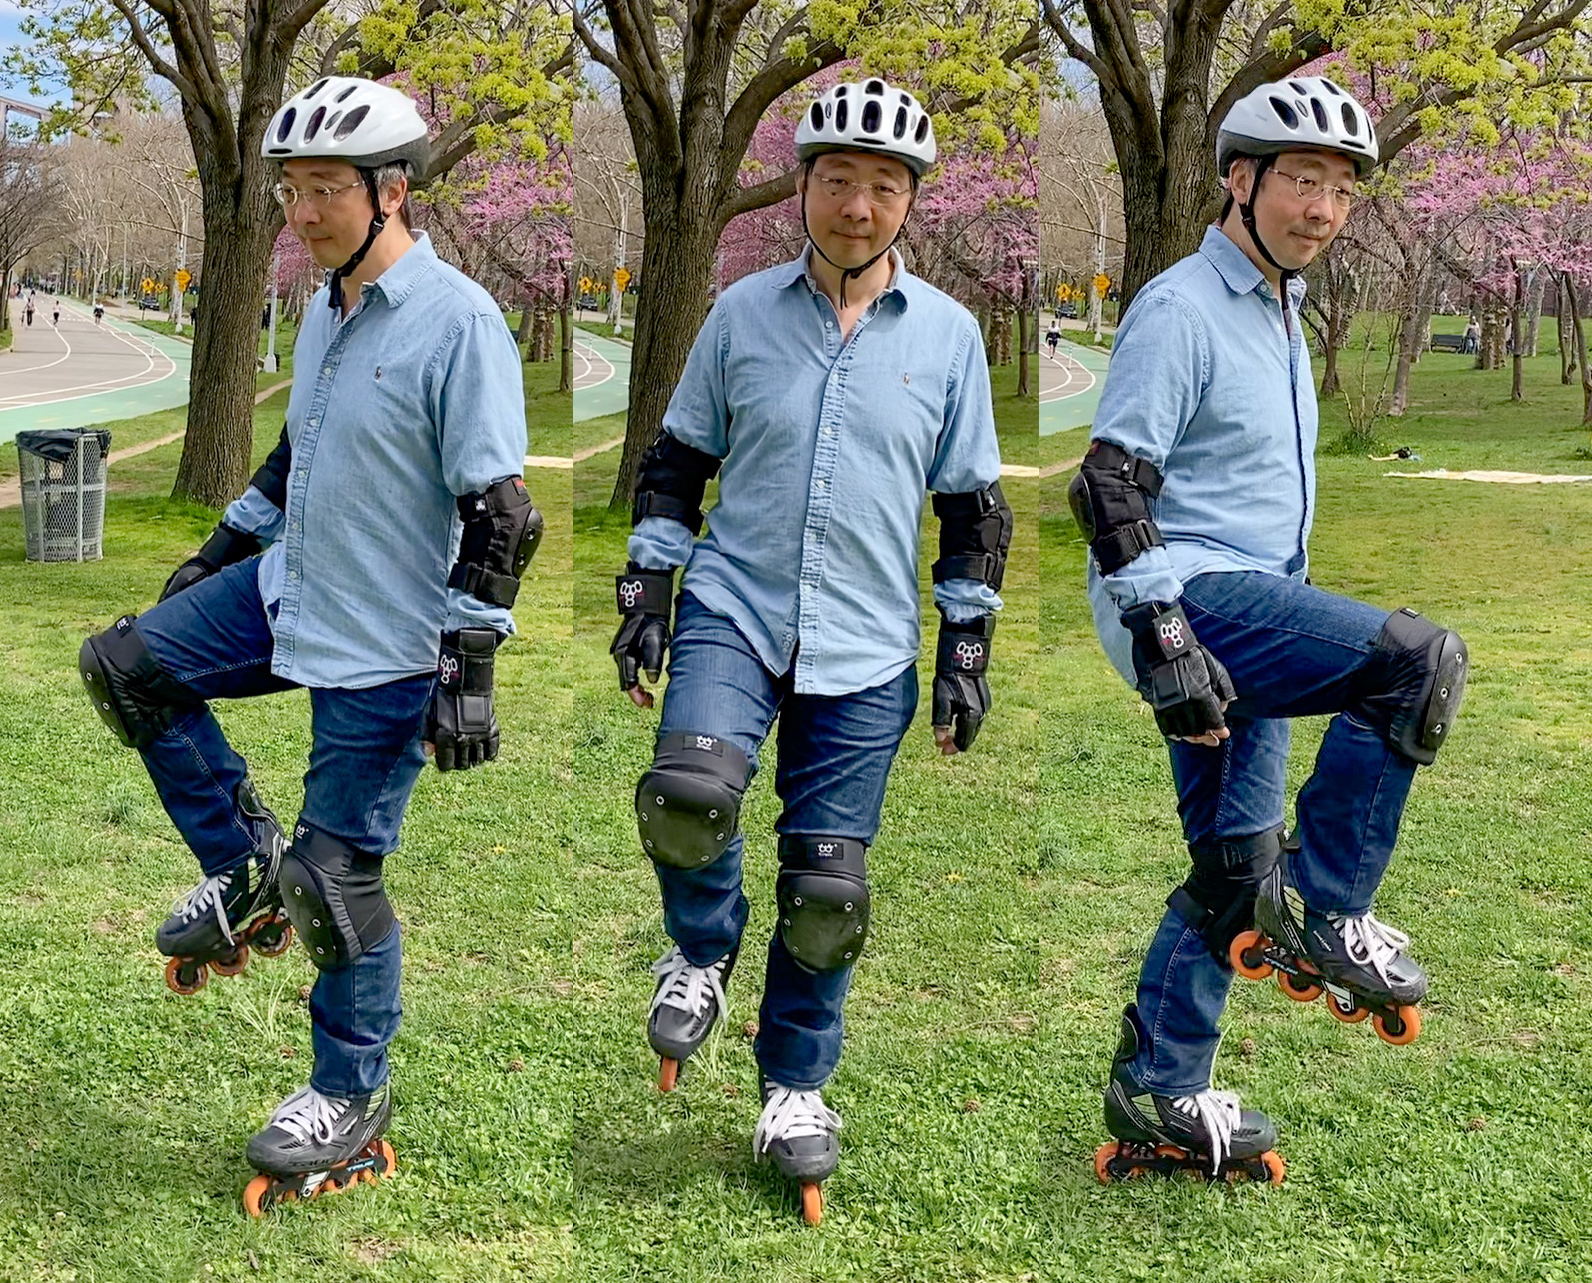
Ankle-bending enables far reaches
I’ll mention one last benefit of the squatting posture. The picture shown below right illustrates a skater balancing on his left skate, attempting to extend his right skate outward to the right. This skater is standing tall with his left ankle and left knee fairly straight. As a result he can’t plant his right skate outward too far. He simply can’t swing his right leg out much, due to basic constraints of geometry.
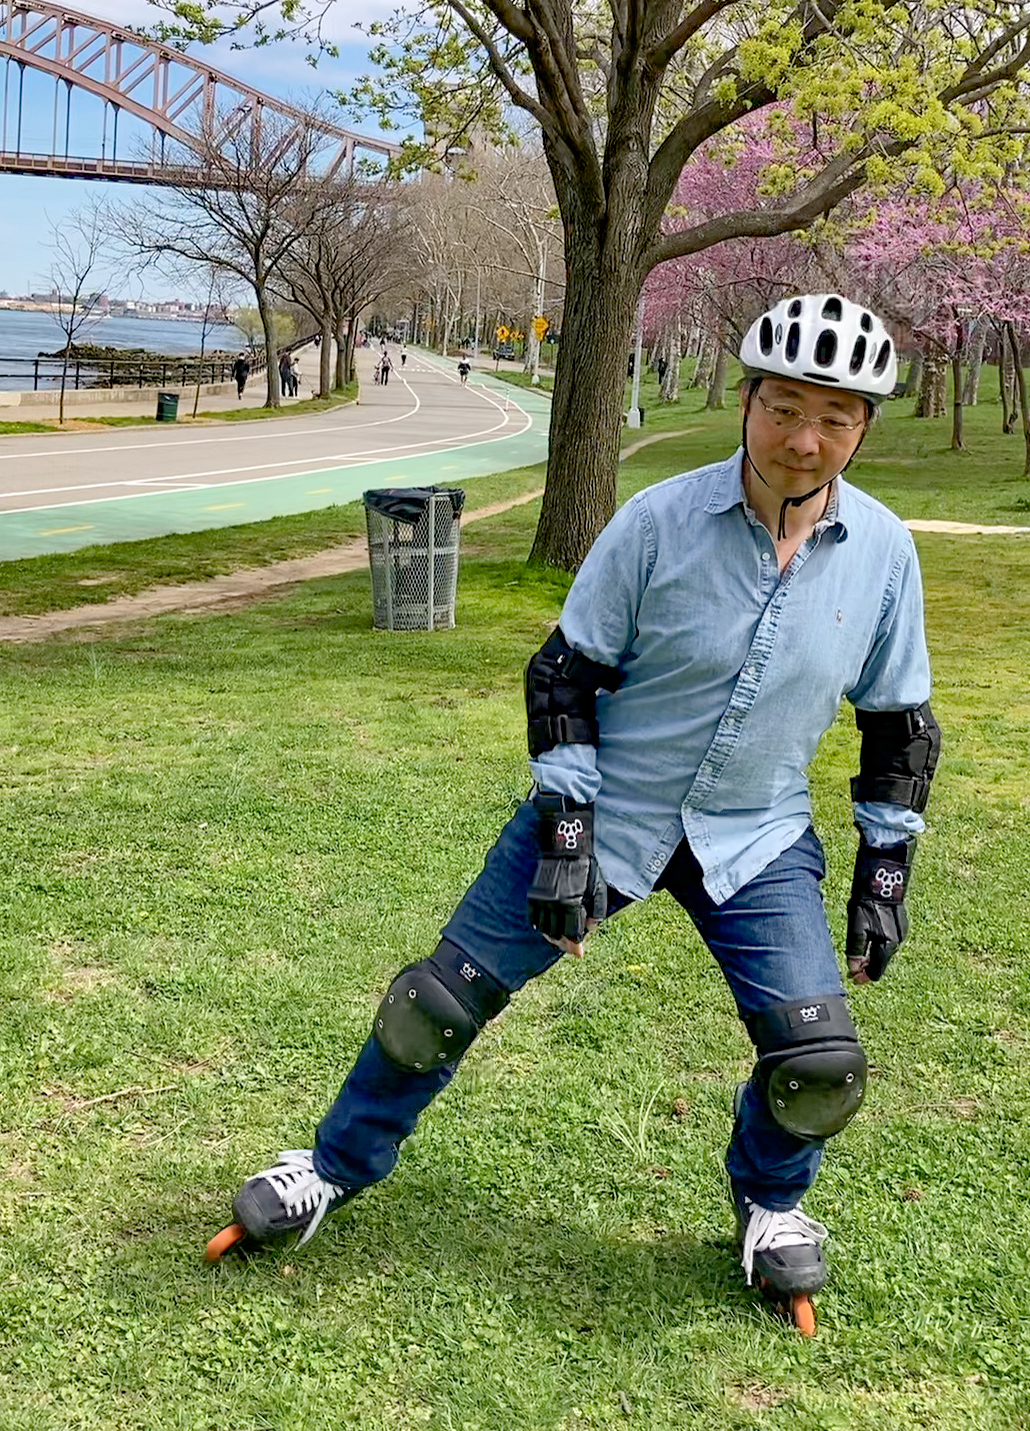

In the picture shown above center, the skater starts to bend his left ankle and left knee. Now he is able to reach a bit further out with his right skate. In the picture shown above left, the skater has assumed a proper squatting posture with his left leg. Now he can reach out with his right skate, and touch the ground with it, wide apart from the left skate which continues to serve as his balancing point.
This wide reach is needed in many skating moves. It is shown below from various angles. Practice it on grass today, even if you are not yet attempting far-reaching moves on pavement.


Before you get too excited about the squatting posture, know that it will take time to train your muscles, over repeated practices. You will be able to hold the squatting posture for increasing length of time as you continue to practice. At first, you won’t be able to skate with a proper squatting posture for too long. That is OK. You can’t really learn to skate properly in two weeks, less a few days, despite what some irresponsible online videos would want you to believe. I’ll have more to say about your muscles later.
_
Asha of Freshskate fame
Now is a good time to introduce you to Asha of the Freshskate fame whom I’ve mentioned earlier. Here is a great tutorial from her for a complete beginner. This quick video covers many topics mentioned already in this article. I think it’s a good recap.
She has a unique way of explaining complex concepts. And she has been teaching skating for a long time. She calls the V steps the “pizza steps”. That’s great name. She talks about bending knees. She stresses how a beginner should stop worrying about emulating skilled skaters, and instead do small pizza steps. Look at how she bends her ankles, and how she keeps her upper body straight. She also recommends that you practice on the grass.
Here is another video from Asha where she talks about 5 common mistakes made by beginners.
In this video she mentions proper lacing and strapping to support your ankles and shins, and how a scissor stance gives you stability. I will expand on these two topics now.
_
Support for your ankles and shins
Your skates need to be property laced, or strapped. Your skates must feel like an extension of your feet. Your feet must not wobble within skates – wobbling is an indication that your skates are too big, or you have not properly laced them. Your feet must not hurt after 15 minutes of skating – pain is an indication that your skates are too small, do not fit you, or have been laced too tight. There are plenty of videos on YouTube that talk about choosing the right skates. So I won’t repeat them.
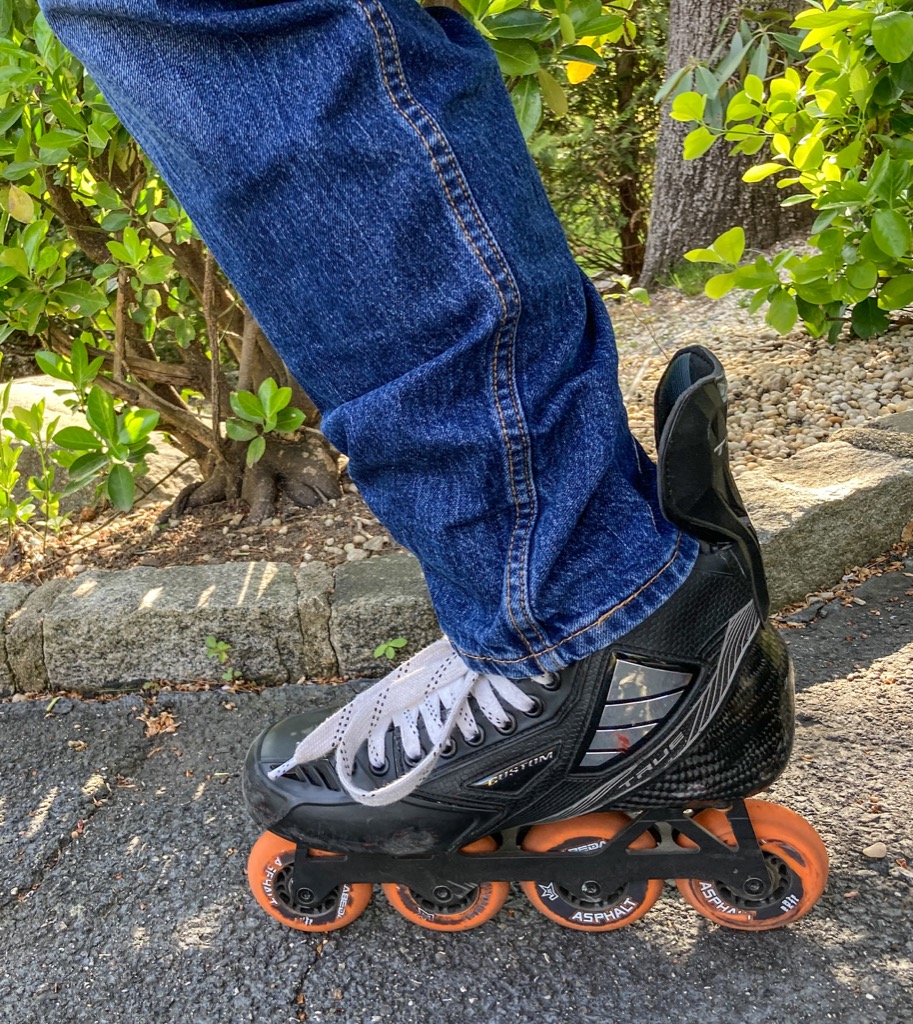
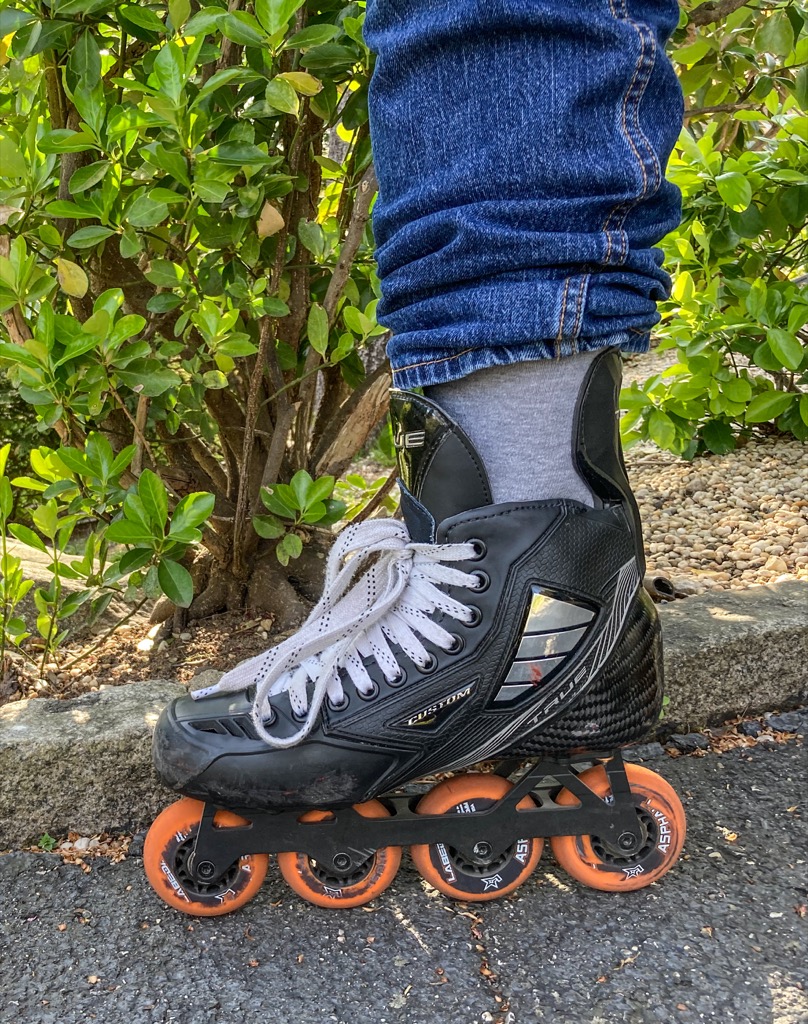
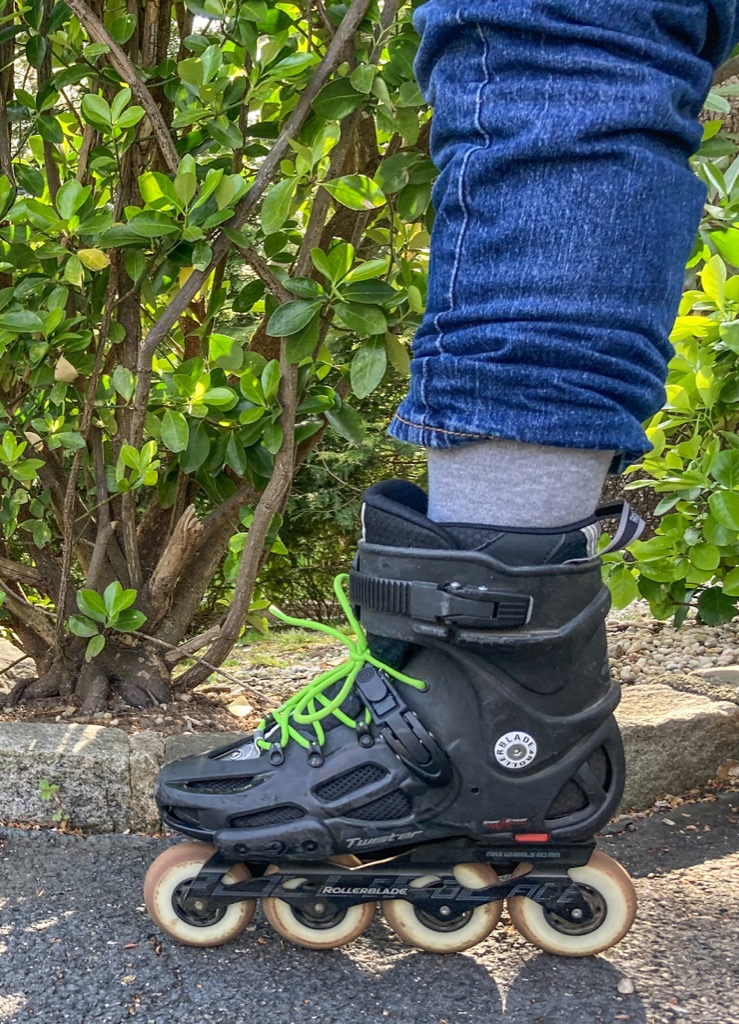
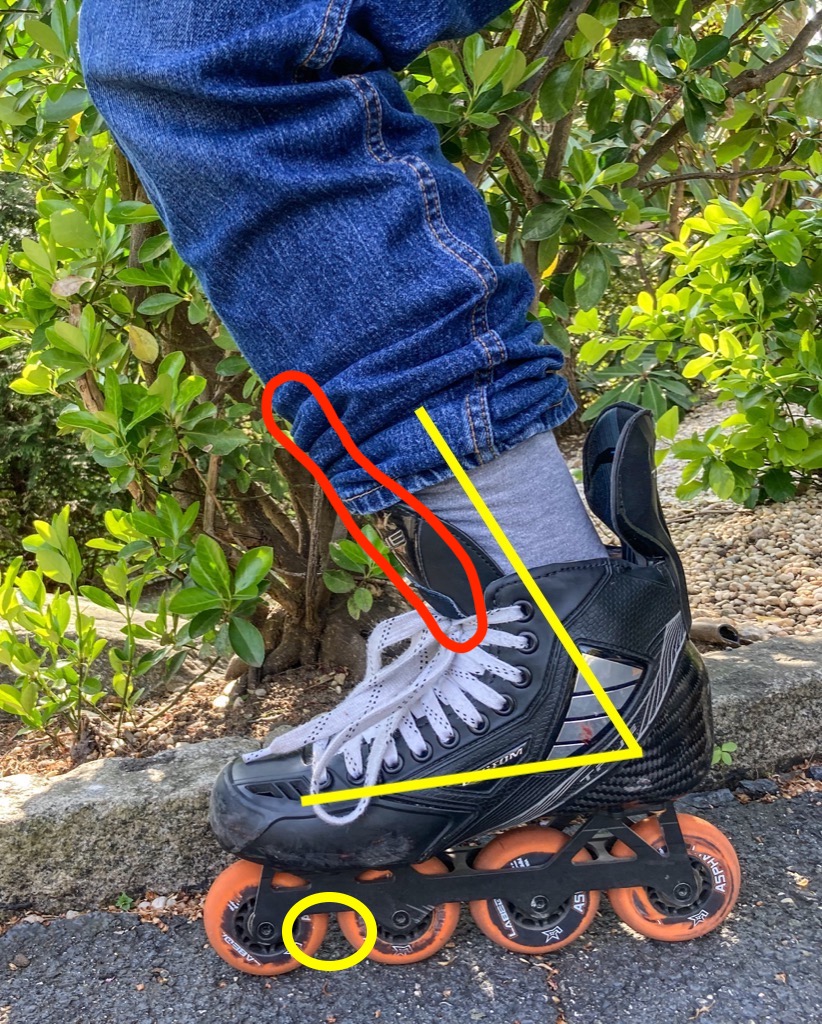
Two types of inline skates are shown below. The ones on the left with white shoelaces and orange wheels are hockey skates. These have monocoque shells reinforced with carbon fiber. Carbon fiber shells hug my feet and provide excellent support for my shins and ankles. The ones on the right with green shoelaces and two straps are urban skates. They have buckled straps that provide good support for my shins and ankles.


As you can see from pictures above, both types of skates allow me to bend my ankles forward, while they continue to provide snug support from sides. There is only one degree of freedom in movement. And the movement is limited to between 60° and 90°, shown by yellow lines above. While I can bend my ankle forward, I cannot wobble them sideways.
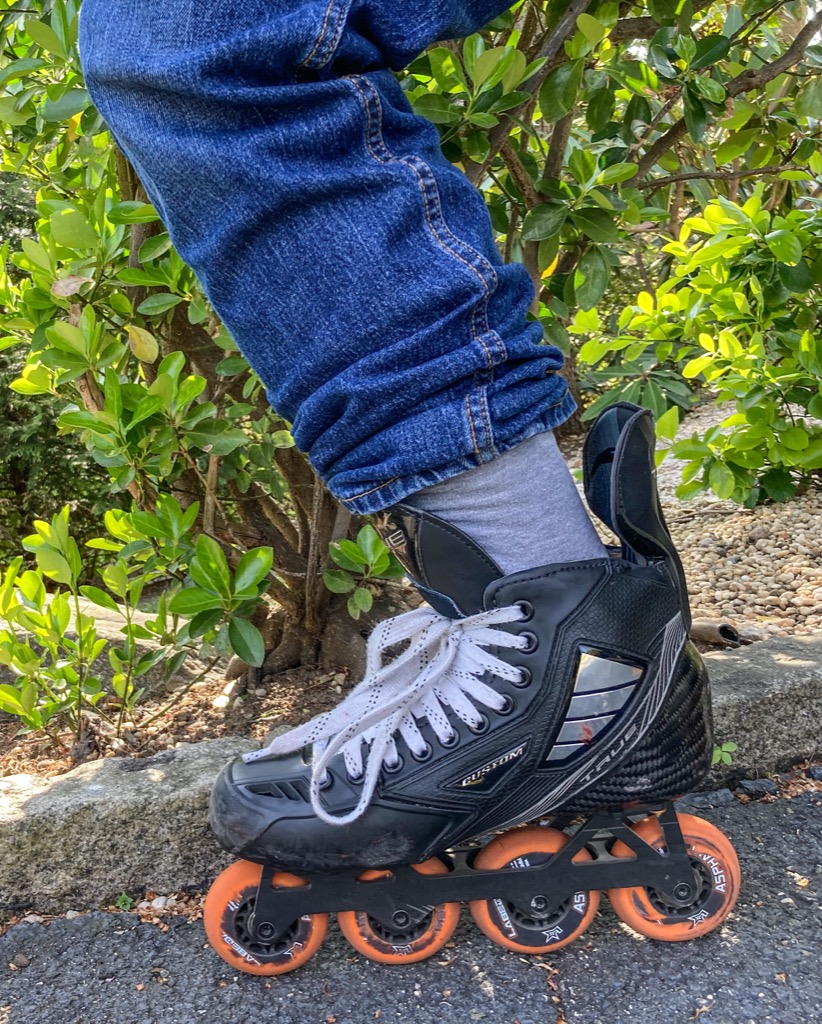
Do not drape cuffs of jeans over tendon guards on hockey skates. That would make it difficult to bend your ankles forward in the squatting posture.

When the pant cuff is lifted to show the leg that bends forward, it may appear as if the skate is too loose. It is not. It is designed to hug your foot snugly in the standing posture shown on the right. And the generous tongue provides excellent support for your shin when you pivot your leg forward around your ankle, shown on the left. Note how the shoelace is stretched taut in the left image to support the shin in the squatting posture. You can control the degree of maximum bending by how tight you lace top holes.
My urban skates come with two straps. The bottom strap is a 45° power strap which keeps the heel locked in place. The top strap is a cuff strap with a locking buckle which provides support for your shin. You need to adjust the top strap to give you enough ankle bending, but not too much that it no longer pushes back firmly to support your shin and your weight.
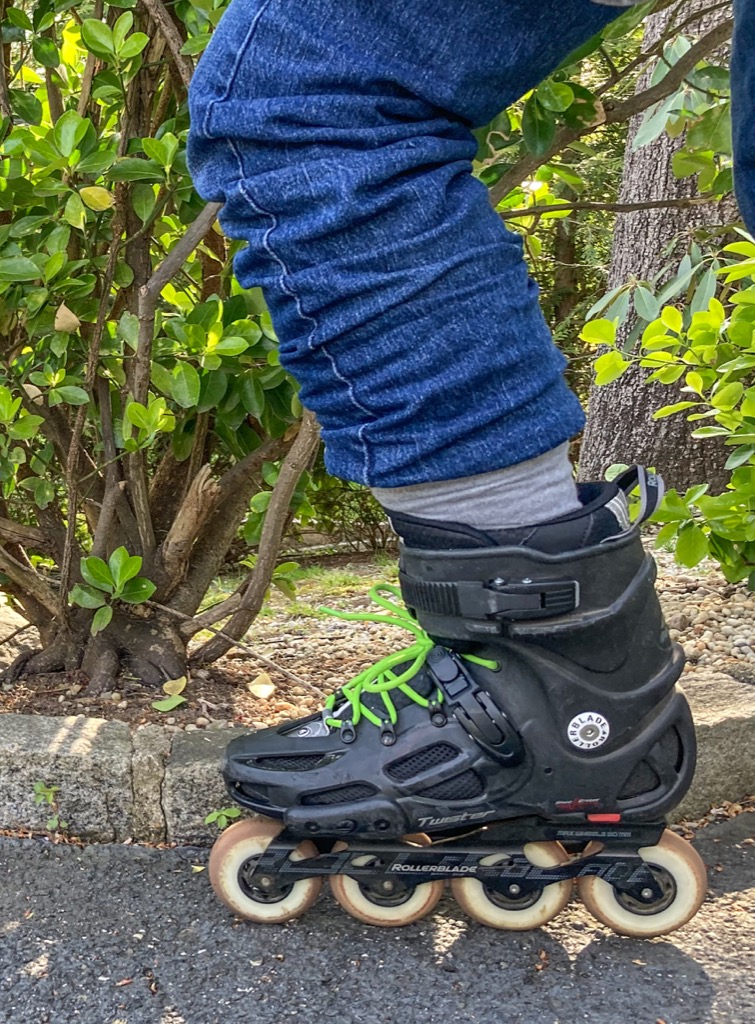
If you are unable to bend your ankles to the degree shown here, about 60°, then you must check your laces and straps. Perhaps you have over-tightened the cuff of your skates. Adjust laces and straps until you get the right amount of bending, without giving up support for your shins.
Watch this video by Ivo Vegter of the Thisissoul fame, on how to size skates, and to fit them to your feet. Hear how he explains how boots support your fee, ankles and shins. Most importantly, see how Ivo takes the squatting stance when assessing the fitness of a skate.
_
Scissor posture and stable glides
Asha reminds learners of the scissor position in a large number of her tutorials, including the 5 common mistakes video shown earlier. This scissor posture is used whenever you glide on both skates at the same time. It provides better stability, and more recovery options, should accidents happen.
The picture shown below right depicts the squatting posture. Start from this posture, and then slide one skate forward, and the second skate backward. The result is the scissor posture shown in the center. A view of the scissor posture from the front is shown below left.


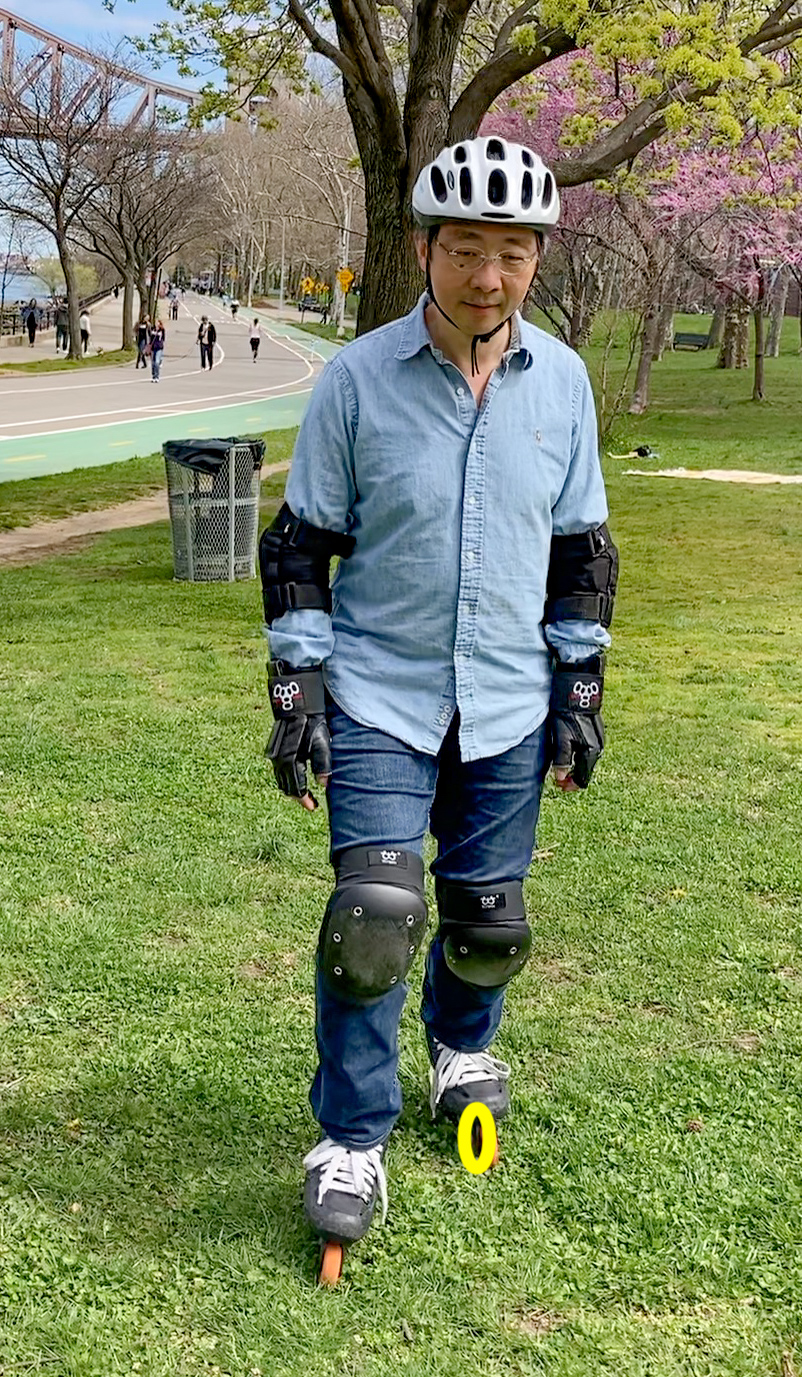
You can’t be in the scissor posture without first learning to master the squatting posture, try as you may. And the scissor posture accentuates an insight of mine that I have not heard from tubers before. Look at the picture shown below. The yellow circle indicates a wheel on the right skate that seemingly shoulders the weight of my entire body, in this scissor posture.

With the scissor posture, all wheels are in contact with the ground. But not all wheels shoulder your weight equally. As you know, dogs run on toes, and not on soles like humans. But we can in fact walk on toes, too. Ballerinas do this all the time. While scissoring as shown above, you should imagine “grabbing” the ground with your right toes, where indicated by the yellow circle. You should feel that the bulk of your weight is carried by these toes. Let’s call the yellow circle the “center of your body projected onto the ground”, or “projected center”.


I don’t literally mean for you to stand on the right toes, of course. I just want you to “feel” that you could switch to standing on those toes if needed, at a moment’s notice. While gliding in this scissor posture, your right toes are not free floating inside your skate. Your toes are planted firmly down and grasping the insole of that skate. Your toes should feel every small bump from pavement as you glide. You can also stand on a floor with your bare feet, and attempt to understand this feeling.
The scissor posture brings the culmination of several key messages. In the image shown below, the yellow circle is where you feel the weight of your entire body. In order to achieve that, your skate must allow your ankle to bend as shown by the yellow lines. But at the same time your laces need to be tight enough to push back against your shin, with the generously-padded tongue serving as a fat cushion, as indicated by the red marker lines. There is a reason why that tongue piece is large and fat. It is there to allow you to rest the weight of your entire body on the skate through your shin. The rigid skate frame transfers that weight down to the front wheels as highlighted by the yellow circle.
Similarly, when the left skate is behind, your left toes should feel like they shoulder your weight. I have found that in a majority of skating situations, toes on one foot assumes the the role of being at the projected center of your body, and thus the main bearer of your weight.
Only in a few situations do you ever place your weight on a heel. Doing so in your beginner’s first few sessions is very dangerous. You could fall backward easily.
Now, of course this is not a simple, fixed rule. Different skating situations call for your balance to be shifted from toes to balls of your feet, and to somewhere closer to heels. But as a general rule, beginners are better off placing weight at the front of their feet. Asha wrote an extensive piece on this topic.
_
Squatting posture vs ankle-cast posture
Now is a good time to revisit the squatting posture (below left) and the ankle-cast posture (below right). When a skater is standing tall, these two postures look similar. The only noticeable difference is illustrated by the yellow lines showing different degrees of ankle bending. The squatting posture inherently puts your body weight on front wheels, thanks to your shins pushing on skate tongues. This gives you stability. The ankle-cast posture, on the other hand, puts your body weight on rear wheels. This causes you to fall backward often.
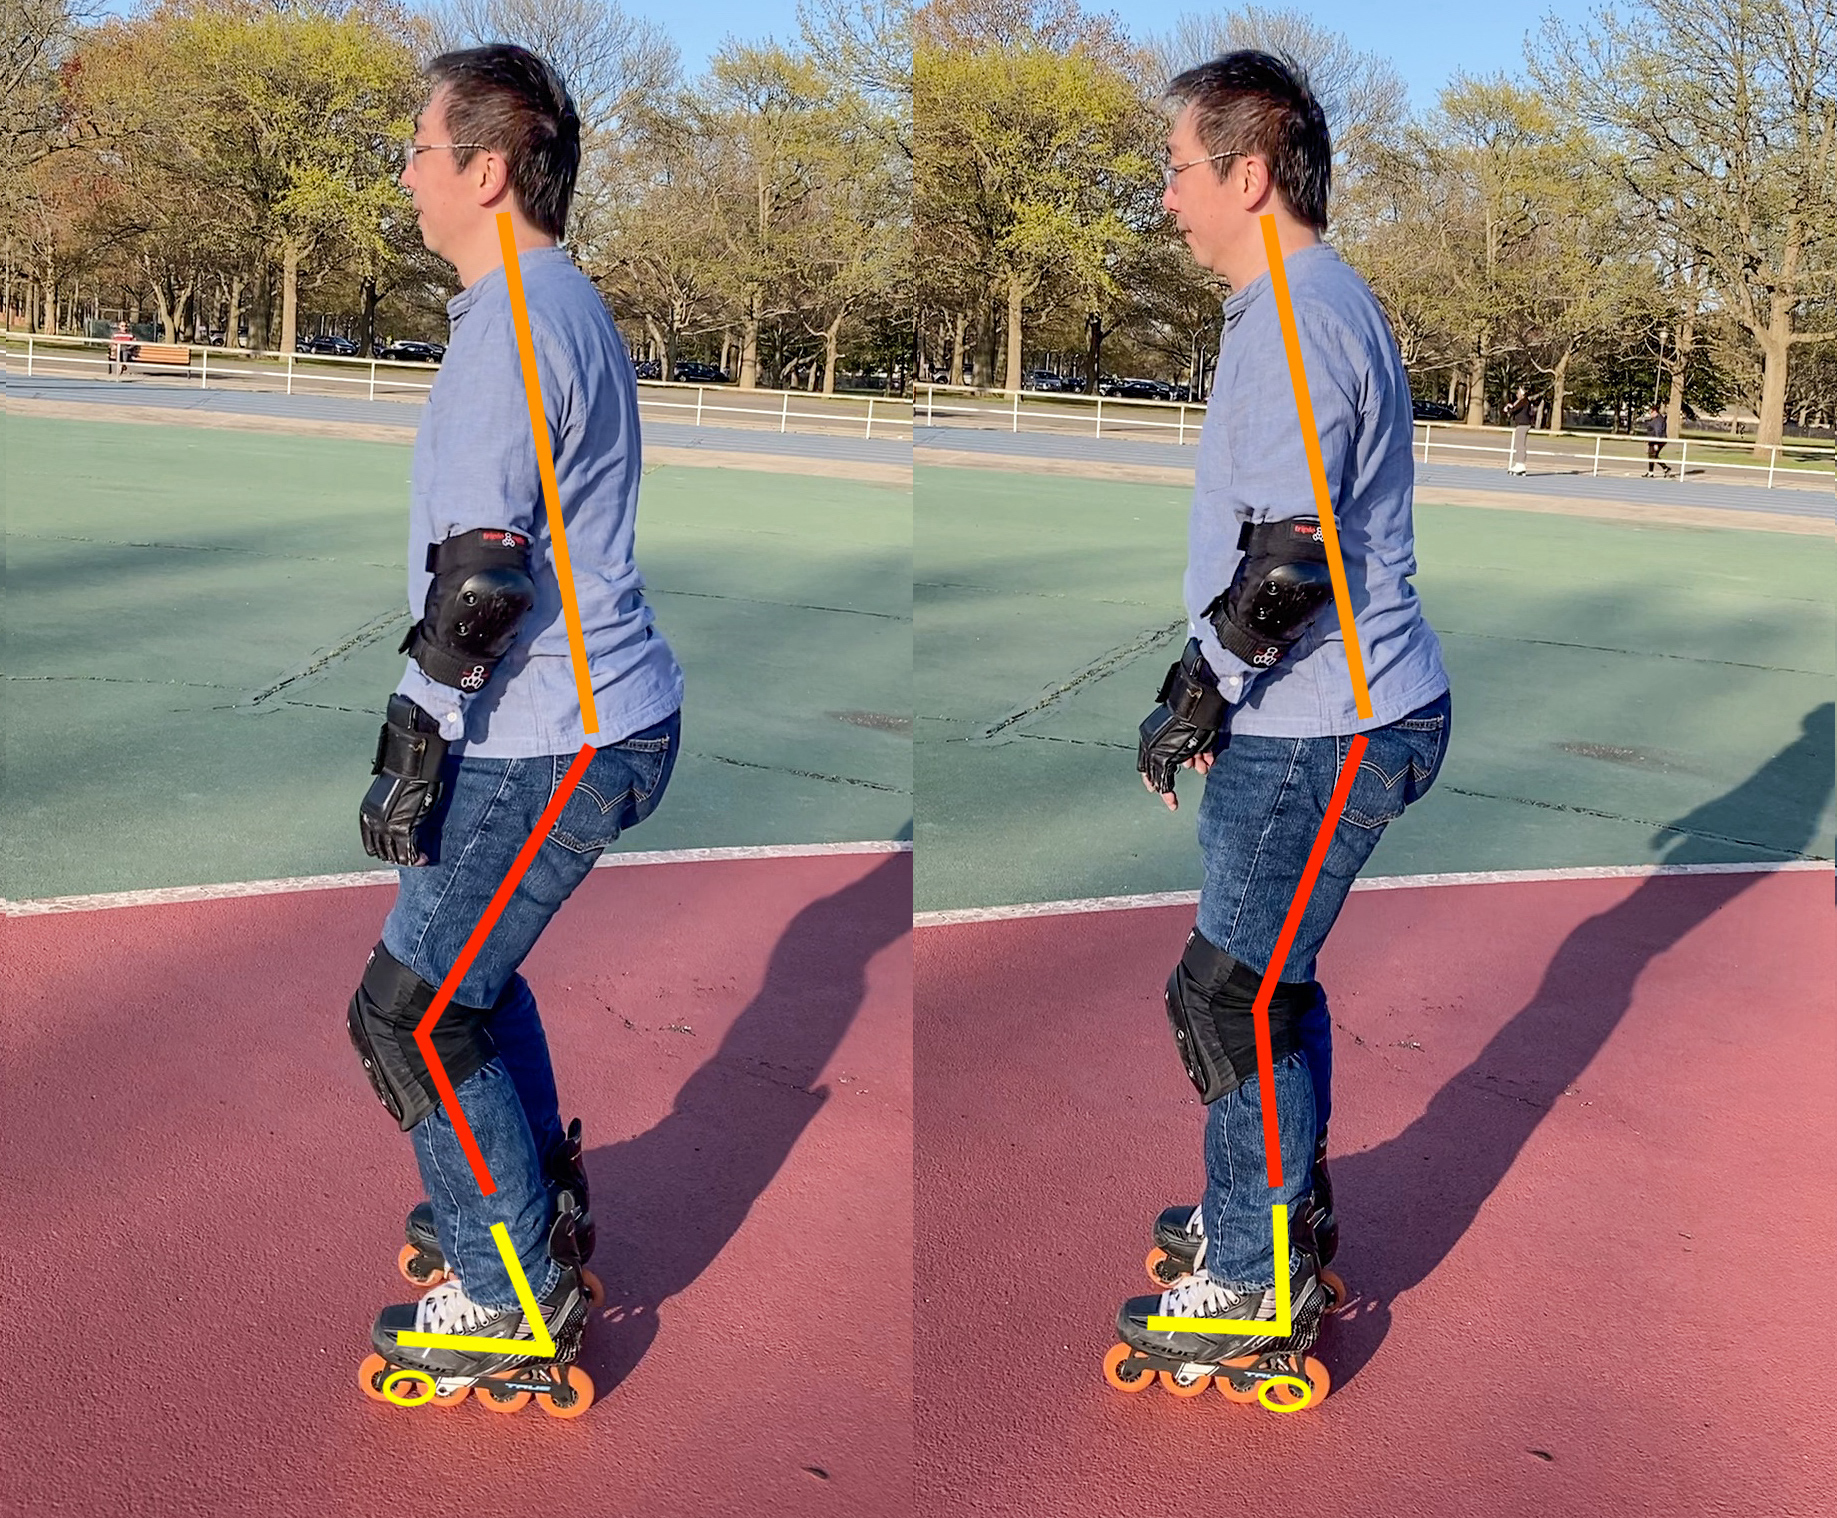
Now the skater tries to bend his knees. With the squatting posture on the left, knee bending is easy and comes naturally. This is a good starting posture for a beginner. With the ankle-cast posture on the right, knee bending is harder, and a skater is forced to lean his upper body forward. This is not a stable posture.

Now the skater bends his knees further. The advanced squatting posture on the left is extremely stable. The squatting skater’s shins aggressively push against and rest on skate tongues. The ankle-cast posture on the right forces a skater to lean his upper body even more, without conferring any additional stability. The skater can still fall backward or tumble forward easily. And the skater can no longer tilt his head back enough to look straight forward. Instead, he is forced to look at the ground about ten feet ahead of him.

Now the squatting skater on the left has achieved the porta potty position, while still looking straight forward. To lower the head to the same level, the ankle-cast skater on the right must lean his upper body so much that he can’t see anything beyond six feet in front of him.

Believe it or not, you can glide while on the Asian squat, as shown below left. As for our ankle-cast skater, his upper body is now almost parallel to the ground, and he still can’t bend his knees anymore than a beginner in the squatting posture can. Now the ankle-cast skater can only see up to three feet ahead of him.

The squatting posture truly is life-changing. Once you grok it you’ll be upset that you haven’t adopted it sooner. And when you see someone else skating in ankle-cast posture, you won’t be able to stop yourself from preaching to them the gospel of the squatting posture.

_
My muscles don’t play along
As you work on the squatting posture, and then on the scissor posture, you may find that your muscles are not in agreement with what you want them to do. You may intellectually know how to squat, but your muscles won’t do it for more than 20 seconds before they quit on you.
You know how they say, “the spirit is willing, but the flesh is weak”? This is what they meant.
Some seemingly simple skating moves take substantial muscle training before they can “look” simple. See this video:
Inline skating requires strength in muscles that you did not know you had. As you learn to skate, you will find that your body aches the day after in new places. You can quickly “learn” a move from tutorials, in your head. But for these previously-unused muscles to build up strength will take weeks of persistent practice. So it is OK that you don’t seem to progress as fast as you intellectually could. Give it time.
While this article and most tutorials are structured in a linear sequence of skills you acquire one after another, you do not necessarily need to “master” one skill before you work on the next skill. It is true that many skills depend on prerequisite skills. But this is not an all-or-nothing type of deal. If you currently do a poor job at a prerequisite skill, you’ll do a mediocre job at a subsequent skill that depends on it. But you can still practice both skills in parallel. And when you improve on your prerequisite skill, you’ll find that you also magically perform better at the subsequent skill.
_
Why can’t I glide on a single skate?
Now that you have overcome the stability issue by adopting the squatting posture, you can learn the next most important skill in inline skating: being able to glide on a single skate.
Many beginners manage to skate forward fairly quickly, but then hit a plateau where they can’t seem to acquire additional skills. For some of them, the reason is their inability to glide on a single skate for more than 2 seconds. By “gliding on a single skate”, I mean that the other non-gliding skate is off the ground, and the body isn’t falling towards the non-gliding side. Watch this video:
Following is my impression of inline skating without single-skate gliding. This shows the worst case where someone has just picked up a pair of skates, and managed to walk around without falling. There are many who can skate forward at a reasonable speed, but still suffers from the same underlying issue of not being able to glide on a single skate.
Following images illustrate a skater standing with a severe pronation. A dictionary defines pronation as “walking on the inner edge of the foot”. In “ice” skating, the word “edge” has a very specific meaning. It refers to one of the two sharp knife edges of a blade. Each blade has two edges. The edge facing outward from the body is called the “outside edge”. And the one facing inward is the “inside edge”. Inline skating borrows the same terms to apply to the two sides of wheels.
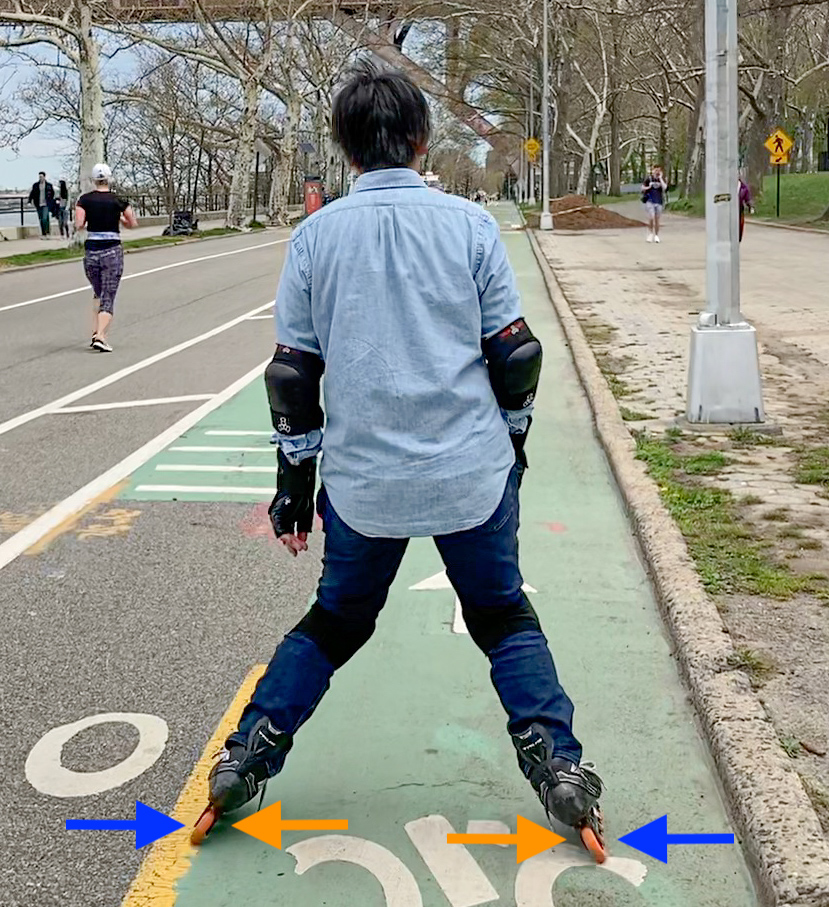

The picture shown above left indicates outside edges in blue, and inside edges in orange. The picture shown above right marks the two skates orange, to show that the “inside edge” of wheels are touching the ground. That is, the skater is skating in a pronated stance.
The picture shown below illustrates in yellow lines key parts of the body. These body parts have mass. The yellow circle represents the center of gravity from these body parts, projected onto the ground, identifying the balance point on the ground. Note how neither skates of this skater are positioned on this projected center (aka the yellow circle).
_
Standing on the projected center
Let’s examine why this skater is unable to glide on one single skate. Following pictures mark pronated skates actively shouldering a skater’s weight in orange. Wherever the skater lifts a skate off the ground, the skate is marked in white. It doesn’t matter how the skate is oriented when it’s no longer contacting the ground. Projected center is marked by a yellow circle. We are going to call the orange skates in these pictures the “gliding skates”, and the white skates the “free skates”.

The skater shown above is unable to glide on any skate for more than a second or two, because his gliding skate (or skates) is not positions on the projected center. And his gliding skate (or skates) are pronated, and therefore are unable to shoulder his body weight. This forces his body to lean inward, further increasing the degree of pronation. Every time the skater attempts to lift one skate off the ground, gravity conspires to bring that same leg and skate back down to the ground immediately.
The skater shown below glides on the left skate for an extended period of time, after the right skate pushes off to the side. In order to balance his body on a single gliding (left) skate, the skater shifts his body leftward, such that the projected center (yellow circle) moves to where his left skate touches the ground. Because the body is leaning to the left, the left skate is gliding on its outside edge (shown in a blue line). However, at all times, the wheels of the left skate are kept “straight” with respect to the straight profile of the leg (shown in a green line), as seen from a front view.
A key to being able to glide on a single skate is the ability of a skater to adjust the configuration of her body with respect to the gliding skate, such that the projected center is located near the toes of the gliding skate. With the gliding skate on the projected center, the skater can glide for as long as her momentum allows. However, throughout the glide, the skater must continuously adjust her body posture to accommodate changes in the gliding speed, in the centrifugal force of a turn, and in the position of the free leg. In the above picture, it can be seen that the free leg (the right left) kicks to the right side, and then is brought back forward and inward, to end up next to the gliding leg. The upper body and the head can be seen moving in the opposite orientation to compensate for the movement of the free leg.
You can practice this balance on grass, as shown below. You may find it hard to keep wheels straight. It is hard to keep them standing on their center edge. Usually skaters will end up standing on the inside edge when they lift the free skate off the ground. In most cases, your body will need to lean towards the standing skate, and the angle between the ground and your standing leg will not be exactly 90°. You should strive to stand on a slight outside edge.
There are at least two common causes for the tendency of skaters to pronate when standing on a single skate. First, your foot may roll slightly inside your skate, as you attempt to stand on this skate. That would be an indication that a) your skates are too big, b) you didn’t properly tie your laces and straps, or c) your skates don’t have good structural support for heels and ankles to lock them in place within skates. Secondly, perhaps you haven’t build up enough muscle strength to sustain this move. If so, only time and continued training will allow you to overcome this issue. Thirdly, you may just be lazy today and have neglected to watch out for edges when demonstrating standing on one skate.
In the center image above, the skater is standing on a slight inside edge. He has expressed remorse after seeing these pictures, and has promised to improve next time.
You can try to extend your arms wide apart from your body. Moving arms around gives you finer control of your balance. This is especially helpful in the beginning, when you don’t yet have great muscle controls in your legs.

Again, the skater in the above pictures stood on the inside edge most of the times. In one instance he did manage to stand on the outside edge. Again, he has promised to improve next time.
Here is one of the few tuber videos that explicitly discusses edges: inside edge, center edge, and outside edge.
_
Skating as a sequence of falls and recoveries
You can glide on a single skate in severals ways: 1) on the inside edge, 2) with wheels at 90° angle with the ground, or 3) on the outside edge. Usually you don’t get to choose how to orient wheel angles. Usually wheel angles follow how your body is oriented, and how you balance on the gliding skate.
Here is an example of a skating move that requires a substantial leaning on the outside edge for gliding. It’s a forward cross roll. The skater’s body leans aggressively to the left, and then to the right in a cycle. Aggressive leaning is what injects energy to sustain this move. Watch this video:
Cross rolls highlight an unintuitive aspect of skating. That is, skating is more about almost-falling and just-in-time recoveries, than it is about feeling stable on skates and being perfectly balanced at all times. The sooner you understand this and embrace it, the faster you will progress in your skating studies.
I wrote a treatise on this topic a few years ago, in the context of ice skating. I think it is useful to inline skaters as well. See this: Ice Skating as a Sequence of Falling and Recovery Steps.
Even if you are unable yet to do a cross roll as a beginner, this skating maneuver can still help you understand a fundamental concept of skating. Almost all skating moves can be broken down into a repeating sequence of three steps: falling down, recovery from the fall, and balance moment.
Below is a stop motion sequence showing one forward cross roll movement from the above video. In the leftmost image of a skater, a yellow circle indicates his projected center which is far away from his gliding (right) skate. The skater is in a fall to his right side. But his left skate has crossed over in an attempt to recover from this fall. In the second leftmost image, the left skate has now landed on the ground, exactly on top of his projected center. This is indicated by a red bracket, showing that this is a “balance moment” as I termed in Ice Skating as a Sequence of Falling and Recovery Steps. The left skate now becomes the gliding skate, and the right skate becomes the free skate.

Continuing on to the third leftmost image above, the skater now swings his free (right) leg to the right, and leans his upper body to the left, in a deliberate attempt to initiate a fall to his left side. While the fall is ongoing, the left skate continues to glide on its outside edge. By the fourth rightmost image, he has succeeded in moving the projected center (yellow circle) outside of his gliding (left) skate. Now he initiates a recovery by crossing his free (right) skate in front of the gliding (left) skate, in the third and the second rightmost images. The rightmost image shows the skater successfully landing his right skate at the next balancing moment (red bracket) exactly on his projected center (yellow circle). This completes one forward cross roll movement.
Below is the next forward cross roll movement from the video. What happens is exactly the same sequence of fall, recovery and balance, except the two legs have swapped roles.
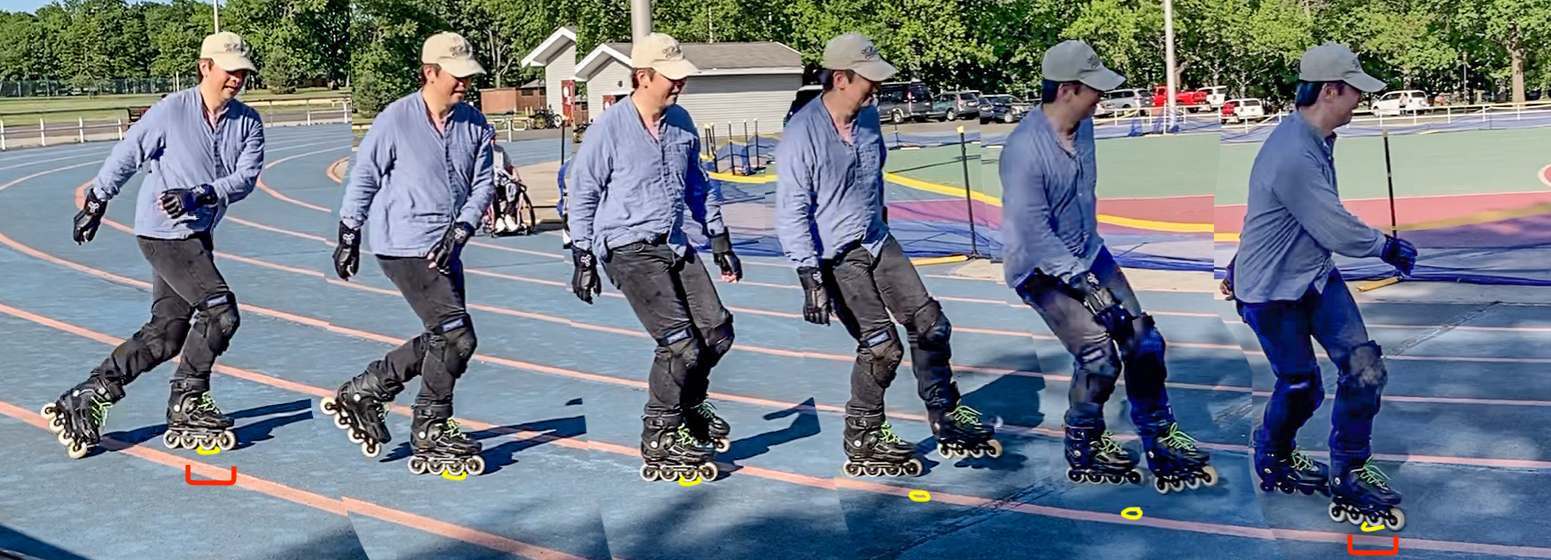
Below is the third forward cross roll movement. This is exactly the same as the first movement, but now the steps of falling, recovery and balance are illustrated from the right side of the skater.

Below is the fourth forward cross roll movement. This is exactly the same as the second movement, but now the steps of falling, recovery and balance are illustrated from the four o’clock angle of the skater.

Below is the fifth forward cross roll movement. This is exactly the same as the first movement and the third movement, but now the steps of falling, recovery and balance are illustrated from behind the skater.
After the writing of this long how-to article, I’ve expanded the topic of rhythmic falls and recoveries here: Inline skating as rhythmic falls and recoveries.
_
Pronation and outside edge, again
Asha is rightfully obsessed with correcting incorrect pronations in her students’ strides. I also point this out to people whenever they ask me for help. I feel that this is one of the biggest problems plaguing not only beginners, but all skaters. And I count myself among the afflicted, as I find myself lapsing once in a while.
The following video is a long discourse by Asha on the issue of pronation. If you are just starting to skate, you will not be able to appreciate yet her long discourse. Bookmark this video, and come back to it later. She also touches upon the issue of pronation in a large number of her videos. See for instance this one, this one, and this one. She uses student videos to show pronation issues and to point out exercises to help address this issue.
I find it puzzling that more inline skating tubers don’t talk about this. After all, the issue of inside edge vs. outside edge dominates “ice” skating discussions.
Perhaps it is useful for beginners to watch some ice skating videos which illuminate the issue.
- How to Glide on One Foot on the Ice
- Skating Essentials: Deep Forward Outside Edges
- Understanding Edges – Skating Fundamentals Episode 3
- Cold hard science: The Physics of Skating on Ice
- Edge Control Exercises for Beginner Ice Skaters
- Establishing the Outside Edge
- How To Ice Skate And Glide For Beginners
- Outside Edge Skating Tips
_
Zig-zag gliding
You are reading the last section of this long article. I will let you in on a secret I stumbled upon, for beginners. I do not know why more tubers don’t talk about it. It has helped many first-time skaters I ran into.
I call it the “zig-zag glide”. And I don’t mean zig-zagging around cones. That is for intermediate skaters. I am talking about plain skating. Specifically, I am talking about a natural extension of V steps, or what Asha calls pizza steps. In my opinion, this zig-zag gliding is the best way to learn to balance yourself on a single skate while gliding. It allows you to effortlessly keep your projected center on your gliding skate at all times.
V steps is an ingenious teaching instrument where you are told to simply focus on making baby steps with your skates opened up in the shape of a letter V. If you focus singlemindedly on just that, you’ll learn to move forward safely and surely. You won’t pick up and perpetuate bad habits doing these V steps. You don’t need to to know why it works. You don’t need to understand theories of skating. You don’t need to know anything about falling, recovery and balance which I elaborated earlier. Follow the simple instructions, and you’ll progress. Once you become more skillful, and you actually know some theories of skating, you will appreciate why V steps are ingenious.
Now, watch this video of a skater zig-zag gliding on a single skate. Focus on following alternating skates that glide. Specifically, look at the relationship between gliding skates and track lines on the ground. Observe how the skater glides “across” track lines. With every glide he crosses at least two track lines. You will find that gliding skates draw a zig-zag pattern on the ground.
Most beginners try to skate forward in a straight line. Trust me. That is not the easiest thing to do. Even the most skillful skaters find it hard to skate forward with alternating strokes in a perfectly straight line. Keeping proper balance so you do not pronate is very hard when you try to skate in a straight line. You won’t glide much, if you attempt to learn to skate by first moving forward in a perfectly straight line.
Follow my simple instructions for zig-zag gliding instead:
Find a skating trail that is wide enough. Say at least 12 feet across. Or find a skating rink like the one shown in the video. Stand on the left side of the trail at first. Adopt the V step configuration for your skates. First put weight on your left skate. Then turn your upper body rightward to look at roughly 2 o’clock. Train your eye on a point on the right side of the trail. Now point your right skate towards that point, lunge head first, and glide on your right skate to that point. When you almost reach this point on the right side of the trail, switch focus to your left skate. Bring your left skate back close to the right skate, forming a V step again. Turn your upper body towards 10 o’clock, and train your eye at a new point on the left side of the trail. Lunge head first, and glide towards that point on your left skate. When you reach the left side, repeat.

Do this, and you will find yourself gliding on single skates in no time.
For the theory-minded people, I want to hear your ideas about why this trick works. You can compare your theory to mine here: Inline skating as rhythmic falls and recoveries.
Following is a GIF showing the zig-zag gliding move which you can embed online where videos are not accepted. The GIF is a bit nauseating. Control click on the thumbnail to watch it in a separate browser tab that you can close if unbearable. The default links to a 4 fps version showing fluid leg movements. Here is a 2 fps version, and a 1 fps version.
_
To sum it all up
Only after I first finished writing this article did I come across a great video from one of my favorite skater tubers. This great video all but sums up everything I’ve written, plus some more that escaped me. I am talking about Ricardo Lino, and his popular video called 10 Reasons Why You Can’t Skate. For the first time I found a tuber expounding why bending of the ankle must accompany bending of the knee. Richardo talked about the shin putting pressure on the skate by bending the ankle at 7:52s. He demonstrated squatting down to the porta potty squat at 8:25s. He talks about the V steps at 9:43. He points out that you must never leave your head behind at 10:24. This a key point of my zig-zag gliding idea from earlier. Richard did not explicitly point out the zig-zag glide, but watch him skate a perfect zig-zag glide at 10:59. So, without further ado, I give you Ricardo’s 10 Reasons Why You Can’t Skate.
Go subscribe to his channel.
_
Protection equipment
There is one last thing. The protection equipment. I use a biking helmet sometimes. When I feel that I need full protection at a skatepark, I wear a hockey helmet. I think you can get a more stylish skating helmet on your own. I won’t elaborate on helmets.
But it did take a while for me to find the right wrist guards that worked. I wanted something more sturdy that the the usual wrist guards. I also wanted more protection all around, akin to fingerless paddling gloves. So when I saw Triple Eight Hired Hands wrist guards, I got a pair. And that’s what I’ve been wearing ever since.

I also found knee pads and elbow pads from Triple Eight to my liking. I have had many other pads before. They were either too bulky or too flimsy. The KP 22 and the EP 55 were perfect for me. They were low-profile, and yet sturdy enough for all my inline skating needs, including sessions I had at skateparks.

If you want knee pads that are even lower-profile, I also often use TXJ knee pads. This knee pad can be worn with or without the elastic sleeve. I find that is stays better on my pants with the sleeve.
I mentioned that I always wore padded shorts. This is what snowboarders wear. The particular one I got years ago was a Docooler padded shorts. They are no longer available. But you will find plenty of similar shorts everywhere now, such as this one which looks almost identical. These underpants have saved me numerous times.

Last updated 2026-07-11


Hi Xinhai,
I bumped into your posts/community on Reddit as I’ll be spending two months visiting my sister in Long Island. I’ll be taking my blades with me and was wondering if there’s a rollers community to connect and roll around :)
Cheers!
Jess
Hey Jess. On Long Island there are no formal inline skate groups. I tried to get a Nassau-bladers meetup and/or Google Groups going, to no avail. But a handful of us do text one another from time to time, about where we skate. Half of the times we drive to Eisenhower Park – see this article: https://xinhaidude.com/2022/04/17/inline-skating-rink-at-eisenhower-park/. If you are able to skate for two hours, you should seriously consider joining Wed Night Skate NYC. See: https://xinhaidude.com/2022/07/02/wednesday-night-skate-nyc/. There is also the Big Apple Roll event happening at the end of July. You should check them out : )
Thanks so much for your message, Xinhai! I was actually planning to attend Wed Night Skate NYC at some point, and also check other meetings during morning time, as it will come more convenient to me. I won’t be having my own car and don’t want to depend on my sister all the time to drive me around..haha…I’ve been checking the LIRR connections though.
Unfortunately I might not be able to attend the BAR as there’s a big chance that I have to go to Richmond, VA during that same weekend :(
Hopefully we can catch up one day at Eisenhower park! :)
I’ll let you know when I’m planning to be around.
Cheers!
Jess
You did mention Reddit. Look up mods of r/inline_skating, the small sub, not the huge but now dead r/Rollerblading or r/inlineskating. IM me if you like on Reddit. Because r/inlineskating has been recently made private, in the past few weeks we’ve had a sudden surge of traffic at r/inline_skating. We may yet rebuilt an open inline community online again at last.
Fred
Xinhai, thank you so much for this insightful and wonderfully comprehensive guide. Most of the tutorials I’ve found on getting started so far have left me feeling silly and frustrated, but your advice and helpful diagrams made a lot of what I’d been lost or anxious about start to finally click! This article is truly a gift for those itching to get moving on their wheels. Love from Wyoming!
Thank you, for your kind words. It makes me happy to see enthusiasts progress quickly and enjoy flying on wheels which is exactly how I feel when skating :)
Happy New Year from Dallas, TX! This is the best most comprehensive beginners guide to in-line skating I have ever read. As an analytical person myself, I appreciate the technical description around center of gravity, ankle/knee bend, and zig-zag gliding. Saves me a lot of frustration. I am going to put this into practice in 2026 and hoping to become an intermediate skater this year!
Happy new year to you as well. Thanks for letting me know that you found this long essay useful. May the new year bring you even better skating abilities :)
Hi Xinhai, thank you for taking the time out of your day to share this knowledge. I hope you continue to grow as a skater & wish you the best for your future endeavours 🛼
Thanks for leaving a comment. It’s good to know there are people who find them useful. I enjoy writing down my learning processes :D
Fred
Hi Xinhai, I live in Nassau County myself. What are some smooth surfaces to skate on for beginners (without too much slope)?
Also, can you write a good stopping tutorial? I love the details in your blog with exact weight distribution, etc. I would love to learn the hockey stop or other advanced stops that can stop you very quickly.
You have very few choices for a flat and smooth surface for beginners. For official places for biking/roller-skating/roller-blading, Eisenhower Park is your best choices. There is an outdoor roller-skating ring (not rink) surrounding a softball field (which also have smooth surfaces). See https://xinhaidude.com/2022/04/17/inline-skating-rink-at-eisenhower-park/. But as of yesterday 2024-05-25, the field is officially closed for resurfacing. The folks renting out mini golf equipment told me it would be open soon. But some people climbed over the handrail to get into the the track. Oh well. Be sure it’s safe and clear of construction debris/equipment.
There are a few other places to skate. But most of these do have uphill and downhill sections. You can also try out the Astoria park. It’s got a long section along the water – half of it is flat-ish. The other half has a very mild incline. See: https://xinhaidude.com/2021/10/18/public-skateparks-on-long-island/. Don’t go to a skatepark obviously – they are dangerous until you can skate well. But many skateparks have a street-hockey rink next to them – those are good learning places. But be aware that these often have a sticky surface painted onto them – skating on these feel very different from skating on asphalt. Check out those public skatepark articles.
As for “unofficial” surfaces – try a large and empty parking lot. During Covid some industrial areas and commercial office buildings completely shut down. For a good year I was able to drive to various empty parking lots, and have fun hitting and chasing a street-hockey puck.
I am not particular knowledgeable on most stops. I suck at the true hockey stop on ice (shaving off ice and showing off to a ice-splashing stop). On roller blades, I mostly employ the T-stop. I can do some other stops that Asha demonstrates as well. But when it comes to split-second decisions to save my life, I invariably fall back on the reliable T-stop that I execute well. LOL. Search on YouTube for: roller blade t stop. Or just follow Asha’s videos.
But note that you can’t do T-stop until you can comfortably glide on a single skate as this long article of mine discusses. If you haven’t mastered gliding, you should search for this on YouTube: roller blade basic stop plough stop. You will find for instance this video: https://www.youtube.com/watch?v=c6iiniZwD_8 from Daniel whom I talked about on this article. Asha has a “stepping” version of this which I should probably learn as well: https://www.youtube.com/watch?v=thDnaDdrknY.
Cheers : )
Thank you so much for the detailed answer. I loved your “public skateparks” article too.
I may bump into you at Eisenhower Park sometime this summer!
I tried once to get a community going at https://www.reddit.com/r/NassauBladers/, but it didn’t really take off. There are a bunch of bladers over there. But the sub isn’t active. A few of us do keep one another abreast of our intentions to skate, by SMS texting. Just say hi to random inline skaters at the park next time. I do : )
Finally, a rollerblading analysis for Capricorns! But for real, I just started up again after two years and am figuring out my muscles after much worsening of my hyper mobility and decided to take an approach much like yours. Slowing down and analyzing the movements that are supposed to happen. No coincidence I made some of the same realizations as you!! Been practicing the squatting and those abductions. Also just standing in certain positions and studying which muscles are engaged. Going to try your exercises! Thank you!
Thanks for leaving this comment. It means a lot to me. Most people don’t understand why some of us think about these things :D
Hi Xinhai,
I stumbled onto your blog when I was looking for beginner inline roller skate guide, and I had to immediately read it because I live in Astoria and recognized the Astoria Park background. Incredible write-up and guidance, which I’m sure will help me to learn properly. Let me know if you’re down for a roller skate meetup in Astoria Park :)
Fellow New Yorker. Ha ha ha. During Covid, I made an effort to find different places to skate. Nowadays I usually skate at Eisenhower Park (https://xinhaidude.com/2022/04/17/inline-skating-rink-at-eisenhower-park/) weather permitting. It’s too cold right now though : ) Hey, enjoy your skating. And be safe.
Hi Xinhai,
I just came via RC Planes AR636… but found cool posts of you. This are like small scientific pieces :) I like how you analize everything.
Since I didn´t rollerblade as a kid and began to XC skiing as an adult, I also tried the blades. But my feet were hurting due to bad position (pronetaion) or rollerblades.. Some day I´ll try it again! But I still enjoy XC skiing in skating style.
Greetings from Bavaria!
All of these sports have things in common. Thanks for your kinds words. One day I want to try snow boarding myself :) About the pain, yeah. I could have been the fit of the skates, pronation, and more. For me, with a wide and irregular right foot, I only found relief after years of skating with custom skates.