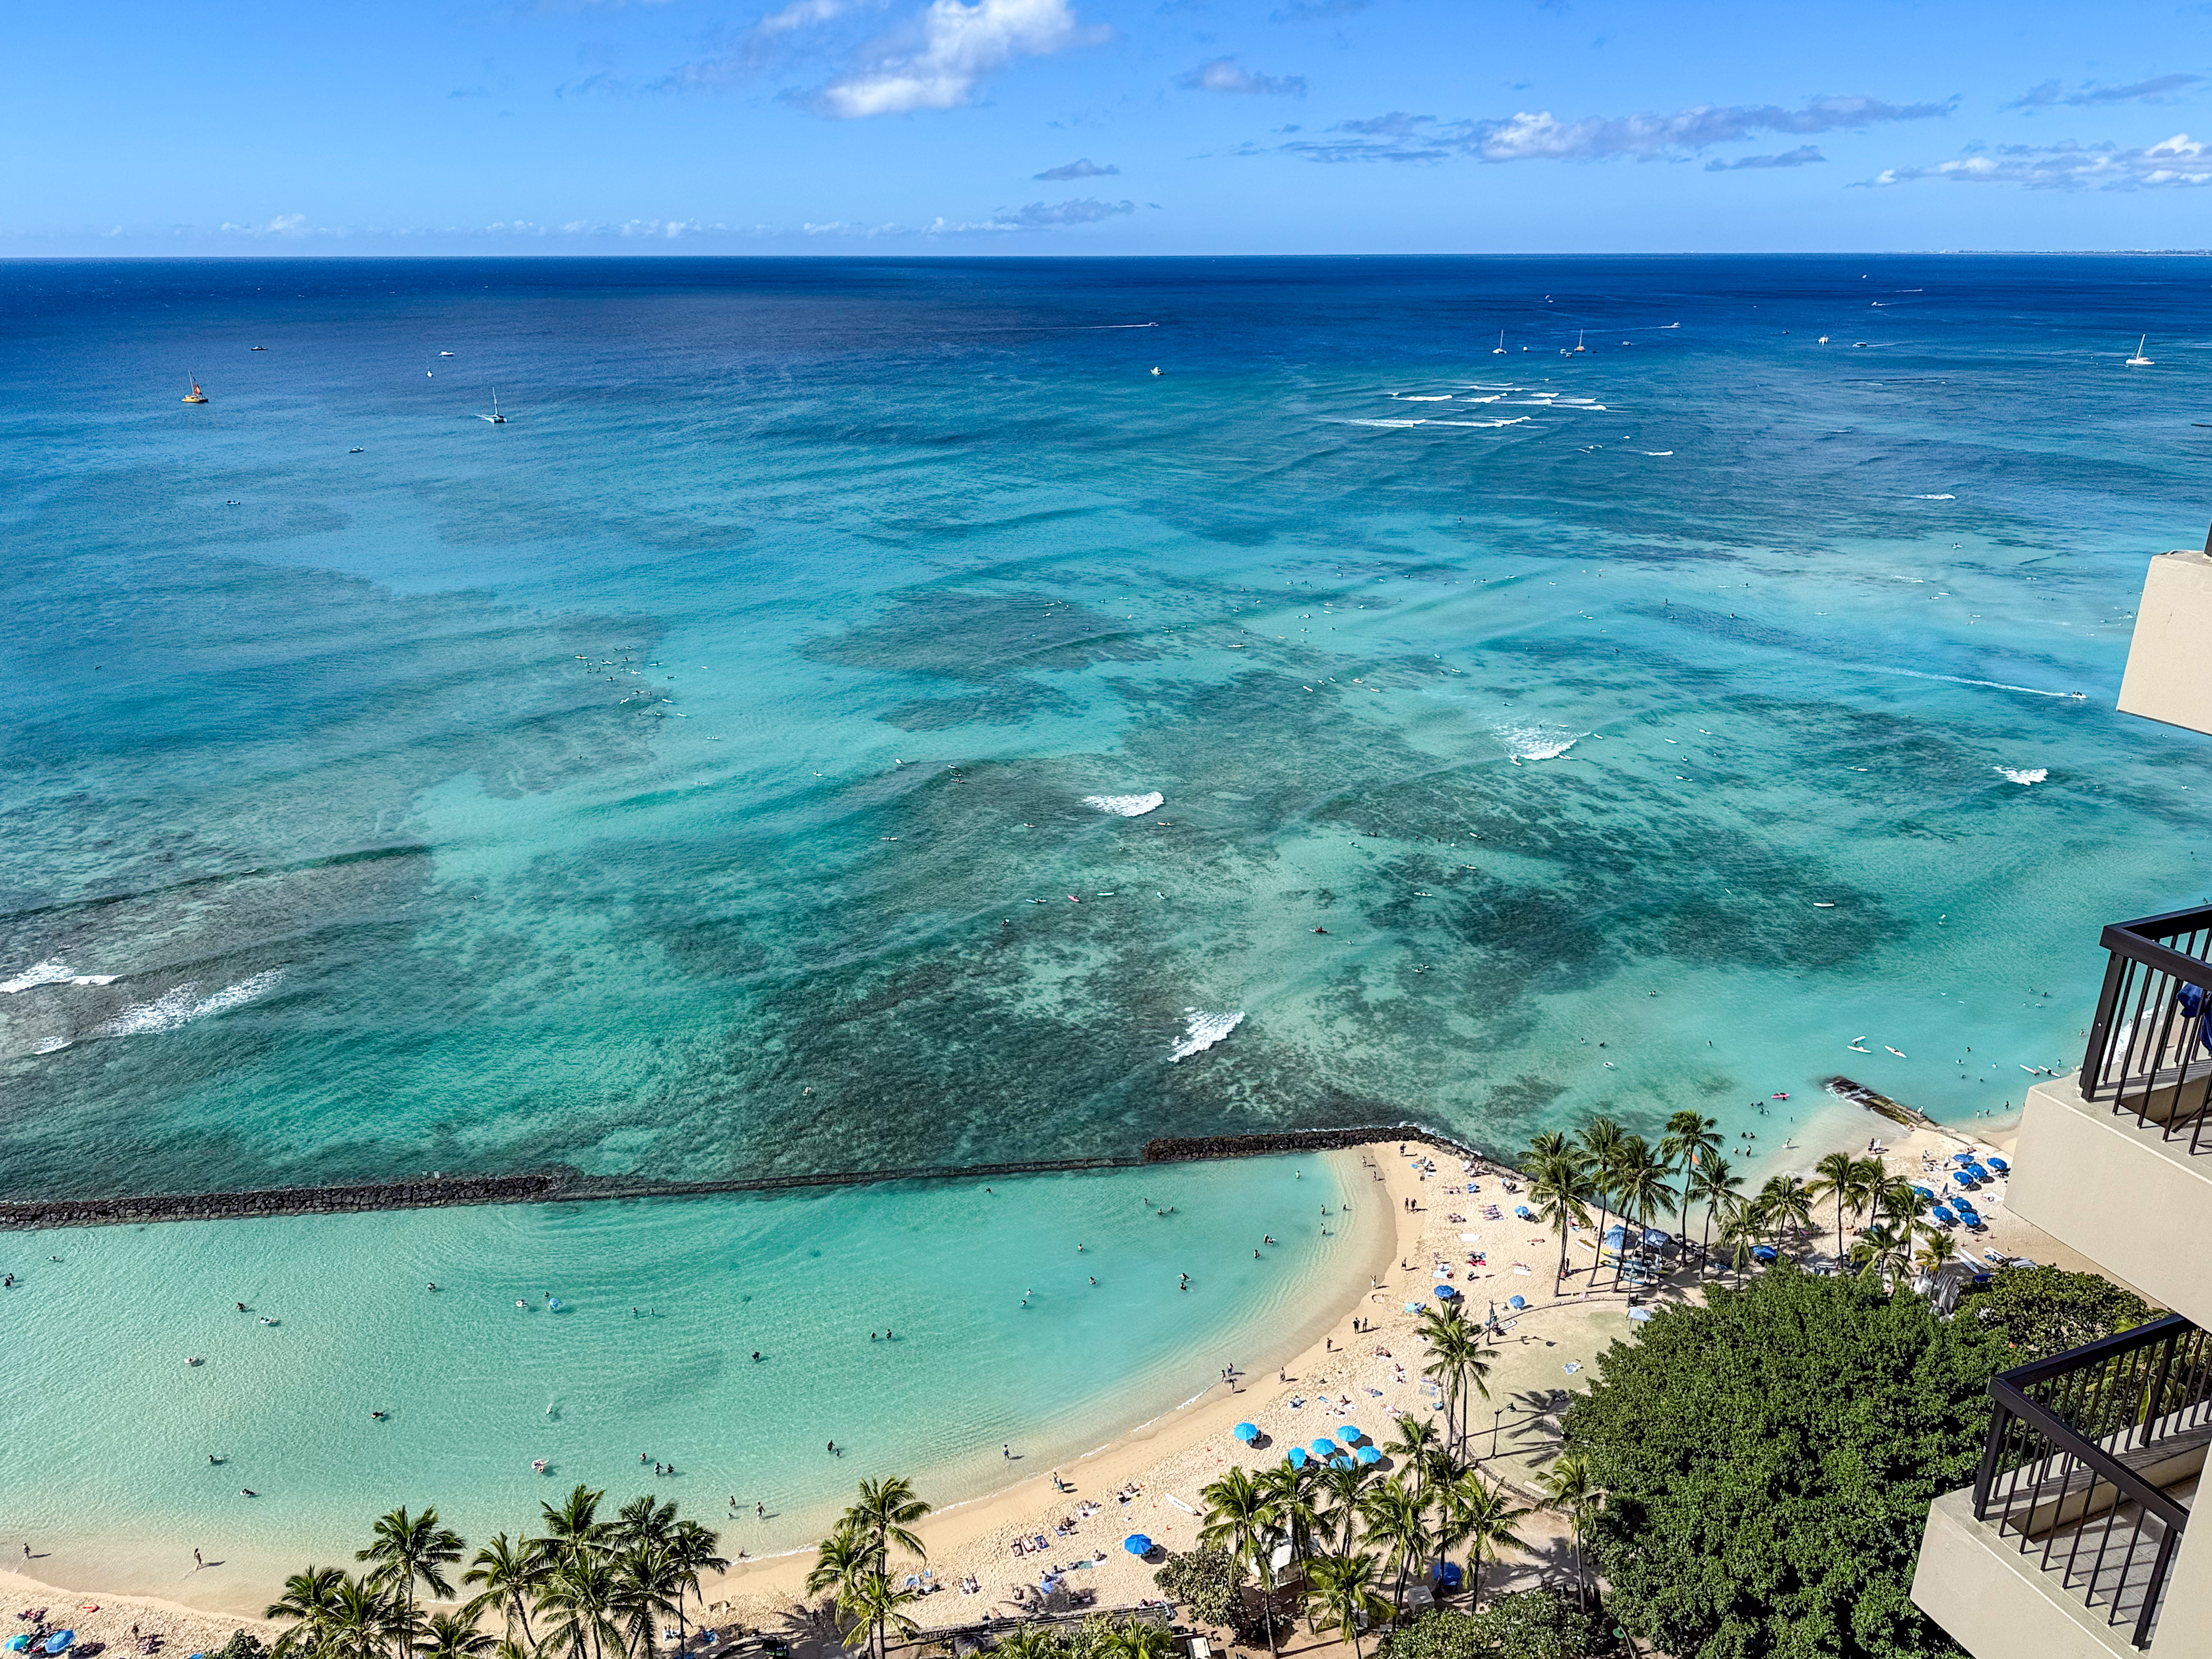
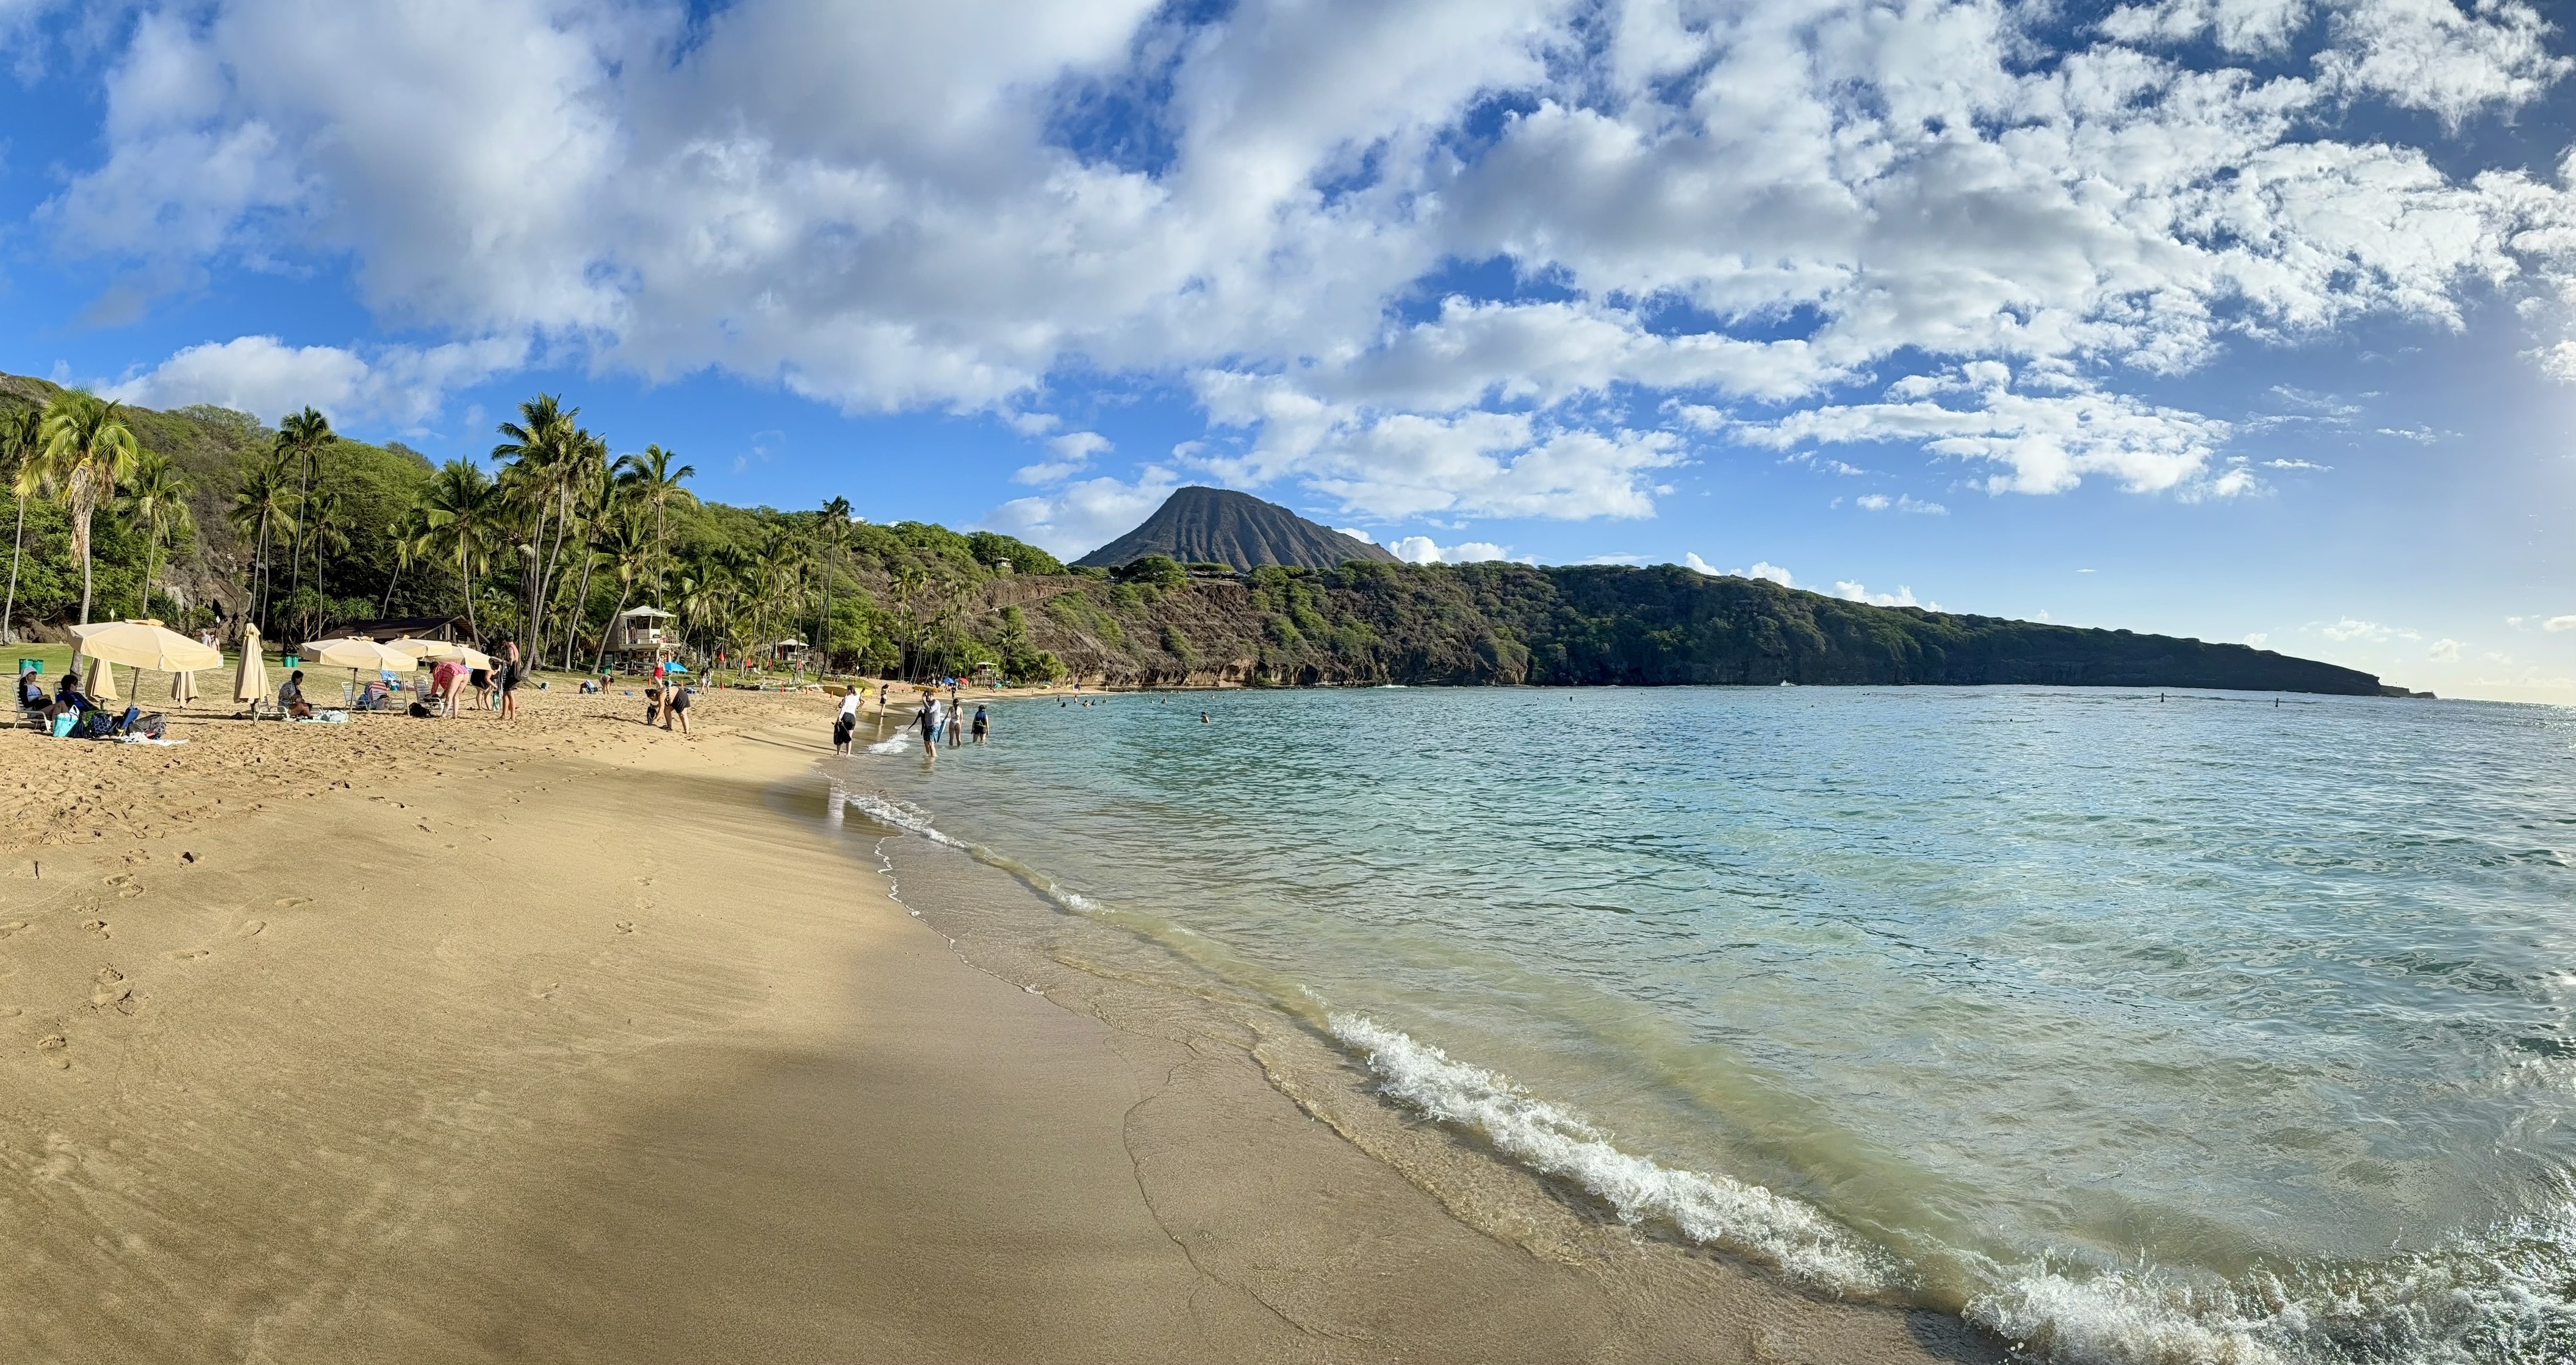
Kūhiō Beach at Waikīkī, along with its two walled ponds, is often misunderstood. It is frequently lumped together with the rest of Waikiki beaches and dismissed as eternally crowded – “like a zoo”, as they say. In reality, each beach along Waikiki Bay has its own distinct vibe, shaped by differences in location, reef structure, parking access, and proximity to oceanfront resorts.
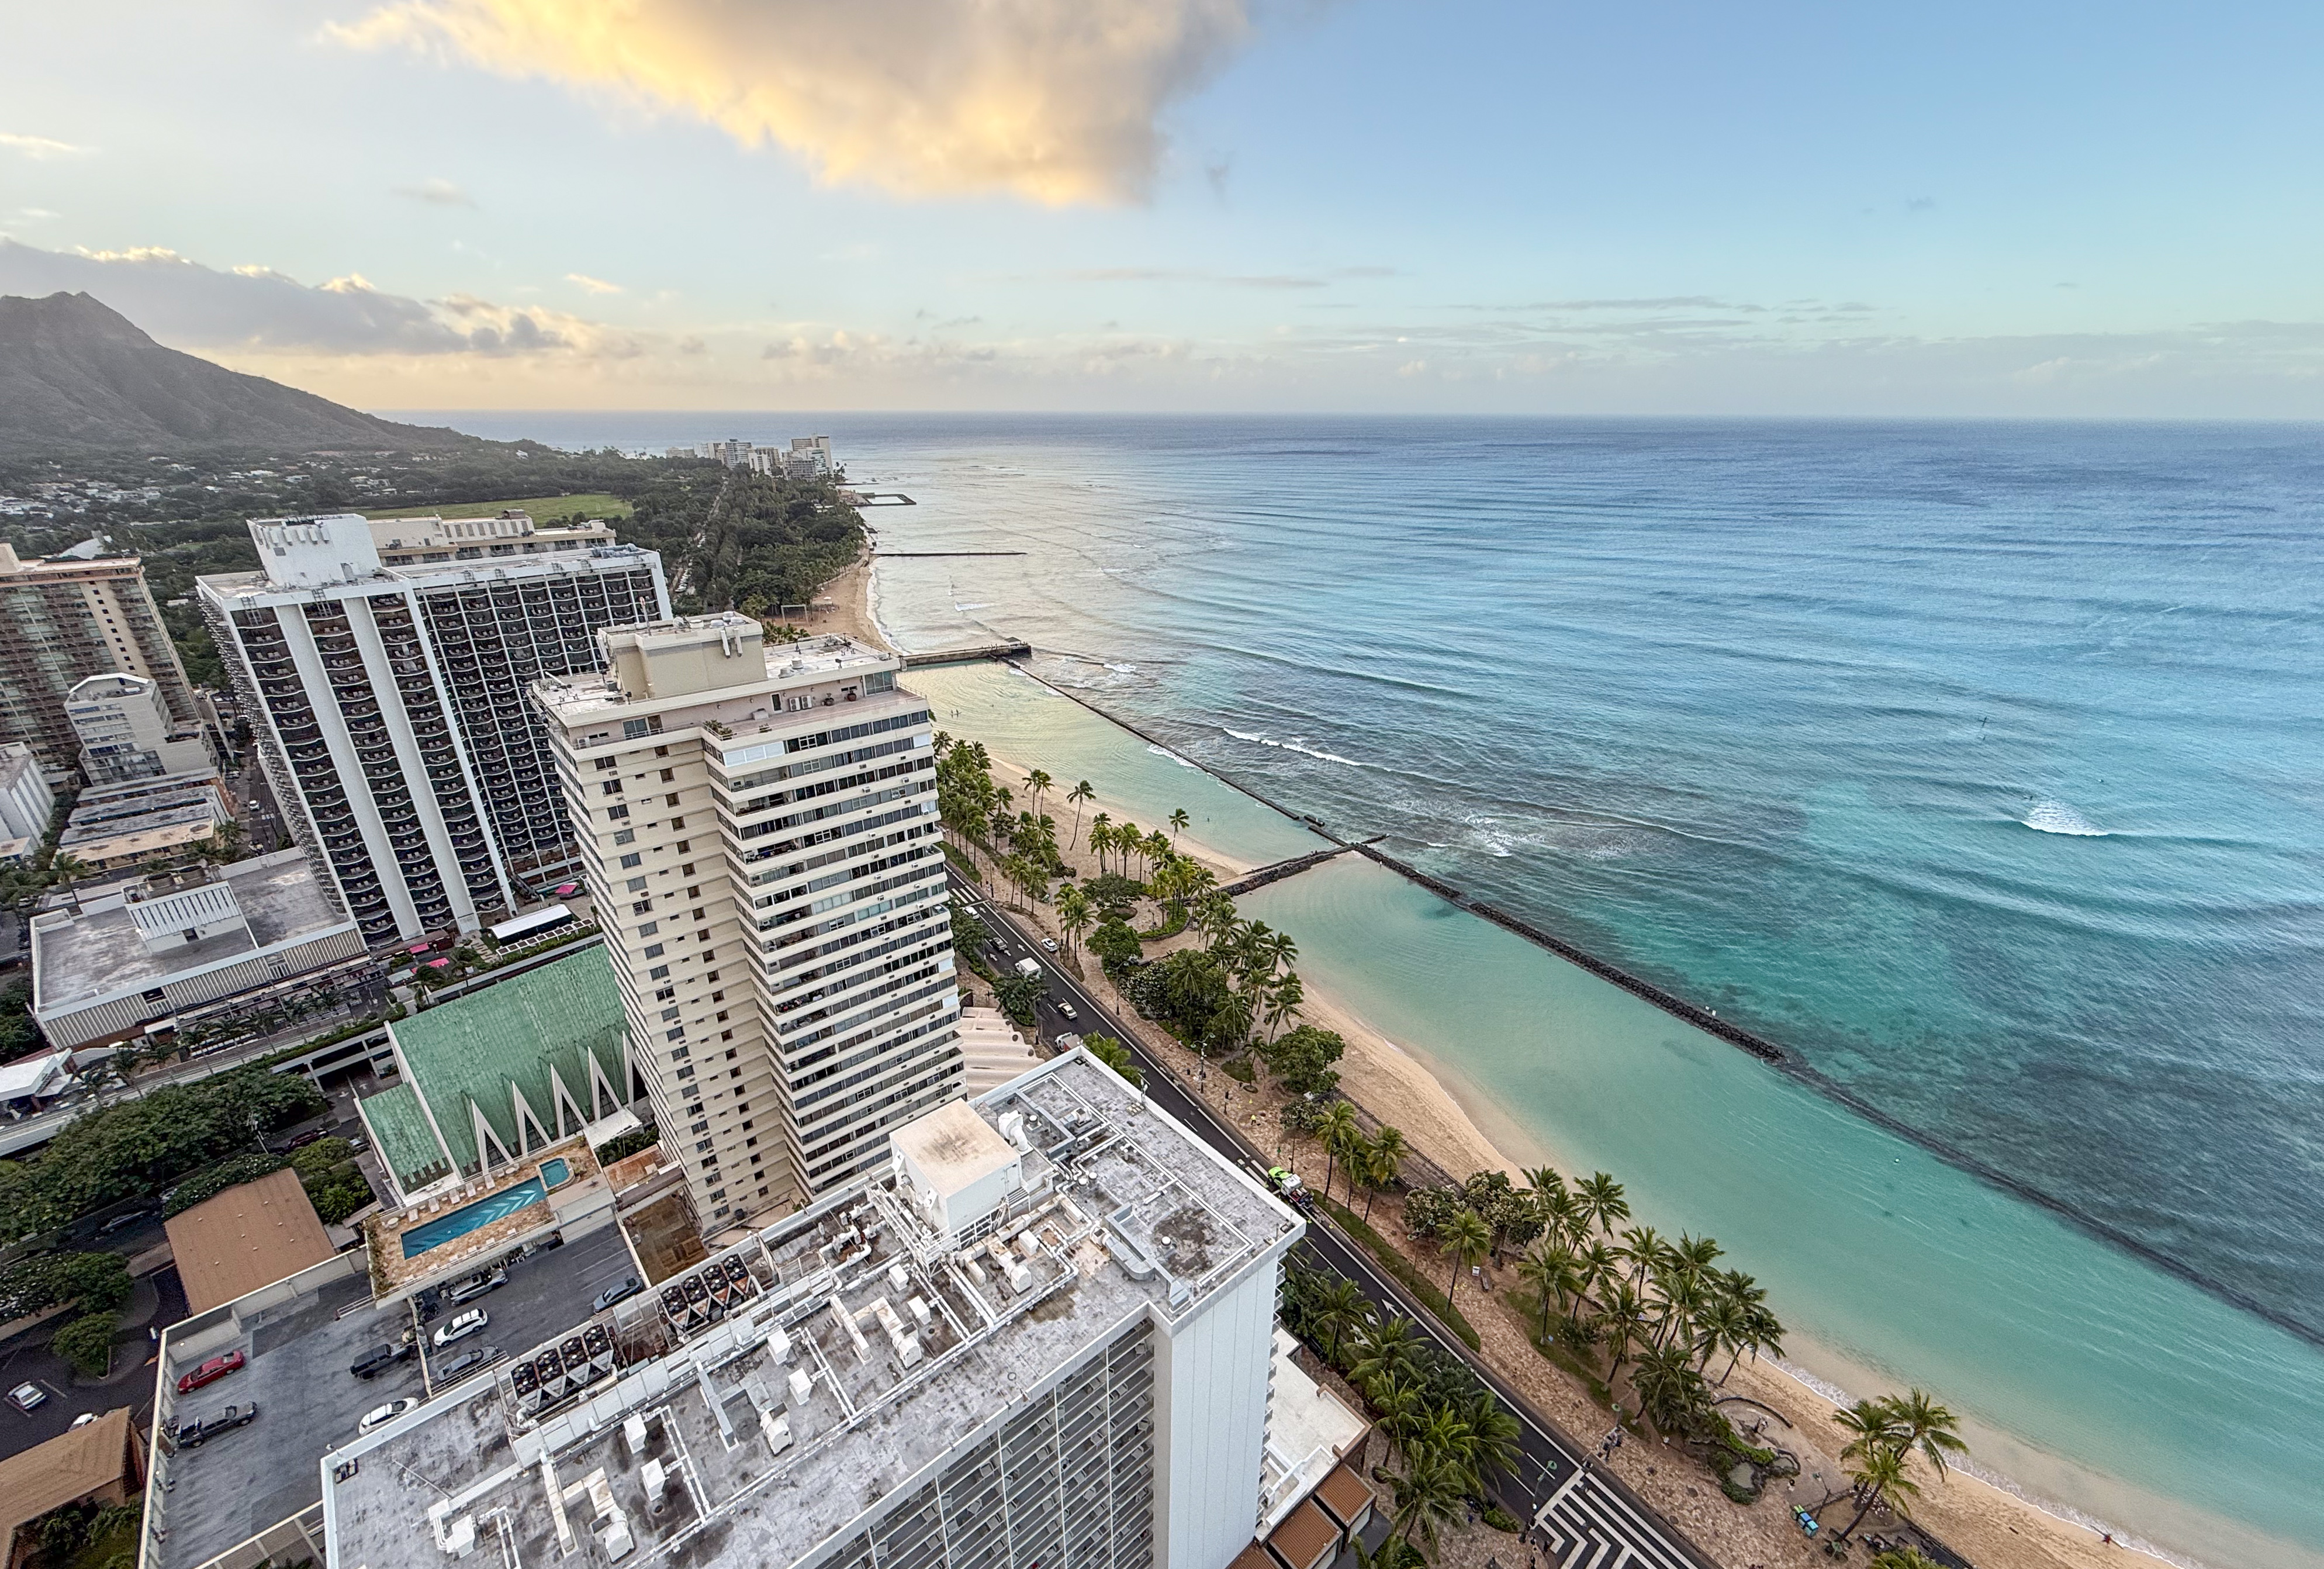
Kuhio Beach and its two walled-ponds at sunrise (7am)
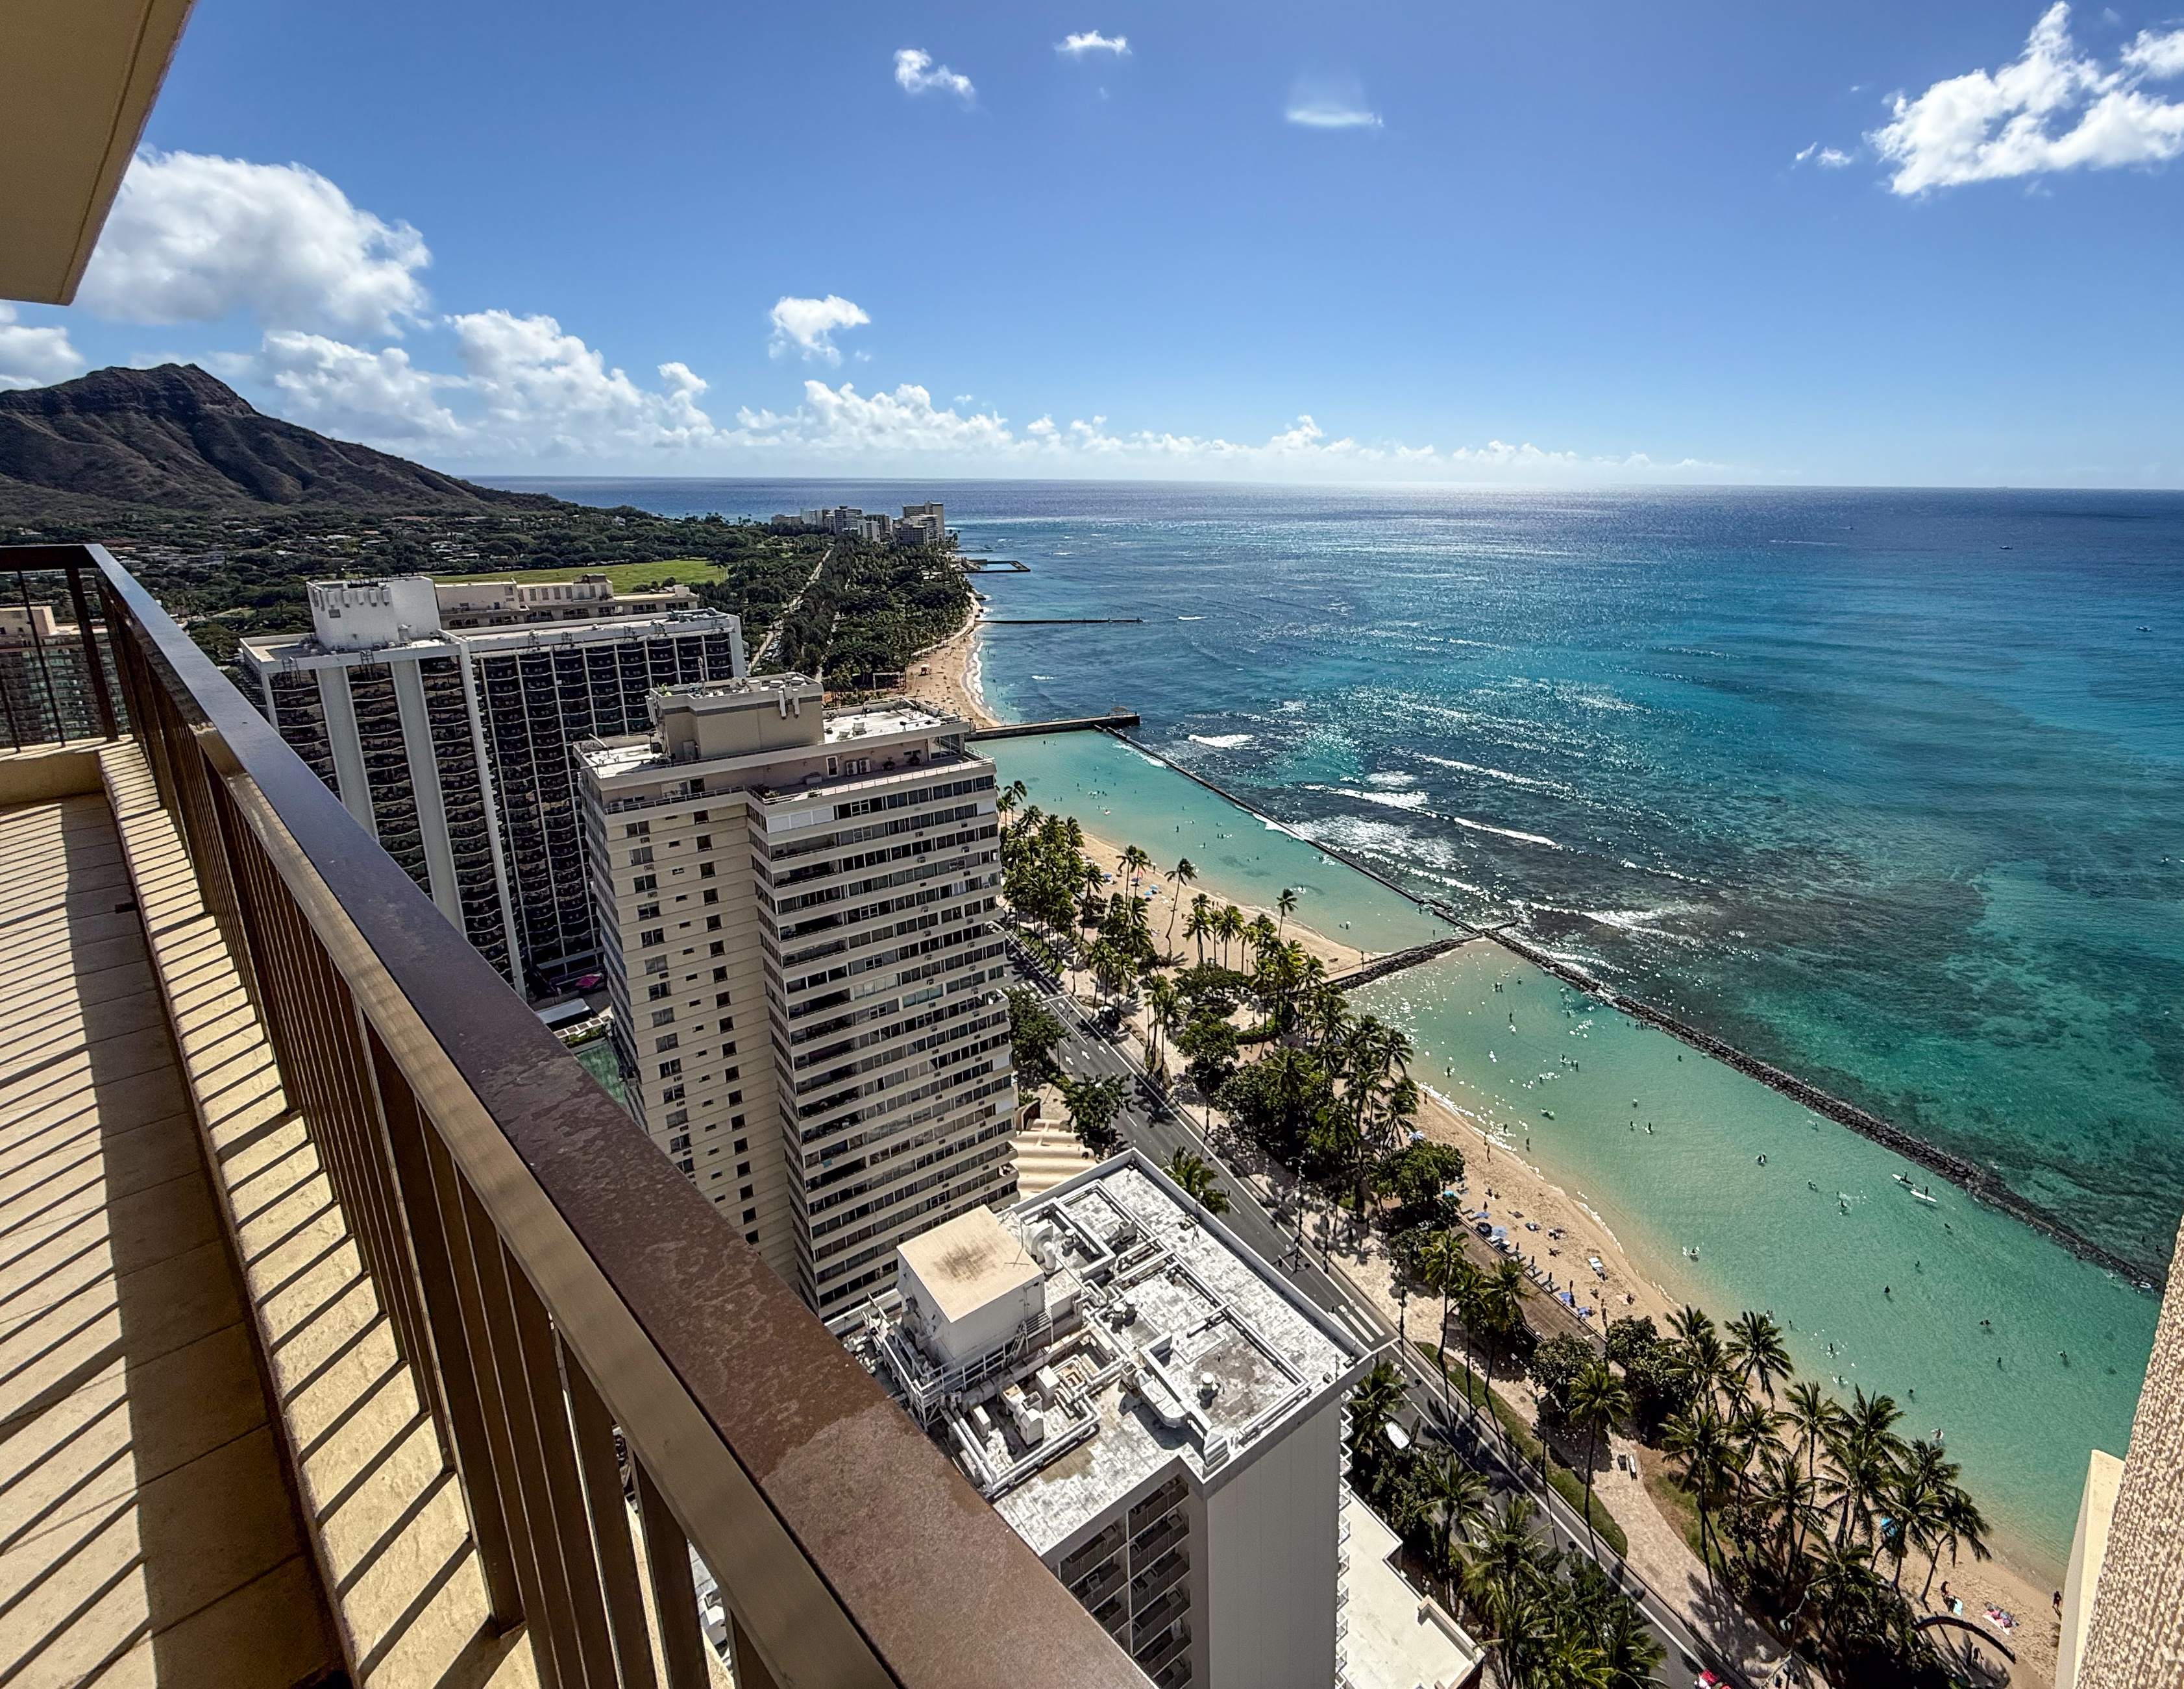
Kuhio Beach and its two walled-ponds at noon (1pm)
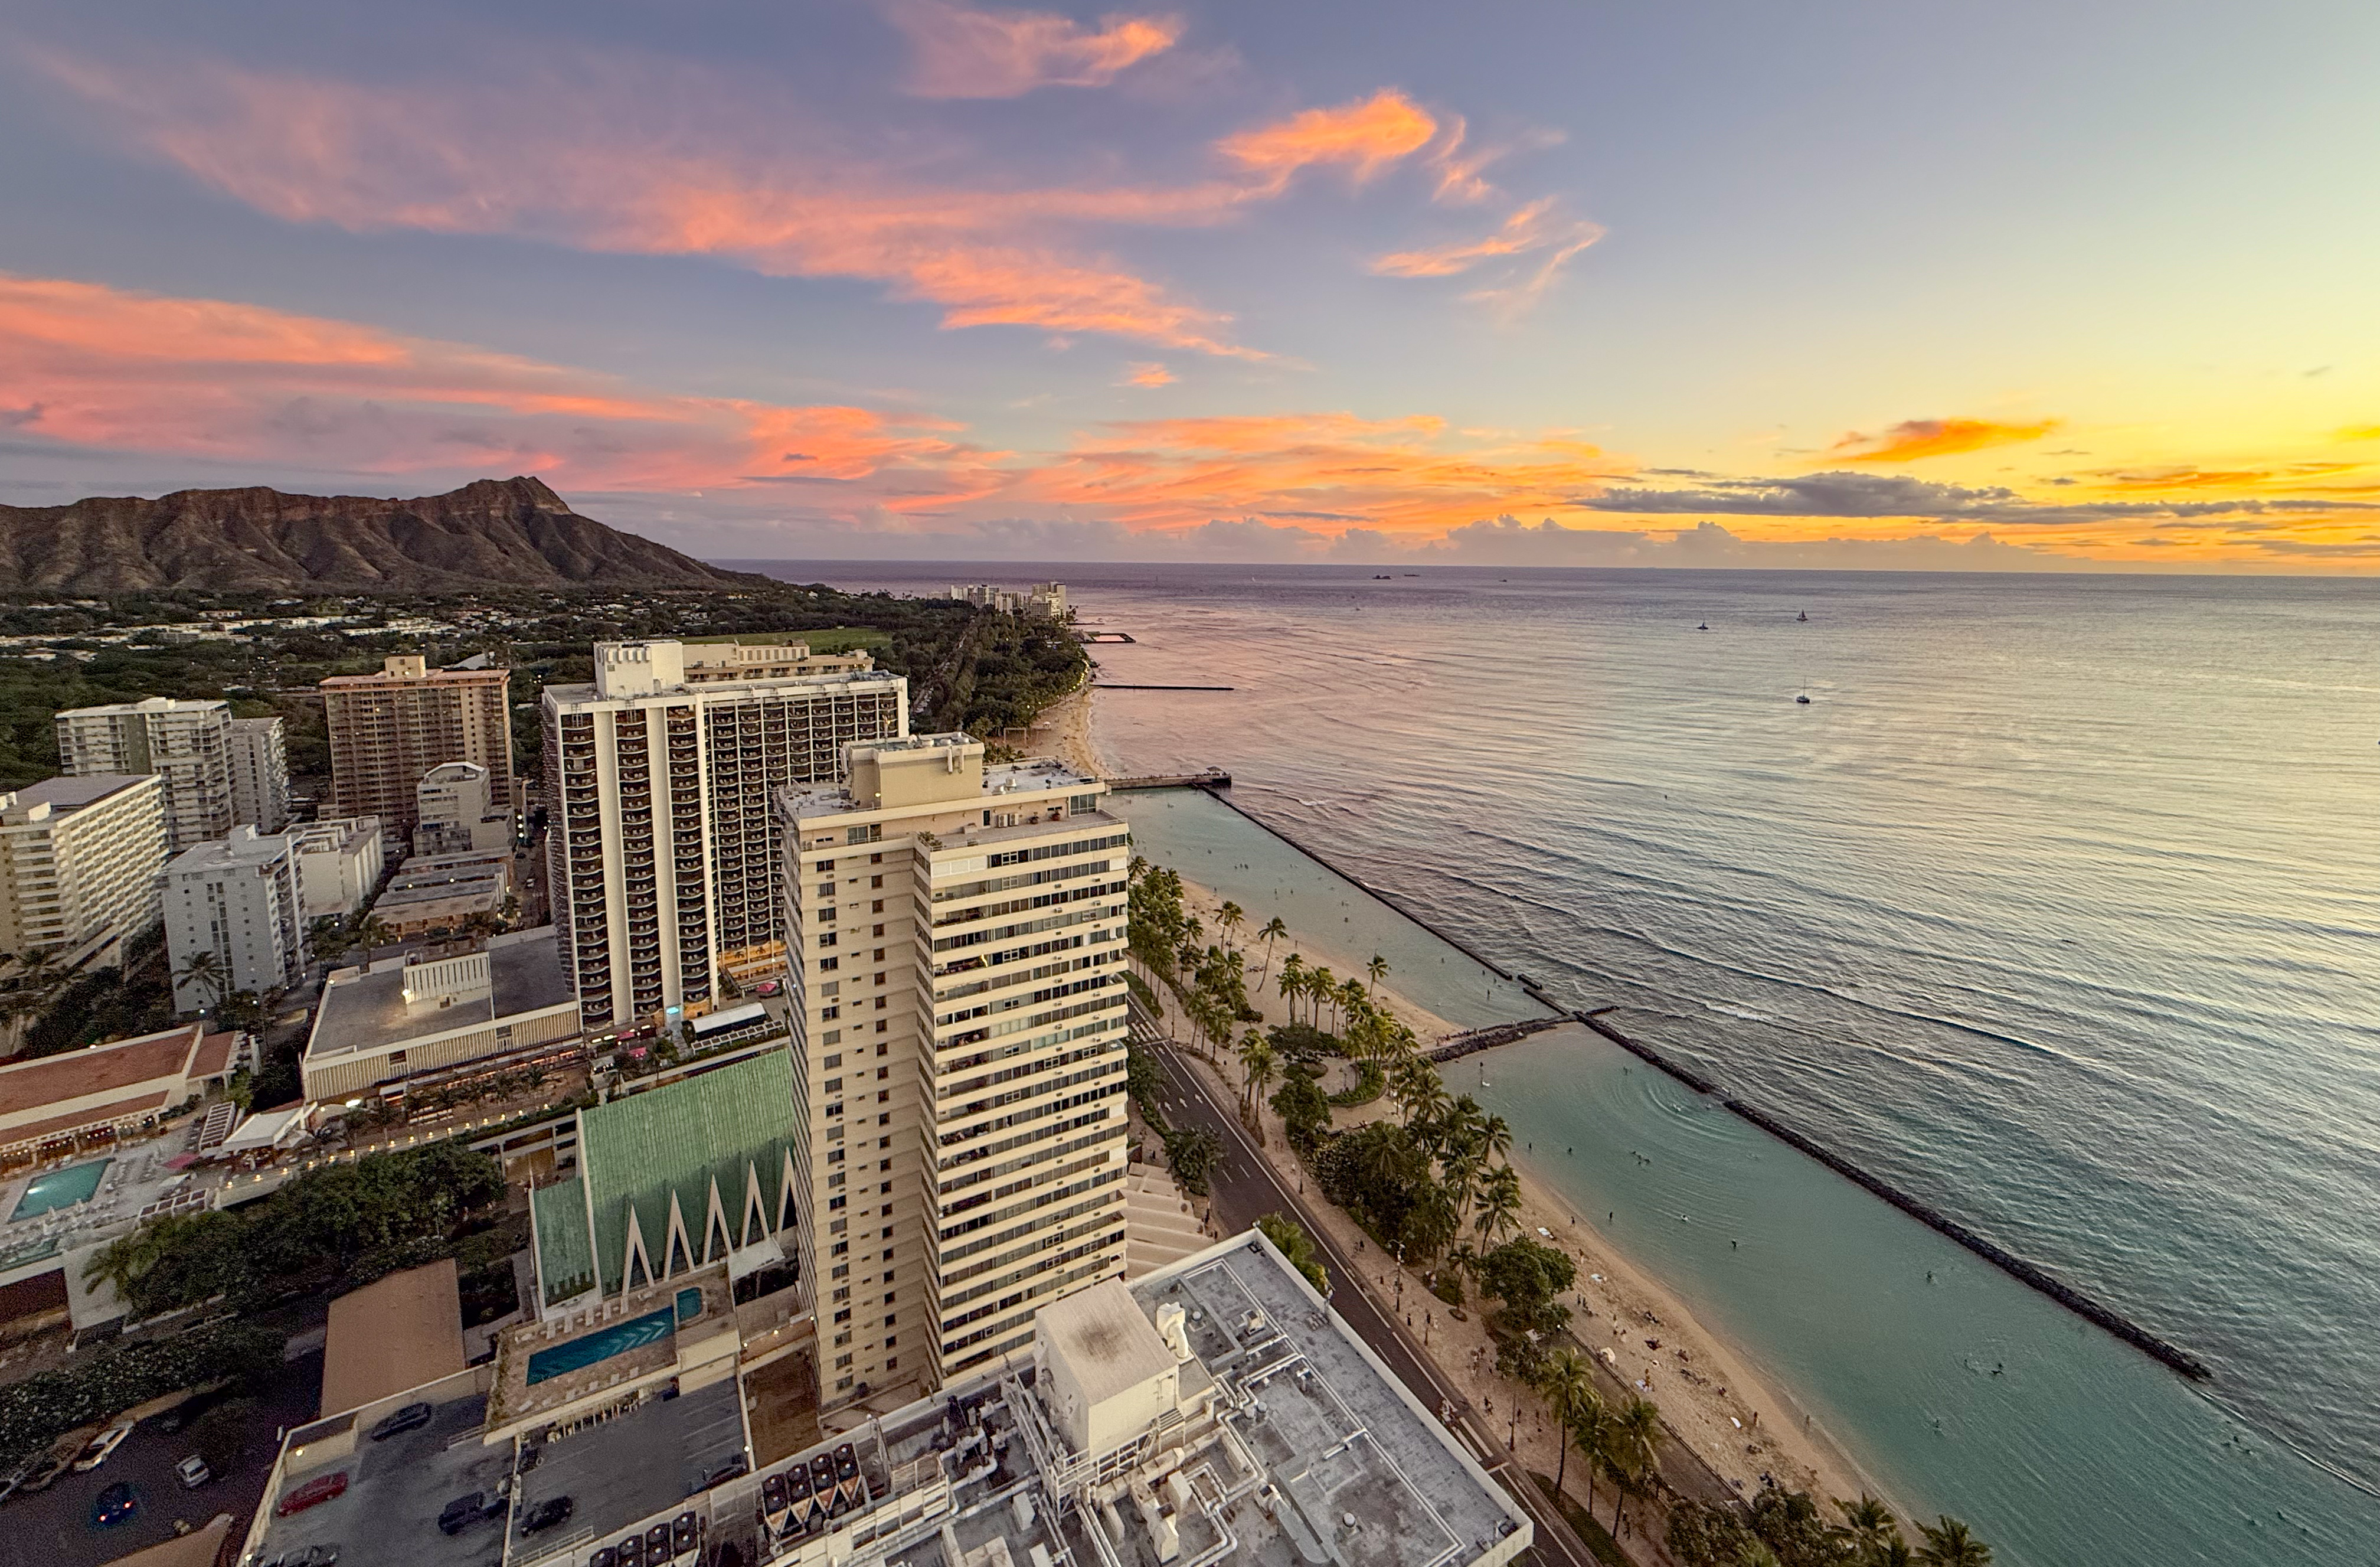
Kuhio Beach and its two walled-ponds at sunset (6pm)
Surfers begin gathering at Kuhio Beach well before sunrise, paddling out to Canoes, arguably the most popular surf break along all of Waikiki beaches. Long before swimmers arrive at the walled ponds, surfers are already catching waves on the reef just outside the west pond. Even after sunset, silhouettes of surfers can still be seen braving the break, moving against an ocean painted with the fading afterglow of dusk.
Surfers already catching waves at Canoes before beachgoers show up (7am)
Everybody that wanted to be at the beach was at the beach (11am)
Everybody was still at the beach as the sun sets (5:40pm)
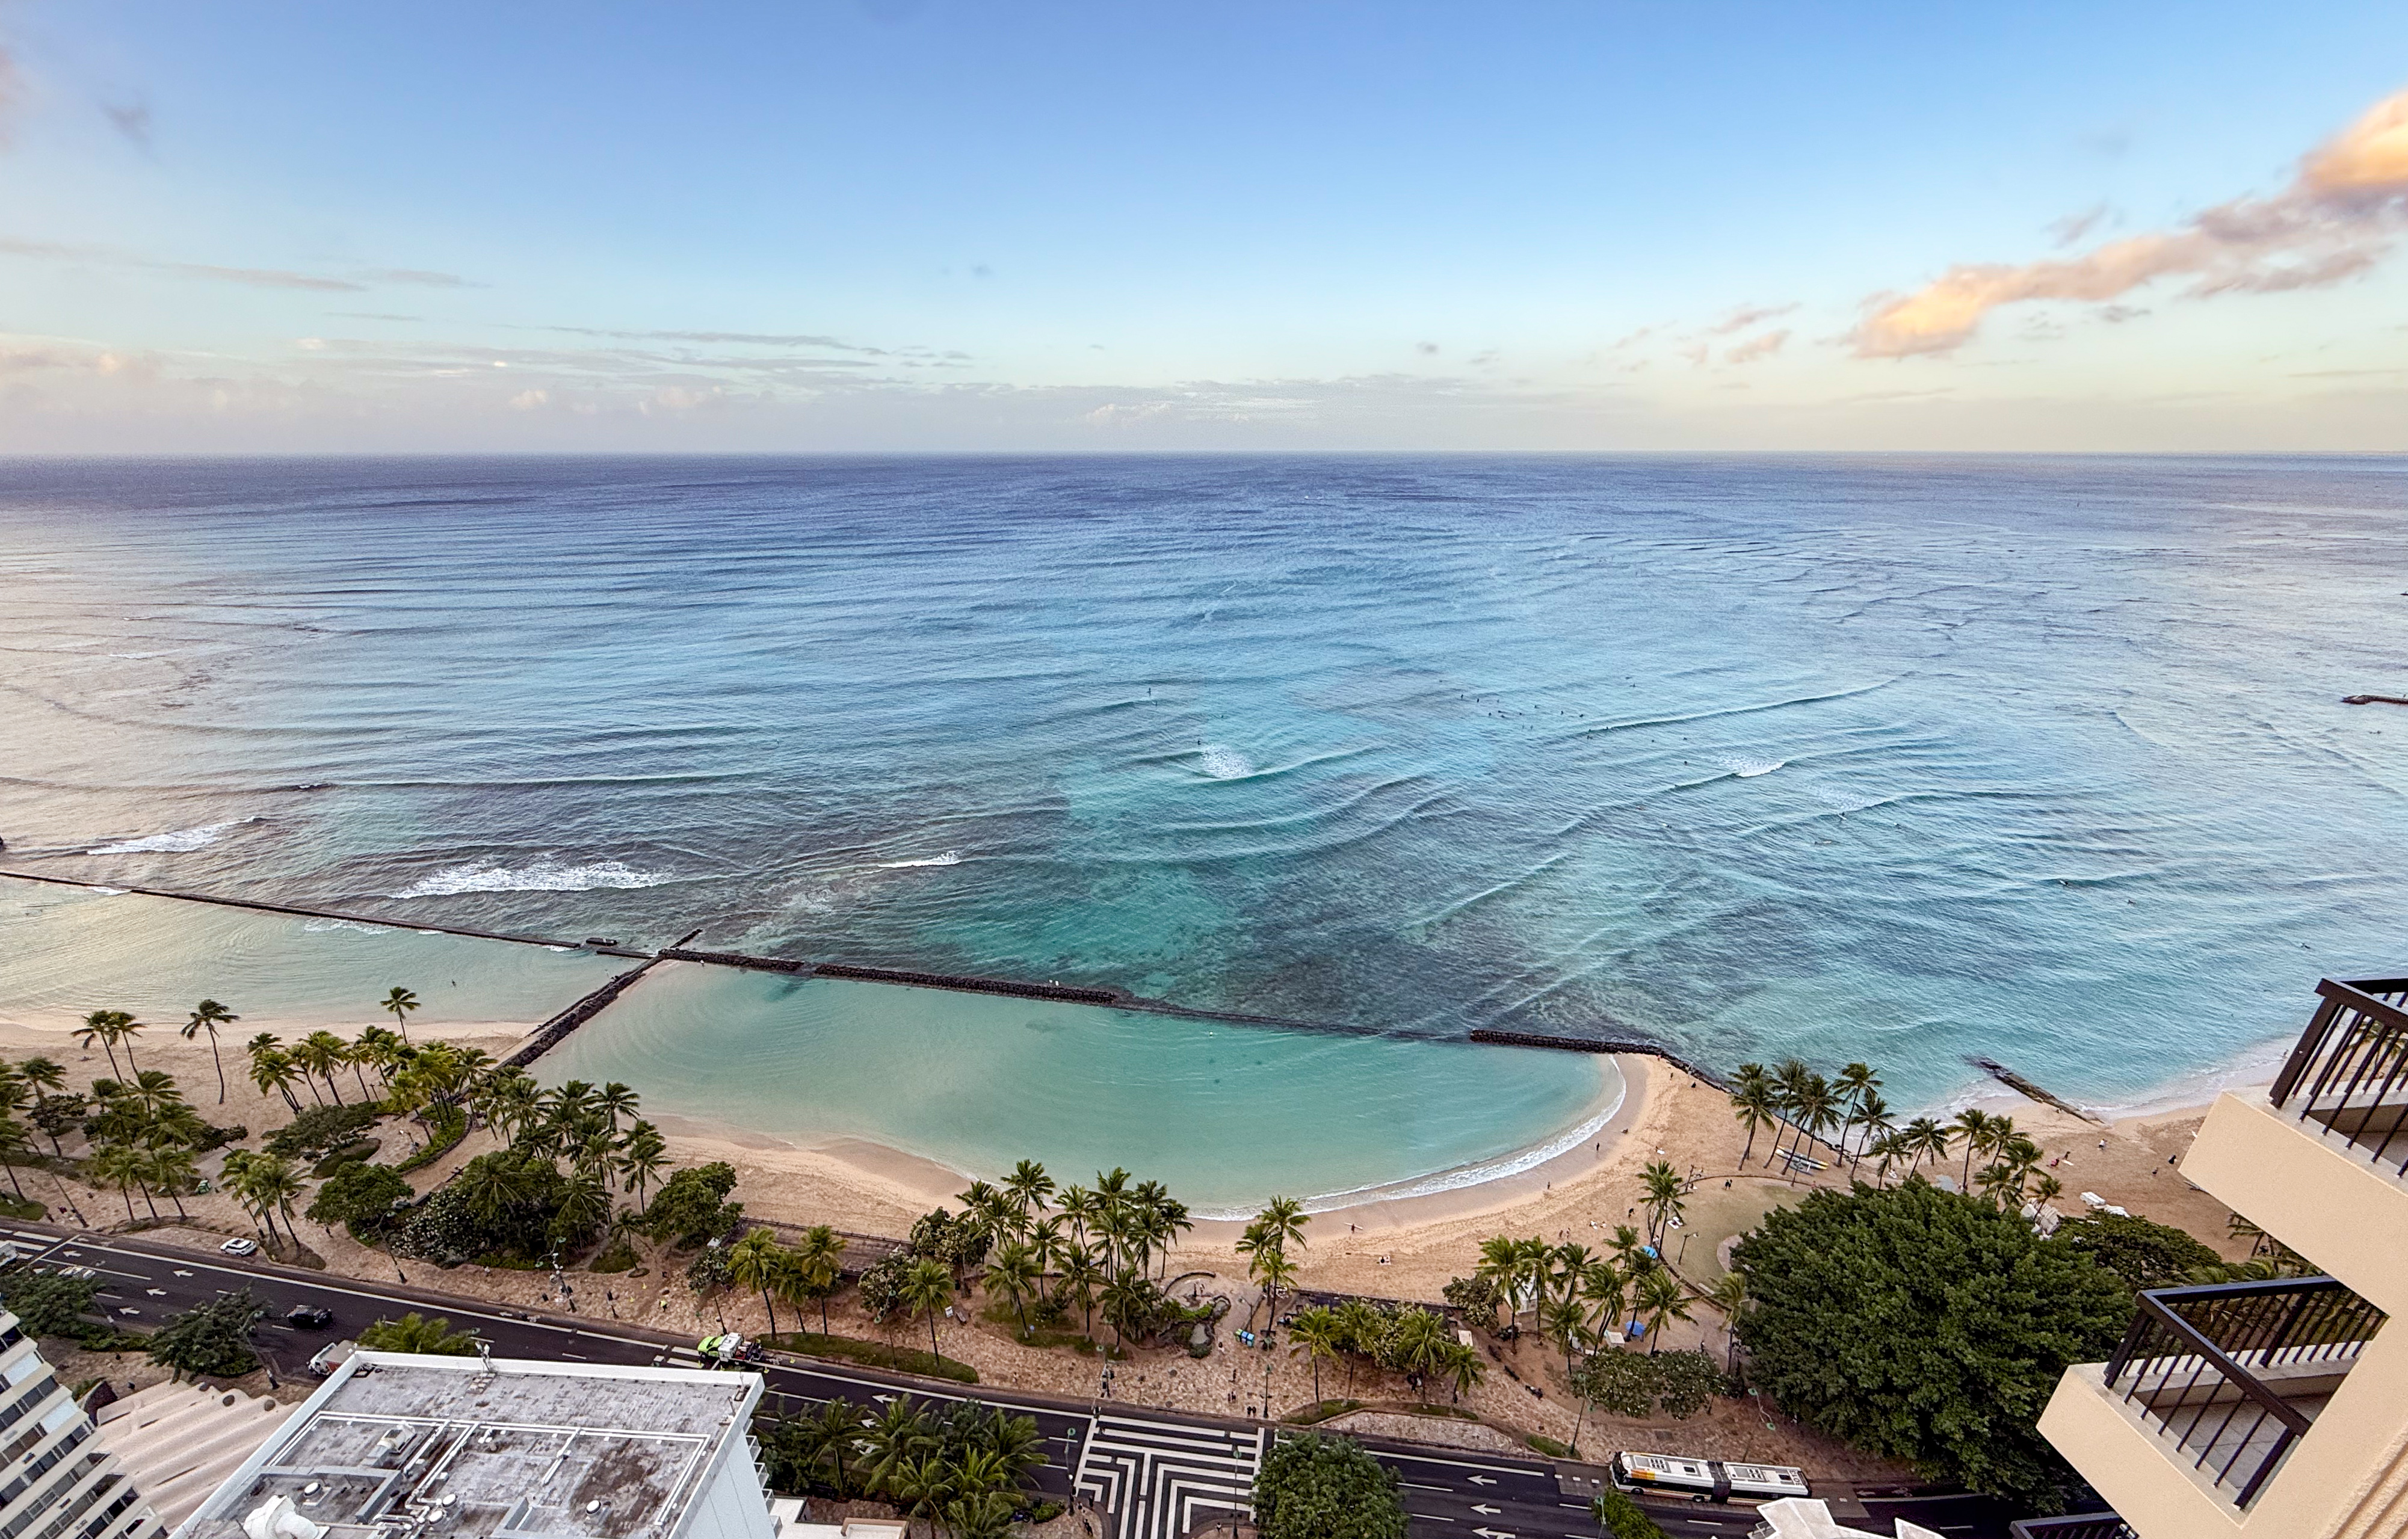
Surfers linger well past sunset, with only afterglow remaining to guide them (6:10pm)
I don’t know what Kuhio Beach looks like in summer or during the holiday season, but I can describe what it feels like to stay beside it for a week in November. The experience was noticeably different from influencer videos that highlight midday crowds during peak months. It also felt less touristy than portrayed by websites written by people who have something to sell to you.
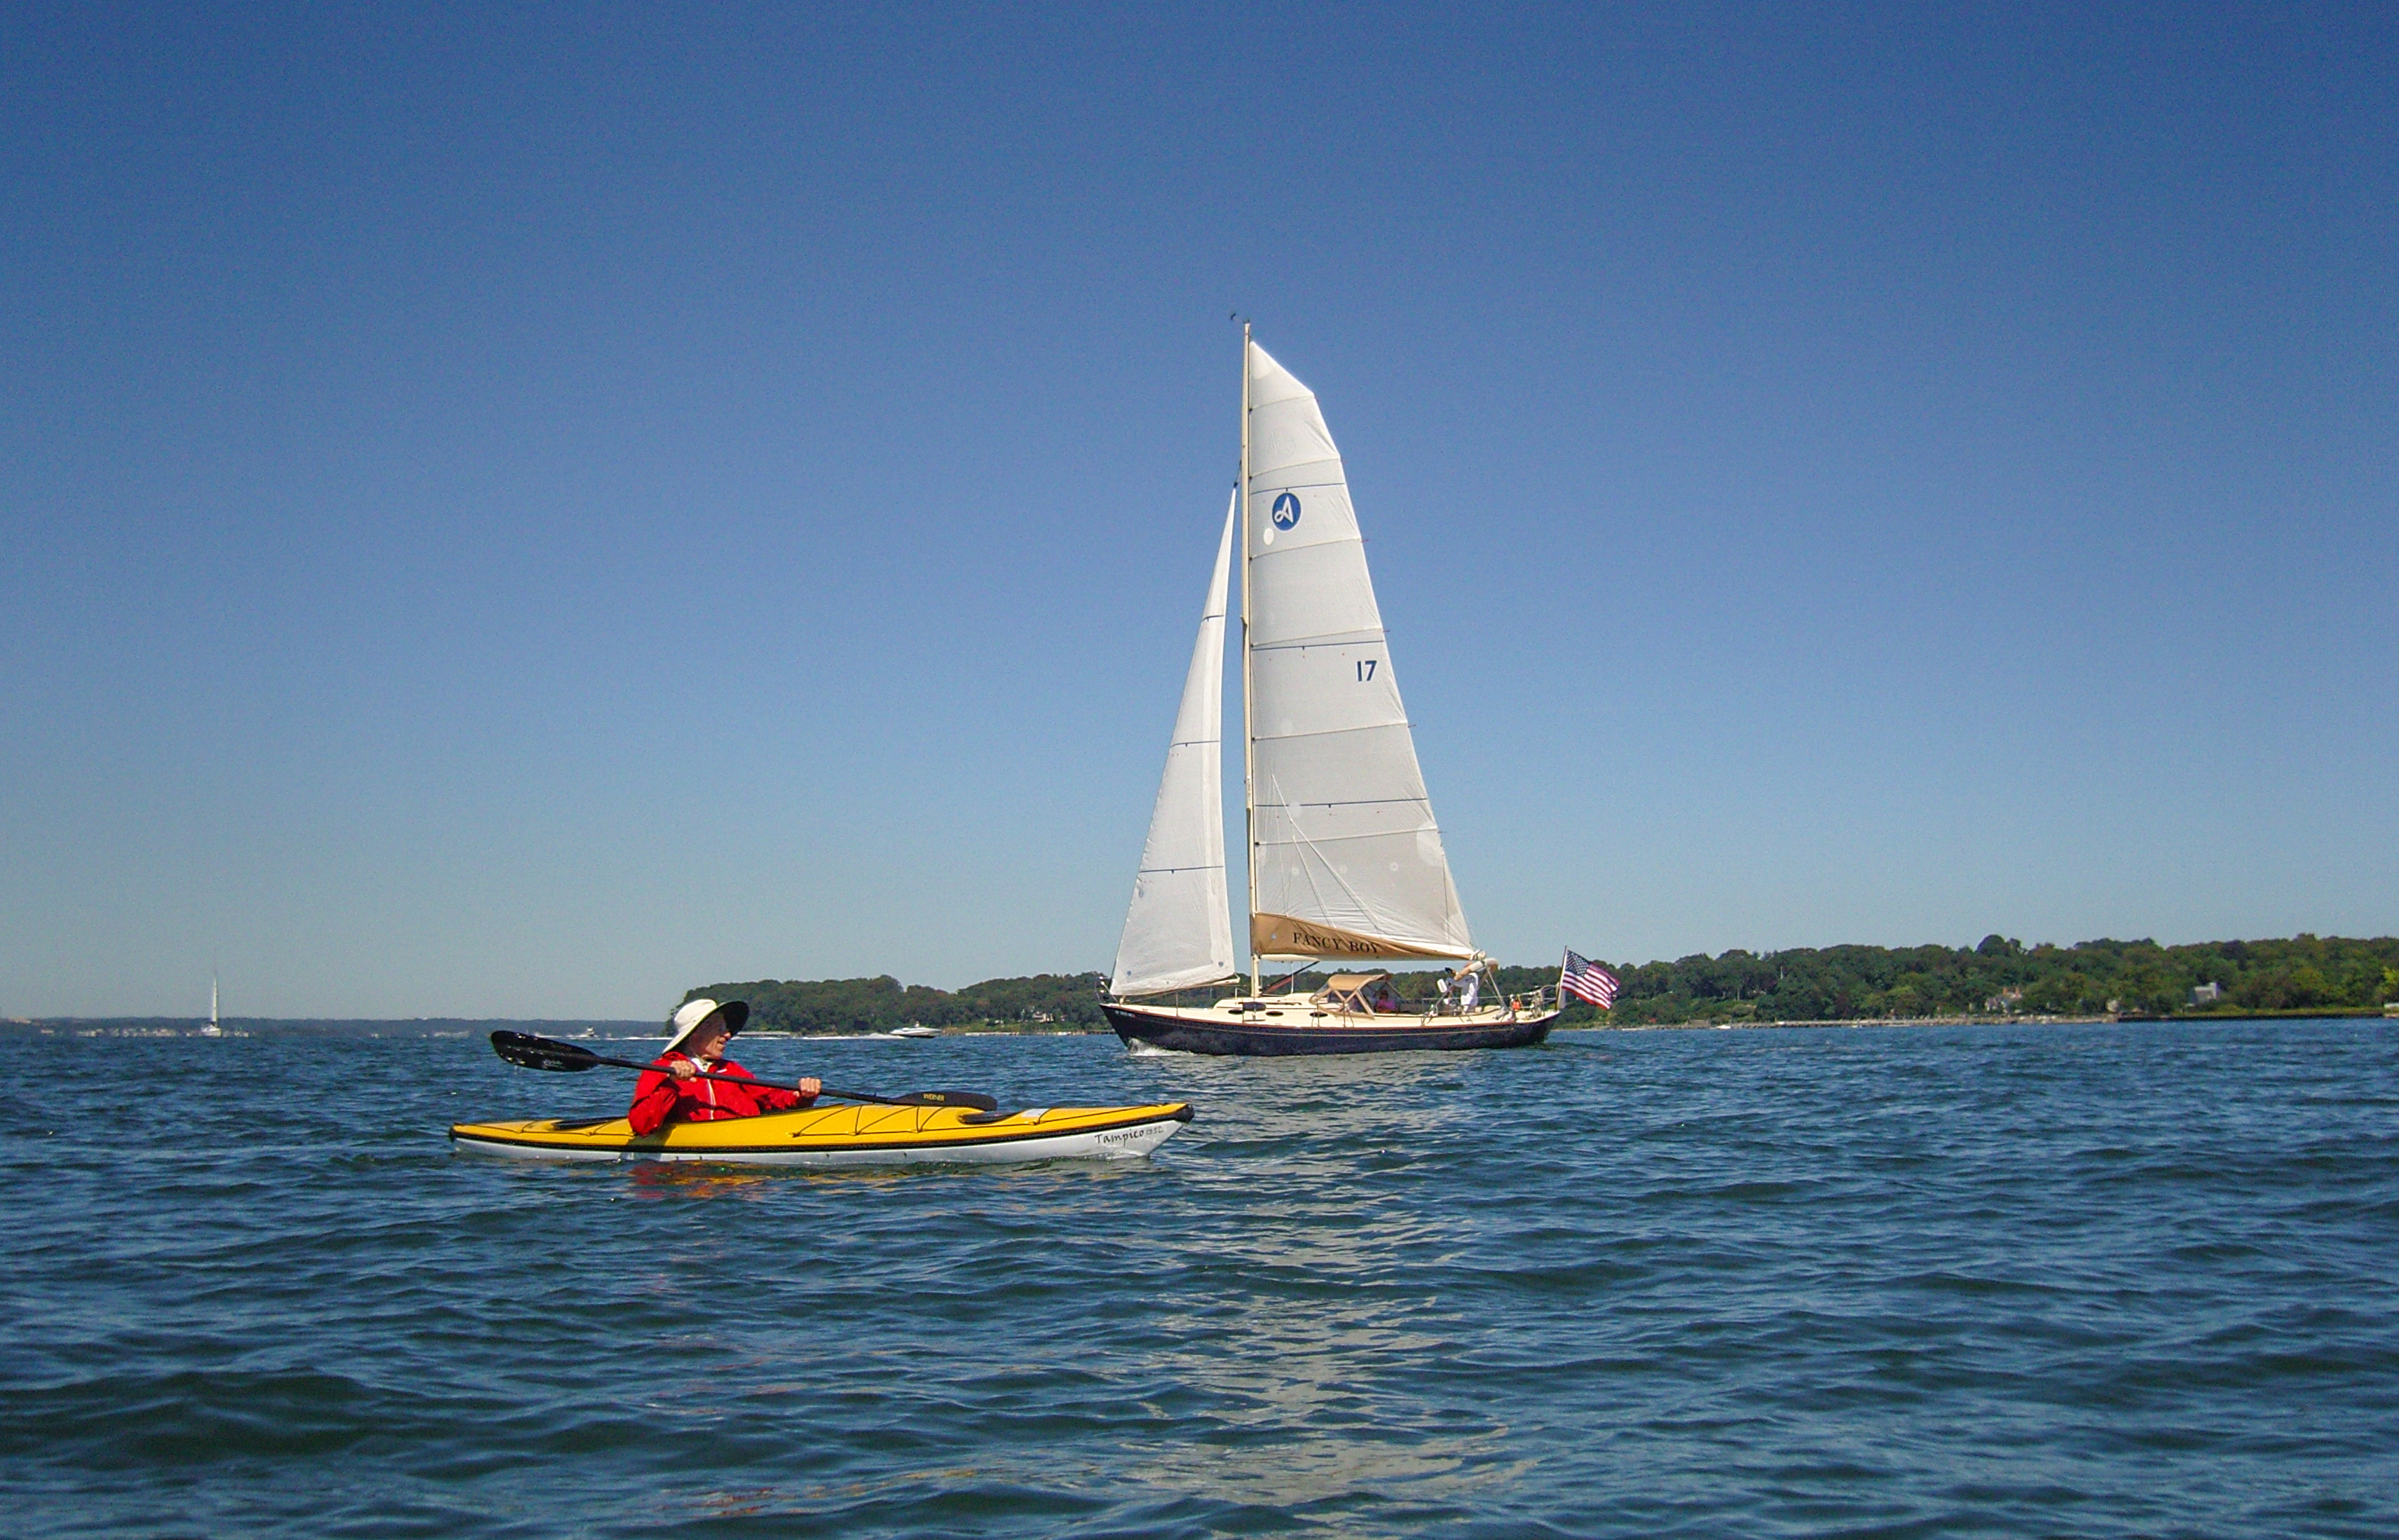
I have been taking pictures around Manhasset Bay for quite some years now. Except for a few that I uploaded to Wikimedia as an Wikipedian a decade ago, most have never seen the light of the day. I dusted off a bunch of these and re-processed them. I hope they capture a glimpse of the life around the bay that fictionally separated Jay Gatsby from Daisy Buchanan.
A sailboat zooms by a kayak on Manhasset Bay (2009)
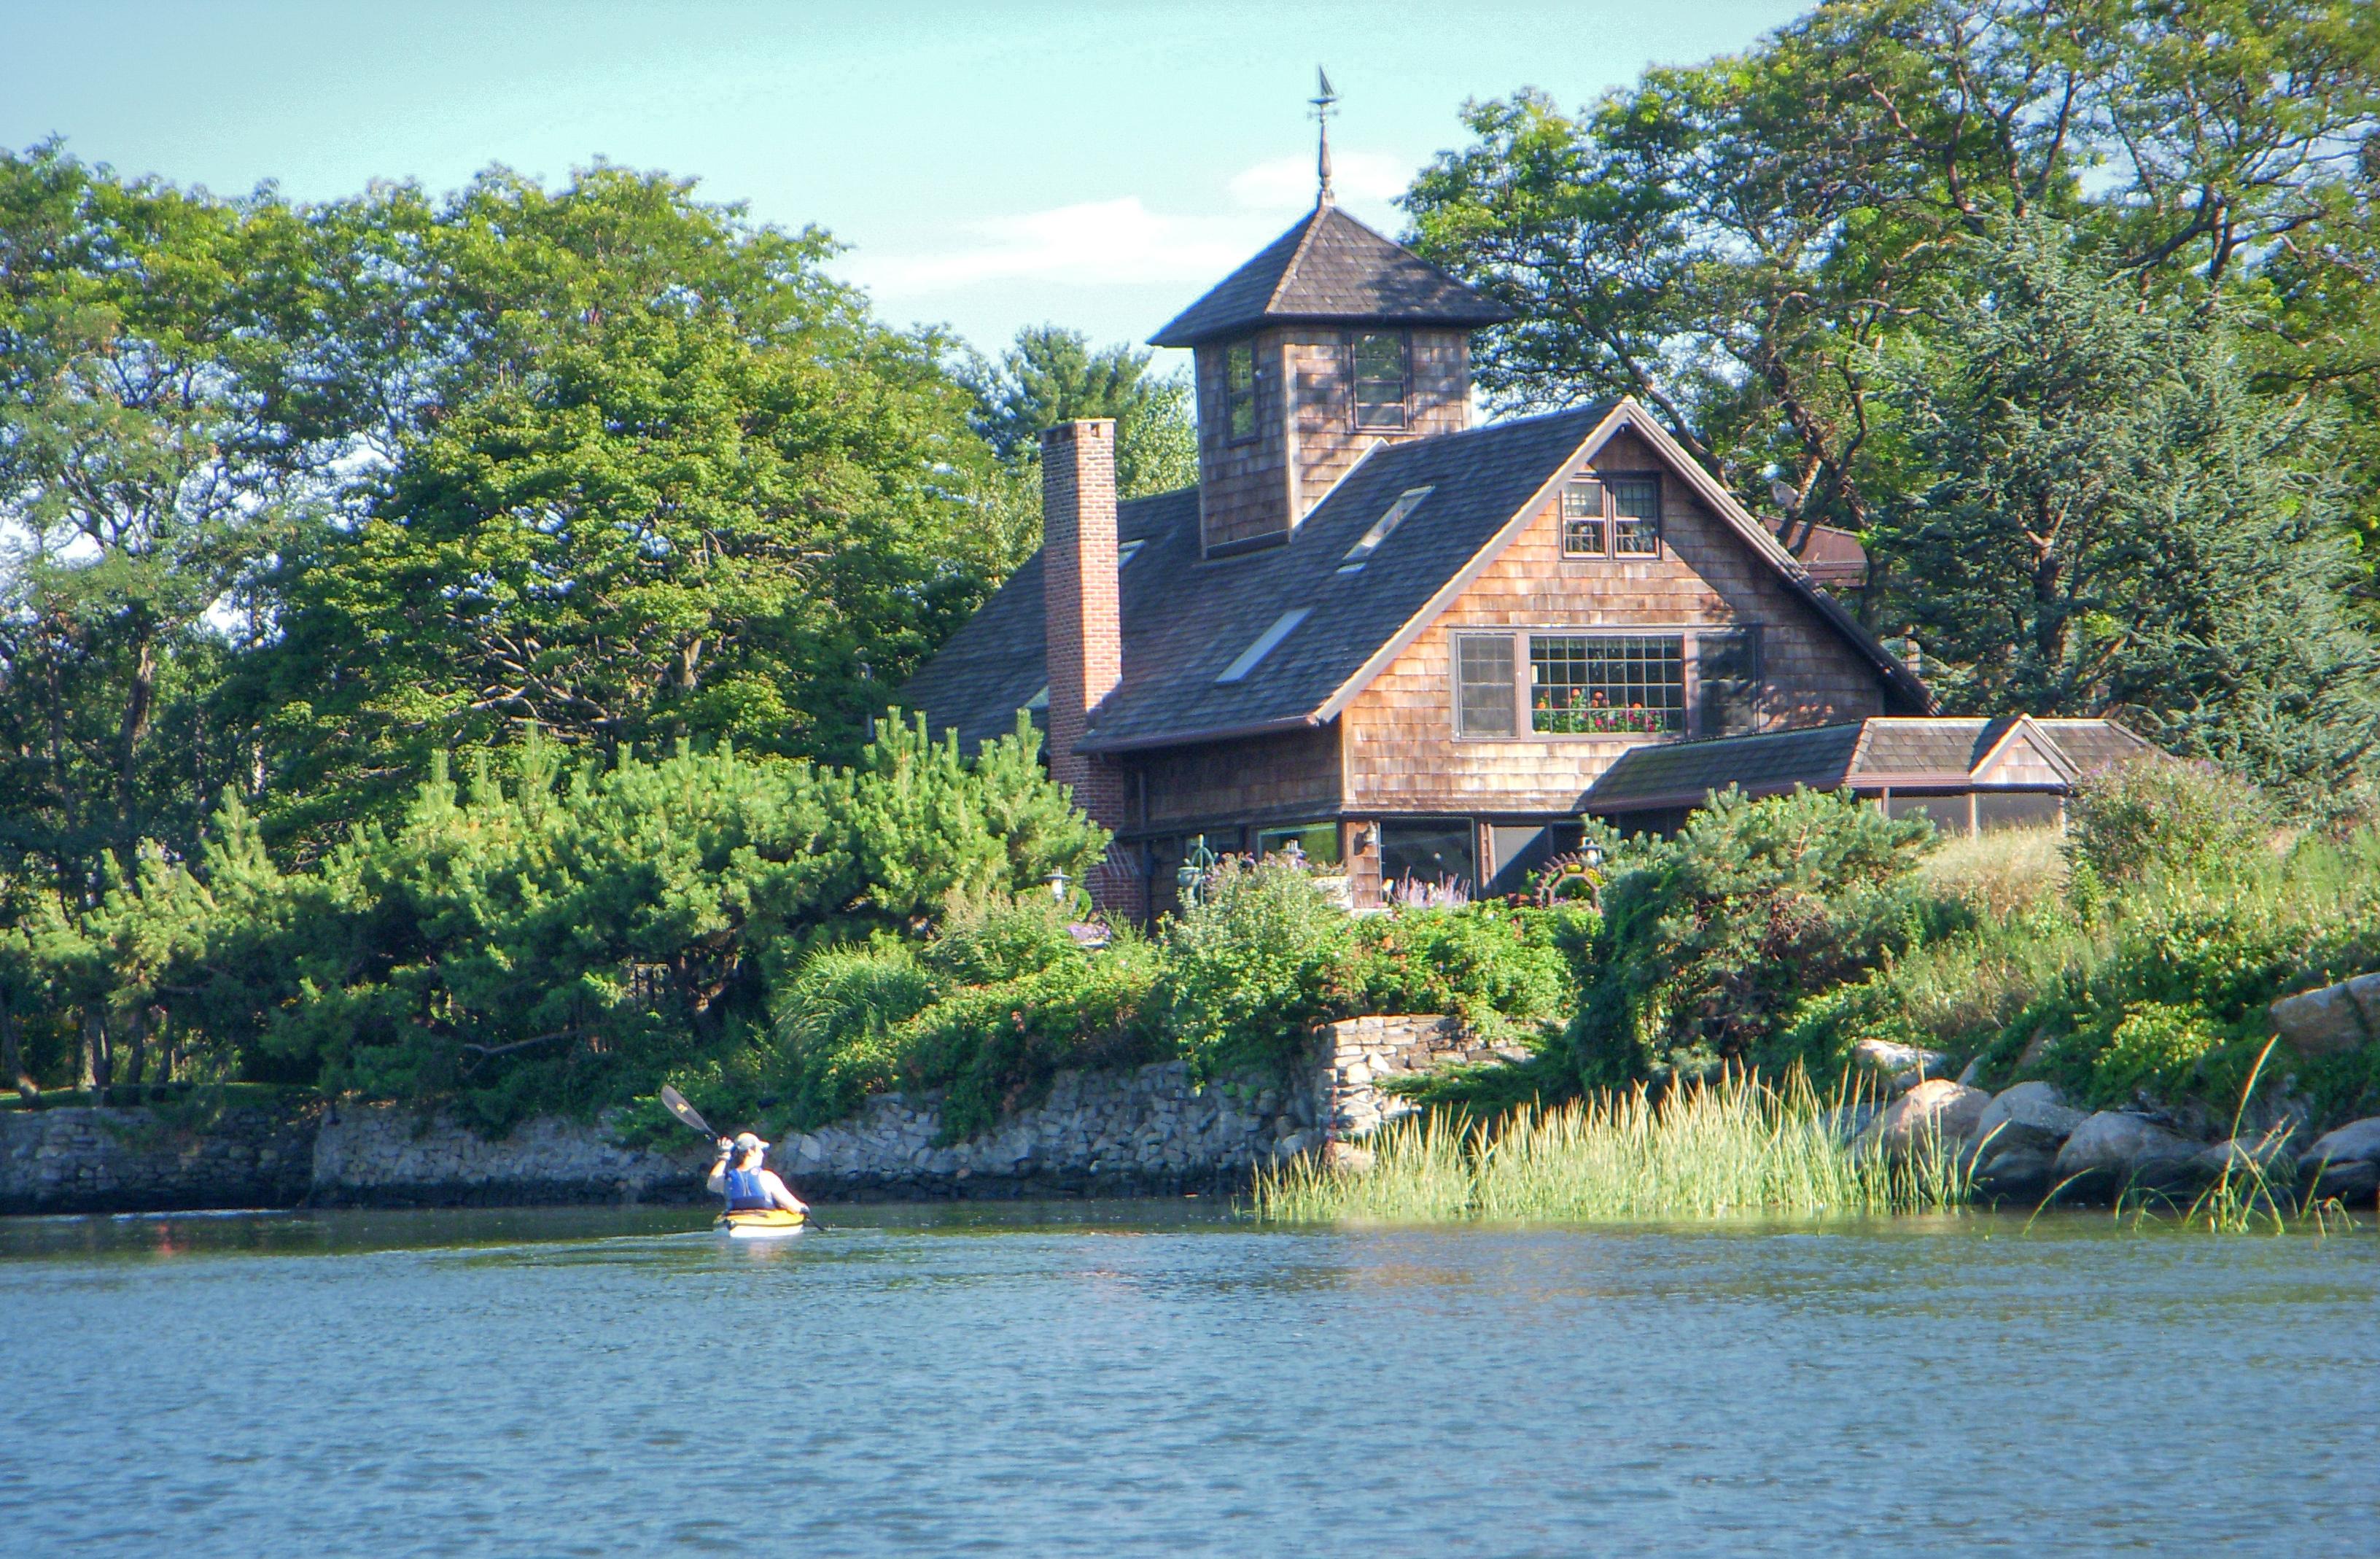
The truth is that many people around the bay have very little idea how their towns look from the water. And those not addicted to examining satellite pictures are often unaware of expansive waterfront properties.
Most water-fronting mansions are shielded from unwanted street views. But all of them are clearly visible from the bay, for obvious reasons. After all, if you can’t see someone’s bedroom window from a kayak, then they can’t see the water either from their bedroom.
An original tidal mill house transplanted from Leeds Pond to waterfront (2010)
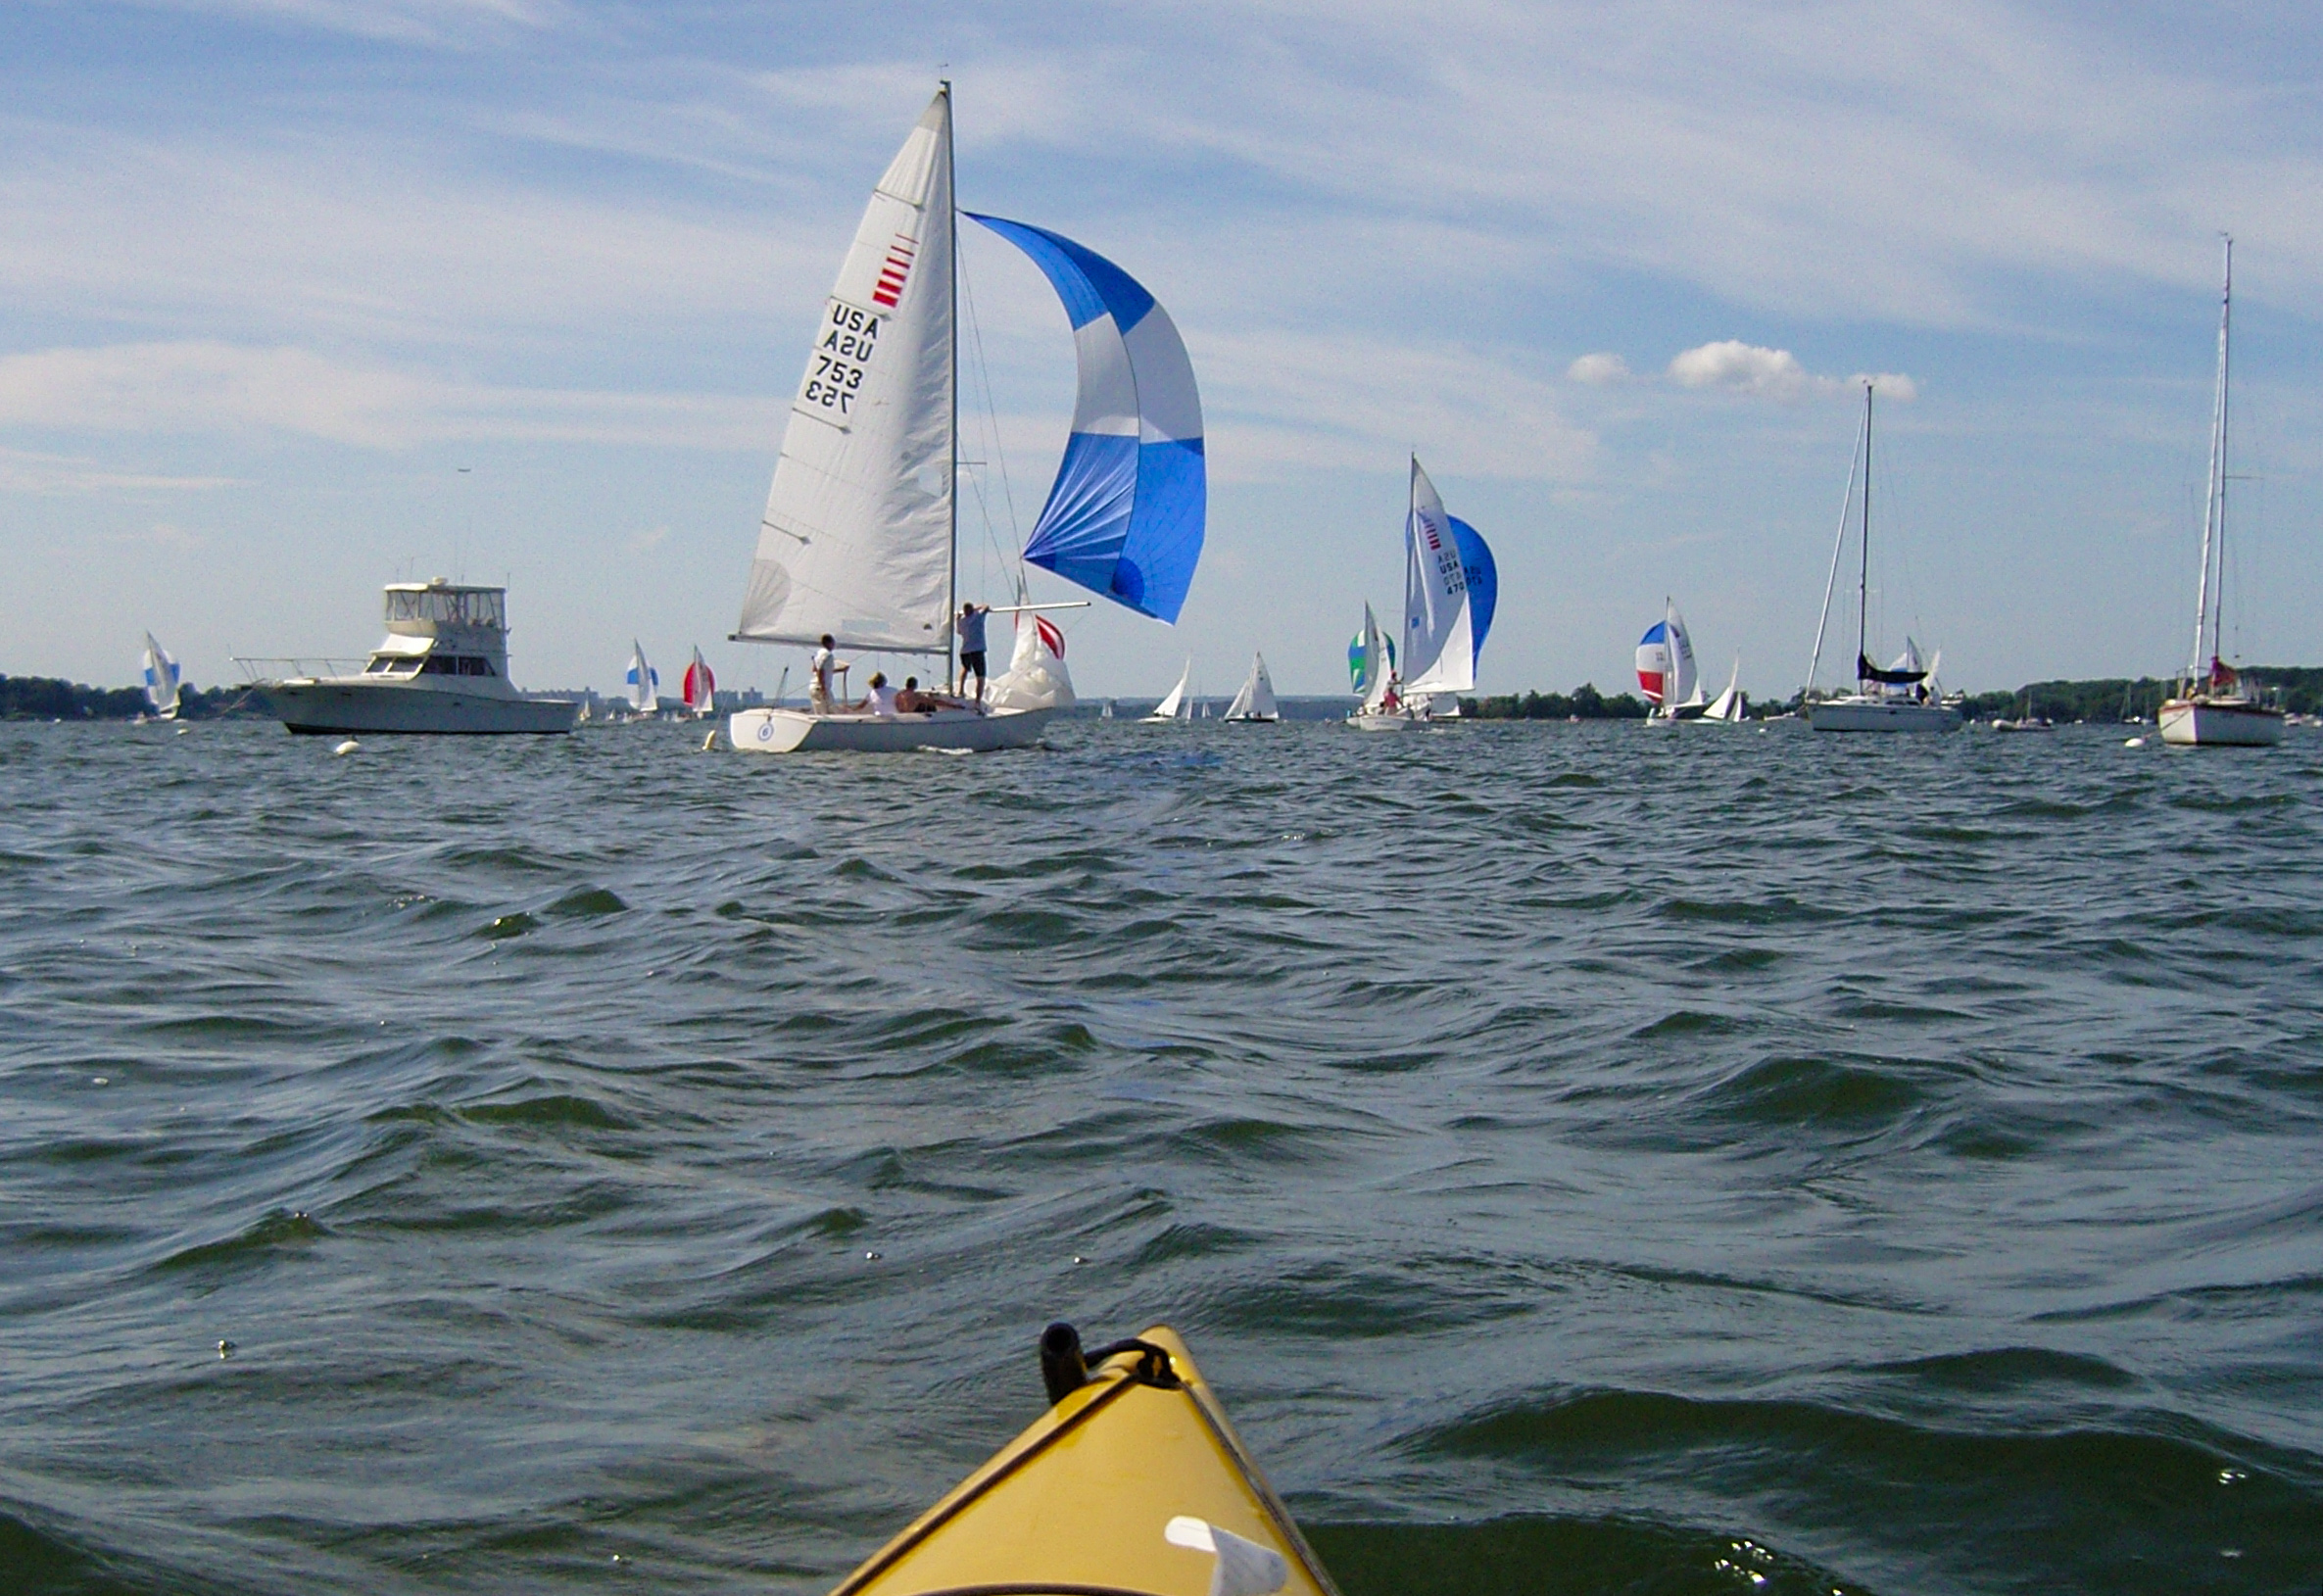
The bay comes alive in summer. Sailboats, kayaks and all sorts of watercraft abound. Yacht clubs hold races that draw sailors from all around the bay, and often beyond.
A sailboat race as seen from a kayak facing the mouth of Manhasset Bay (2010)
I enjoy writing about things I can’t find online. Here I wrote a snorkeling guide to Hanauma Bay for those of us that must obsessively research before our trips. I wish someone had written one before my trip.
Snorkeling at Hanauma Bay in November
This essay would have been much longer if I had not stumbled upon Jordan’s travel blog on Hanauma Bay. You should take a detour and read it first. Watch the narrated video at the top of his blog. Scroll down to look at pictures and accompanying descriptions. He covers almost all basic questions a normal person may ask, including hours, booking a reservation, paying for it, driving to the bay, parking, renting snorkeling equipment onsite, and fish you will find. The blog includes great pictures showing what you may see. You’ll also find majestic views that you unfortunately won’t see in person, unless you were a bird or a drone.
Jordan’s narrated video is also available on YouTube. Go like it and subscribe to his channel. Also read the FAQs on this semi-official website. Find documentation from the park itself which answers even more questions. Come back if there are still unanswered questions on your mind.
If you are still reading, then I assume you are one of us, the chronically-overprepared. Here is a list of additional questions I tried to answer before my trip.
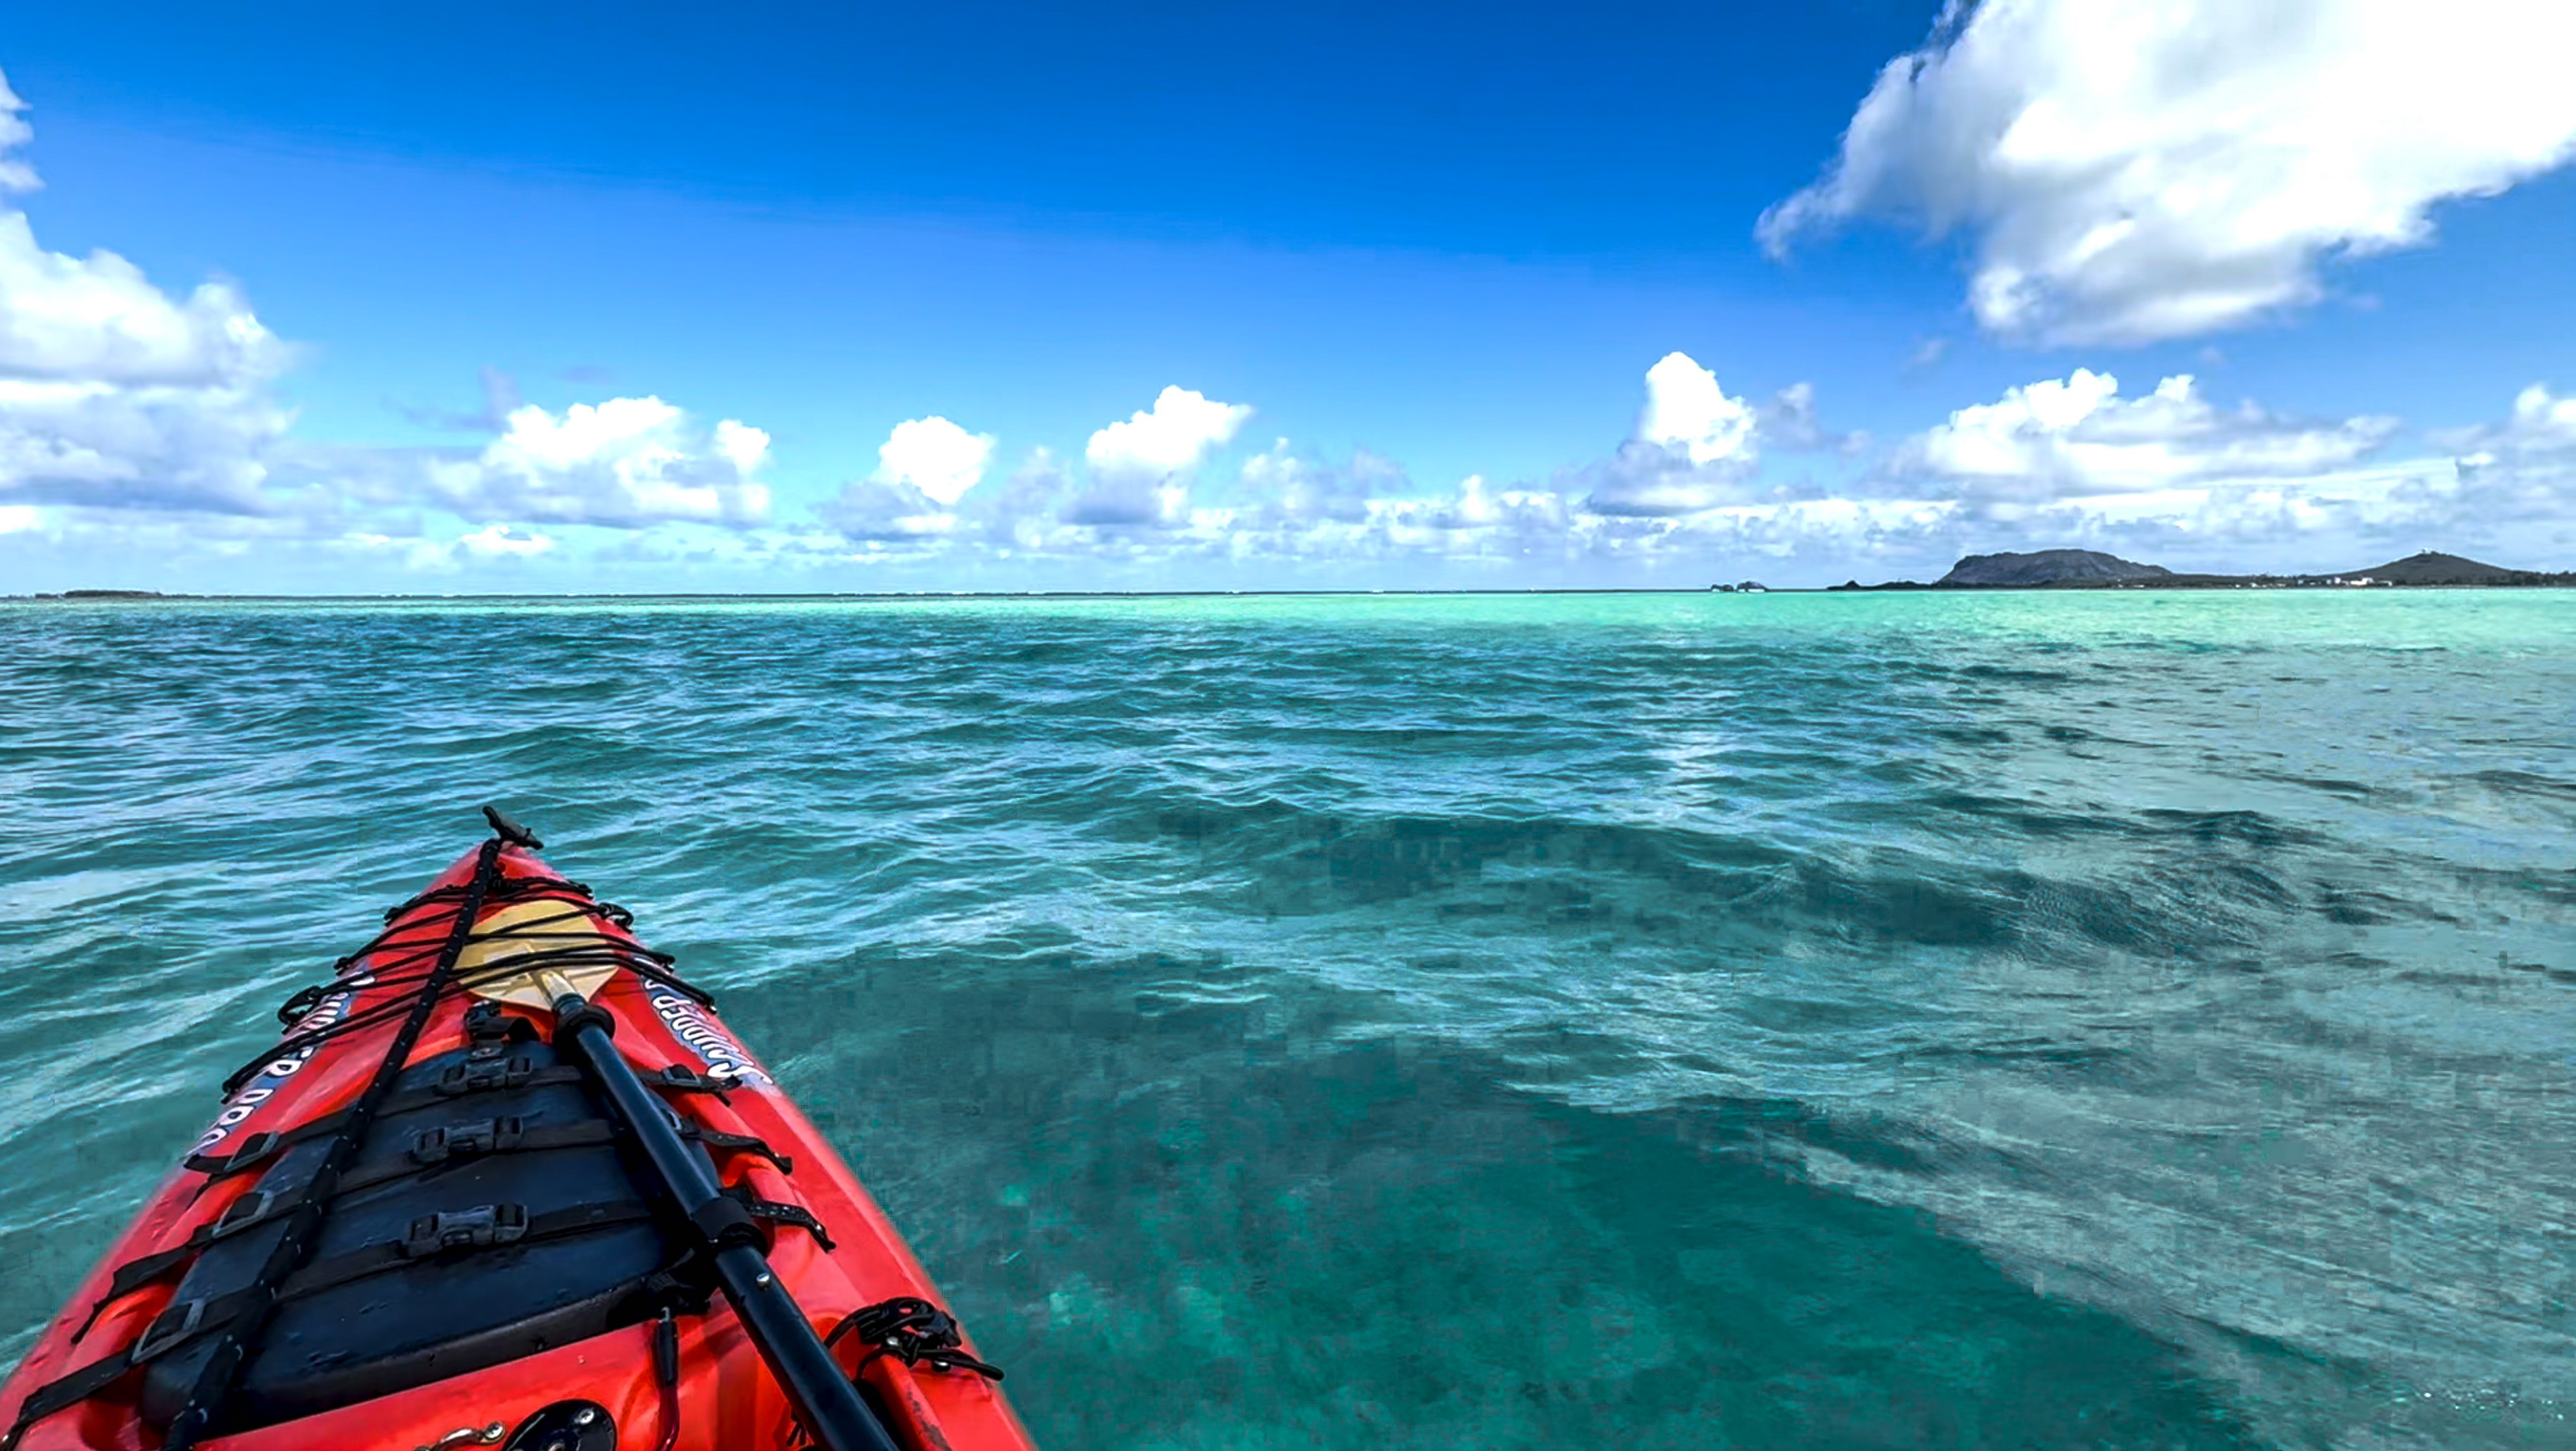
On a windy and rainy day in November, I rented a kayak from Go Bananas, and drove to He’eia Kea Boat Harbor. I launched off towards where I thought the legendary Kaneohe Sandbar would be.
For the entire trip to the sandbar, I paddled alone in a foreboding ocean. Perhaps “bay” is a more accurate description. But from my low vantage point, it looked as if I were in the middle of the wide wide sea under dark clouds. I aimed for Kapapa Island as told. And that was good advice. Because from my kayak, all I could see were breaking waves in every direction, except for that tiny speck of an island in the distance.
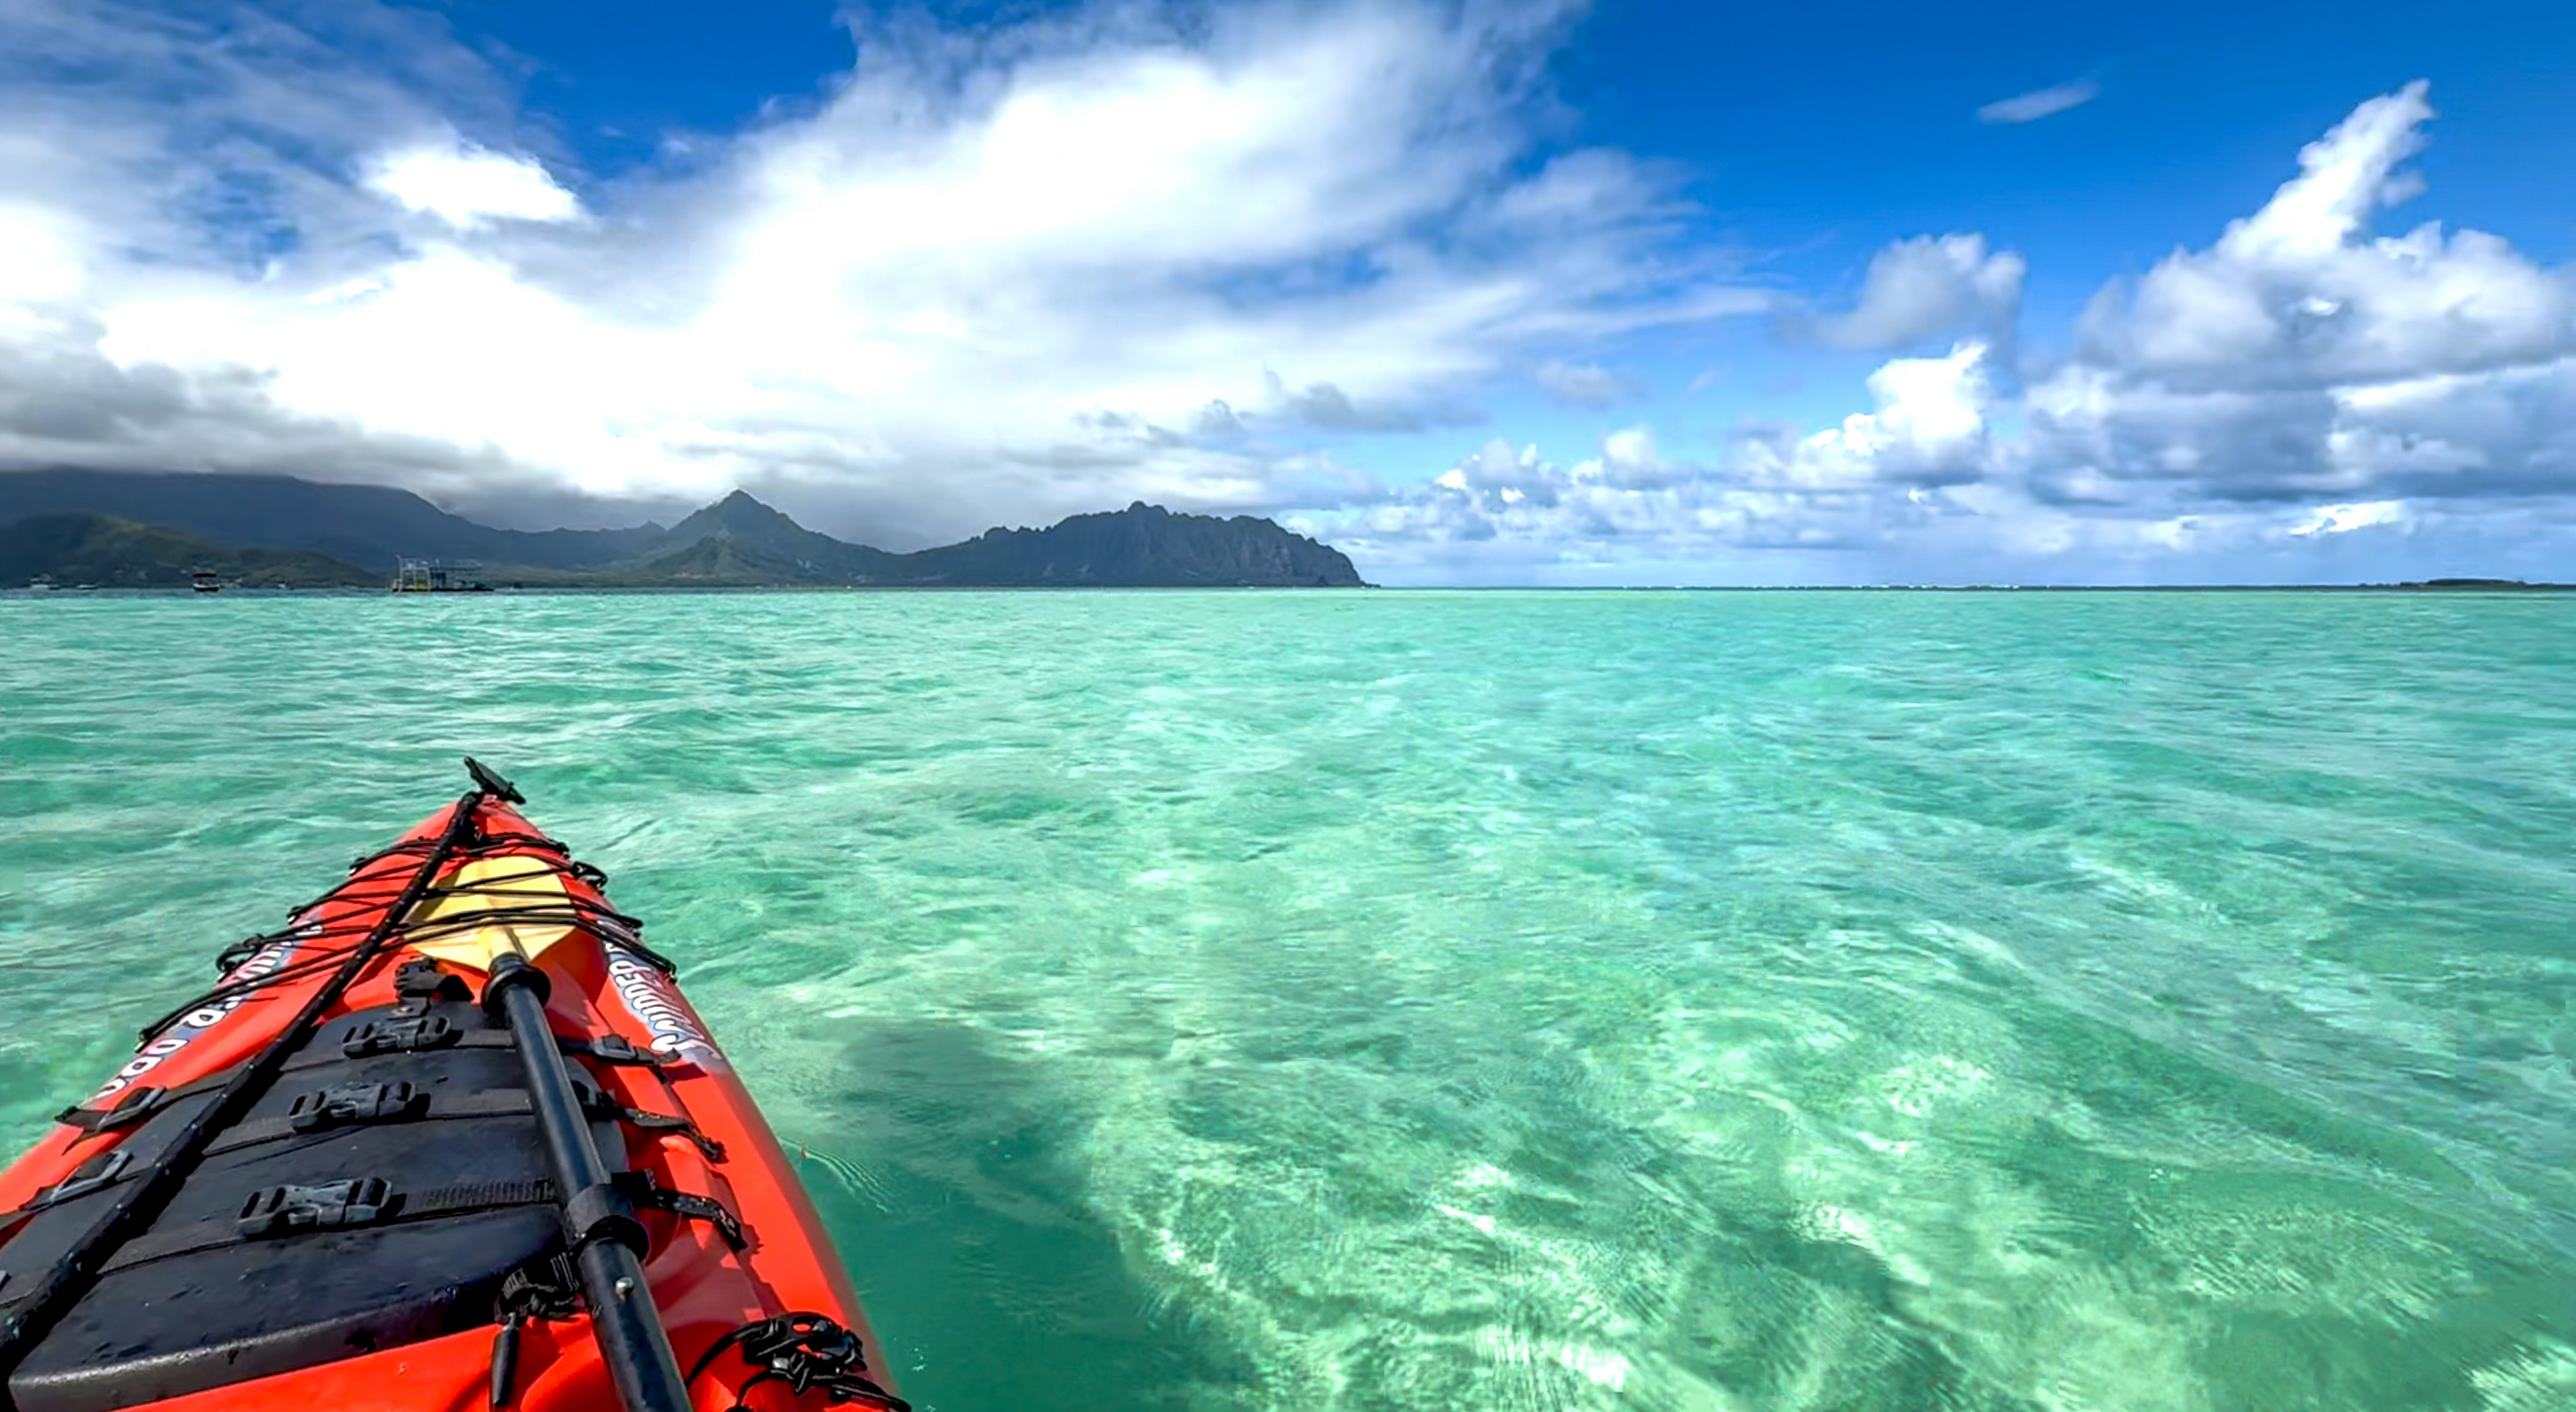
Watching two entire towns being rained on
I kept turning my kayak back towards the harbor, second-guessing the sanity of my choice. I saw dark clouds pouring rain over entire towns. I pivoted back towards Kapapa Island and paddled some more, all the while frightened to the core and utterly alone.
I reached the last boat in sight, hoping to find tourists having a great time. But it was empty, silent and moored in deep water. No sandbar to be seen. I swung back facing the harbor. I again turned towards Kapapa. I kept going.
After what seemed like a lifetime, I sensed a change in water color. Shortly the sun poked its head out from behind clouds. And magic happened. The sea all around me turned turquoise as soon as sunlight touched them, revealing that I was merely a foot above the sand now. I got why this place is also known as the Sunken Island.
Sun revealing at first just a slice of turquoise sea In a second it became clear just how shallow the sea was
I paddled around and found a lone standup paddler lying supine on his board, drinking from his flask. I also ran into a birthday party seated around a half-submerged table. Then Captain Bruce showed up, unloading a bunch of merrymakers who were blissfully unaware of the hardship some went through, to find and reach this sunken island.
Captain Bruce unloaded tourists onto the Sunken IslandTourists mistaking your correspondent for a fellow merrymaker
Now that I know the place, I won’t have any trouble coming back and finding it again. Looking back, I can’t help wondering why I expected an immense sandbar rising above the sea, even though I knew it was high tide. Not being able to find anything jutting out of the dark water really did frighten me.
Then it hit me.
Have you ever seen a picture of the immense sandbar under dark water with the sun behind clouds? Nor have I. That doesn’t quite capture the vacation spirit. Instead you see tourists enjoying the best time of their lives, playing makeshift volleyball on an exposed sandbar under a blue sky.
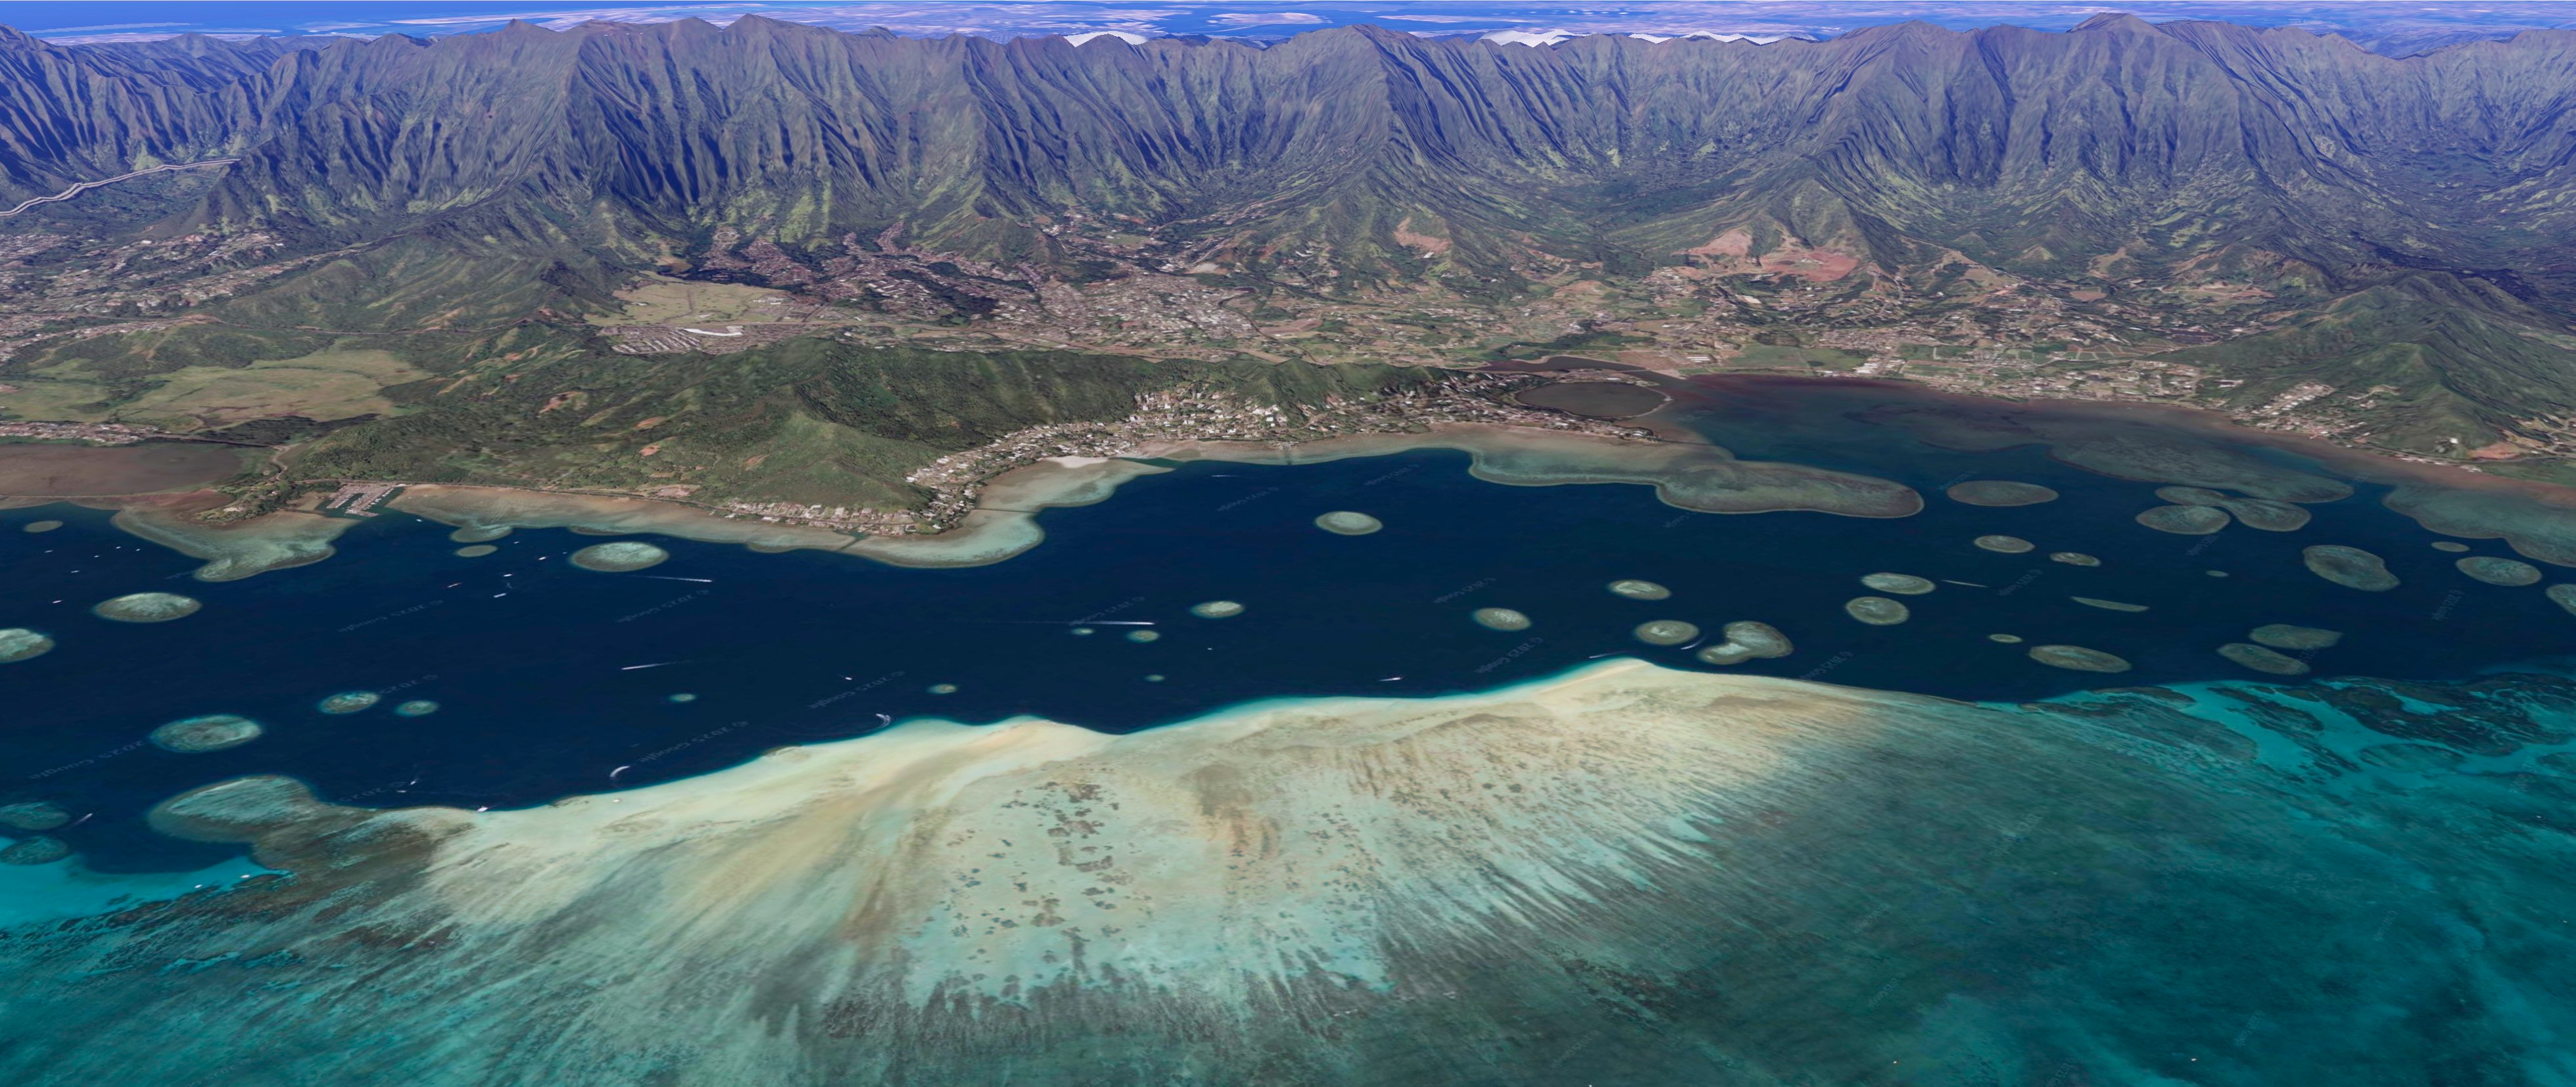
I created two illustrations based on Google Earth to show you the Kaneohe Sandbar at low tide, and then its alternative personality, the Sunken Island at high tide. Yes, you can still see the sunken island at high tide from a helicopter. But the “island” really does disappear beneath dark waters at high tide without direct sunlight, as seen from the low vantage point afforded by a lowly kayak. I wish someone had written this post before my trip. Sigh.
Kaneohe Sandbar emerges at low tide from the ocean (manually-tinted Google Earth image)Waist-height sea conceals the Sunken Island at high tide (manually-tinted Google Earth image)
Read on, if you plan to visit this sunken island. Here’s essential information for a safe and enjoyable trip.
In the year 2025, there are plenty of resources online that answer the question: why does my snorkel mask keep fogging up? Before my 2025 trip to Hawaii, I consulted numerous YouTube videos and Reddit discussions on this topic. Chiefly I wanted to avoid repeating my sub-optimal snorkeling experiences from the 2015 cruise trip and the 2009 trip to Trunk Bay and Caneel Bay. One regrettable aspect of these past trips was that I couldn’t stop my lenses from fogging up when snorkeling, despite having done what I perceived to be adequate preparation.
Mask lenses fog up despite defogging preps
Not surprisingly, today’s online resources are actually worse than in 2009 and 2015. Blogs with insightful resources have gone dark, long replaced by either inaccessible tribal social media, or exceedingly-short clickbait clips tailored to today’s audience. Chiefly the latter peddles quick fixes showing the “hows”, but not the “whys”. The thing is, lens-defogging, like most things in life, follows Tolstoy’s law – that every happy family is alike, but every unhappy family is unhappy in its own way. There’s a long list of things that each alone can fog up your lenses. You need to remediate each and every one of them, to get to the “happy path”.
During my 2025 trip, I finally attained defogging nirvana. I experienced crystal-clear views from my mask for two hours of snorkeling at Hanauma Bay, for the first time in my life. Nobody had told me that this was the norm for snorkeling. One shouldn’t have to stand up on shallow reef mid-snorkeling to address fogs, ever. Until I had this experience, like countless new merrymakers all around Waikiki, I did not regard having to deal with fogging every 5 minutes as anything unusual.
Snorkeling at Hanauma Bay – book early time slots ahead of the crowd
Delta 650 took off from runway 8R at Daniel K. Inouye International Airport due East at 5:15pm local time. Our pilot seemed to have made a point of banking the aircraft to trace the southern coast in the first 4 minutes of the flight to afford those seating on the left side a great aerial view of Sand Island, Honolulu downtown, Ala Moana, Waikiki, Kaimana, Diamond Head, Kahala, Hawaii Kai, Hanauma Bay, and Koko Head. Then the plane turned East again and flew towards the mainland.
Unlike the JFK arrival video I recorded, I was able to recognize all landmarks as I looked out of my window seat. This was largely due to my month-long research into Oahu before our trip to the island. But still, I figured I would write a post showing these famous Hawaiian landmarks. Here is the recorded video.
Here is a map showing the flight path as recorded in the clip. Open the map with Ctl-click or Cmd-click into a separate window to compare it to the video. You can also open the YouTube video in its own window.
Departing flight path of Delta 650 in late November 2025 from runway 8R at Honolulu AirportContinue reading →
I’ve always chosen window seats on flights whenever I could. And I never grew tired of watching my plane take off and land. Possibly I am just fascinated with flying, whether it involves model airplanes, computer simulations, or actual planes. But with only a few exceptional landmarks, I could almost never identify in realtime what the plane was flying over. It amazes me that I can’t recognize locations that should be familiar to me where I’ve driven by countless number of times.
The truth is that aerial views often looks quite different from ground views. Even though I kept thinking that I could mentally reconstruct a god’s eye view of my neighborhood, every landing proved me wrong. And my last trip was no exception. As I the plane readied itself for landing, I looked out of the window and couldn’t tell where the plane was. I put my phone against the window pane for the first time, and recorded the entire landing path.
I played the clip backward at home, and fired up Google Maps with Globe View to rotate its map to match the window view of the terrain. Painstakingly I retraced the flight path backward from runway 22L. This turned out to be the quickest way to reconstruct the landing path. In doing so, I’ve joined a bunch of nerds like Joseph Gunn who document, among other thing, flight paths. In fact, I consulted one of his blog posts on flight patterns to confirm landing paths at runway 22L.
But first, here is the video recording of the landing path of Delta 650 in late November 2025. Can you name of the golf course in the thumbnail? That’s the Wheatley Hills Golf Club. But of course, I had no idea when I looked out the window at it.
Here is a map showing the flight path as recorded in the clip. Open the map with Ctl-click or Cmd-click into a separate window to compare it to the video. You can also open the YouTube video in its own window.
Arrival flight path of Delta 650 in late November 2025 over Nassau County, Long Island, landing at JFKContinue reading →
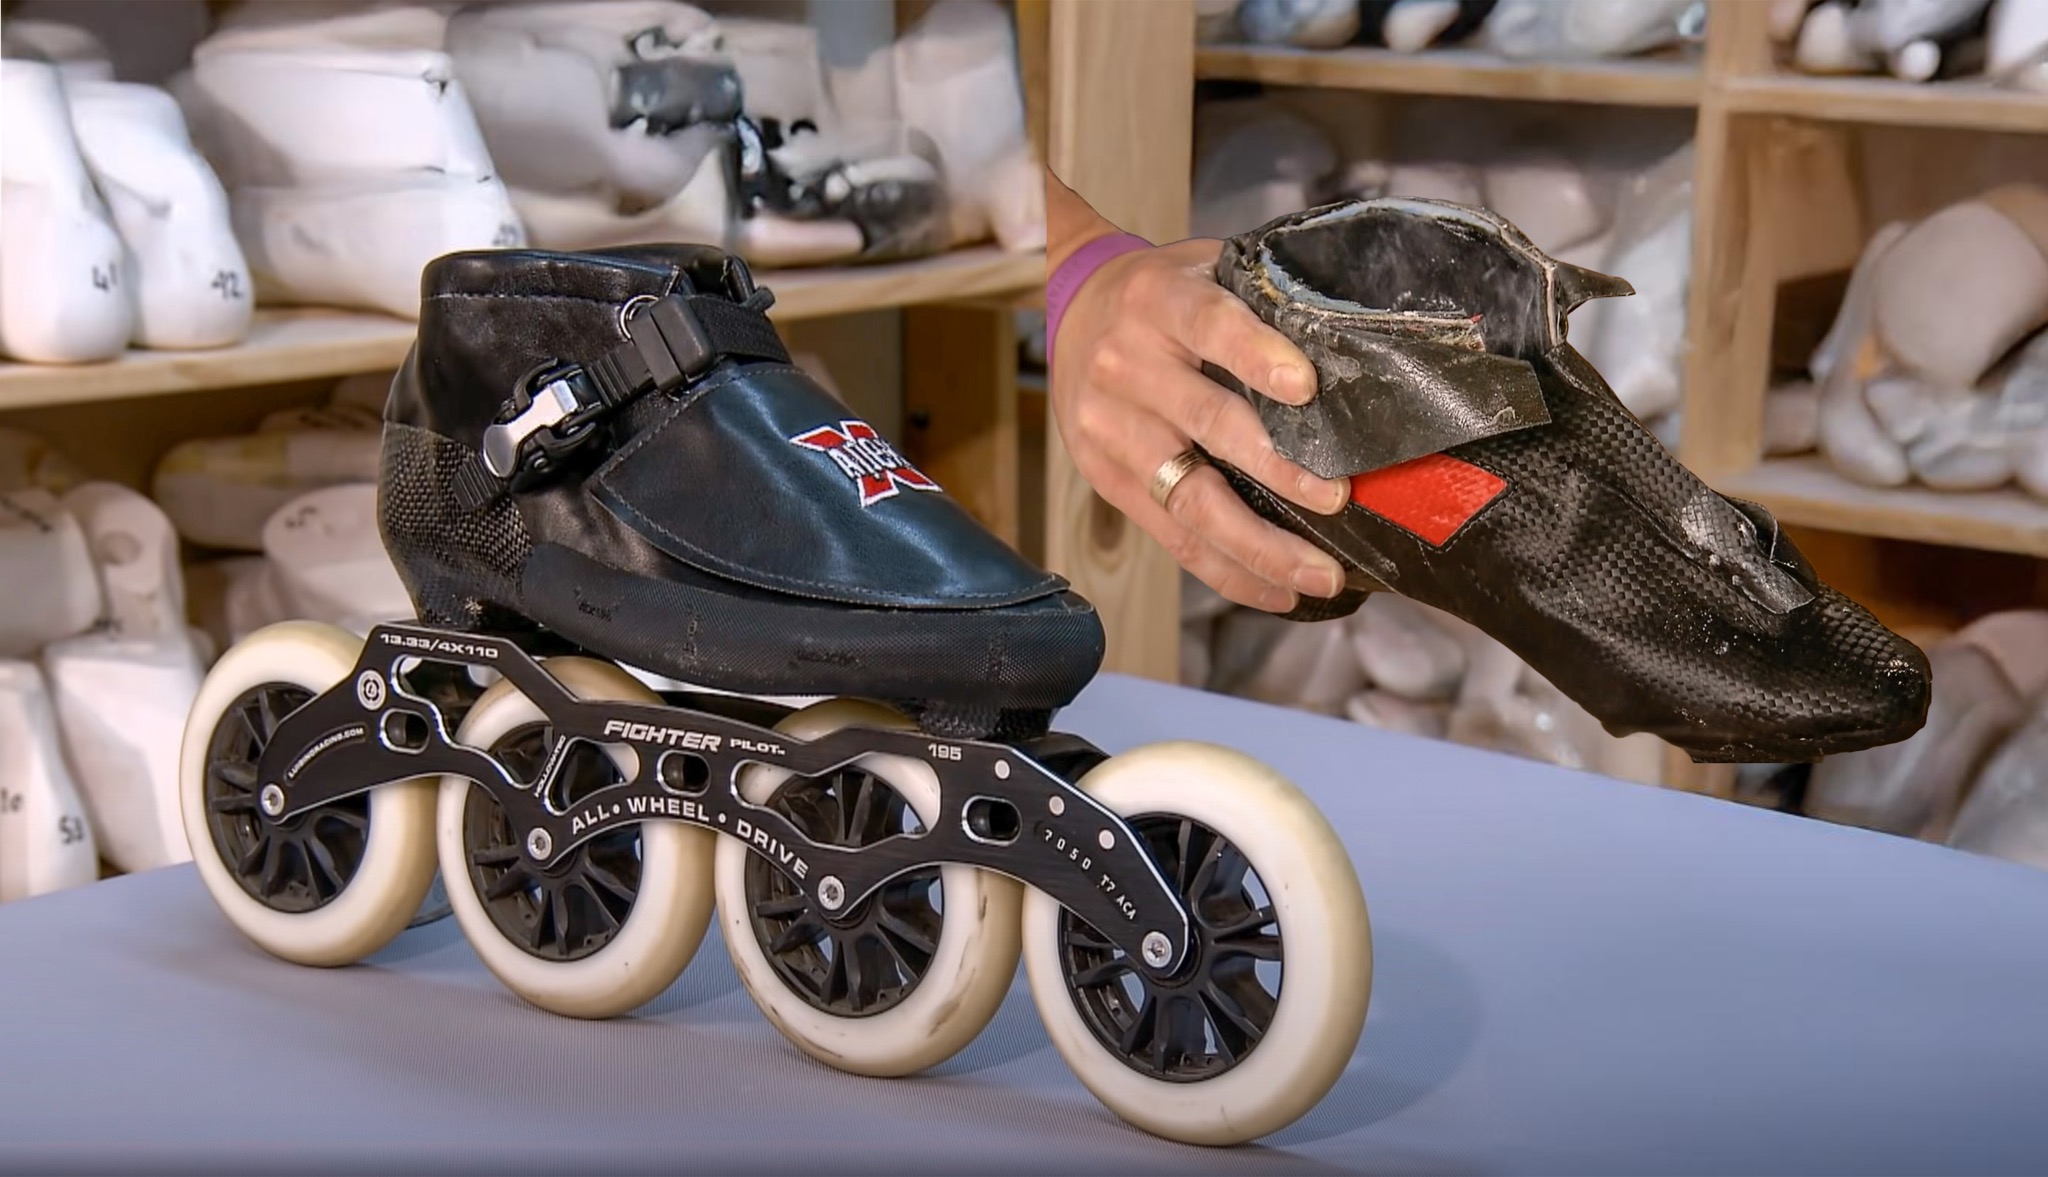
As a postscript to Big Wheels on Carbon Hockey Skates, I mentioned that I discovered Powerslide Reign Ares 100. They look like carbon hockey skates. Yet they’re equipped with Trinity mounts for big wheel configurations, such as 3x110mm. These skates seemingly disproved my assertion that “you simply can’t buy skates with big wheels on full-bodied, carbon hockey shells – they don’t exist“.
I bought a pair of Reign Ares, heat-molded them, and skated on them. I replaced its frame with a Endless 90 Trinity frame, and mounted Undercover Team Blank wheels on them.
Reign Ares with Endless 90 Trinity frame and 110mm Undercover wheels (right)
I’ve examined them, and pondered on the internal structure of these skates for a week now. I’ve done all I could, to divine how they are made, short of cutting my new skates up. I can confidently say that, “they are no carbon hockey skates“.
Reign Ares – carbon hockey skates?
TRUE – the definition of carbon hockey skates
But I love them. I think they are the best answer to my quest to find big wheels on carbon (almost) hockey skates. This long post documents my journey to customize and set up Reign Ares. I turned them into the right big-wheel skates for me, for urban marathons such as Wednesday Night Skate NYC.
Reign Ares with 276mm Endless 90 Trinity frame, and 110mm wheels
A few weeks ago I set out to write a short article on my quest to get Big Wheels on Carbon Hockey Skates. I organized pictures taken during the quest for illustrations. And I realized there were enough materials to address all topics on which I found no information online, during my quest. So here is the first installment. It’s quite long. Enjoy.
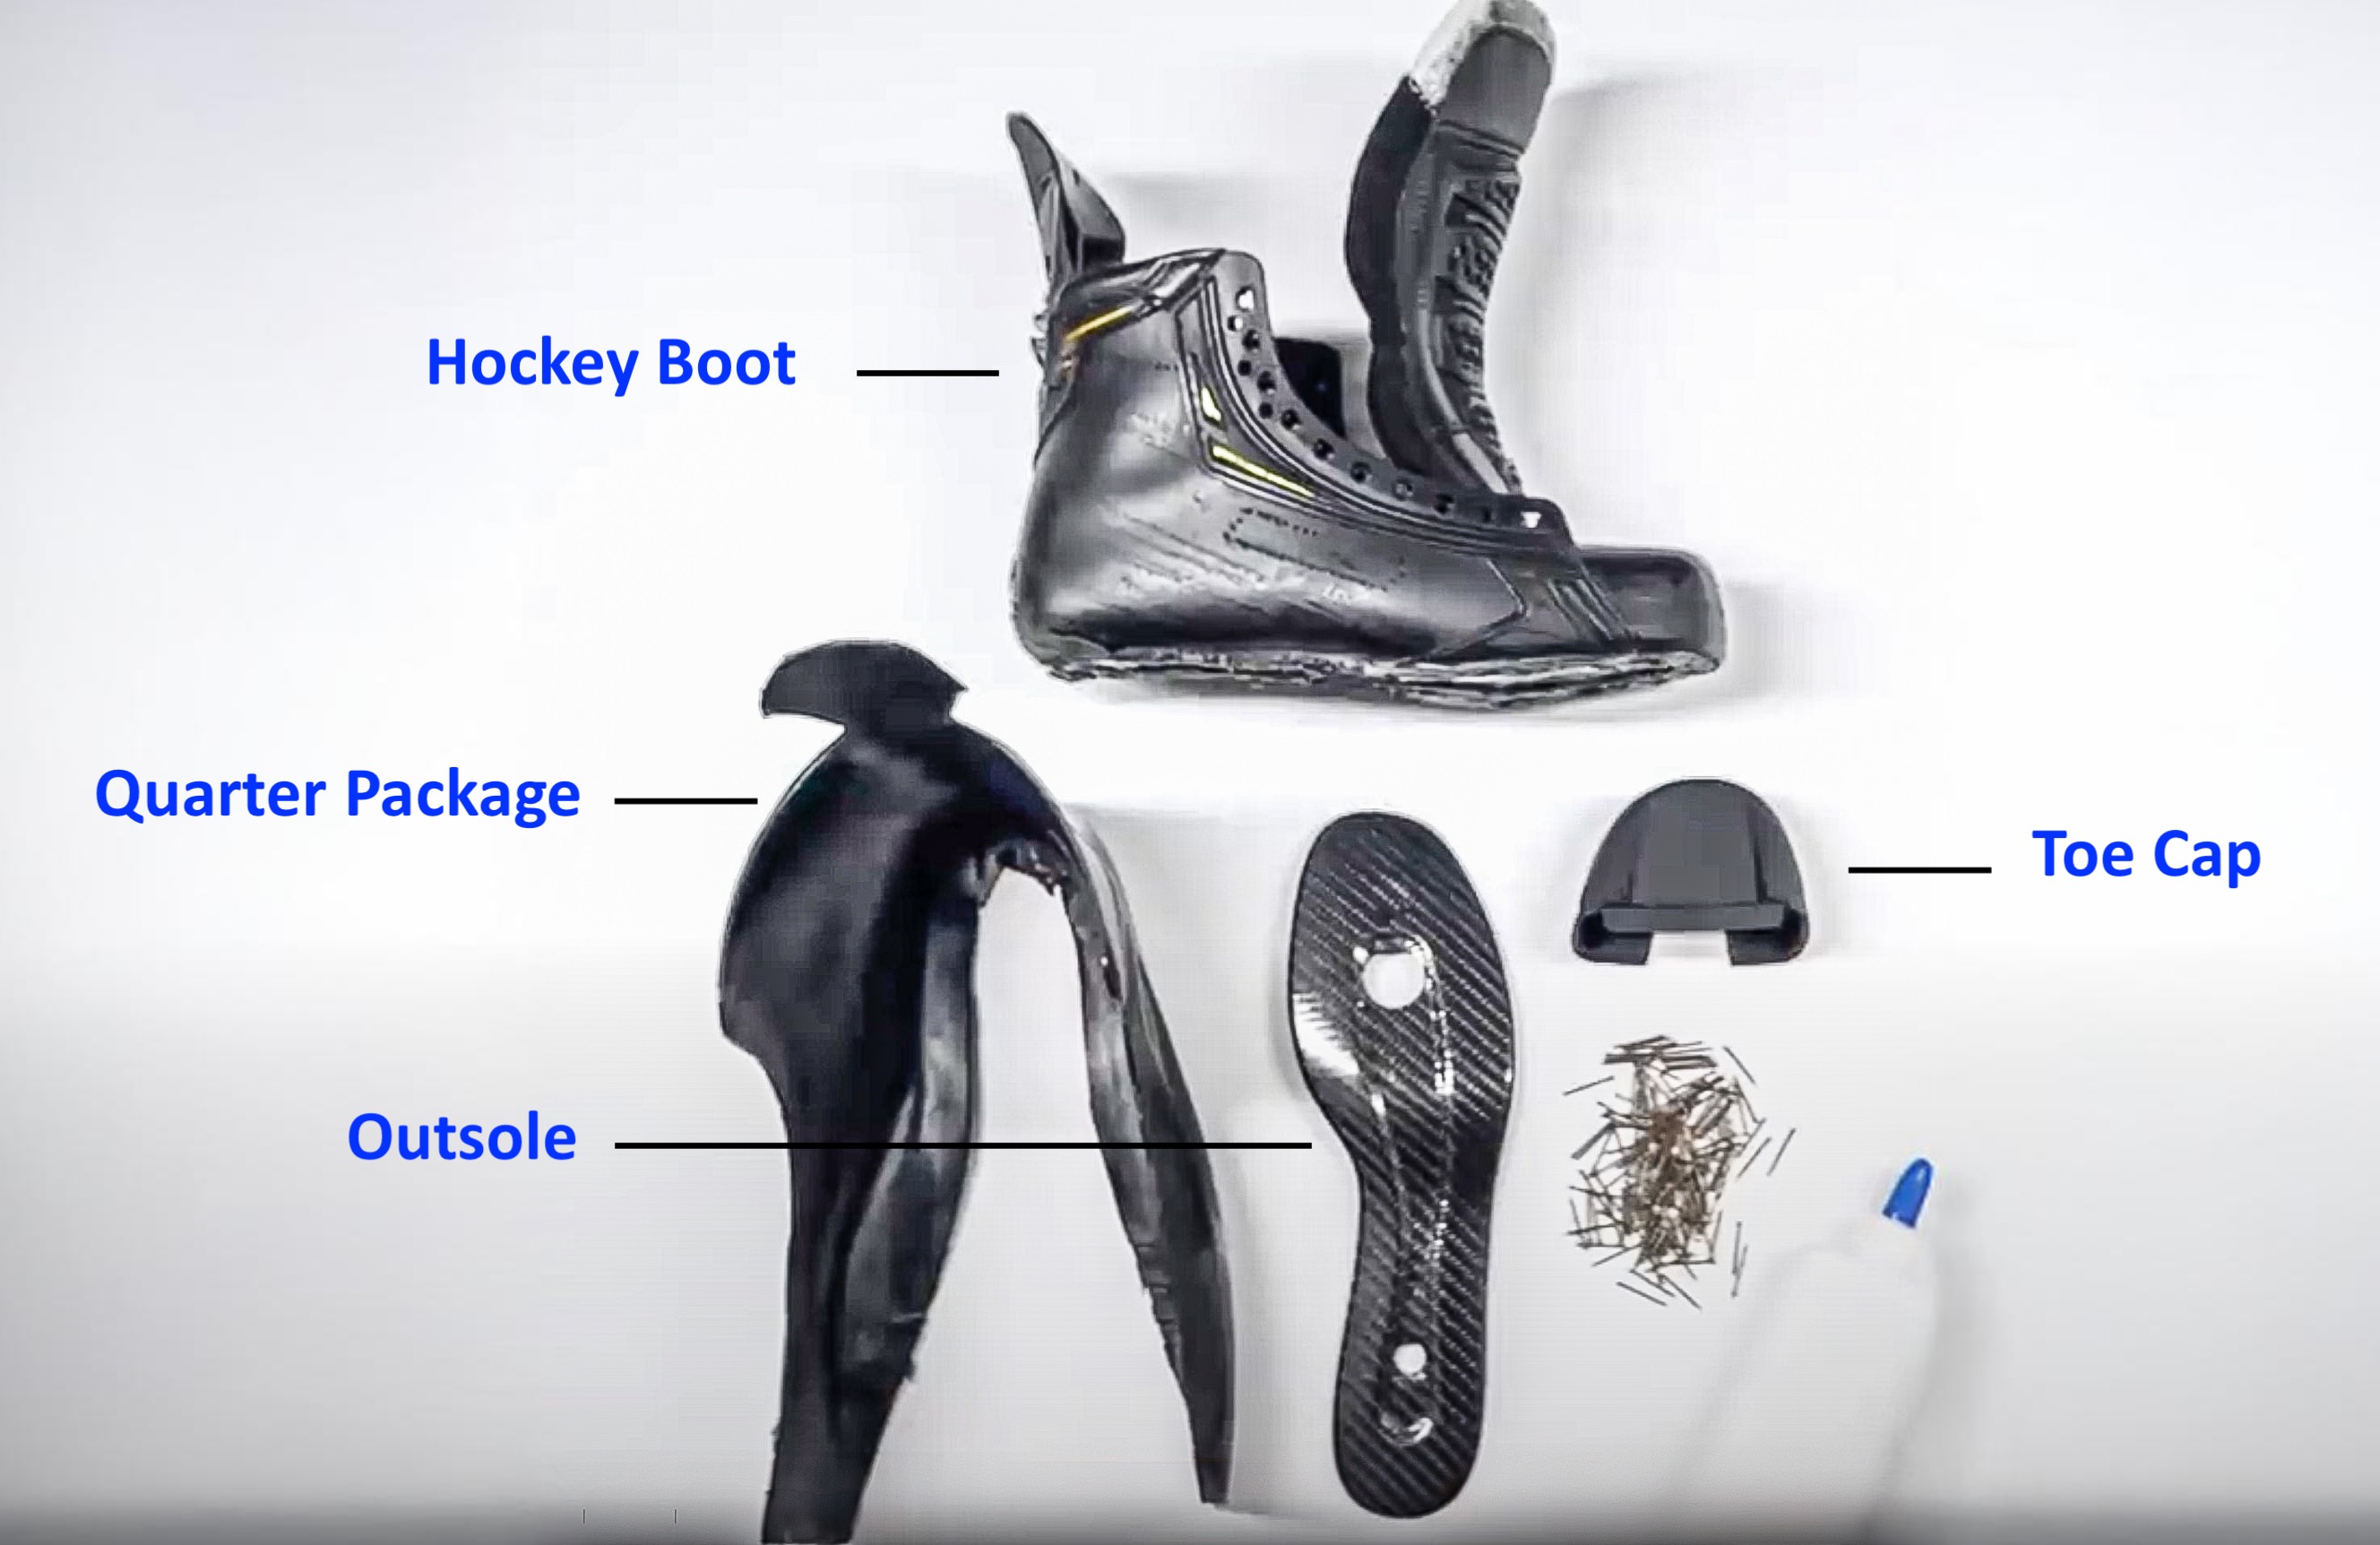
Most carbon-fiber skates today are advertised as a one-piece boot construction. That’s a bit misleading, because clearly the entire skate boot is not formed from a single piece of anything. All that has happened is: manufacturers took two or more parts of a boot, and turned just those parts into a single, one-piece shell, made of carbon fiber-reinforced polymer.
For hockey-style skates, the construction of this one-piece shell is similar for both ice hockey and street hockey (with inline wheels). Following is an illustration of this shell with respect to the other parts of the boot.
Before the advent of one-piece carbon shells, parts of the traditional quarter package, and the outsole would have been made separately. These were then pinned, nails or otherwise glued together with more parts, into a full hockey boot. Nowadays folks refer to this traditional construction as a two-piece boot, because you build the quarter package and the outsole independently. But of course, the entire boot isn’t made from these two pieces alone. But now you see how the “one-piece” and “two-piece” terminology arose from combining the outsole with parts of a quarter package.
To better understand one-piece boots, it helps to first understand how traditional skates were made before the advent of today’s carbon fiber boots. The following video details the process of making traditional skate boots. The same boot is used for both ice hockey and street hockey.
Three types of carbon skates
There are at least three types of carbon-fiber inline skates on the market. So far we’ve been talking about hockey-style skates, hereafter referred to as just hockey skates. Both ice hokey and street hockey share the same carbon shell construction. The picture shown bellow illustrates a typical example. This is from TRUE Hockey, and they call their one-piece carbon shell a monocoque shell, leveraging a well-known term from the car industry.
TRUE Hockey Skates, model TF Pro Custom, with a monocoque (one-piece) carbon shell
I refer to the second type of carbon-fiber inline skates as urban skates hereafter. They are widely popular with people doing slalom skating, freestyle skating, and urban street navigation. For these activities, direct power transfer and firm support for the foot and the ankle is key. These goals are not too different from those for hockey. But for reasons I will elaborate in a future article, the market diverged in the 1990s into two separate design directions. Today, the carbon shell for urban skates is exemplified by the Powerslide Tau shown below. This type of urban skates are referred to as hybrid soft boots, to differentiate them from hard boots and traditional soft boots.
As you can clearly see, these two types of shells are not equal. One covers a lot more areas around a foot, compared to the other. In one, eyelets are punched through the single-piece shell which covers parts of the shin and instep. In one, all of the ankle and parts of the calf are firmly supported by the same single-pice shell. That’s of course the hockey carbon shell. As for the urban carbon shell, only the heel and the sole are supported.
There is a third type of carbon-fiber inline skates, the speed skates. They are in many ways like hockey skates. For one, the same carbon shell construction applies to both ice speed skates and inline speed skates. The shell covers a larger area of a foot, like hockey shells. For instance, eyelets are punched out of the shell directly. In fact, it seems that carbon shells originated with speed skates, before other skating disciplines adopted the same. But you will notice that speed skates don’t have a shaft at all. The collar of the boot barely covers parts of the ankle of the skater.
Speed Skatesfrom Apex with a one-piece carbon shell
At the moment I don’t care about speed skating. So this article will cover only hockey shells and urban shells. One would not cruise urban streets on speed skates. And only the crazy would attempt to slalom around cones on speed skates.
Your foot in a carbon hockey skate
This is your foot. Meet your carbon-fiber hockey shell.
Foot meets carbon hockey shell
This is your foot inside a carbon hockey shell. The second picture illustrates how the shell is almost the entirety of the skate boot, minus top part of the toe cap, tongue, and tendon guard. All eyelets are punched out of the one-piece carbon shell. You can never tear eyelet washers from this skate. The lower shin, the ankle area, and the instep are completely locked in by the carbon eyelet tabs, as long as you lace your boot properly.
Foot in a carbon hockey shell
Foot in a carbon hockey skate
In most skating situations, one would adopt the athletic stance, bending the shin at the ankle by some 15° forward, as shown below. The ankle bones may shift a little between the straight stance and the athletic stance. The ankle area of the carbon hockey shell accommodates for this by punching out the ankle areas into domes. In the case of TRUE skates, they are molded roughly to your 3D model, and made perfect by heat-molding after you receive your skates. As a skater pivots their legs at their ankles, there are no other parts interfacing with the leg, except for the carbon shell, through its heat-molded liner.
Athletic stance in a carbon hockey shell
Athletic stance in a carbon hockey skate
One can almost entertain the idea of skating on a carbon shell without bells and whistles. It is almost possible to attach a frame to a carbon shell, and then skate on it with just eyelets and lacing. Of course, lace bites will make the experience somewhat painful, seeing how there is nothing cushioning the shin and the instep.
I’ve been skating for a while on inline hockey skates with 80mm wheels. These are normal-sized wheels popular since decades ago. I actually have a hi-low setup with 76mm and 80mm wheels. But for the purpose of this article, treat them as so-called “4×80” setup – meaning that the frame of each skate houses 4 wheels of 80mm diameter.
Inline Hockey Skates with normal 80mm wheels in a 4×80 setup
But they are no good for marathon skating like folks do at Wednesday Night Skate NYC. I got leg cramps most of the times, and I’ve never been able to finish an entire night skate. Lack of stamina obviously played a role. But I did note that a large part of the crowd sported big wheels. Some had skate boots on four 110mm wheels, and some had three 125mm wheels.
After some research, I decided to get myself a pair of skates with a 3×110 setup. It seemed like three 110mm wheels allowed for sustained high speed skating with less labor. And at the same time, it still gave me the ability to maneuver in an urban setting. With practice, presumably I would be able to resume wizard skating on this setup as well.
I already had a pair of TRUE hockey skates. They were custom-molded with a monocoque carbon shell, built to 3D models of my feet that my local Pure Hockey store scanned. What I wanted was to put an Endless frame with three 110mm wheels, on these TRUE hockey boots. I just wanted to mount a different frame and different wheels on them, as shown below, in an imaginary image I stitched together for your viewing pleasure.
This fantasy skate doesn’t exist
This would have been glorious. Just look at the comparison between the run-of-the-mill TRUE hockey skates on the left, and the 3×110 fantasy version on the right.
4×80 on the left, and a fantasy 3×110 version on the right
This fantasy setup was not meant to be. It turned out that nobody makes carbon-fiber hockey skates that take big wheels.
I had to settle with non-hockey boots instead. I did mount an Endless 90 frame on this alternative, with three 110mm wheels, as shown below.
By “carbon shell hockey skates”, I mean a one-piece shell that covers far more than just the sole and parts of the ankle. Look at the TRUE monocoque “hockey” shell shown below, compared to most so-called carbon shells of “inline” skates on the right.
Actual TRUE monocoque “hockey” shell on the left, vs Powerslide Tau- and HC Evo-like “inline” shell
You simply can’t buy skates with big wheels on full-bodied “hockey” shells. They don’t exist. I am still puzzled by this unexpected void in the universe of all possible skate setups.


