
I saw someone skating an amazingly graceful move at the Bryant Park ice rink last Christmas. Until then I wasn’t really interested in ice skating – figure skating wasn’t for me, and hockey looked too violent. But this amazing freestyle move shocked me, and made me buy a pair of ice hockey skates, to started to learn it.
First, I had to find out what this move was called, before I could learn it. And finding it online proved to be nontrivial. First, there was scarcely anything written about it online for one to find using words. Also, nobody bothered to piece together still frames into a stop motion sequence of images, until I did, so Google image search didn’t work very well either. Finally, after sifting through endless ice skating videos on YouTube, I found it. It is called the Grapevine move. And this Grapevine tutorial video shows it in its full glory at the end.

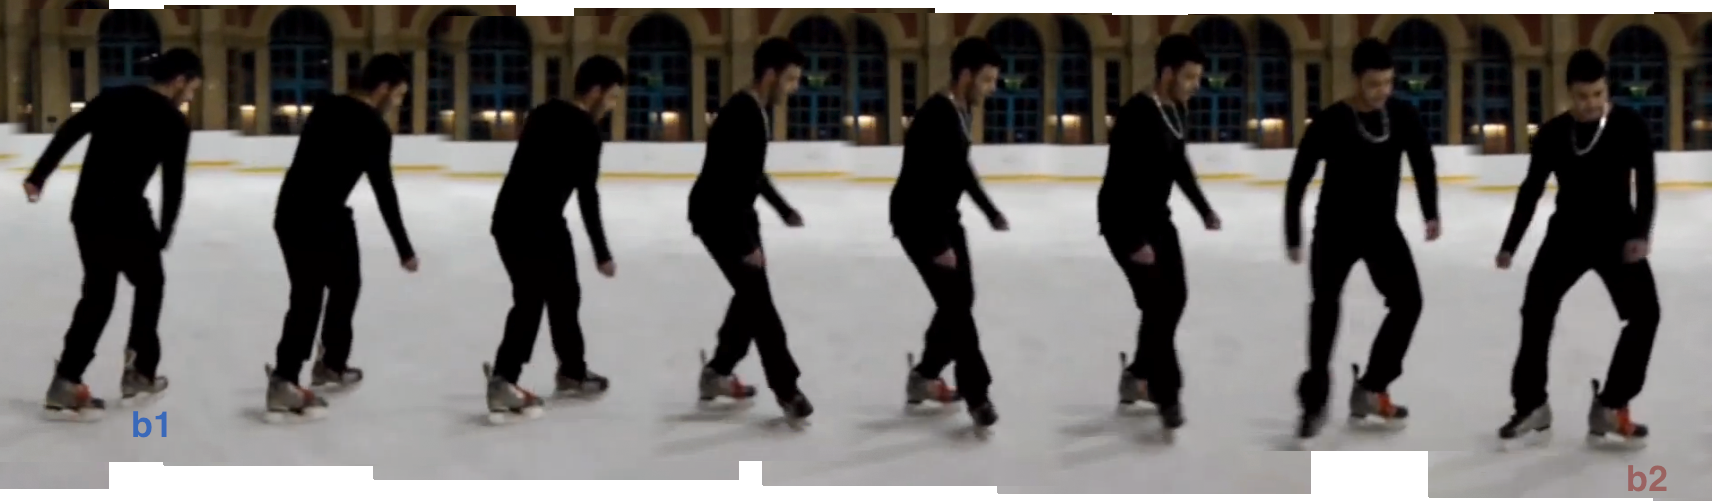
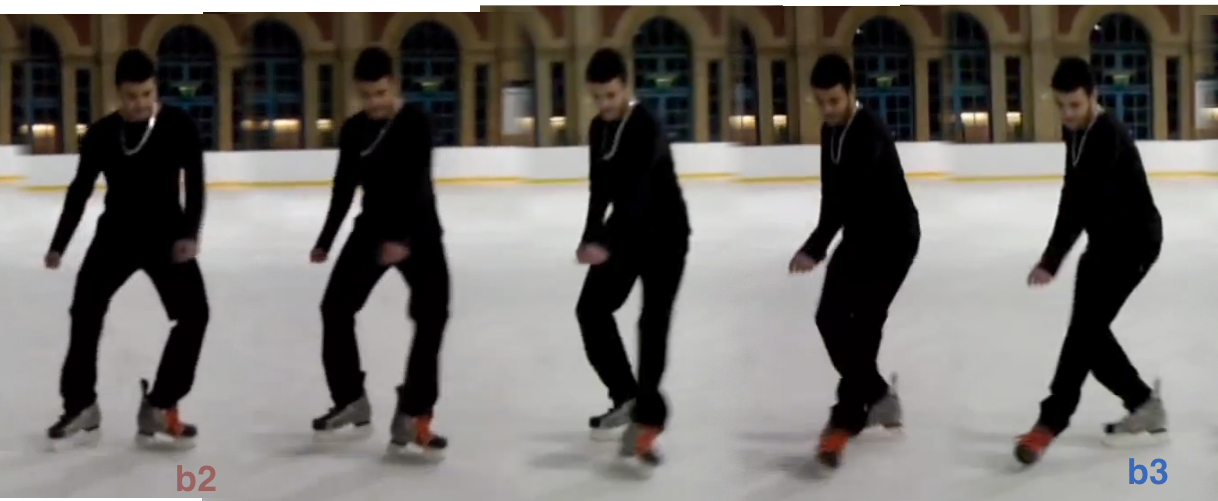
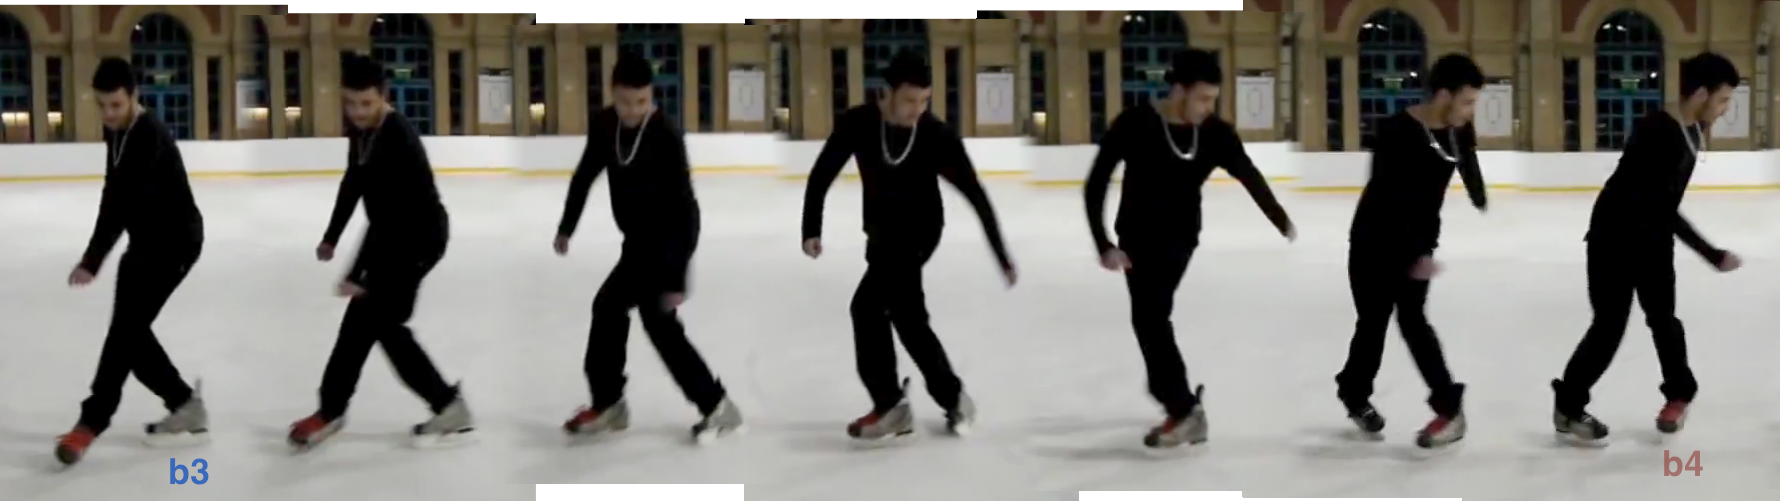
Stop motion picture of Jordan skating the Grapevine stitched from the Hockey Tutorial video
Grapevine is a classic skating move skated exclusively on outside edges, which when done to perfection appears to an onlooker as if the skater had Jackson’s moonwalk power, and could magically propel herself indefinitely in a straight line while constantly turning forward and backward, and with both skates on the ground at all times without showing signs of any efforts to push herself onward.
So I took to the rink and tried to practice the Grapevine based on the tutorial video mentioned above. It turned out that one didn’t simply jump from barely skating forward without falling, to being able to execute the Grapevine. Many other skills of intermediate difficulty had to be learned and practiced, before one could skate a recognizable Grapevine. That great video tutorial gave me a false sense of achievability by breaking the move into seemingly effortless segments. What the author didn’t tell you was that he assumed that the learner was already an accomplished figure skater or hockey player, and just wanted to dabble in some freestyle fun. He took it for granted that no toddler would try to run the 100-meter dash at the Olympics.
I tripped, and I fell as I tried to Grapevine. While brooding over my failure on the bench, I watched others skate. Then I started to imitate how they skated, and I watched hockey tutorials online. Every time I learned a new basic skill, I found I could do a part of the Grapevine slightly better. Eventually I understood what skating was all about: the edge, leaning into the edge, the posture, the balance, and most importantly the use of posture to transfer balance from one foot to the other.
Here is my account of how I (almost) learned to skate a two-foot move such as the Grapevine. I am going to describe the learning process in a new language of moment of balance, falling and recovery, unlike how most tutorials explain the move. Perhaps I can provide fresh ideas on learning this move, on two-foot skating and on skating in general, from the perspective of a newbie. I have watched and re-watched countless number of tutorial videos, and have bought and read great books on ice skating written at the turn of the last century. And in analyzing skating and the Grapevine move for this article, I found that I now understand what I was doing wrong, and perhaps can finally learn to Grapevine gracefully.
Update 2021-09-20: I wrote a follow-up article to this one, for inline skaters: Learn the Two-foot Grapevine on Inline Skates.
Basic Skills
Grapevine involves skating both forward and backward. So these are prerequisites. I heard in all hockey tutorials: “bend your knees, flex your ankles, and stay low.” I heeded the advice, and it served me well. I found that basic training in figure skating tutorials appeared to focus exclusively on having trainees stand tall and good-looking. I ignored these – I was not figure-skating.
Grapevine is skated exclusively on the outside edge once a skater masters it. So one must understand what “the edge” means to skating (hint: everything). And one needs to be able to do crossover effortlessly both forward and backward. Skating and balancing on one leg taught me the importance of posture – I learned to keep track of the head, the torso, the hip, the hands, and the other leg which is off ground.
Following is a list of tutorial videos that helped me. Look for the rest of quality videos from the same YouTubers, and click on links to their websites. Even seemingly irrelevant skills help in unexpected ways. For instance, hockey stops showed me how to control center of gravity and momentum, and how to use the edge to engage with ice for a good purchase which is useful when one launches into maneuvers.
- How to Ice Skate (How To Hockey)
- How to Stop on Skates & Hockey Stop (Hot To Hockey)
- Understanding Edges – Skating Fundamentals Episode 3 (How To Hockey)
- Basic Forward Crossover (expertvillage)
- Forward Crossover and Power Turns (Hockey Tutorial)
- Skating Backwards Crossover Drill – Skate Drills (Hockey Tutorial)
- How To Hockey Stop On Weaker Side (Hockey Tutorial)
- Ice Hockey – Skate Forward and Backward Cuts Around the Cones (MonkeySee)
- Skating Forwards to Backwards Transitions (How To Hockey)
- Skate Forward Crossover to Backwards (jump and turn) (MonkeySee)
- Balance, Tight Turns & Ice Skating Backwards crossover (Hockey Tutorial)
- Turning in a Tight Area (HockeyShare)
- “Xtreme Figure-8” tutorial (Prolite)
- Mohawk and Barrel Roll (Adrian Jack)
And, of course, go watch tutorials on the Grapevine move…
- Learn How To Do The Grapevine Freestyle Ice Skating (Hockey Tutorial)
- Freestyle Ice Skating: Grapevine Tutorial (Uristenzor)
- Grapevine Tutorial (Naomi Grigg – inline, not ice skating)
And read up on the Grapevine from definitive sources from the 19th century:
- A System of Figure-skating: Being the Theory and Practice of the Art as Developed in England with a Glance at Its Origin and History, by H. E. Vandervell & H. Cox, 1880
- A Handbook of Figure Skating Arranged for Use on the Ice, by George Henry Browne, 1900
- The Art of Skating by Irving Brokaw, 1910 and 1926.
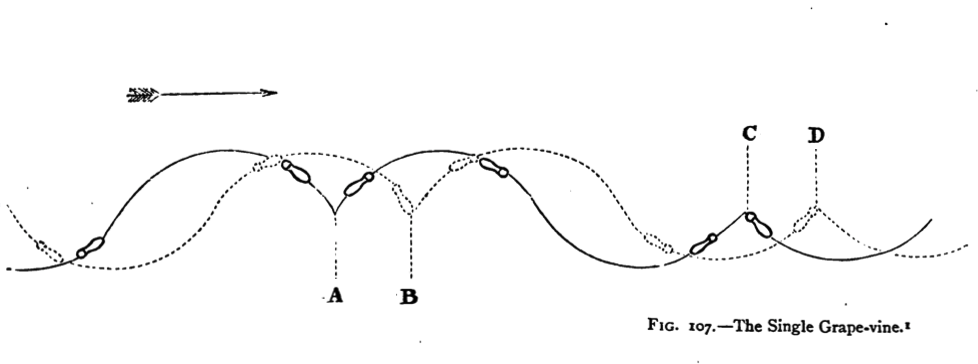
Diagram of the Simple Grapevine. A System of Figure-skating, H. E. Vandervell & H. Cox, 1880
Lately I found a good book on power skating with verbal discussions of techniques, clear diagrams and pictures written in this century. It’s really meant for hockey players, but is still extremely useful: Laura Stamm’s Power Skating – 4th Edition.
No matter how great the video tutorials are, sometimes verbal instructions simply don’t congeal into a mental model of how a move ought to work. I found that turning a snippet of a tutorial into an infinite loop worked for me. I would watch a demo sequence repeat a hundred times in normal speed as well as in slow motion, until I “got it”. I’d track one foot exclusively for a dozen repeats, then move onto the other foot. I would look at the hip to see whether it led a leg or was a result of a leg moving. Then I would study when a skate shouldered body weight. On the iPhone, one can download SpeedUpTV to watch any YouTube video in slow motion, and set up AB loops for an infinite replay.
Skating as a Sequence of Falling and Recovery Steps
In the article Ice Skating as a Sequence of Falling and Recovery Steps, I explained how I now thought of skating as mainly about guiding the unemployed leg as the body went through falling, recovery and finally a brief moment of balance, as the unemployed skate landed on ice to became the new employed one. It seemed to me that when one concentrated on transferring balance from one landing to the next landing, the employed leg would naturally follow in reaction, and perform its strokes perfectly.
How to Skate the Grapevine
The figure skating crowd appear to name the two legs the “skating leg” and the “free leg” today. That works well for “pure skating” on one foot. Applying these names to two-foot moves such as the Grapevine will only cause confusion, because both feet skate at all times, and no foot is ever free. So in this article I use the words, from ancient texts I referenced earlier, “employed” vs “unemployed” to denote the leg shouldering body weight and the non-load-bearing leg doing the recovery, respectively.
Even thought it may seem counter-intuitive, one can apply the same falling/recovery analysis to a “non-pure” skating move such as the Grapevine. While in the Grapevine no skate ever completely leaves the ice, unlike in “pure” skating on a single foot, the same principle of balance transfer from the current employed leg to the next employed leg still governs the move.
Defining Balance Moments
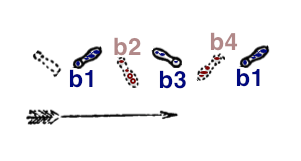
In Grapevine, there are 4 balance moments: b1, b2, b3 and b4. I call out these moments, even though they are unlike the ones I mentioned in previous article when using forward crossover as an example. In Grapevine one never physically lifts any foot off the ice, so at b1, b2, b3 and b4, both feet are on the ice. Yet we can, and must clearly define the moments when one foot is balancing the body weight, and the other non-load-bearing foot is just gliding on the ice.

Balance moments b1, b2, b3 and b4 in the Grapevine move
Another apparent difference between Grapevine and crossover occurs at balance moments b2 and b4. At most balance moments in pure skating, the skater is gliding on the employed foot, thus as I mentioned in the previous article, if the body posture were to be frozen, the skater would continue to glide without falling. But at b2 and b4 in Grapevine, the employed skate is perpendicular to the movement of the body, thus it can’t really glide if the skater were to pause the flow of the movement – the employed skate in theory would trip the skater. But in reality, the skater’s body/hip is in the middle of a turn at b2 and b4, thus the torque of the body would continue to rotate the employed skate until it glides in the direction of the body movement, while the skater remains balanced on this skate.

Balancing moments b1, b2, b3 and b4
Also note that, just like the forward crossover example, how a foot shoulders body weight changes as the skater becomes more familiar with a move, and speeds it up. As a move is sped up, the momentum of the body and centrifugal forces increase with velocity. The body may need to lean more, or less. And all of these have an impact on how the foot dig into ice for purchase. But again, just like the crossover example, the moments b1, b2, b3 and b4 remain unchanged in the Grapevine.
At b1 and b3, foot “one” is shouldering body weight, indicated in blue in the picture. At b2 and b2, foot “two” is, shown in red. If foot one is the right foot, then foot two is the left foot, and the body initially turns clockwise after b1. If the two feet are reversed, then the body initially turns counterclockwise after b1.
I’ve heard differing opinions on whether for a beginner foot one should be the strong leg, or the weak leg. It appears that the majority of opinion is for the strong leg. So in this article, b1 and b3 are shouldered by the right leg which is the strong leg for most people, and the body turns clockwise from b1 to b2.
“Walking” the Grapevine on the Carpet
The 1880 book recommended that beginner skaters concentrate on tracing exactly the lines shown on the diagram. The authors wrote that doing so faithfully, even if body posture and timing were not right, would still acclimate the the skater to this move.
Diagram from Vandervell and Cox, 1880.
“Walking” this move on the carpet at home may be an even faster way to learn the flow of steps in this move. Stepping on ice first is how I learned to do backward crossover. Had I found out about transfer of balance and “balance moments” earlier, I would not have sustained so many bruises from my ad hoc attempts at learning the Grapevine. In retrospect, practicing the Grapevine balance moments on the carpet would have been a great way to understand the unusual hip turns, toeing in and toeing out stances in this move.
First, we map the four balance moments onto the Grapevine diagram. This diagram is accurate for skating on the ice. But on a carpet one cannot replicate these steps, because the diagram incorporates the movement of skater’s body roughly from left to right in curves.

Balance moments b1, b2, b3 & b4 mapped onto the 1880 Grapevine diagram
When the overall movement of the skater is removed from the skating diagram, we are left with the following “walking” diagram that can be practiced on a carpet. Try to step into each footprint in the right order. Note that the labels b1, b2, b3 and b4 are placed at the heel of each step to more clearly illustrate the orientation of each foot. The unlabeled dotted step to the far left is the initial position of the left foot.
“Walking” the Grapevine on the carpet
These steps involve serious twists of the hip. They also require you to toe out and toe in unexpectedly. Following step-by-step diagrams illustrate how, at each step, one should lift a new unemployed foot off the carpet, and twist the hip to move the foot onto the target location. Additional uncolored footprints show the orientation of unemployed foot as it moves toward the target location.
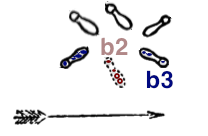
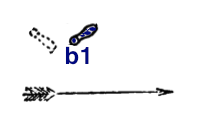
In the following diagram, you lift your left foot, and guide it around the right foot to plant down at the red footprint b2.

Lifting & moving the left foot to b2
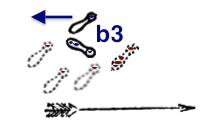
Here you lift the right foot, and rotate your hip and body clockwise 180 degrees, then plant the right foot down at the blue footprint b3.
Lifting & moving the right foot to b3
Now lift the left foot and kick it backward to plant down at the red footprint b4.
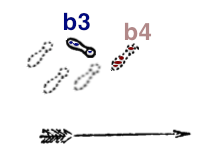
Lifting & moving the left foot to b4
Lift the right foot, and rotate hip and body 180 degrees counterclockwise, swinging and kicking the right foot towards the blue footprint b1. As in all previous steps, the employed foot shouldering the weight during a step may be forced to rotate a bit out of its footprint. That will be especially pronounced in this step for the employed left foot. And it is completely fine, and is in fact how the employed foot would be rotating when the Grapevine is skated on the ice.

Lifting & moving the right foot to b1
As you guide one unemployed foot to its target, you’ll notice that all of these four steps are crossover steps. This fact is clearly highlighted if you focus on landing each step on the virtual “outside edge” of your barefoot on the carpet. Recall that the entire Grapevine is best skated on the outside edge, so emulating it without skates is a good starting point.
Don’t try to walk these steps on the ice. You can’t. Or rather, I couldn’t. Your mileage may vary. Read on for explanation.
Difference between Walking and Two-foot Skating
Keep in mind that the “walking” exercise treats the move as a “pure skating” move, in that we focus on the movement of the unemployed foot which is “free” to do whatever it needs to do off the ground, and we assume that the employed foot would trace naturally its own correct path as the body turns.
But the Grapevine is not a “pure skating” move – both feet are always gliding on the ice, and thus the unemployed foot is not really “free” to do whatever it wants. In Grapevine, the orientation and movement of the two skates are tightly intertwined with each other, and with the posture of the skater.
As an illustration, consider the common situation in “pure skating” where one has the free skate toed out at 90 degrees from the gliding skate. If one were to suddenly plant that free skate down onto the ice, without lifting the foot currently on the ice, the end result would be a violent spin or a tumble. But two-foot skating such as the Grapevine call for frequent use of non-parallel skates on the ice at the same time. This is solved by having the hip/body induce an appropriate rotation, every time the two skates form an unwieldy non-parallel stance that is not conducive to gliding.
Look at this Grapevine diagram again. Notice how there is never a straight line? That is because the two skates never skate in parallel for more than a split second. They are always toed in or toed out. As a result, the body never stops rotating to accommodate the two skates.
Diagram from Vandervell and Cox, 1880.
The practical consequence is that the “walking” exercise does not really replicate the trajectory of either foot, compared to actual Grapevine skating on ice. However, the footprints left by each foot planting down at balance moments are 100% accurate, and that is the point of this walking exercise. Confirm the truthiness of this assertion by comparing the walking diagram to the stop motion capture of the skater on ice. Note how b1, b2, b3 and b4 perfectly match footprints on the walking diagram.
Orientation of landing foot at b1, b2, b3 and b4
Footprints left at b1, b2, b3 and b4
How to Get a Good Purchase on the Ice
Despite the non-equivalency of the “walking” exercise to actual Grapevine skating, we’ve established that the footprints left by the walking exercise is an accurate representation of actual skating.
Furthermore, the friction one feels on the employed foot, as the unemployed leg moves to its target location, is also very real and accurate, despite the the inaccuracy of traced trajectories. Learning to feel this drag on the outside edge of the employed foot is extremely important, because the drag corresponds to the push one must exert on a new-employed foot at each and every balance moment.
Unlike in pure-skating, getting a good purchase on the ice with an edge of a skate in two-foot skating is quite hard, with the common tendency of the skater to spread his weight equally on the two feet. Without a good entrenchment on the ice, a skater can’t move much despite having the knowledge of all necessary steps, and can’t sustain repeated Grapevine maneuvers. After building up speed and launching into a Grapevine, one would rapidly come to a stop on the ice without finishing even one cycle of Grapevine steps, if one can’t generate more energy from strokes at every balance moment. And here I speak from lamentable personal experience.
For instance, on the ice, immediately after the left foot rotates and glides onto the red footprint at b2, it should start pushing on its outside edge, in a direction opposite to the movement of the body which is indicated by the arrow with feathers in every diagram.

Left foot in red must push at b2 against the direction of arrow
This push by the left foot at b2 is what enables the now-unemployed right foot to swing with the clockwise body rotation towards b3.

Body rotation is enabled by the left foot pushing on ice
The right foot marked in blue right at b3 needs to pivot around the toes, and then push on the outside edge, to give the body the power it requires in order to kick the now-unemployed left foot backwards toward b4.
Right foot pivots on toes as it pushes
Then the left foot at b4 pushes on its outside edge, as the body rotates 180 degrees counterclockwise. The push will feel awkward, but it is not too different in concept to the “cross-under” push in a forward crossover move. This push can be thought of as a result of the hip and the body forcefully turning counterclockwise. The weight of the body shifts during this phase – at b4 the left skate shoulders the weight and drives the push, and at the end of the phase the right skate takes over the body weight.

Left foot pushes in reaction to the hip turning counterclockwise
If one learns to feel how each of these pushes work, on the carpet first, one would save great deal of time and possibly bruises when practicing the Grapevine on the ice.
Skating to the Initial Balance Moment b1
Now we are ready to skate the Grapevine on the ice.
As the Hockey Tutorial on Grapevine shows, the best way to initiative a Grapevine for a beginner is to start with a half lemon. Push out on both legs and bring them back. Cross the right foot in front of the left leg, until both skates are on their outside edge. Again, remember that the entire Grapevine is skated on the outside edge, so starting with the right edge on both skates is essential.
For a beginner, end this set-up step by freezing the body posture after the crossover, and continue to glide on the ice on the outside edge on both legs. Shift the body weight from the left foot to the right foot and glide on it. This is the balance moment “b1”.
Use Half Lemon to get to initial b1

Set-up from Half Lemon into b1
Phase 1 – Skating from b1 to b2
The right foot becomes the employed leg at b1 and starts to shoulder body weight. Lean the body forward to force the weight on the right foot, if you can’t get the weight off the left leg.
Now, imagine the right foot pivoting around its heel, sweeping a small clockwise circle with the right toes. This is what you need to do. And it is done in conjunction with a clockwise turn of the hip. Both of these will now bring the left unemployed foot into a similar, but delayed clockwise sweep against its heel as well. At the end of this phase, the two feet form a 90-degree angle at b2.
Skating from b1 to b2
Phase 2 – Skating from b2 to b3

Left skate pushes on outside edge
The left foot becomes the employed leg at b2. It now digs into the ice on the outside edge, and pushes, to enable the body to lean back and to kick the right unemployed leg backward. It is very important for the left leg to generate energy in this phase, to sustain the move. Use the rotation of the hip to give you that extra push on the left leg.
This phase is intimately coupled with phase 1, because it finishes the heel-based rotations of both legs. Note how both the right leg and especially the left leg finish, in phase 2, the 180-degree rotation started in phase 1. Because of this coupling, unlike in the walking exercise, phase 1 and phase 2 cannot be practiced separately. They must be executed together in sequence on the ice.
At the end of this phase at b3, the two feet are almost coming to align with the trajectory of the overall skater movement. You can actually continue to glide backward instead of proceeding to the next phase. This allows you to ruminate over what has just happened in phase 1 and phase 2, and it gives you a chance to correct your body balance, if your balance is not already on the right foot at b3. You must lean back to drive power to the right foot, in anticipation of the next phase. And you must lean on the outer edge of both skates before you transition into Phase 3.
Skating from b2 to b3
Phase 3 – Skating from b3 to b4
The right foot becomes the employed leg at b3. You body should be leaning back slightly. This phase does not need to take place right after phase 2. For beginners such as myself, by the time I finish phase 2 my body has run out of momentum. In such case you can simply add a few backward crossover steps in between phase 2 and phase 3 to rebuild momentum.
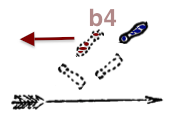
The goal of this phase is to move the now-unemployed left foot, marked in red, from being in front of the body, to behind the body at b4. Observe the trajectory of the left foot – it glides in a roughly linear curve, with the heel of the skate lifted slightly off the ground towards the end of the phase. This is achieved by a counterclockwise twist of the hip to jerk the left leg backwards.
Skating from b3 to b4

Pushing on right outside edge
The same hip twist allows the right foot to grip the ice and generate push. It forces the right foot to rotate counterclockwise about the toe section, digging into the ice at what looks like an awkward posture.
This posture is the key to the success of this phase. But I don’t know of a pure skating move that requires a push of this type where a skate is tilted in the direction of the push. It took me a while to get this push right. Practice this push on the carpet first.
Note how near the end of this phase the two legs form an inverted V, with the toes tuned inward? That is a good mental picture to focus on during this phase. Both skates must be on their outside edges, and the left skate has its heel lifted off ground by the end of the phase. This part is arguably the most memorable moment of the Grapevine. No pure skating moves put the skater into this unusual stance.
In theory, one can continue to glide on the left foot as it reaches b4 at the end of this phase, with the body balanced on the newly-employed left skate. But in practice, if proper and enough rotation of the hip was imparted, the body will want to continue to finish the 180 degree rotation, transitioning the skater into phase 4.
Phase 4 – Skating from b4 back to b1
This phase allows the skater to progress back to the initial b1 moment of balance. If done right, it will impart enough momentum on the skater, allowing him to repeat phase1 and the rest of Grapevine indefinitely. At of the time of the first writing of this article (2016-05), I am still struggling to get this phase right. I imagine that I know in my head how this should be done, but I simply can’t execute phase 3 and especially phase 4 with enough extra energy to keep the move going ad infinitum.
Phase 4 happens and ends in the blink of an eye. For clarity, the stop motion sequence for this phase shows frames before b4 and after b1, to better illustrate the flow of the movement of both feet.

Skating from b4 back to b1
Left outside edge push
The left foot becomes the employed foot at b4, the beginning of this brief phase. It pushes on its outside edge, again, not unlike the cross-under push in a forward crossover move, if a bit exaggerated due to the inverted V shape of the two feet. It is crucial to have the weight of the body on this employed skate, to allow it to dig into the ice, and for the push to come as a continued reaction to the counterclockwise hip rotation initiated in phase 3. Lastly, the push should be done using the toe section, with the left heel remaining off ground.
The same hip twist is also what bring the right leg sliding past the left, in a roughly linear curve. The right foot should now extend forward of the skater, as the skater leans forward near the end of the body rotation. All of these are done, including the left foot push, the right foot slide and the body leaning, in order to inject new energy into the move.
At the end of this move, the skater is back to the initial balance moment b1, and ready to repeat the steps again.
Now Go Forth and Conquer the World
Apparently the move I described in this article is but a “simple” Grapevine. There are dozens of variations on this theme. The books from the 1900’s that I mentioned earlier went into details on many variants. Sadly I am not yet able to start on these variants. I can’t yet even skate two cycles of the simple Grapevine without coming to a stop on the ice as I run out of momentum.
Perhaps this article will be updated in the future, if I ever get past this hurdle. I do believe that in writing this article I’ve gained insight into what I am doing wrong. Watching my own pathetic attempts at skating the Grapevine from the video below, and thinking about what I’ve just written, I now see clearly that I was not pushing enough at b2 and b4. I did not lean enough during the transition from b4 to b1. Maybe I need to jerk the hip earlier and more forcefully at both phase 1 and phase 3. And my inverted V does not seem to show enough outside edge leaning on either skate. Plus, I did not lift the heel of the left skate in phase 3 and phase 4. Lastly, I was looking down at my skates half of the times, thus making it harder to get my posture and balance right.
Cheers. And happy skating. Wear underpant padding for protection. I did, but you probably can’t tell from the video. Search for padded undewear favored by skateboarders.
Postscript
2017-03-04: I ran across more YouTube tutorials you may find useful:
- Freestyle Ice Skating: Footwork and Grapevine Tutorial (in Russian?)
- Freestyle Tutorial: Grapevine by Global Ice
2019-01-20: Advanced freestyle moves based on Grapevine:
- Freestyle Ice Skating: Slalom Grapevine Tutorial by Uristenzor
- Ice Freestyle Tricks: Double Grapevine, Infinity 8, Triangle Spin by Uristenzor
2021-09-20: I wrote a follow-up article to this one, for inline skaters
2022-06-20: I found a skating historian who writes about the history of skating. This is what they have to say about Grapevine:
- Grapevine – from Pagophilia – adventures in skating historiography


This is super helpful. I’m currently already stuck halfway between b1 and b2 so got a long way to go, but I’ll always refer back to this article as it’s very thorough and full of tips to hopefully get me there one day.
Maybe I’m trying to tackle this too soon, as I can’t even do rather basic stuff like cross overs and spread eagle properly yet.
I wish you good progress in your learning. You are going through the same process I went through. Nobody says you can’t try to do parts of Grapevine before you are proficient with other moves. But as I found out, every time I mastered another move, such as the crossover, I could do a part of Grapevine more convincingly :)
Ironically, the day after I wrote this I progressed to b3. I’ll keep working on it, but having now done 1/2 the grapevine, feels like quite a victory actually, so I’m quite pleased with that.
Do you ever ice skate any more? Or just inline?
I went back to ice skating the past winter. Boy, did it feel weird at first, after two years away from ice. The rockered hockey blade felt very unstable for the first 15 min, compare to my flat inline setup. But I got over it.
Similarly, when switching back to inline this summer (because my local ice rink closes at the onset of each summer), I felt like I was dragging two bricks with me for the first 15 min. In retrospect, I am not sure whether it was because I swapped in new wheels and bearings – new bearings are known to not spin well until breaking in. Cheers.
Interesting. I’ve thought about starting inline, but if I’m honest, it’s just to improve my ice skating, and as my rink is open all year, I don’t really see a point. Besides, I’d have to get helmet, knee and shoulder pads, skates etc. making it all rather costly.
I see you have True skates. I use the Catalyst 9 myself. Amazing skates. Very comfortable.
I worked around 1 hour on Grapevine today but absolutely nowhere beyond b3. I can see that will take a while. How long did it take you?
This is amazing. I’m going to see if rollerskate can apply to this to rollerskating.
Thank you!
You can, but you have to be careful. One of the videos I linked to showed an inline skater demonstrating this. I once tried this on inline skates and almost tripped over right away. While the skate can still glide on ice at a non-zero angle to the blade, my inline skates could not, at least not on an asphalt-paved parking lot.
Hey man thanks fir taking the time writing about the good old “grapevine” technique.
Very informative and thanks for the links you provided orabout the many variations on the grapevine technique.
Great video too!
I’m a newbie on roller skating but the technique it’s very similar.
I’ll try what I just learned here tomorrow on the rink.
Also, the underwear patting you suggested is a great idea.
Thanks again and I’m looking forward to see a new video on your improvement and new advice.
I am glad you find it useful.
Yeah. Ice skating is not exactly the same as roller and inline skating. I have recently tried the move on inline skates. It didn’t work out very well for me at first. Inline skates stick to the floor so much more than steel blades, causing me to trip when I tried to skate like I did on ice. I do think I need to practice the basic skills on wheels first.
That’s said, the concepts are the same. And in fact I found Naomi Grigg’s video tutorial for inline skating very useful for me in the beginning. But I imagine roller skates are also slightly different from inline skates. I recall watching roller skaters doing the grapevine. They stand on the front wheels a lot more often than I expected as they turned their bodies.