
This is part 2 of a series on Mabrouk. In this part I describe in excruciating details the four slalom components of Mabrouk previously summarized in What is Mabrouk: a slalom variant of Grapevine. I learned to skate a sustained Mabrouk by first practicing the four slalom components, and by connecting them with rudimentary transitions. I later refined these transitions to make the entire Mabrouk sequence flow, but that is for part 3 and beyond of this series.
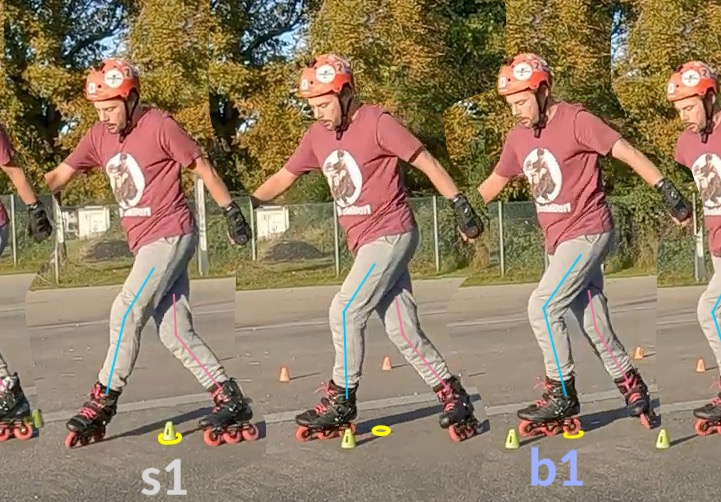
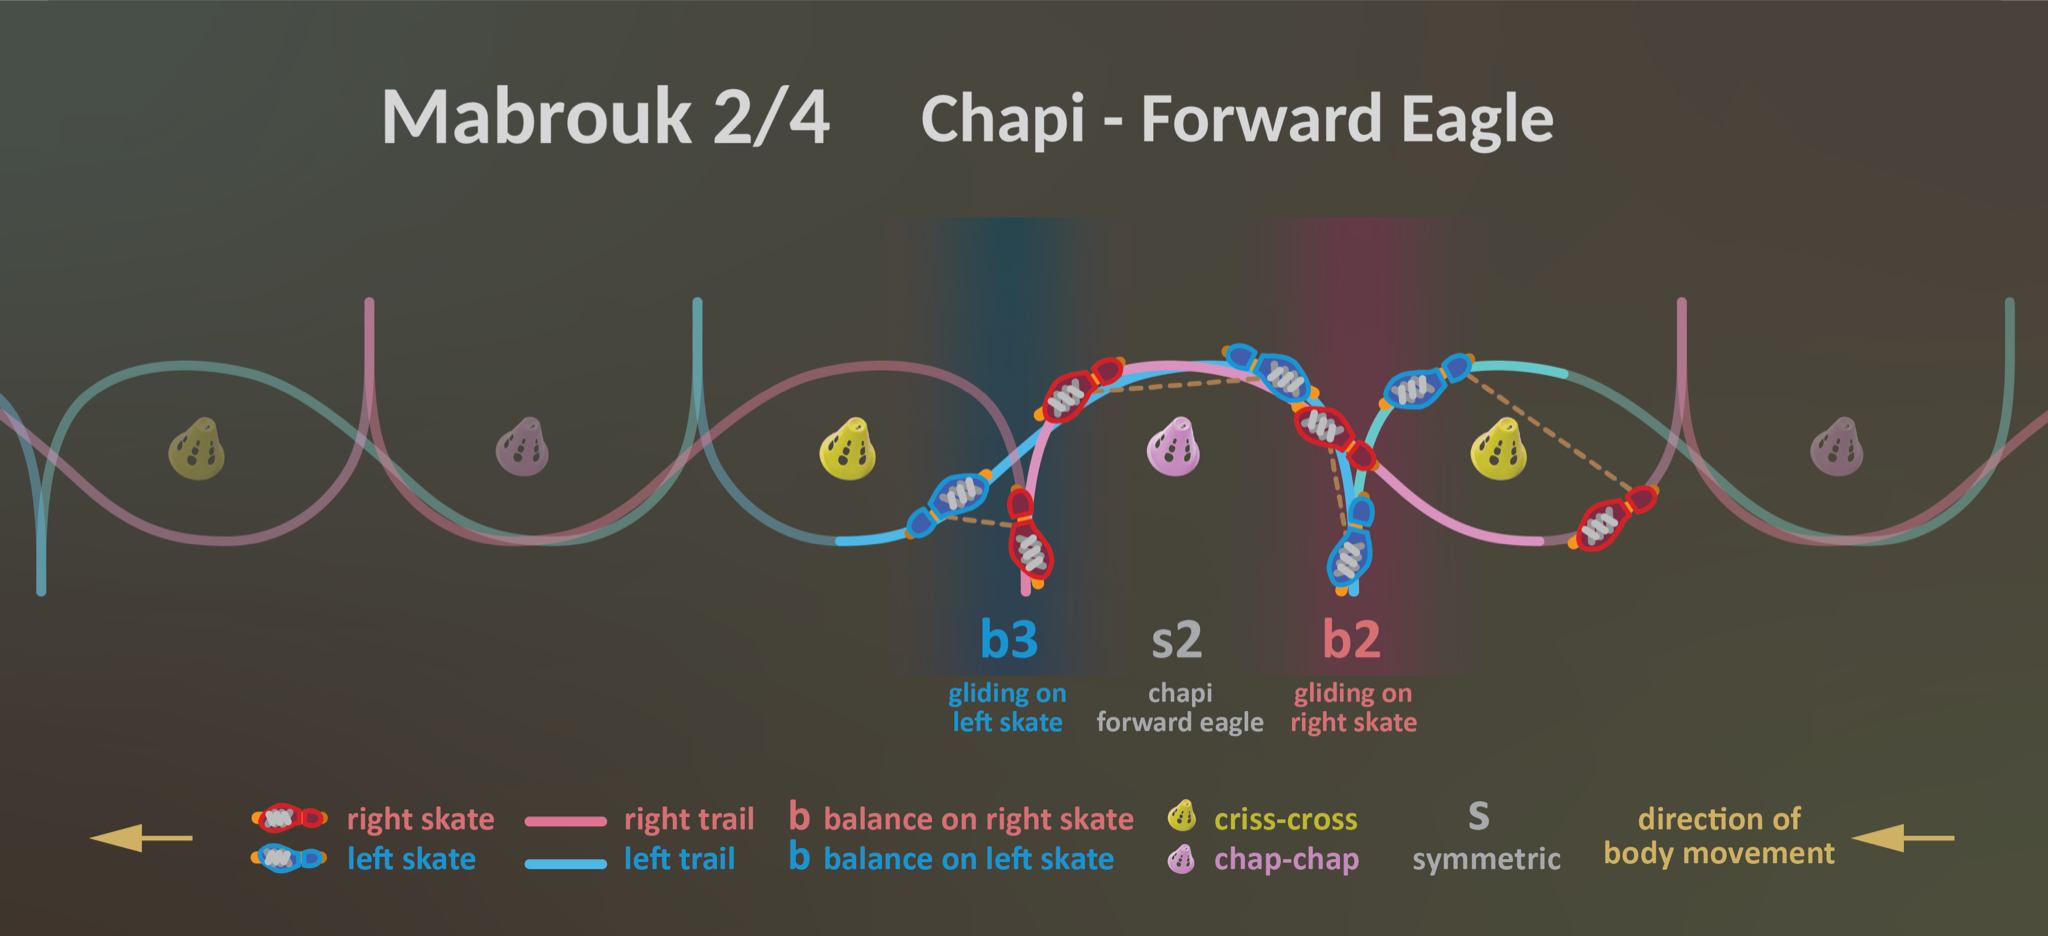
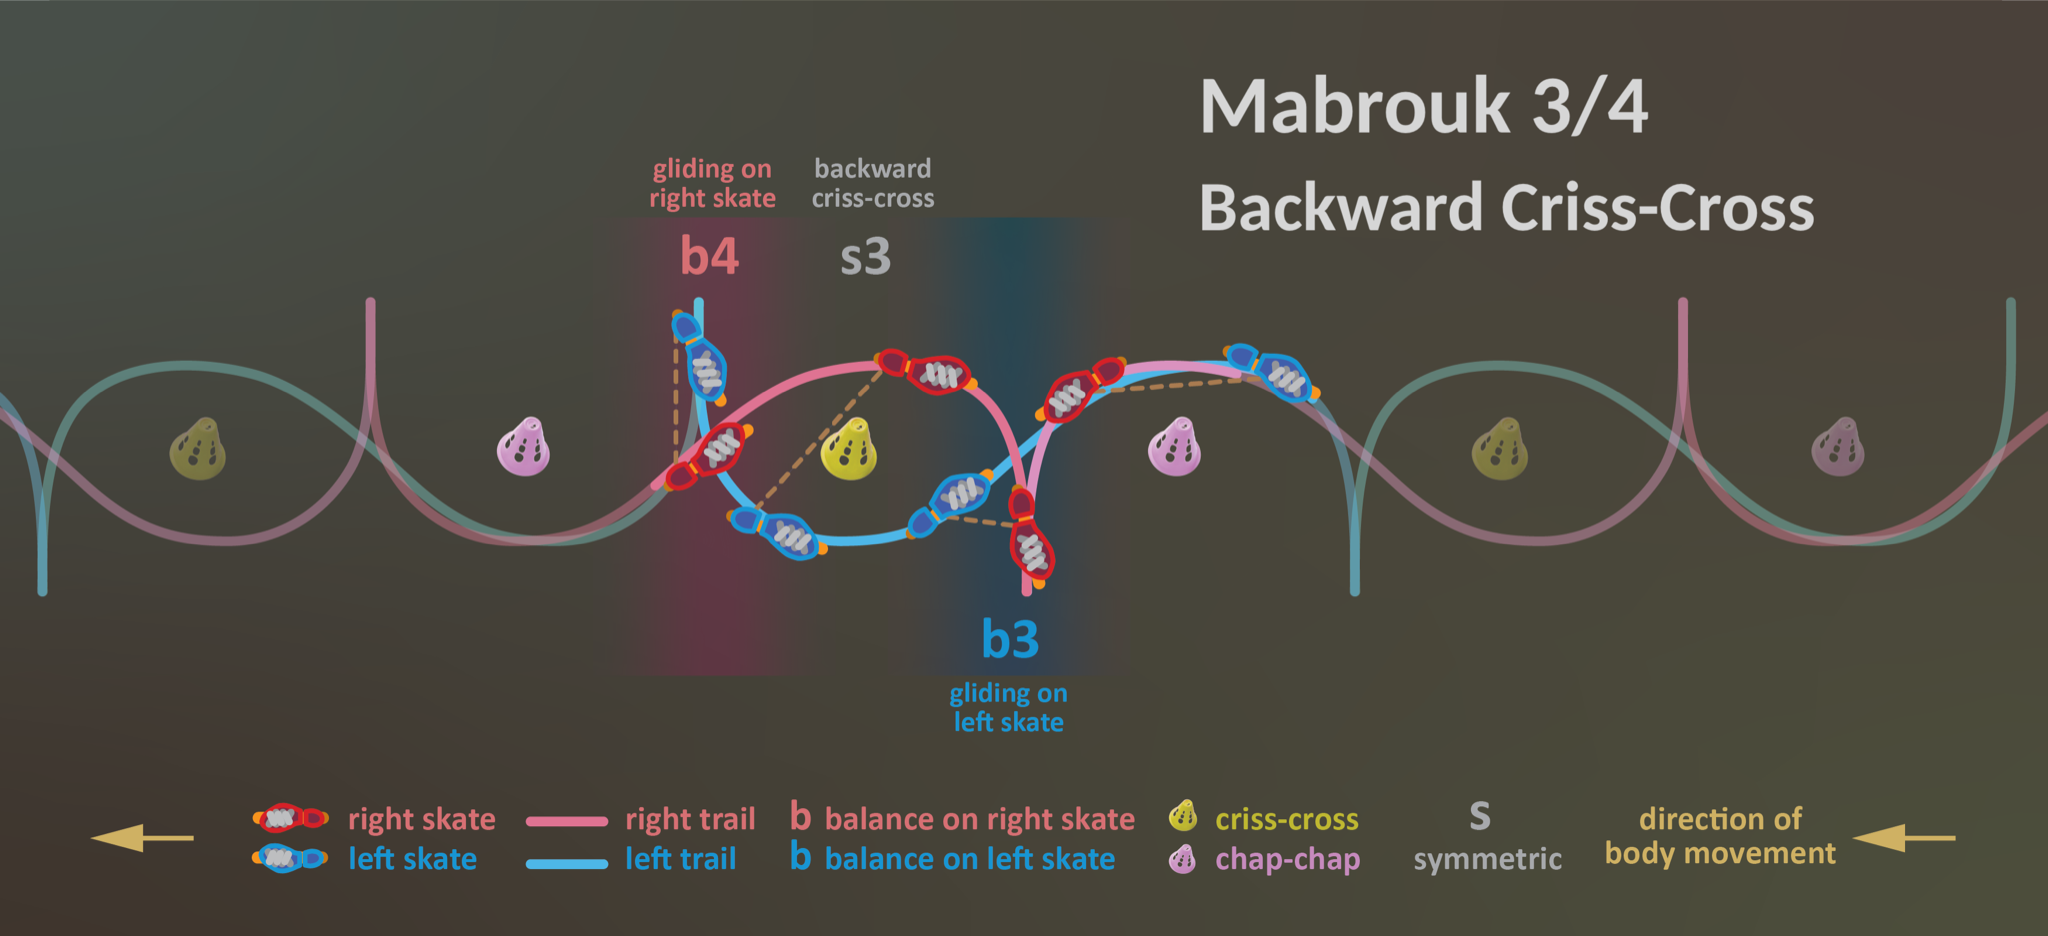
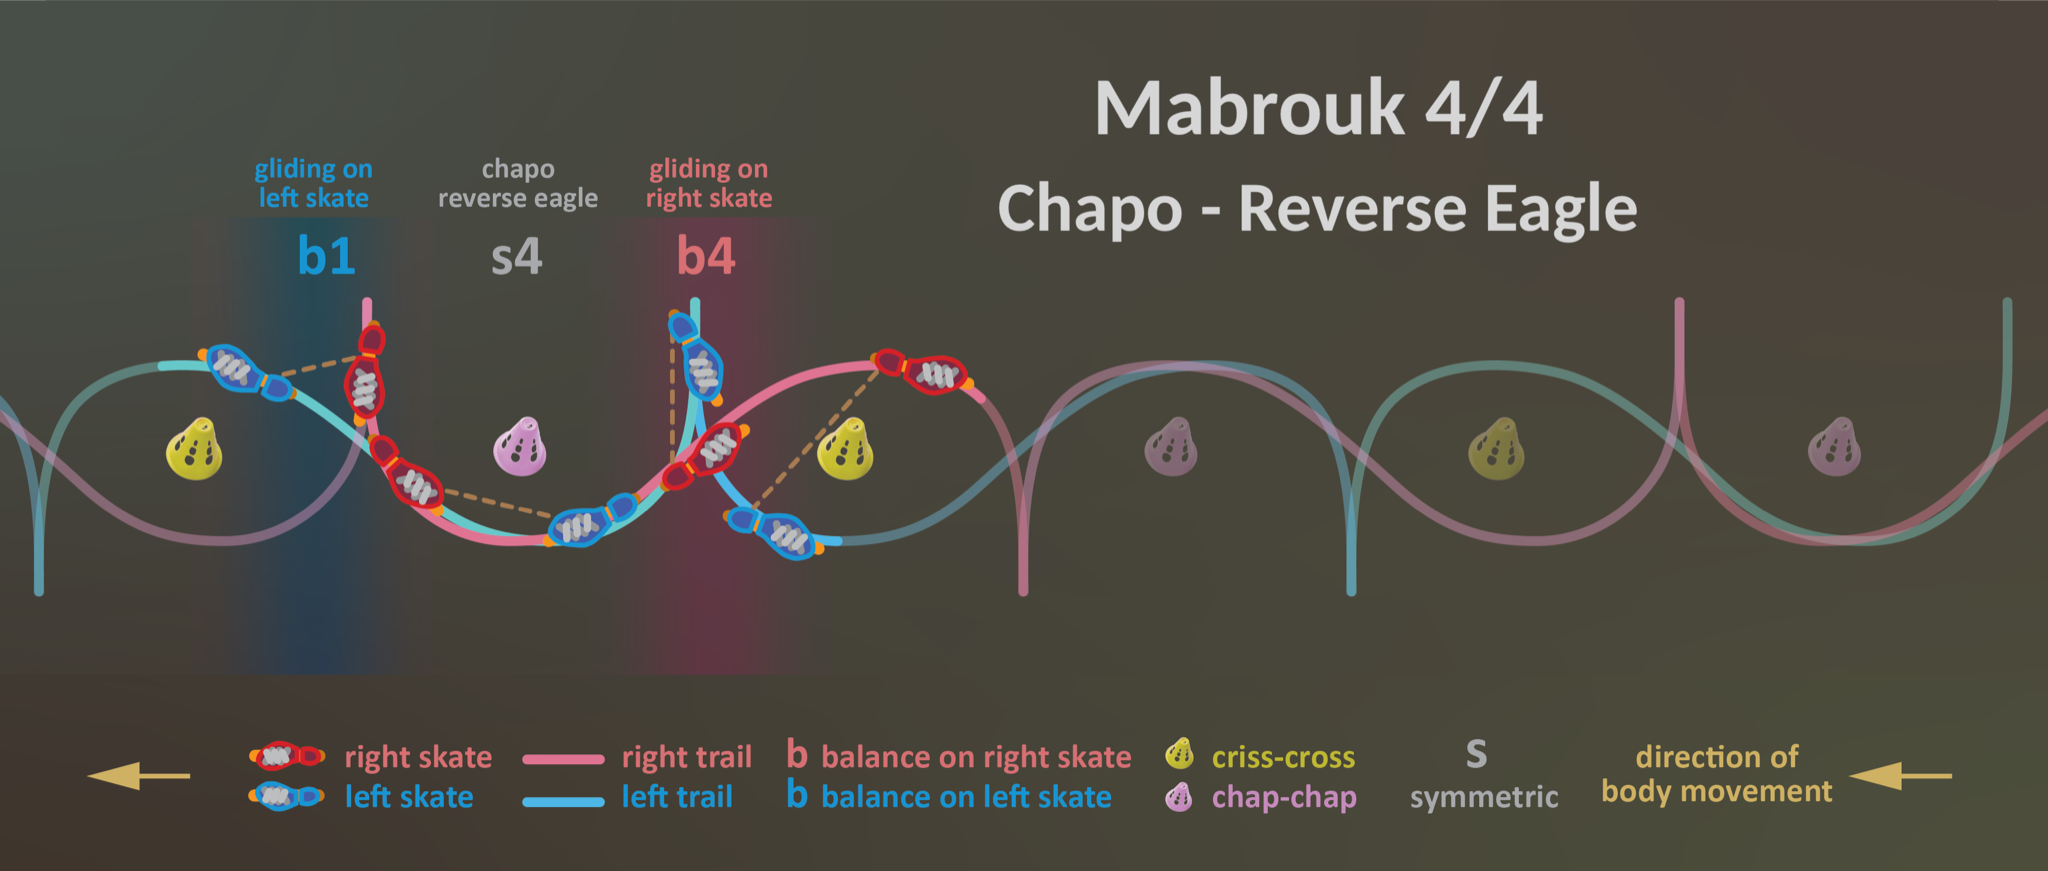
Following diagram and filmstrip recap key takeaways from part 1. Remember to read them from right to left, as indicated by the yellow arrow showing the direction of body movement. Labels s1, s2, s3 and s4 denote the four slalom components of Mabrouk. Transitions are annotated by balance moments b1, b2, b3 and b4. Vertical blue and pink bands show when left and right skates glide alone as the primary bearer of body weight. Thus, the blue left skate can be seen bearing weight and gliding around balance moments b1, and later around balance moment b3. The red right skate can be seen bearing weight and gliding around b2, and later around b4.


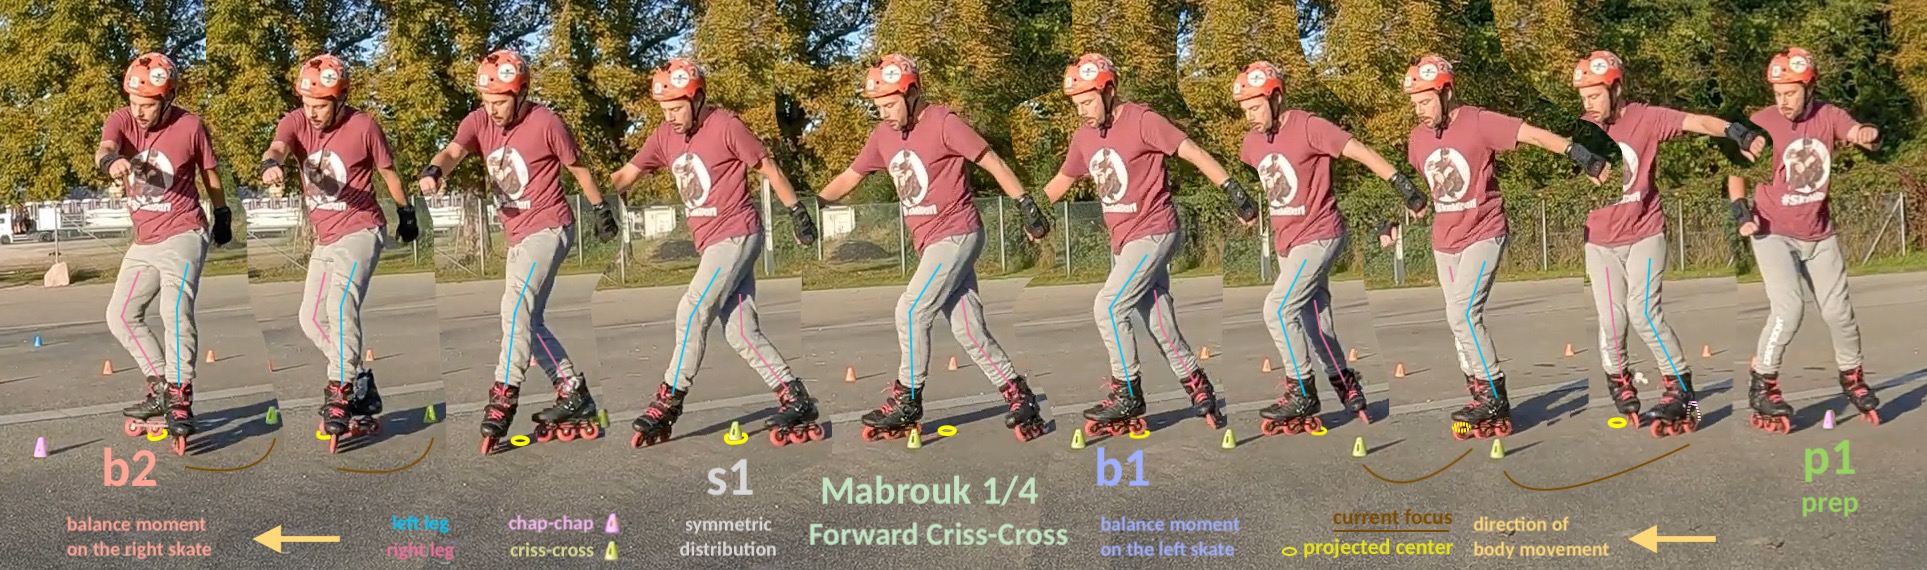
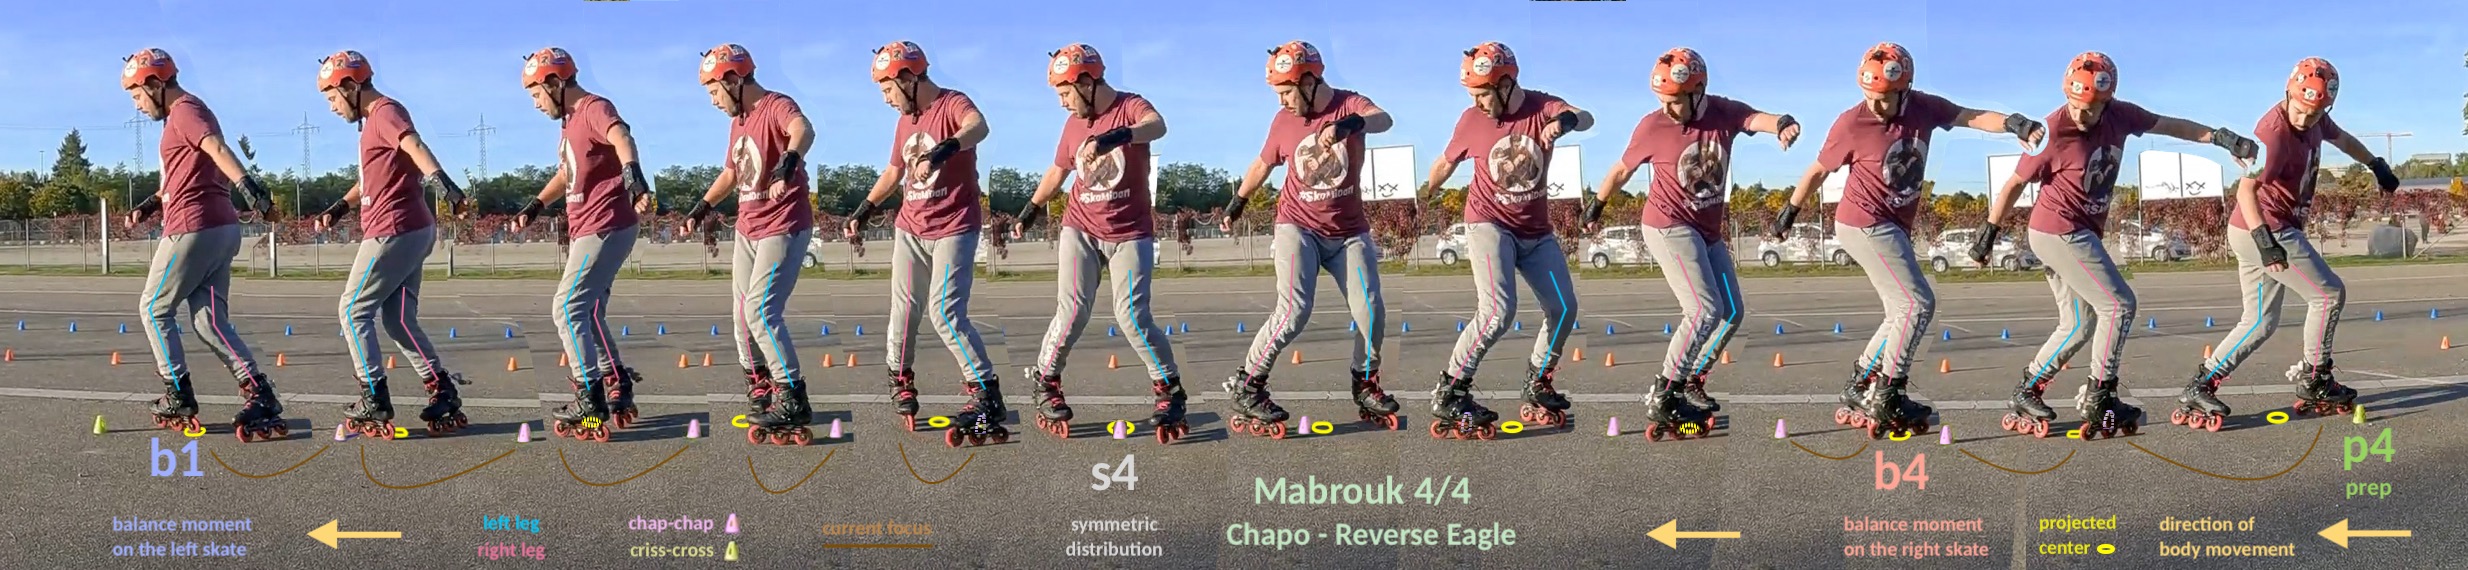
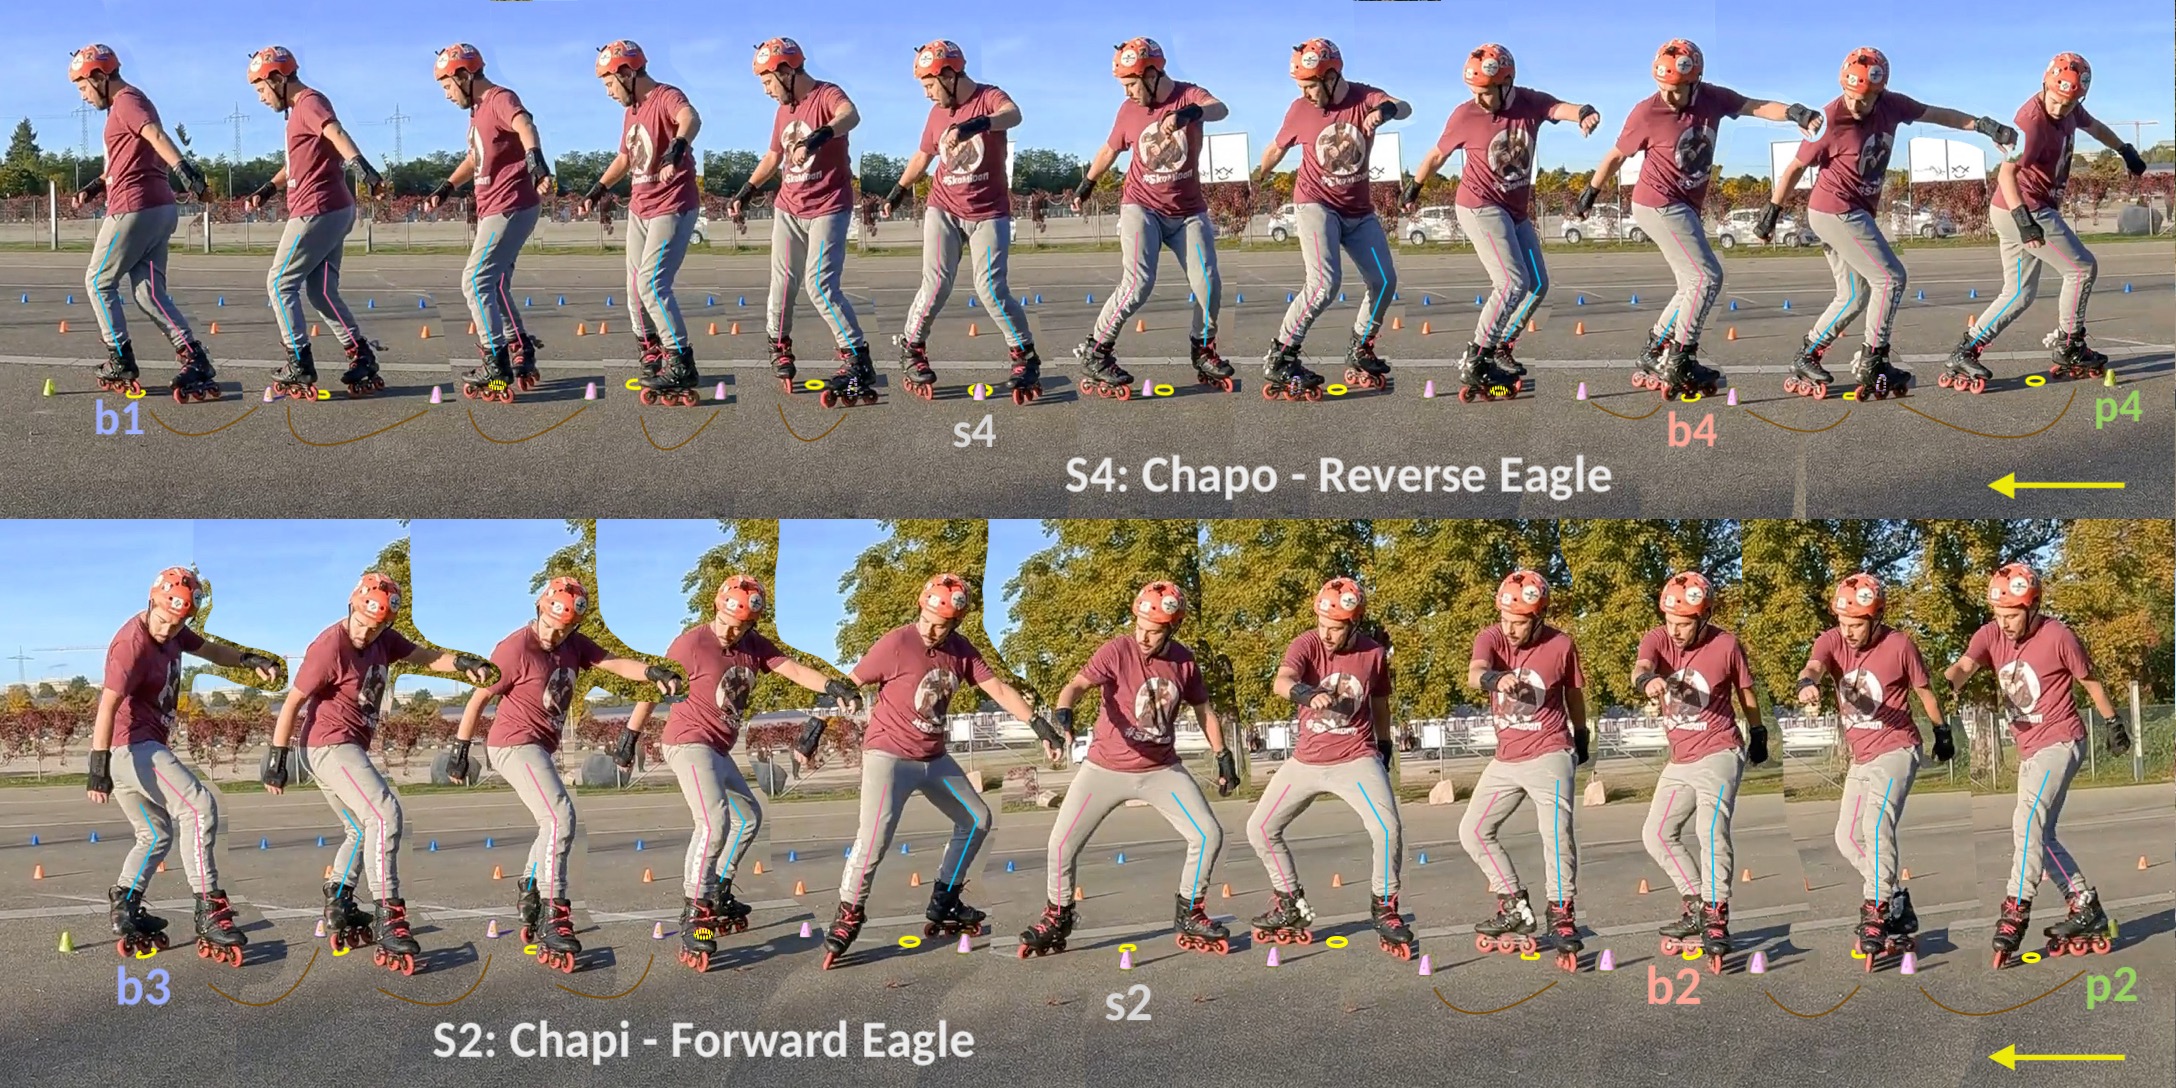
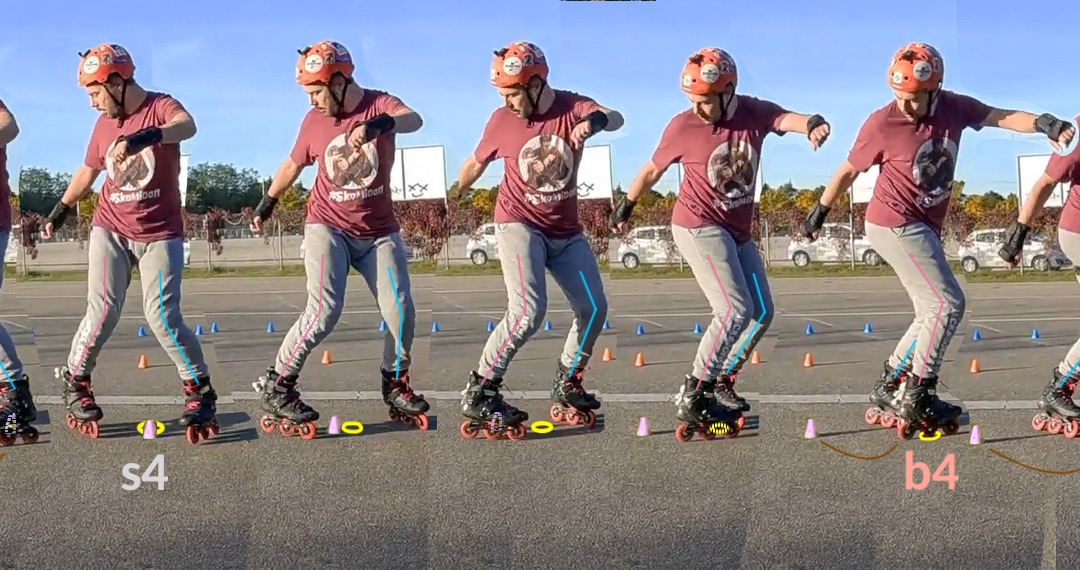
Similarly, the filmstrip above illustrates a full Mabrouk sequence, incorporating both slalom components s1, s2, s3 and s4, and balance moments b1, b2, b3 and b4. Remember to read them from right to left, as indicated by the yellow arrow showing the direction of body movement. At every component and moment, the projected center of gravity is indicated by a yellow circle on the ground. Slalom components are labeled in white – they are symmetric distribution points where both skates shoulder body weight equally. Balance moments are transition steps where one skate shoulders all body weight, colored blue when the left skate carries body weight and glides, and red when the right skate does so.
TLDR: for those of you who just want simple instructions on learning Mabrouk, search for the label TLDR on this page. You may ignore deep introspections and tedious expositions on Mabrouk. Those are really for academics, and for learners with too much time in their hands.
Before we jump into details, let me review a filmstrip, a pattern diagram, and two key videos from part 1 here, to re-establish basic concepts before we dive into details.
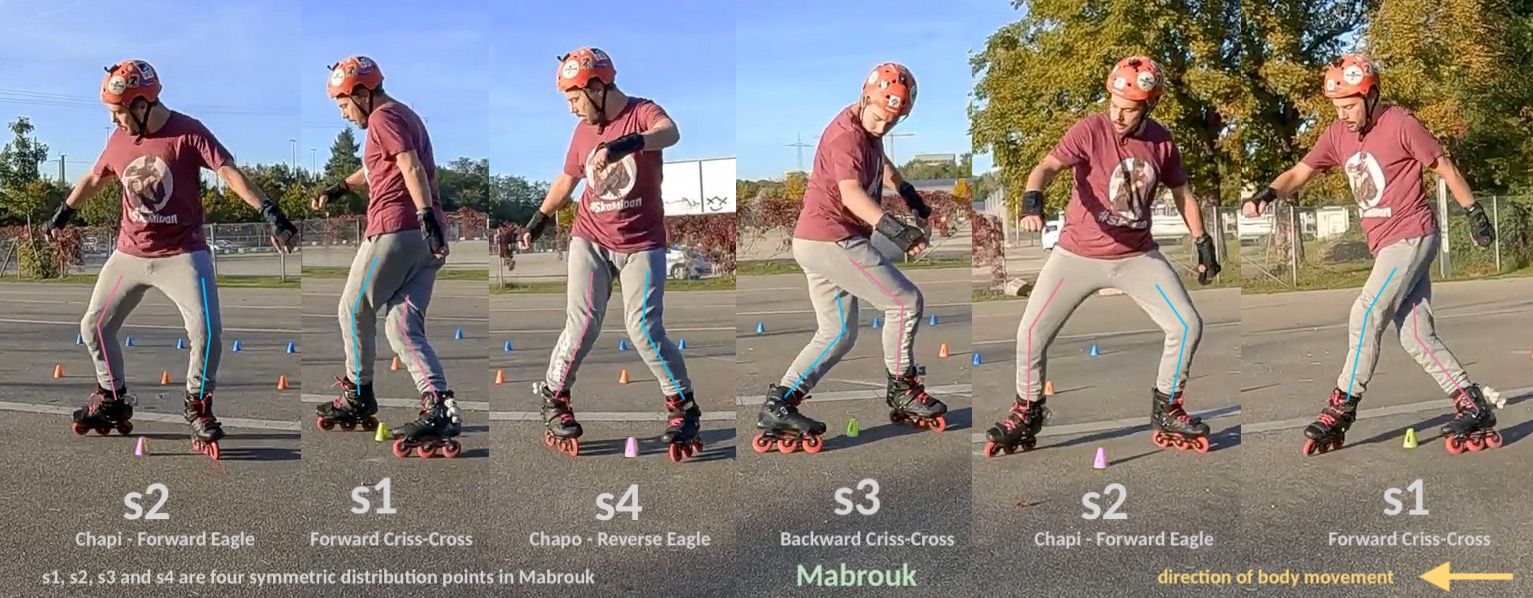
Following is a filmstrip showing the four slalom components of Mabrouk, from right to left: forward criss-cross, chapi – forward eagle, backward criss-cross, and chapo – reverse eagle. The cycle then repeats. In the filmstrip, components are identified by labels s1 through s4, where “s” stands for symmetric distribution points, or if you prefer, “slalom” component.
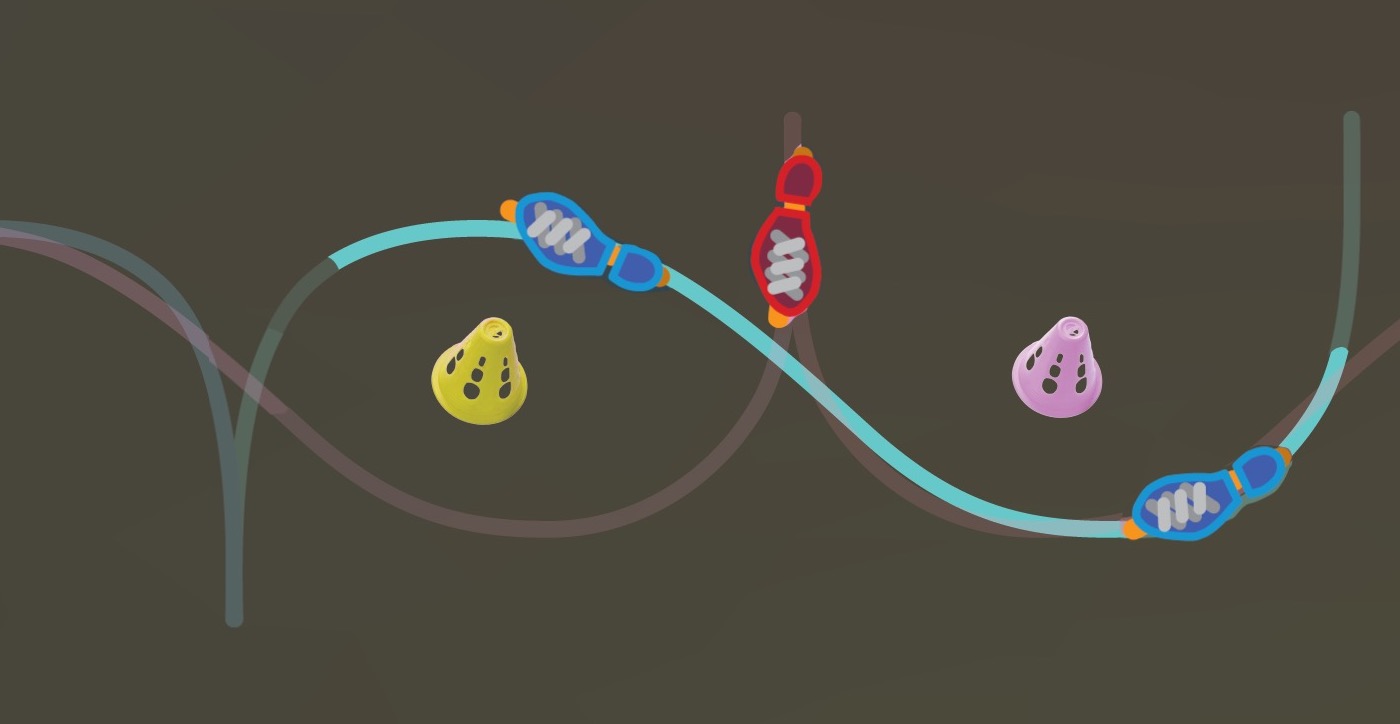
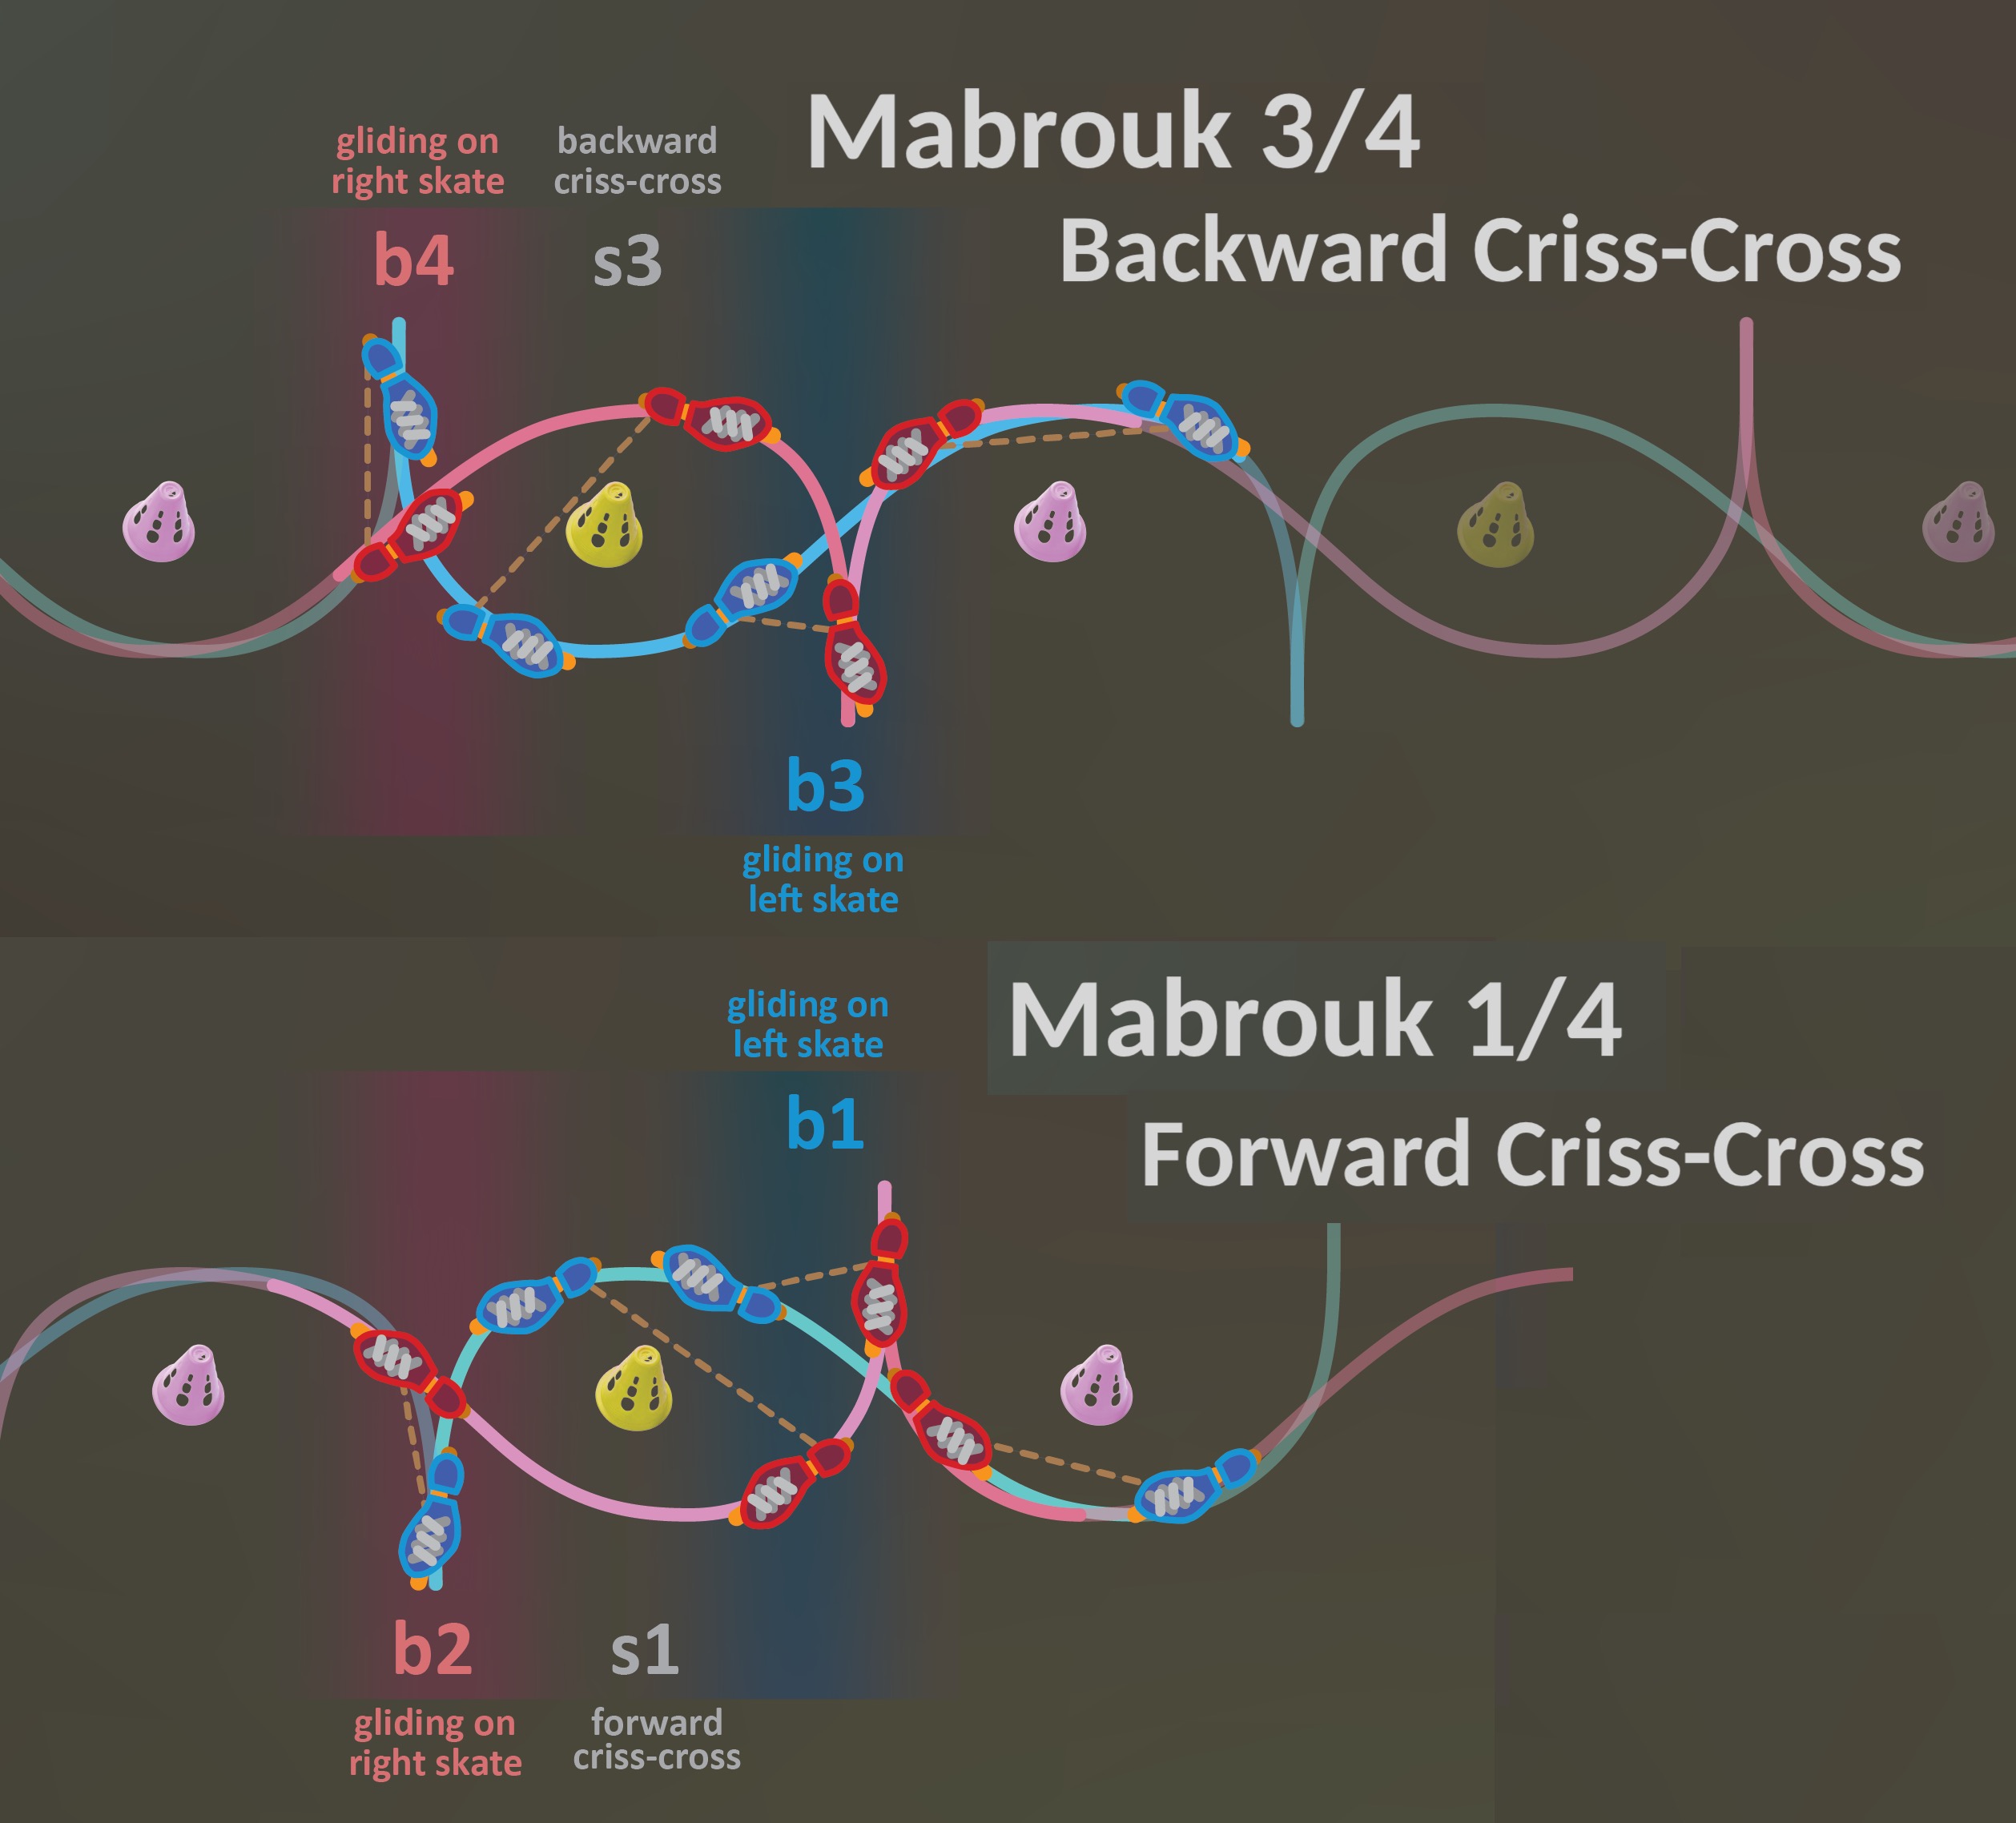
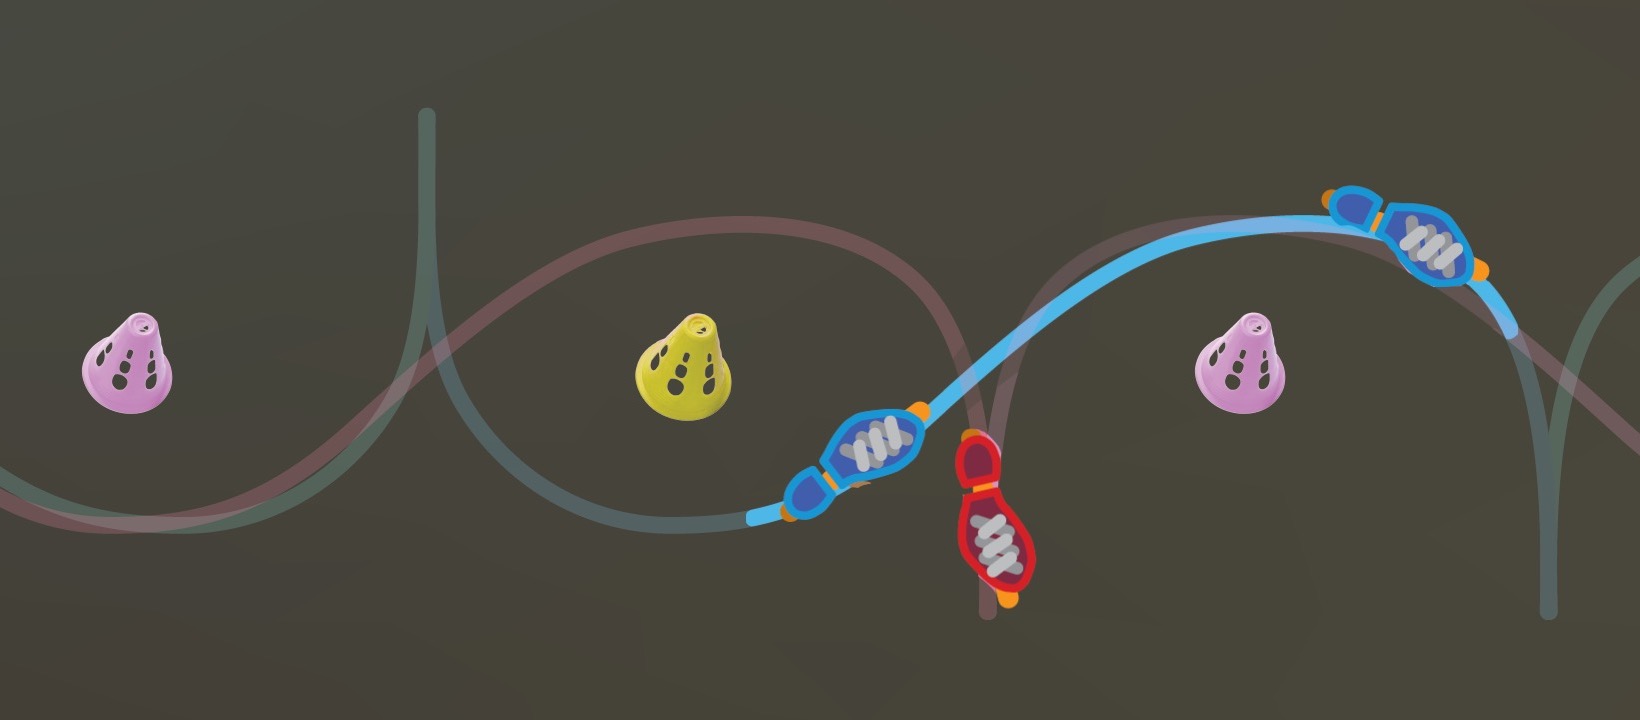
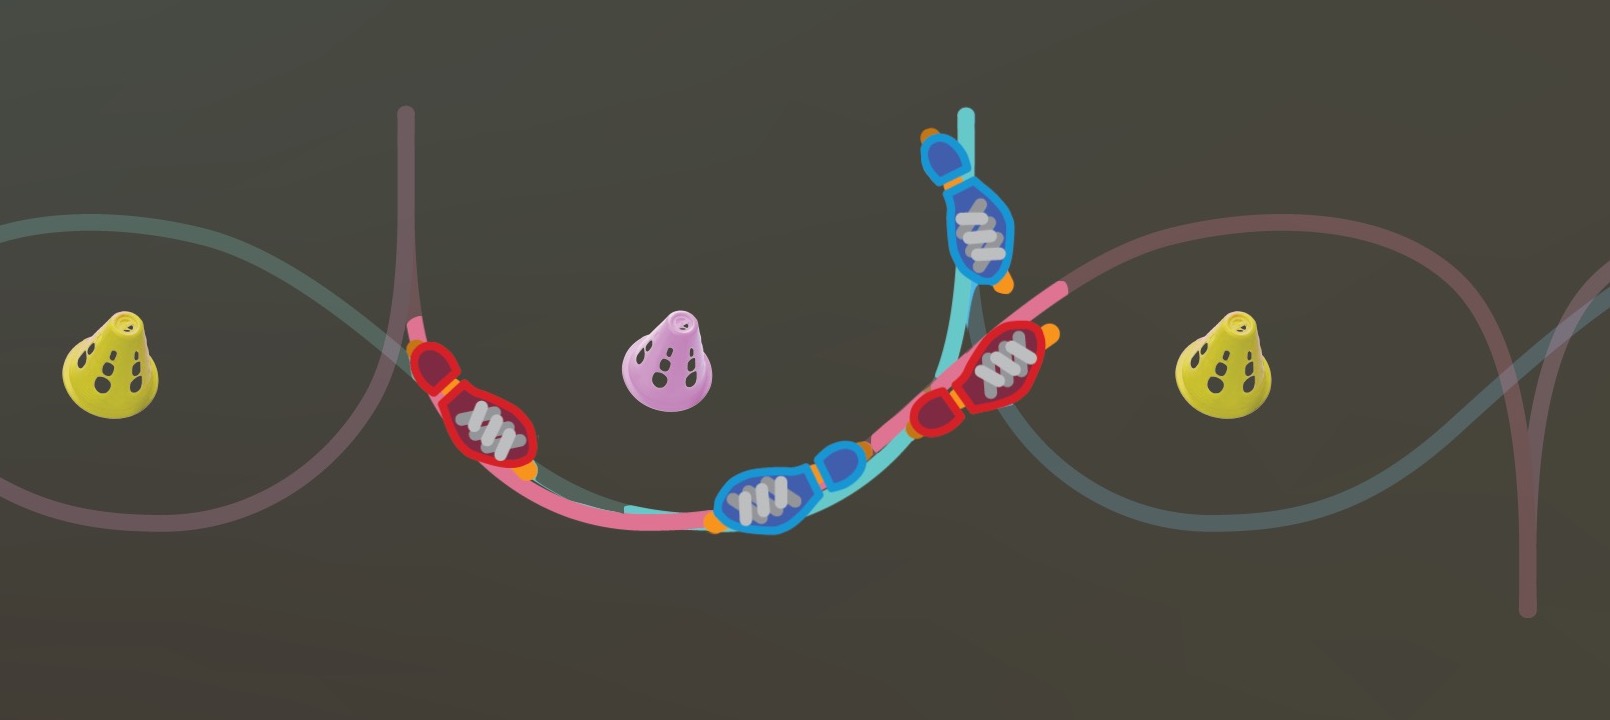
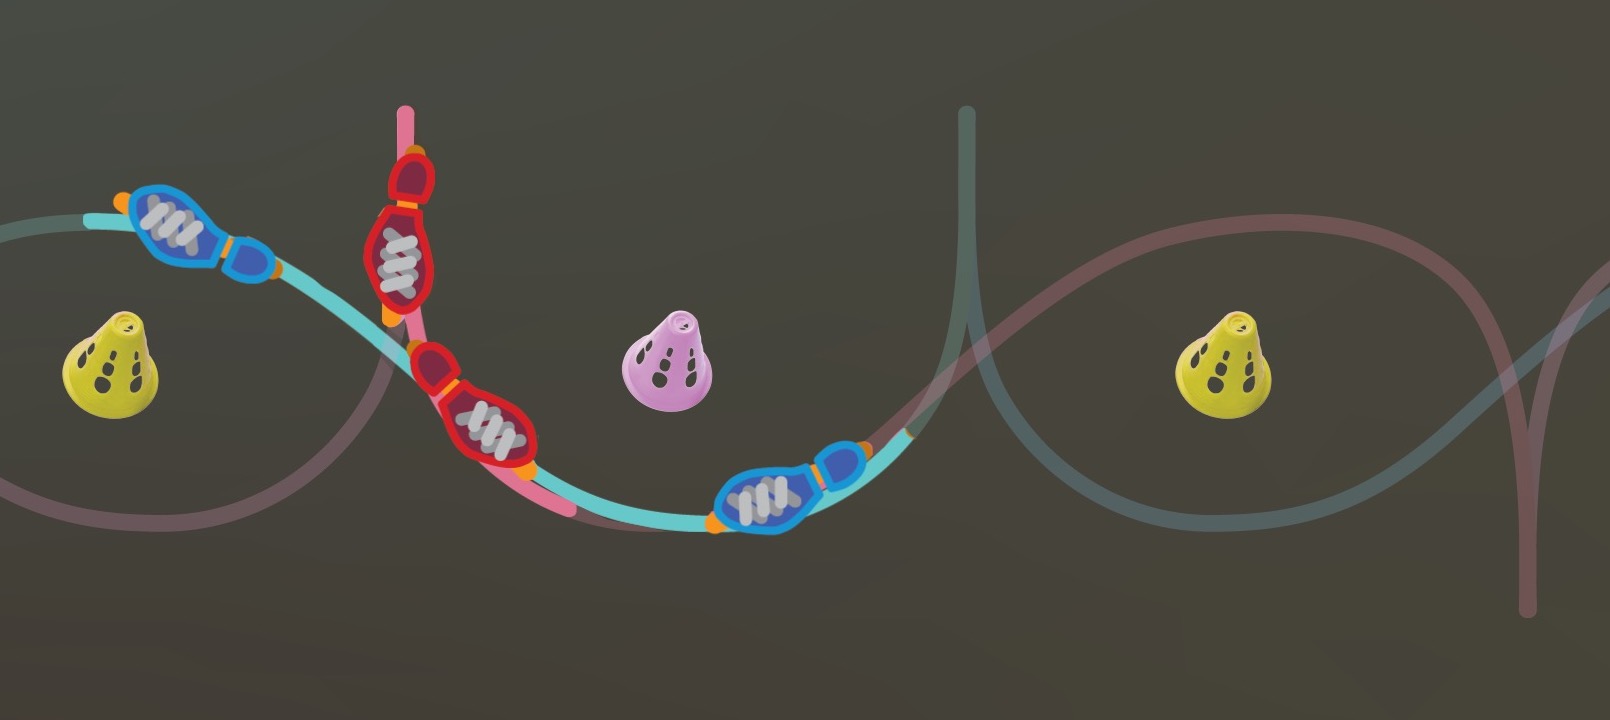
Here is a pattern diagram showing traces left by the two skates on the ground, as a skater performs the four slalom components. In this article, the left skate, the left leg, and traces made by the left skate are illustrated in blue. The right skate, the right leg, and traces made by the right skate are illustrated in red. Most diagrams should be read from right to left, as indicated by a yellow arrow. Compare the filmstrip above to the diagram below. Match Daniel’s stance at every symmetric distribution point in the filmstrip to its equivalent part in the diagram.
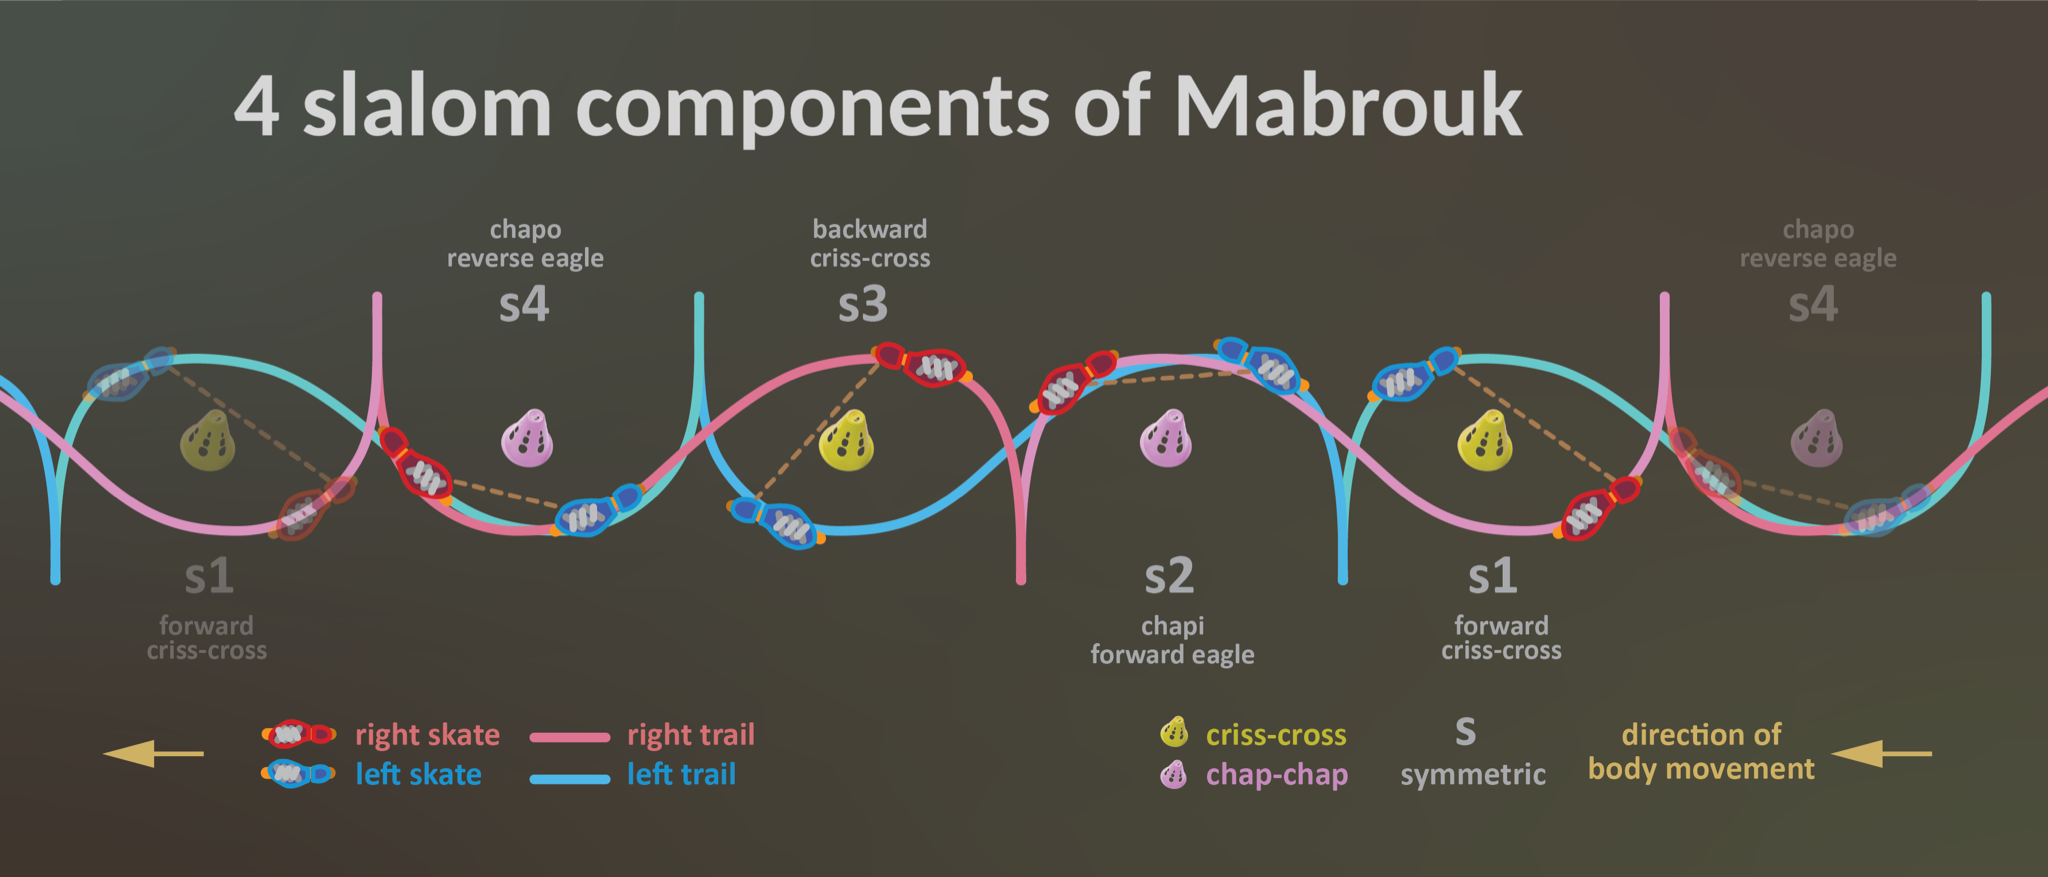
In the filmstrip and pattern diagram shown above, yellow cones mark criss-cross components, and pink cones mark eagle components. The two criss-cross components, when performed forward and backward in a sequence by themselves, form a slalom move known as Crazy. The two eagle components, when performed forward and reverse in a sequence by themselves, form a slalom move known as Chap-Chap (or Chapi-Chapo). In Mabrouk, Crazy and Chap-Chap are broken down to individual components, and remixed into something even more remarkable.
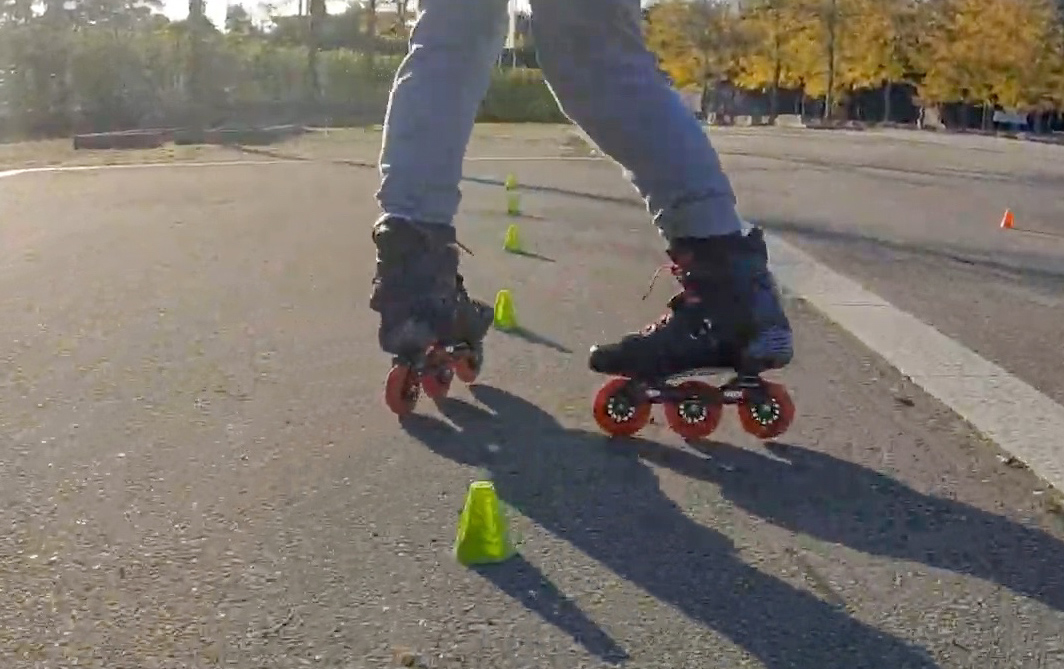
Following is a slow-motion clip showing one cycle of these four slalom components. The clip loops automatically by default. Focus on the cones, and how the two skates go around them. Identify the four symmetric distribution points s1, s2, s3 and s4 in this video.
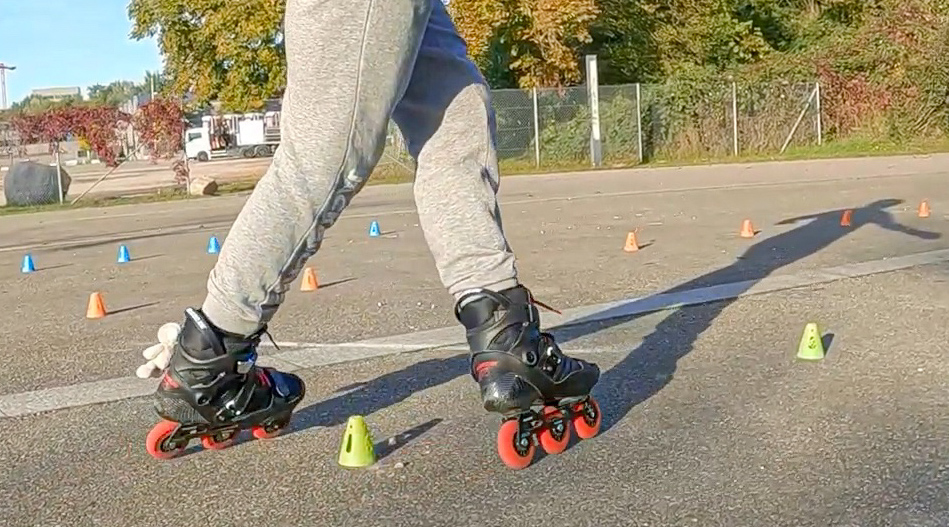
Here is another slow-motion capture of Mabrouk, from the opposite viewing angle.
Finally, as I stressed several times in part 1, there isn’t one way to learn, master and perfect Mabrouk and Grapevine. For some people, perhaps you’ll get there faster by starting with basic slalom techniques such as forward criss-cross, forward eagle, backward criss-cross, and reverse eagle. For others, learning to first string forward criss-cross and backward criss-cross into Crazy may be easier than attempting to connect forward criss-cross (s1) and backward criss-cross (s3) in Mabrouk via a forward eagle (s2). Use this article only as one of your many sources for learning. Also consult part 3 and beyond of this series, when they come out. These follow-up articles will focus on transitions and balance moments between slalom components. They will also show you how I actually learned, and how I incrementally refined my Mabrouk and Grapevine moves.
Table of Contents
- TLDR: How to learn Mabrouk
- Component s1: Forward Criss-Cross
- Component s2: Chapi – Forward Eagle
- Component s3: Backward Criss-Cross
- Component s4: Chapo – Reverse Eagle
- To cone or not to cone
- Next steps
TLDR: How to learn Mabrouk
I have spent a lot of time dissecting Mabrouk in part 1. Analytically-inclined folks may find the analysis amusing. But to the doers out there, I must have sounded like an old man droning on and on.
The truth is: most people don’t learn skating analytically. The best way to learn is to have someone skilled in the art show you how it is done properly, in person, after watching you fail a few times. Targeted teaching is best, always.
But most of us do not have such luxury or opportunities. So, for the doers out there in the world, I now give you simple instructions I wish someone had told me when I first became fascinated with Grapevine. You can ignore all of the boring analysis mentioned earlier and later. Just scan the rest of this article for the TLDR tag. It stands for “too long; did not read”. Look at filmstrips and diagrams associated to these succinct TLDR instructions. And ignore long discussions about why these simple instructions work.
I’d like to think that these simple instructions are the equivalent of pizza steps and zig-zag gliding I mentioned in How to Inline Skate, now invented for all of you doers to learn to Mabrouk without having to understand why the instructions are the way they are. In fact, I will use parts of pizza steps and zig-zag gliding instructions to describe Mabrouk.
Component s1: Forward Criss-Cross
Simple TLDR instructions: Straddle the pink cone at position p1, while turning your head clockwise to look at the next yellow cone. Make a mental note of the left skate at position b1. Now lift your left skate, swing it forward with an exaggerated movement, and plant it down there at position b1, to the right of the yellow cone. Continue gliding forward with this momentum, and focus on straddling the yellow cone at position s1 with the two skates crossed, one on each side. Once you pass s1, make a mental note of the next pink cone at b2. Look at a spot the right side of the pink cone, and take a step towards it. Specifically, lift your right skate off the ground, swing it out from behind you, and move it in front of you. Plant the right skate down at that spot. You are at balance moment b2. Now attempt to glide on the right skate for more than 3 seconds, with the left skate lifted off the ground. You’ll glide away from the Mabrouk pattern – it’s OK.
Full instructions: Start the Forward Criss-Cross straddling the pink cone at position p1, while looking at the next yellow cone. The direction you are looking at is forward. But your body is facing left, and your two skates are pointing to the left as well. Look at the left skate at position b1. That where you want your left skate to be shortly. There are two ways to start the move. A) When first learning, lift your left skate, swing it forward with an exaggerated movement, and plant it down there to the right of the yellow cone. B) Once you get the gist of A, switch to the correct way to start: forcefully twist your upper body clockwise to face the yellow cone, as you lunge head first towards that spot to the right of the yellow cone. This twisting will swing your left skate gliding forward. Catch your balance with your left skate at balance moment b1. When your left skate passes b1, your right skate will now be brought along by your body movement. Focus on adjusting your balance such that the two skates straddle the yellow cone at symmetric distribution point s1, with a crossed-over stance. Once you glide past s1, start to uncross your two legs. Shift your focus onto the next pink cone now, and lean your body forward, head first, towards the pink cone. As you uncross your two skates, point the right skate towards the right of the pink cone, and point the left skate outward to your left. When you reach half way between the yellow cone behind you, and the pink cone in front of you, your skates form a letter L. This is the balance moment b2. Finish this exercise with flair by lifting the left skate off the ground, and continue gliding forward on the right skate for as long as you can.
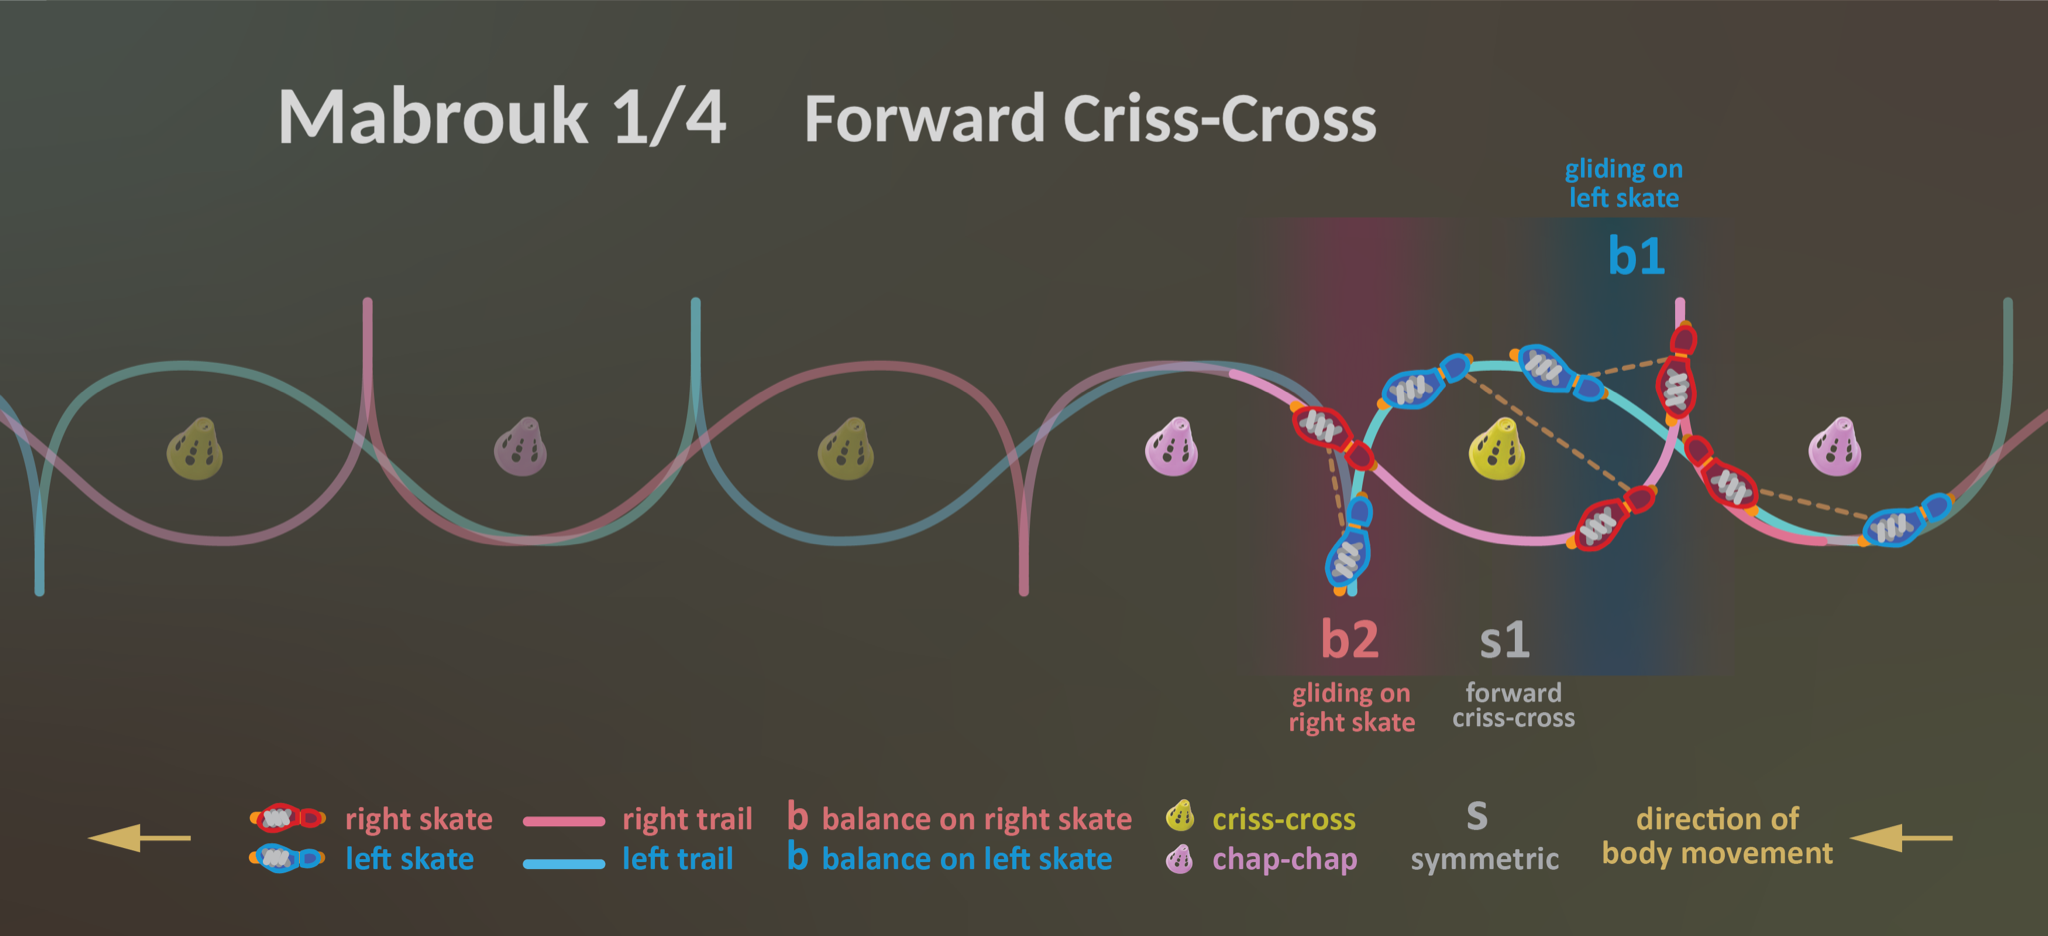
The first component of Mabrouk is a forward criss-cross around a yellow cone, as shown at symmetric distribution point s1 in the pattern diagram above. This component starts at balance moment b1, and ends at balance moment b2. When entering this component, the blue left skate assumes full body weight at b1, and glides forward on the right side of the yellow cone. When leaving this component, the red right skate has now taken over the weight of the body at b2, and glides forward towards the right side of the next cone, a pink cone.
I think practicing Mabrouk is a much better way to learn Grapevine, because the skater has cones to guide her movements as she refines them. She can start, stop and resume any part of a movement, using cones as guides track where parts start and end. This is a valuable tool for a beginner who has no prior expectations about how long each part should last, nor how far skates should move at any given part.
The forward criss-cross component of Mabrouk forces a beginner to bend her ankles and knees, in order to separate the two crossed skates far apart, such that she can clear cones. Having to skirt around the cone with crossed skates forces her to skate on her outside edges, on both skates. Recall that almost the entire Mabrouk (and Grapevine) must be skated on the outside edge. Cones serves as a silent coach who constantly coerces the skater to be on her outside edge.
Without the yellow cone enforcing outside edges as shown below left, a learner will often do lazy scissors with upright wheels and two skates close to each other, instead of a real criss-cross. If you turn component s1 of Mabrouk from a real criss-cross into lazy scissors, then your skates will not form a letter L at b2. This bad stance and bad entrance into b2 will cause you to botch the next component s2.
Deep outside edges in Mabrouk is the secret to effortless tracing of the hallmark Mabrouk pattern. When I first tried to learn Grapevine on unmarked ground, I spent a lot of time willing my skates to trace that hallmark pattern, without a lot of success. When I switched to practicing Mabrouk with cones, I didn’t have to think about willing my skates to trace that pattern. Instead, by clearing and moving around cones, my skates were put in deep outside edges without my conscious effort. Deep outside edges drove my skates to move in curved patterns automatically. I finally understood that the curved patterns of Mabrouk is a result of skates moving with deep outside edges. The curved patterns were not a result of a skater consciously moving skates to trace curved lines.

The simple instructions begin with stance p1, for preparation step 1. This stance is actually not a part of the first criss-cross component. It is in fact the last part of the fourth component, the reverse eagle. To practice a component, the skater needs to start with a setup that is a part of the previous component. Using a previous component as a prep step helps you learn to eventually string the 4 components into a single flow. As you will see later, all prep steps of the four components set up the skater “to fall”. See the article Inline skating as rhythmic falls and recoveries for terminology on falls and recoveries. This “fall” is a key part of a transition from one component to the next component, making the move a Mabrouk move.
The simple instructions tell a learner to lift a skate and make a step. Taking a step is not how Mabrouk will eventually be skated. But it is a good approximation of the eventual two-footed skating. The real gliding start for this component is hard for a beginner execute. So this simplified stepping action serves as an introduction to the real gliding start, in the same way pizza steps are a good introduction to actual zig-zag gliding. When a beginner masters pizza steps, she will naturally transition into zig-zag gliding. The same will happen with a beginner taking simple steps in Mabrouk, when the correct stance and sequence is followed, simple steps will turn into proper gliding, in time.
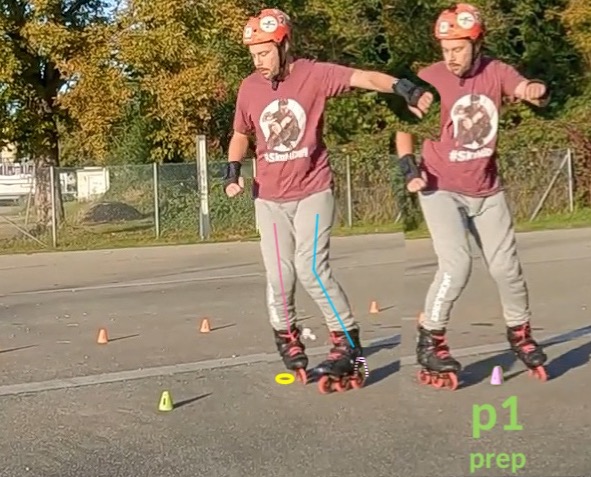
The picture above shows a skater standing with equal balance on both skates at p1. He forcefully turns his upper body clockwise to look at the yellow cone which will be his immediate target. This torso turn causes his hip to turn clockwise as well. And the hip swings the left leg, and thus the left skate clockwise, bringing the left skate to point at the yellow cone. At this point, his projected center is now outside both skates, as indicated by a yellow circle. The skater is intentionally falling towards the yellow cone. If he does not move his skates to eventually catch his fall, he will topple forward onto the cone.
This fall is how energy is injected into Mabrouk. As mentioned, no skates ever leave the ground in Mabrouk. So a skater doesn’t “kick”, in the traditional skating sense, to propel himself forward. By inducing a fall starting at p1, the skater converts potential energy into kinetic energy. Then he moves the blue left skate into the correct position at b1, to catch himself and recover from the fall. This recovery is done without absorbing the kinetic energy from the fall. Instead, the recovery in Mabrouk channels downward (kinetic) energy into a forward-moving (kinetic) energy, to perpetuate the forward momentum of Mabrouk. As you will see, this energy conversion happens at every balance moment in Mabrouk, when a non-gliding skate becomes a gliding skate at the balance moment.
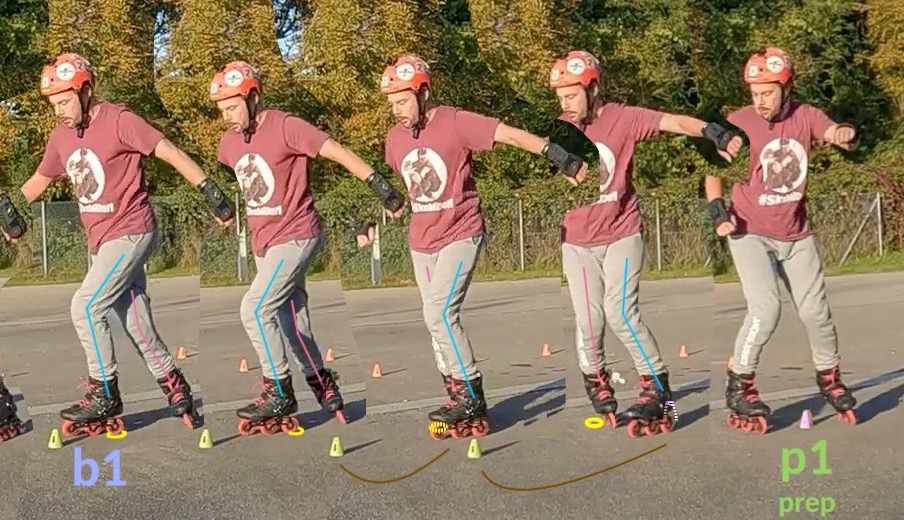
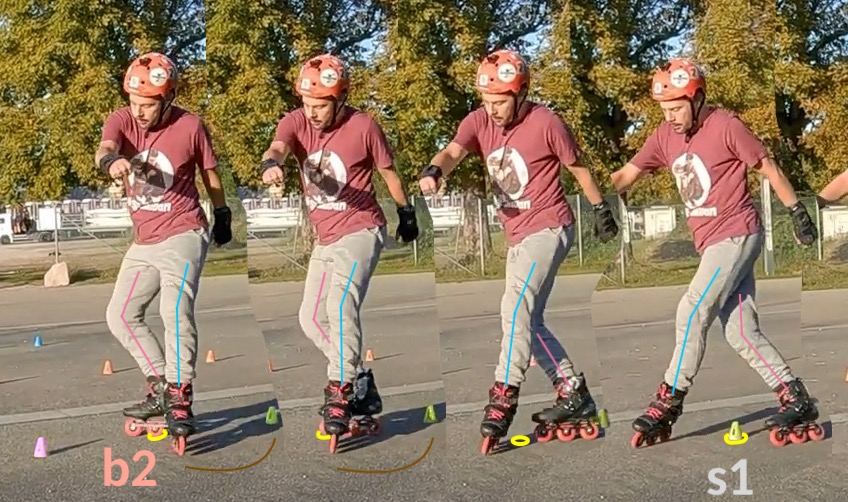
If I said that a skater never needs to use muscle power to sustain Mabrouk, I would be lying. Yes, the gliding left skate does get its initial nudge from this energy conversion at b1. But what really happens hinges on how the right skate braces against the pavement. Note how the non-gliding right skate remains fixed to the pavement, unbudging from p1 through b1, shown in the p1-to-b1 filmstrip. The non-gliding right skate is oriented at 90° to the gliding left skate. This strategic orientation of the right skate generates maximum friction against the pavement. It allows the skater to brace this non-gliding skate against the pavement as a leverage, so that he can use his muscle power to further move the gliding left skate away from this non-gliding skate, as seen between b1 and s1, as shown below. This marks the first half of the forward criss-cross.
The second half of the forward criss-cross starts at symmetric distribution point s1. From here on, the skater reverses the roles of the two skates. The red right skate now increasingly shoulders body weight, while the left skate increasingly absconds this responsibility. As the right skate shoulders more weight, its orientation aligns more with the direction of the body movement, in preparation to become the gliding skate at balance moment b2. As the left skate absconds from shouldering weight, it turns towards the left side, and rapidly stops gliding, until it becomes wedged to the pavement at b2, standing on its rear wheel.
At this balance moment b2, a skater can in fact lift the left skate completely off the ground, and can continue gliding solely on the right skate for several feet. This gliding finish would not be a part of Mabrouk, but is not a bad way to end this exercise, as the skater would need to be on a deep outside edge, in order to glide for more than a second or two at this stance where two skates form a letter L. Any exercise that perpetuates outside edges is good for learning to Mabrouk.
Before I understood how outside edges drove the curves, I attempted to move my skates to form a letter L at b2. But now I know that is akin to putting the cart before the horse. All I need to do, is to continue to maintain deep outside edges, on both skates, even after passing s1. These outside edges will automatically drive the two skates to toe out from s1 through b2, ending with the letter L at b2 without me having to maneuver my skates consciously.
Many skating moves can help you master this first component of Mabrouk. You can start by learning the plain criss-cross. Also watch this one on lemon cross. But that is only a part of this first component. Equally important are the entrance transition from the fourth component into the first component, and the exit transition out the first component into the second component.
Some tutorials opt to use a lemon as a practice entrance move into the first component, such as demonstrated in this ice-skated Grapevine video. The lemon is a quick way to launch yourself with energy into this first component of Mabrouk. It is a useful tool in the beginning. But you should eventually replace it with the preparatory step p1 described above, even though my instruction is harder to execute. You will feel underpowered until you eventually learn to trust yourself to twist your torso and to fall forward. Lingering on the lemon as a starting move will impede your mastery of the transition from b4 to b1 eventually, because it teaches away from the right transition.
Component s2: Chapi – Forward Eagle
Simple TLDR instructions: Stand at position p2, in between a pink cone in front, and a yellow cone behind. The two skates form a letter T. The left skate is the cap bar of letter T, pointing to your left. The right skate forms the vertical trunk of letter T, pointing towards a spot on the right side of the pink cone. Take a step forward with your right skate. That is, lift your right skate off the ground, lunge head first towards that spot, and catch your balance by moving the right skate forward to plant down on that spot. As you glide past position b2, focus on keeping your hips open, and making your skates form a spread eagle stance as you get to position s2. Continue to turn your upper body counterclockwise, such that you spin around the pink cone, until your back is now facing the next yellow cone. You are now skating backward. Take a step backward by standing on your right skate. Lift your left state, and move it backward behind you. At the same time, cross it with the right stake, as shown at position b3. Now attempt to glide on the left skate for more than 3 seconds, with the right skate lifted off the ground. You’ll glide away from the Mabrouk pattern – it’s OK.
Full instructions: Start the Forward Eagle by standing midway between a pink cone in front, and a yellow cone behind, at position p2. Position the red right skate to point at the right side of the pink cone. Place the heel of the blue left skate in front of the right skate, and point the toe of the left skate towards the left. The two skates form a letter T. Train your eye on the pink cone. Lunge head first towards the cone, as if you were going to fall towards the cone. Let your forward-falling body bring your red right skate gliding forward. When your right skate passes balance moment b2, your left skate will now be brought alone by your body movement. The two skates now form a move known as “spread eagle“. Make an effort to keep your hips open, and maintain this eagle stance. Use this eagle stance to continue gliding around the cone for almost 180° degrees, past the symmetric distribution point s2, until you have come to be between the pink cone and the next yellow cone. You are between s2 and b3 now. And the next yellow cone is behind your, since you have turned 180°. Lean your head backward towards the yellow cone behind you, as if you were going to fall onto it. But you catch your fall by bringing your blue left skate gliding backward towards your current 4 o’clock. Your left skate passes between your right skate, and the yellow cone, at balance moment b3. Finish this exercise with flair by lifting the right skate off the ground, and continue gliding backward on the left skate for as long as you can. Learn to lean your body far to your left as you glide backward, for proper balance while gliding.
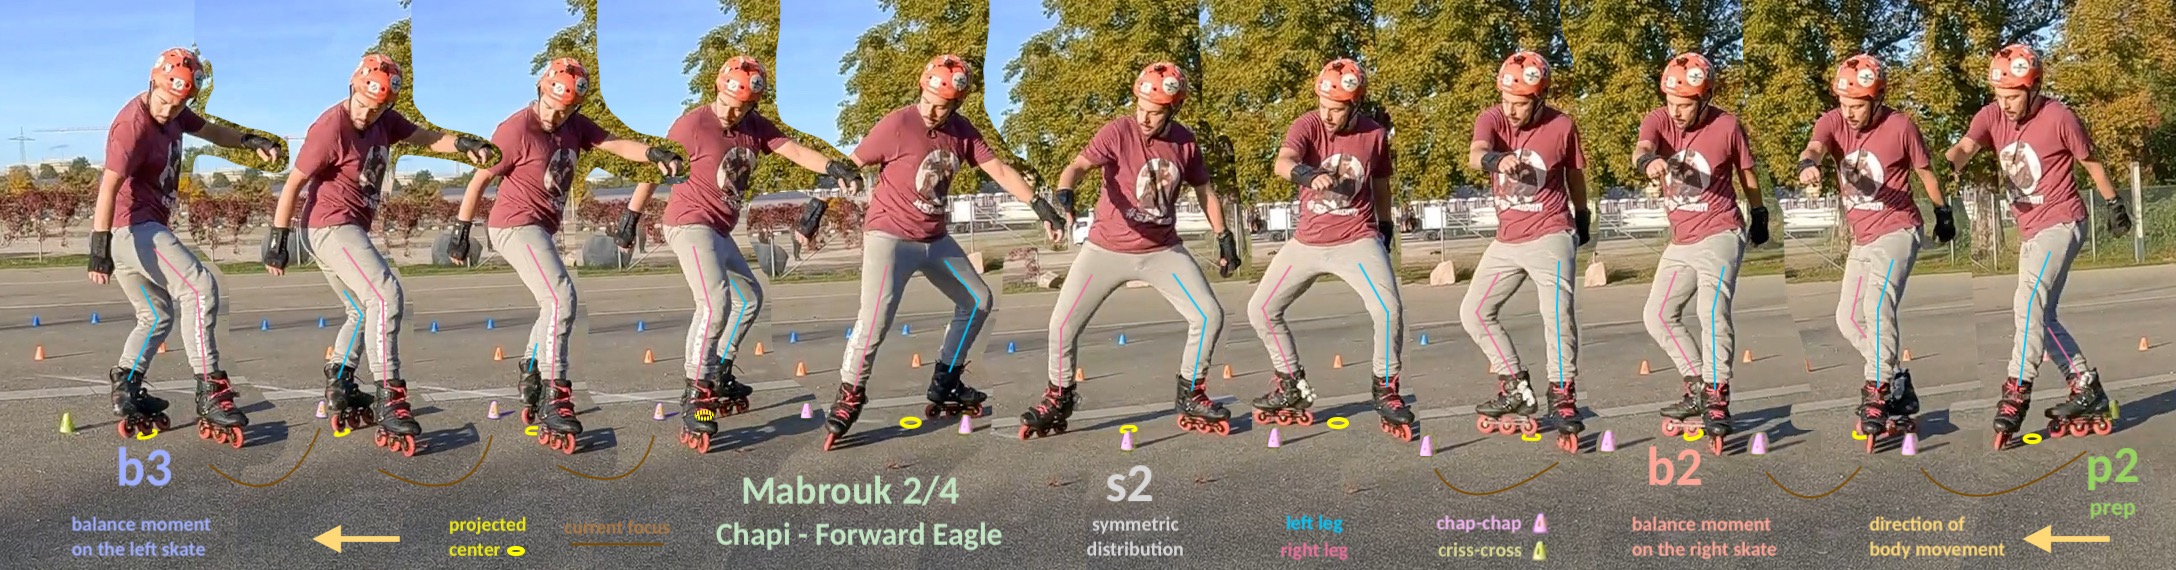
The second component of Mabrouk is a spin around a yellow cone, as shown at symmetric distribution point s2 in the pattern diagram above. This component starts at balance moment b2, and ends at balance moment b3. When the skater is in between b2 and b3, the two skates are toed out, meaning the toes of the two skates point outward, forming a spread eagle stance. This type of spin around a cone is known as a forward eagle. In Mabrouk, this spin is exaggerated, as if a skater is doing a spread eagle spinout stop.
When entering this component, the red right skate assumes full body weight at b2, and glides forward on the right side of the yellow cone. When leaving this component, the blue left skate has now taken over the weight of the body at b3, and glides “backward” towards the left side of the next cone, a yellow cone. The eagle spin is the trick that allows the skater to reverse her body orientation, while keeping the same direction of body movement, as indicated by the yellow arrow in the diagram shown above.
The pink cone, again, serves as a focus point for a skater, in executing this eagle spin. The skater can gauge her skate movements in relation to this cone, evaluate different ways to skate, and fine-tune her movements until she gets good results. Her body (or brain) will eventually commit into muscle memory all necessary controls of her body with respect to the cone. I wish I had realized this earlier. It took me a long time to ice-skate an awkward Grapevine. I found it hard to progress without anyone helping me. And I couldn’t tell what I was doing wrong, because I had no reference markings or objects on the ice to help me differentiate one way to skate versus other ways.
The simple instructions tell a learner to take a step before, and another step after spinning around a pink cone. Taking a step is not how Mabrouk will eventually be skated, as already discussed in component s1. But it is a good approximation of the eventual two-footed skating, as the full instruction teaches.
The picture below shows a skater standing with roughly equal balance on both skates at the preparation step p2. His center of gravity is located midway between the two skates as a result, indicated by a yellow circle. The left skate points towards the left, and should remain unmoving on the pavement during this step. You want to move the red right skate from behind the left skate (at p2) to in front of the left skate (at b2). There are many ways to practice this step. You can lift your right skate off the ground, and plant it down forward. To do that, with the left skate remaining immobile, you will need to lean your head and upper body forward, as if you were going to fall forward towards the pink cone. That is the key lesson of this step.
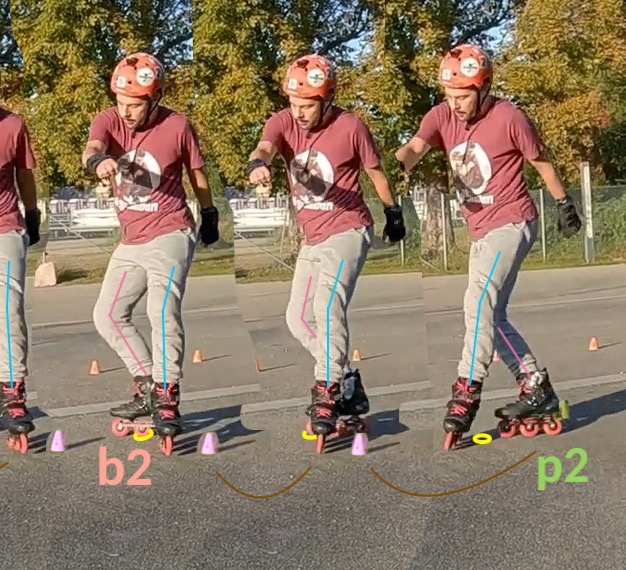
Once you have learned to trust your right skate to catch your balance as you fall forward, you can stop lifting your right skate off the ground at p2. Instead, lean your body froward, and let your leaning body tug your right skate gliding forward. Look at the hip of the skater in the picture above, from p2 to b2. The hip has turned slightly counter-clockwise. That’s just human anatomy. The positions of the two legs are such that the hip must turn as you “step” the right skate forward, while the left skate remains immobile on the ground. This hip turning is a key connection between this step, and the next step.
In the next step, it is crucial that you maintain a spread eagle stance. But don’t do a 180° eagle. Instead, the two skates form roughly a 120° angle. Using the energy injected into the right skate from the previous step, the two skates at this angle allows you to spin around the cone. Don’t try to move your skates to trace this semicircle around the cone. Instead, focus on forming and keeping the correct angle such that your skates bring you to spin around the cone.
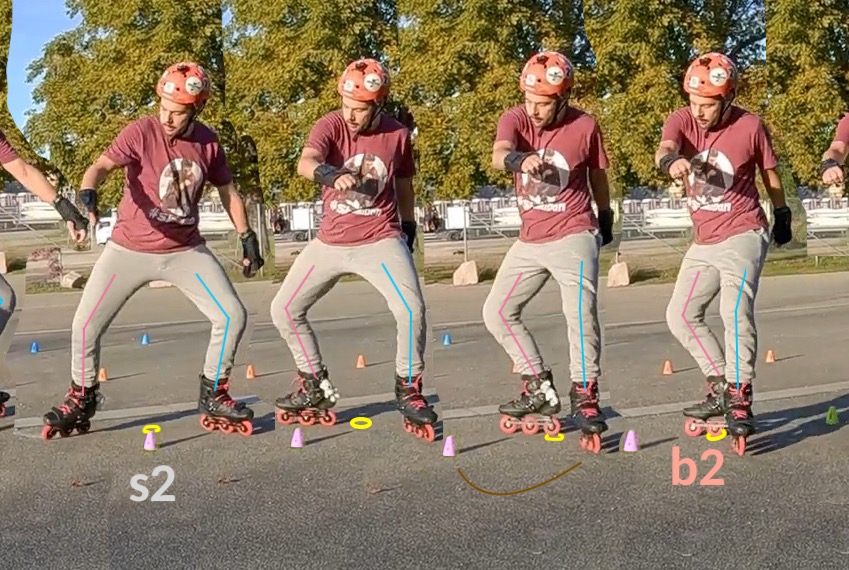
Just like in component 1, you need to continue to inject even more energy into this component 2, at this second step. Follow the right skate in the picture above from b2 to s2. Observe how the right skate continues to separate from the left skate from b2 to s2. This is a result of the skater willing his muscles to “kick” the right skate outward starting at b2, using the left skate as leverage against the pavement. After you “kick” the right skate outward, your body will eventually tug on the left skate, and bring it out of its immobile position, to partake in the spin.
The left skate was immobile earlier at p2 and b2. Then it started to glide from b2 to symmetric distribution point s2. Starting at s2, the left skate begins to shoulder more weight than the previously-gliding right skate. If you follow the yellow circle representing the projected center of gravity, you will see that the left skate and the yellow circle inch closer to one another, until they become one at b3. The blue left skate becomes the sole gliding skate at b3 as a result. And the red right skate has now ceased to glide, and becomes fixed immobile to the pavement at b3.
This exit stance at b3 is crucial for launching into the third component of Mabrouk. At this balance moment b3, the skater can in fact lift the right skate completely off the ground, and continue gliding solely on the left skate backward for several feet. This gliding finish would not be a part of Mabrouk, but is not a bad way to end this exercise, as the skater would need to be on a deep outside edge, in order to glide for more than a second or two at this stance. As you will see in the next component, having the left skate in deep outside edge as you transition into the third component is one key ingredient for success.
Many skating moves can help you learn this second component of Mabrouk. You can start by just spinning around a cone. This won’t teach you the entrance stance to the second component, nor the exit stance. But you will get a feel about the spinning part of this component. I found that managing to learn parts of the Lion move useful as well. It helped me figure out how to push a skate forward in a spin using the heel, and how to pull a skate backward in a spin using the toe. You can also try the spread eagle spinout stop. But you do not need to completely master these extra moves to perfection. Simply knowing about these moves, and being able to do a small part of each will already help you skate the s2 component of Mabrouk better.
Component s3: Backward Criss-Cross
The slalom component s3, a backward criss-cross, is an exact mirror copy of component s1, a forward criss-cross. Open another browser window, and compare instructions for s3 to that for s1. I’ll have more to say about this mirrored nature later.
Simple TLDR instructions: Straddle the pink cone at position p3, while turning your head clockwise to look at the next yellow cone. Make a mental note of the left skate at position b3. Now lift your left skate, swing it backward with an exaggerated movement, and plant it down there at position b3. Your left skate started this swing on the left side of your body, and ends up on the right side of your body – a crossing step. And you are skating backward – see the stance of your body at b3. Continue gliding backward with this momentum, and focus on straddling the yellow cone at position s3 with the two skates crossed, one on each side. Once you pass s3, make a mental note of the next pink cone. Look over your right shoulder at a spot next to the pink cone, and take a step backward towards it. Specifically, lift your right skate off the ground, swing it out in front of you, and move it behind you. Plant the right skate down at that spot on the ground. You are at balance moment b4. Now attempt to glide on the right skate for more than 3 seconds, with the left skate lifted off the ground. You’ll glide away from the Mabrouk pattern – it’s OK.

Full instructions: Start the Backward Criss-Cross straddling the pink cone at position p3, while turning your head clockwise to look at the next yellow cone. The direction you are looking at is forward as far as the overall body movement is concerned for the entire Mabrouk sequence. But in this component, you will be skating backward towards the yellow cone. In this instruction, “right” refers to the right side of your body, and “left” refers to the left side of your body, not with relation to the overall trajectory of your body. Look at the left skate shown at position b3. Note its location with respect to the yellow cone. That where you want your left skate to be shortly. There are two ways to start the move. A) When first learning, lift your left skate, swing it backward with an exaggerated movement, cross it over to your right side (and behind), and plant it down there to next to the yellow cone. B) Once you get the gist of A, switch to the correct way to start: forcefully twist your upper body counterclockwise, so your back faces the yellow cone, as you lean your head backward towards that spot next to the yellow cone. This twisting will swing your left skate gliding backward. Catch your balance with your left skate at balance moment b3. When your left skate passes b3, your right skate will now be brought backward along by your body movement. Focus on adjusting your balance such that the two skates straddle the yellow cone at symmetric distribution point s3, with a crossed-over stance. Once you glide past s3, start to uncross your two legs. Now shift your focus onto the next pink cone behind you, looking over your right shoulder. Lean your body backward again, head first, towards the pink cone. As you uncross your two skates, point the heel of the right skate towards your right, and point the heel of the left skate outward to your left. When you reach half way to the pink cone behind you, your skates form a reversed letter L. This is the balance moment b4. Finish this exercise with flair by lifting the left skate off the ground, and continue gliding backward on the right skate for as long as you can.
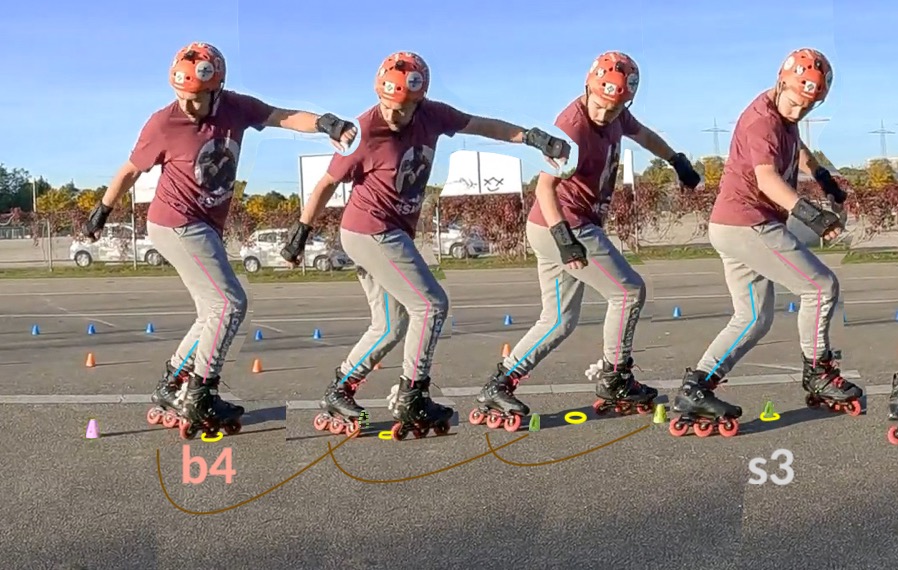
I wrote earlier that component s3 is a mirror version of component s1. Following picture illustrates the mirrored relationship. The bottom portion shows a flipped filmstrip of the forward criss-cross, where the direction of flow is reversed by the flip, in comparison to the top portion where backward criss-cross is illustrated. Compare the top filmstrip to the bottom filmstrip, and confirm to yourself that these two components are truly mirror versions of each other.
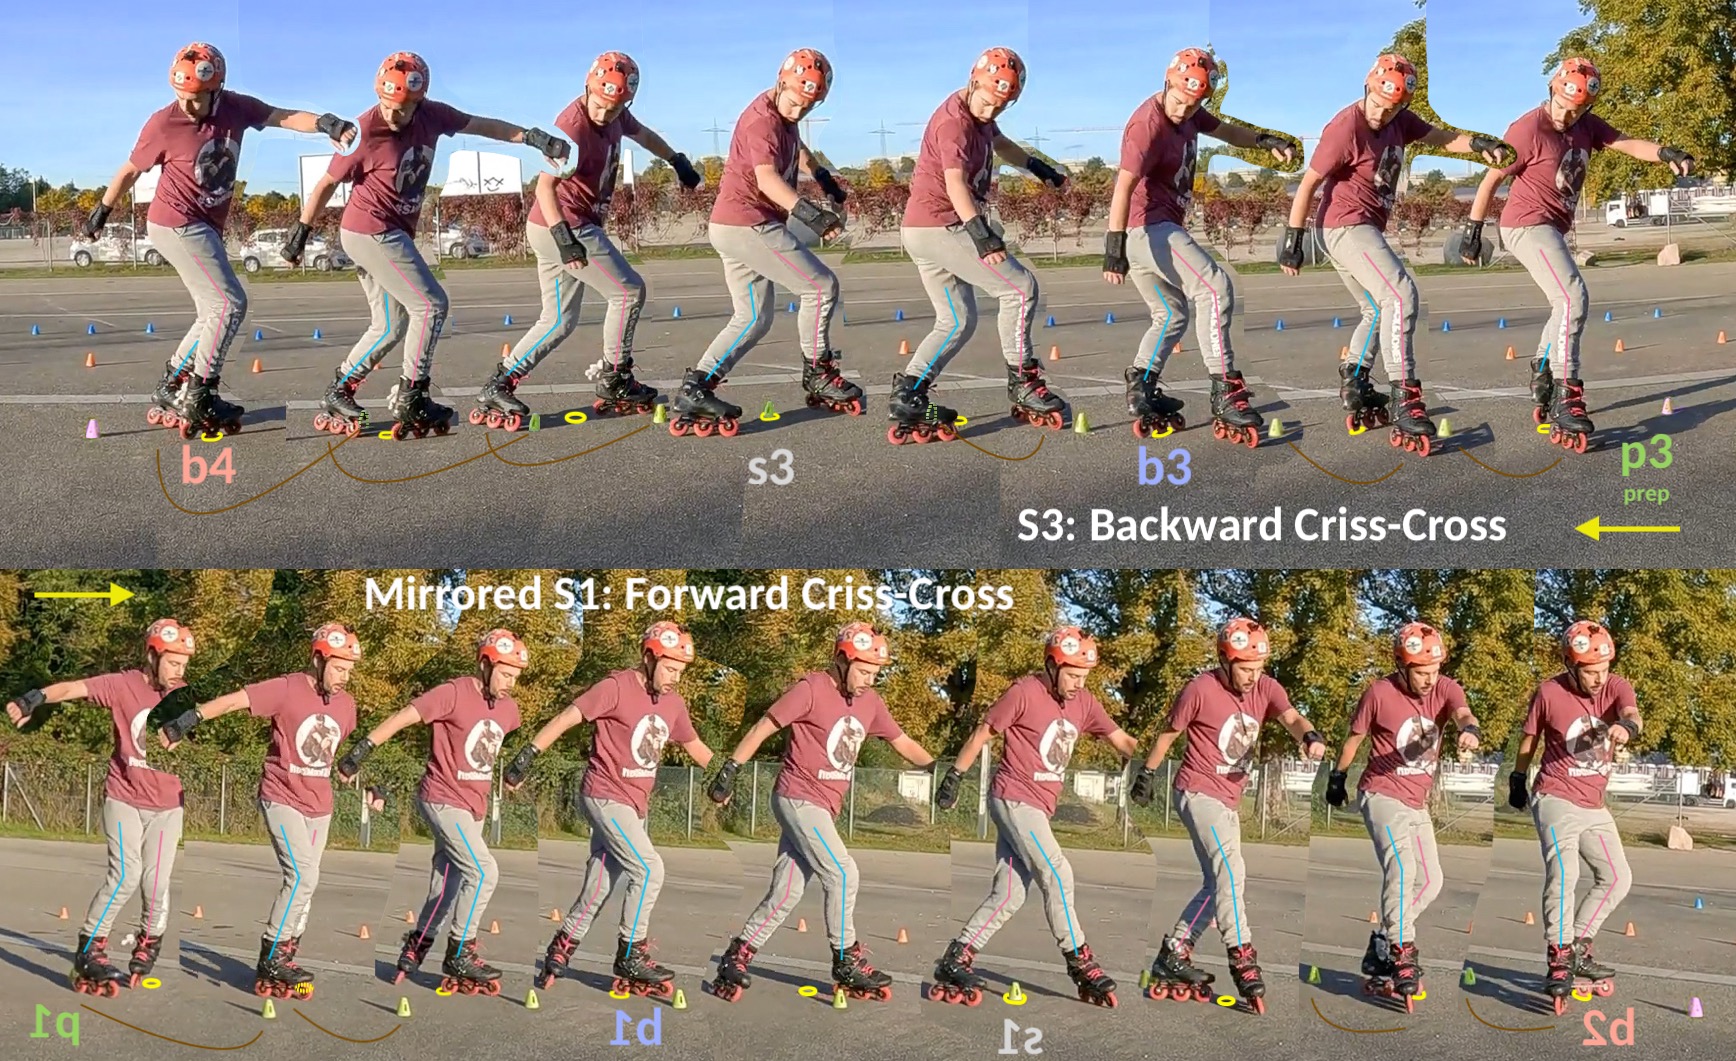
You may also contrast both simple and full instructions for s3 to those of s1. Even the instructions are mirrored versions. Specifically, the instructions are forward-backward mirrored. The left skate and the right skate play the same roles in the two components. In both components, the two skates cross over each other at the beginning of the step, and uncross at the end of the step. In both components, the two skates straddle a yellow cone at a symmetric distribution point (s3 in the third component). The only difference between the two components is the reversed direction of skates in component s3.
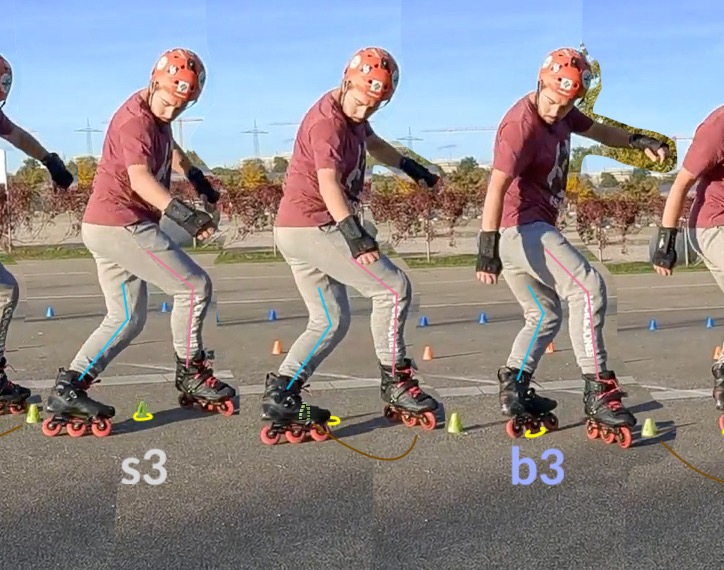
The picture below illustrates the preparatory step for a skater to get into balance moment b3 which is the real starting point of this backward criss-cross component. Just like for component s1, the simple instructions for component s3 instructs a beginner to lift the left skate at p3, and swing it backward to step onto the right place at b3. This simplified preparatory step will naturally mature over time into a gliding version as depicted below. The skater must lean backward, and turn his hip counterclockwise, in order to move or glide the left skate into position at b3, on a deep outside edge. At p3, both skates shoulder equal body weight. By b3, the left skate takes over that role by itself, and is the only skate that glides. This is indicated by the yellow circle right under the left skate at balance moment b3, showing that the projected center of gravity is exactly where the left skate is.

Recall that the skater stands still at p3, and becomes gliding on the left skate at b3. Thus energy has been injected into this step in between these two points. Just like I explained for p1 and b1 earlier, for the first component, the body twisting and leaning induces this momentum, via a fall and a recovery (by the left skate). If you find it difficult to initiate movement this way when first learning Mabrouk, you may instead start with the previous component, the forward eagle. You then transition from that component into this component, using momentum you generated from the eagle spin. As you become more proficient, come back to practice starting at p3 standing still. You will need to eventually master the injection of energy at every preparation step, in order to sustain a continuous Mabrouk move.
As you glide backward on the outside edge of the left skate at b3, you continue to lean backward, and “prod” the left skate to continue gliding away from the right skate which is firmly planted on the pavement. Some people may interpret this as your leg muscles forcing the two skates apart. Nonetheless, the result is the same. At some point your right skate will be pulled by your backward-moving body out of its stationary stance, and it too will begin to glide. You want to focus on crossing these skates even more than they are already crossed. You achieve that by pointing the heel of the right skate as far to your left as you can, and by continuing to point the heel of the left skate as far to your right as you can. It helps to bend your ankles and your knees to get best results, as this enables farthest reaches of these two skates. At some point, your skates cannot separate from one another any further, and you are straddling the yellow cone. That is the symmetric distribution point s3, where the projected center falls between the two skates, exactly where the yellow cone is.
From s3 on, you now uncross the two skates. But first, continue to look over your right shoulder, and identify the next pink cone. It is behind you, and may be hard to see. If you can’t see it initially, don’t worry too much about it. You know it’s there. Keep your back towards the pink cone. You will now point heels of both skates towards each other, to bring them to glide past each other, so that your right skate returns to its natural position on the right side of your body, and the left skate on the left side of your body. This uncrossing of skates from s3 through b4 is arguably one of the hardest part of Grapevine to learn. But with Mabrouk, you can master this tricky movement by focusing your mind on “criss-crossing” the yellow cone. After all, that’s the name of this third component. Watch this tutorial on backward criss-cross if you need additional help.
Once you can uncross your skates, you can start to practice placing your body weight on only the right skate, at balance moment b4. You achieve this by leaning your head backward and to the right. This shifts your body weight to coincide with where your right skate will be, at balance moment b4. The skater can in fact lift the left skate off the ground at b4, and continue gliding backward solely on the outside edge of the right skate. As was the case at the mirror balance moment b2 earlier, the skater must be in deep outside edge in order to glide for more than a second or two on the right skate.
Component s4: Chapo – Reverse Eagle
The slalom component s4, a reverse eagle, is a mirror copy of component s2, a forward eagle. Open another browser window, and compare instructions for s4 to that for s2. I’ll have more to say about this mirrored nature later.
Simple TLDR instructions: Stand at position p4, in between a pink cone behind you, and a yellow cone next to your right skate. Start by holding a scissor stance, with your right skate in front, and your left skate behind. But pivot your left skate clockwise on its toes, so that your left skate points to your right. Now turn your head clockwise 180° to look at the pink cone behind you. At the same time swing your right skate backward, heel pointing to your right. You can lift the right skate slightly off the ground at the start of this swing. In between p4 and s4, you will pass through the balance moment b4. Plant your right skate down on the pavement at b4. As you glide past b4, your body will tug on your left skate, and it will start moving to encircle the pink cone. You will continue to spin clockwise around the pink cone this way, with toes of skates pointing at each other, as you glide past s4, until you face the next yellow cone. This stance is called a reverse eagle. Now take a step forward by standing on your right skate. Lift your left skate, and move it forward at 2 o’clock to cross in front of the right skate. Plant your left skate down as shown at balance moment b1. Now attempt to glide on the left skate for more than 3 seconds, with the right skate lifted off the ground. You’ll glide away from the Mabrouk pattern – it’s OK.
Full instructions: Start the Reverse Eagle by standing in between a pink cone behind you, and a yellow cone next to your right skate, at position p4. Remember that at p4, your body is moving backward. So the pink cone behind you is the next target. Start by holding a scissor stance, with your right skate in front, and your left skate behind. But pivot your left skate clockwise on its toes, so that your left skate point to your right. This is an unconventional posture. But it’s the key to a streamlined Mabrouk/Grapevine. Now turn your head clockwise 180° to look at the pink cone behind you, and at the same time let your turning body swing your right skate backward, heel pointing to your right. Aim to plant your right skate down beyond the pink cone at s4, after it traces backward half a circle around the pink cone. In between p4 and s4, you will pass through the balance moment b4. As you glide past b4, your body will tug on your left skate, and it will start moving to encircle the pink cone. Focus on pointing toes of both skates towards each other, and bringing knees together to form a “reverse eagle“. You will continue to spin clockwise around the pink cone this way, as you glide past symmetric distribution point s4, until you face the next yellow cone. You have turned 180° clockwise, and your body is now again moving forward. Take a step forward with your left skate, while standing on your right skate. Specifically, lift your left skate, lunge forward head first, and bring the left skate forward at 2 o’clock to cross in front of the right skate. Lean your upper body forward as if you were going to fall onto the yellow cone in front of you. But you catch your fall by bringing your blue left skate gliding forward, to shoulder your full weight at balance moment b1. Your left skate passes between your right skate, and the yellow cone, at balance moment b1. Finish this exercise with flair by lifting the right skate behind you off the ground, and continue gliding forward on the left skate for as long as you can. Learn to lean your body far to your left as you glide forward, for proper balance while gliding.
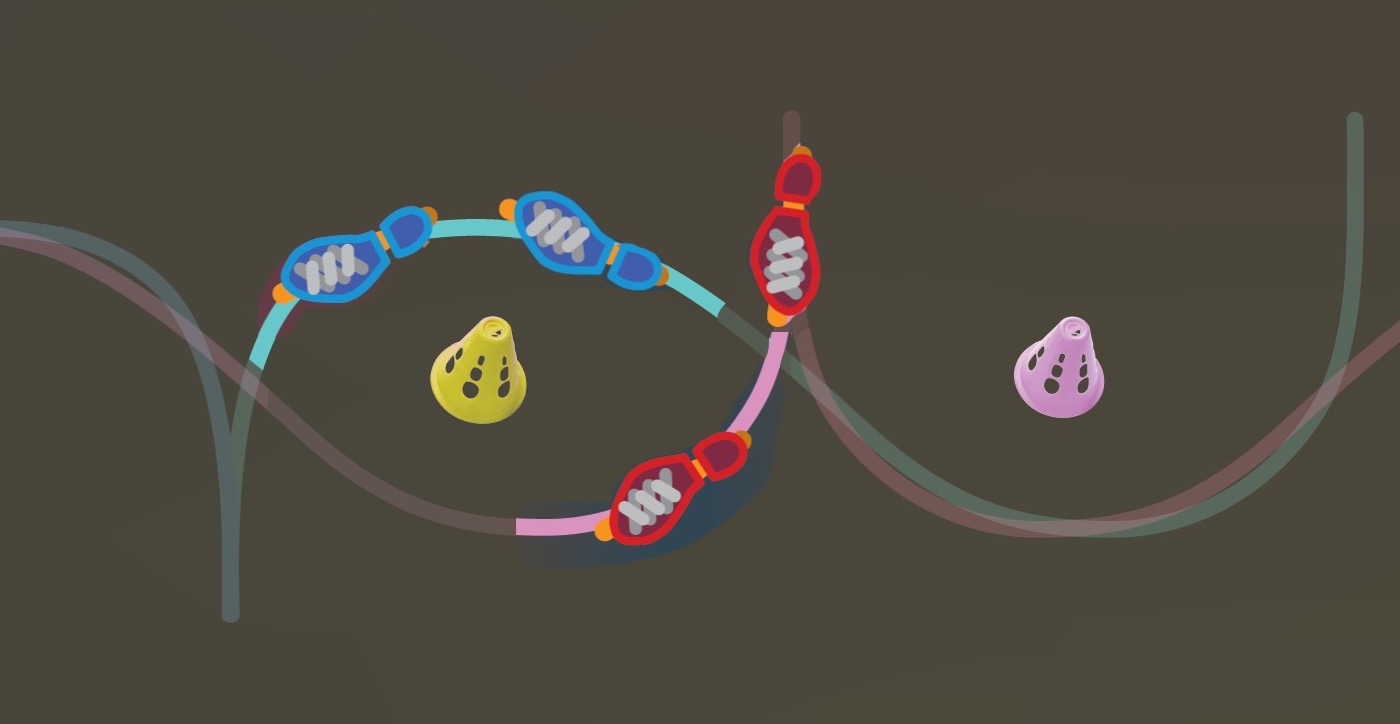
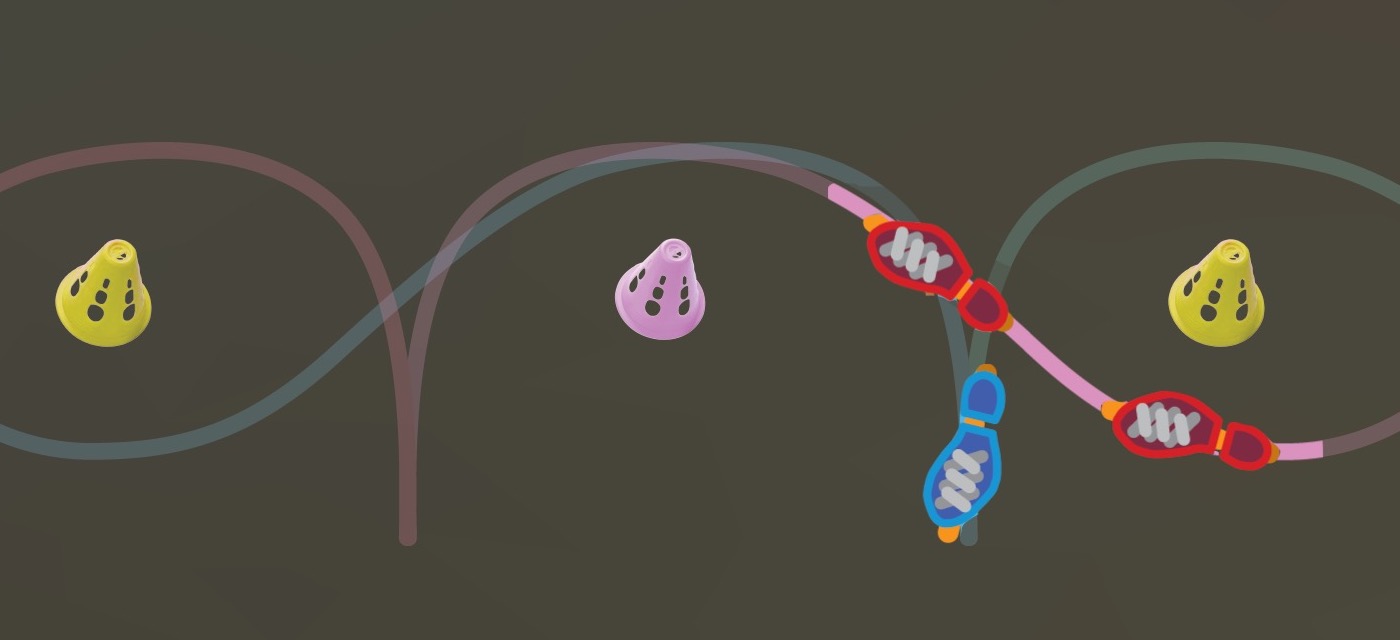
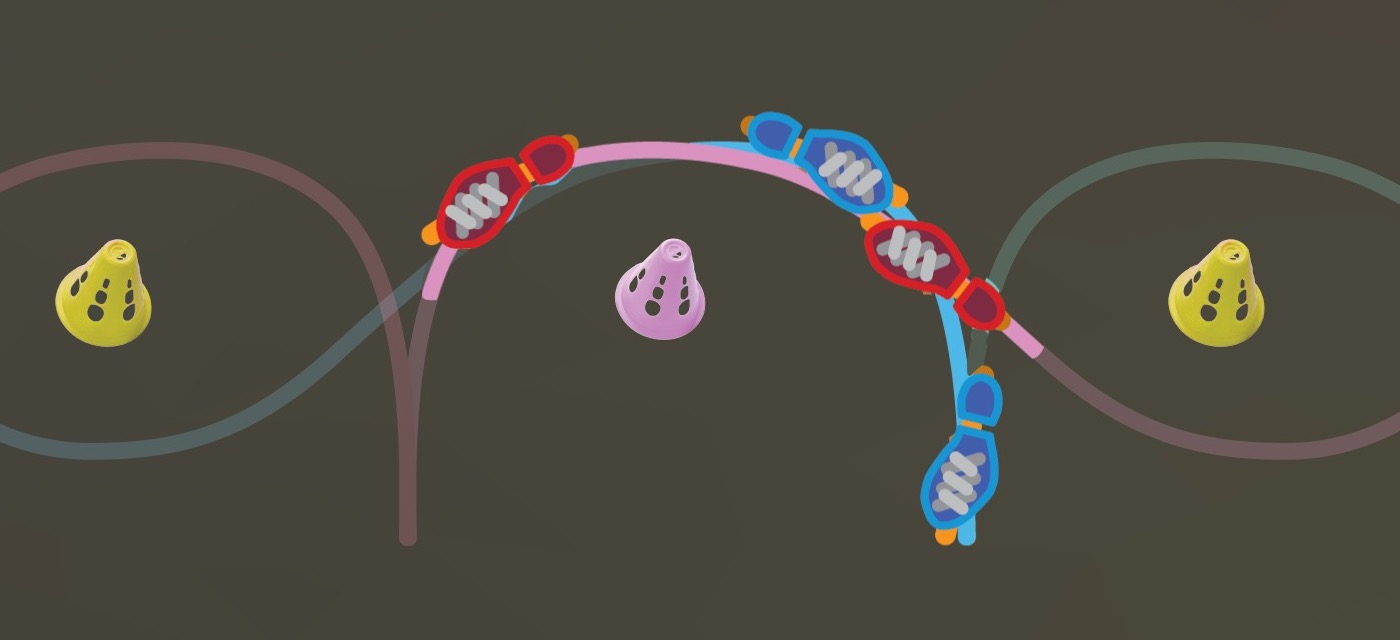
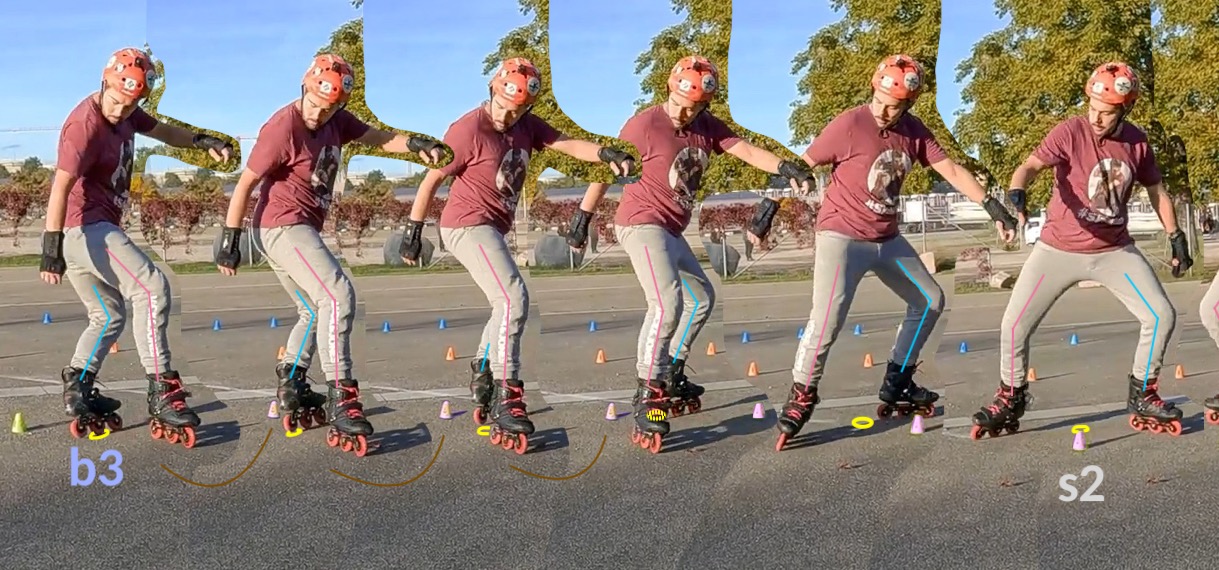
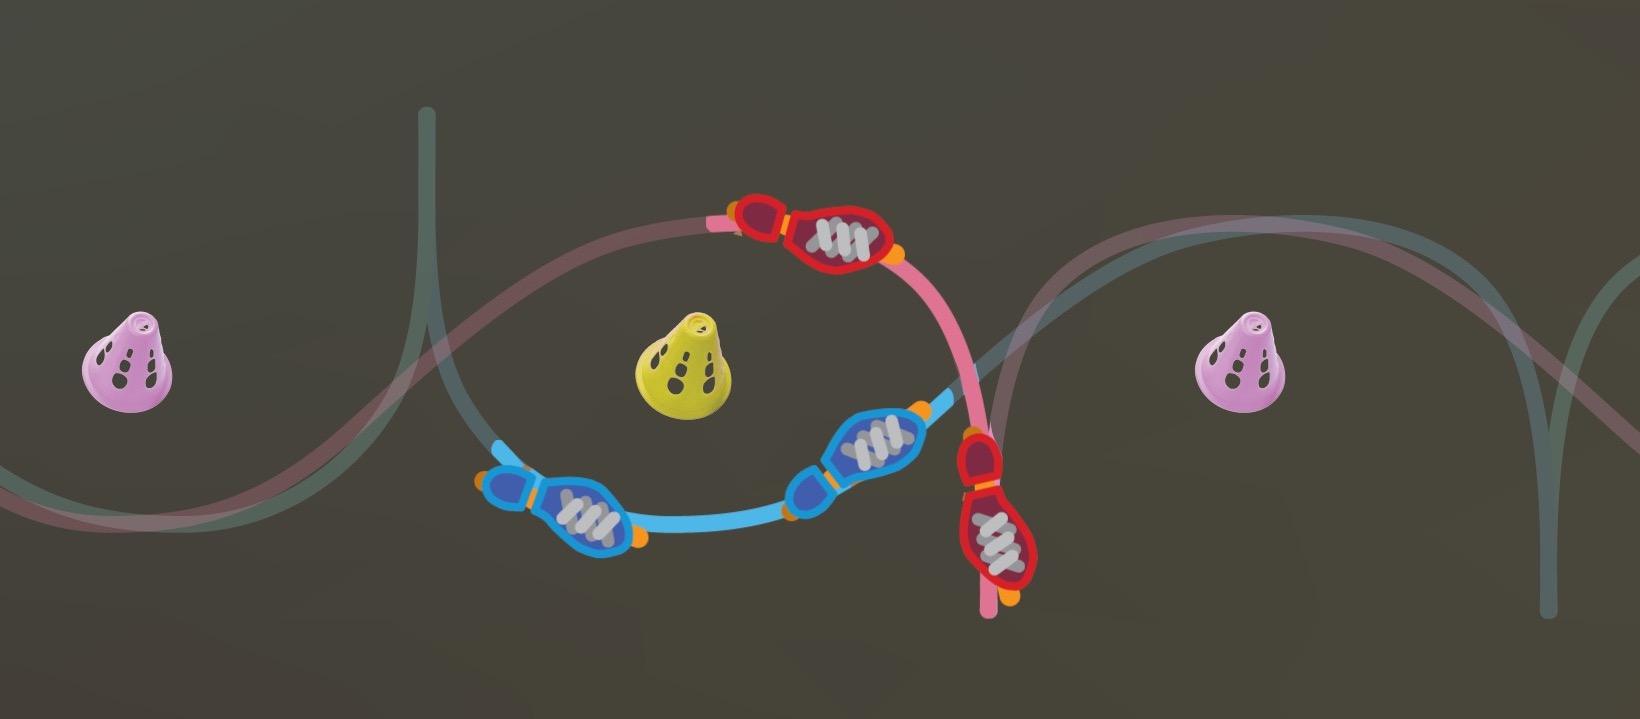
I wrote earlier that component s4 is a mirror copy of component s2. Confirm this using the following comparison. The bottom of the image shows a filmstrip of a forward-eagle spin around a pink cone, in comparison to the top portion where a reverse-eagle spin is illustrated. At a glance, the mirror nature may be hard to discern. So start by observing that the skater moves backward in s4, and forward in s2. Secondly, the skater has his back towards the pink cone as he spins around it in s4, but stares at the pink cone in front of him in s2. These are exact opposites.
However, the right skate and the left skate plays identical roles in these two opposite moves. Track the right leg marked with red lines in both filmstrip, following the direction of the yellow arrow. Note how the right skate glides from p4 (or p2) through b4 (or b2). The right skate then spins around a pink cone, passing through s4 (or s2). The right skate is subsequently driven sideways until it can no longer glide, and remains parked immobile until b1 (or b3). Now, track the left leg instead which is marked with blue lines. The left leg and the left skate start at p4 (or p2) immobile. In both filmstrips, the left skate is used as leverage to move the right skate from p4 (or p2) to b4 (or b2). Shortly after, the left skate is pulled by the moving body, to glide and spin around a pink cone. It continues gliding even after the spin ends, and becomes the weight-bearing skate, as the skater transitions into the next slalom component at b1 (or b3).
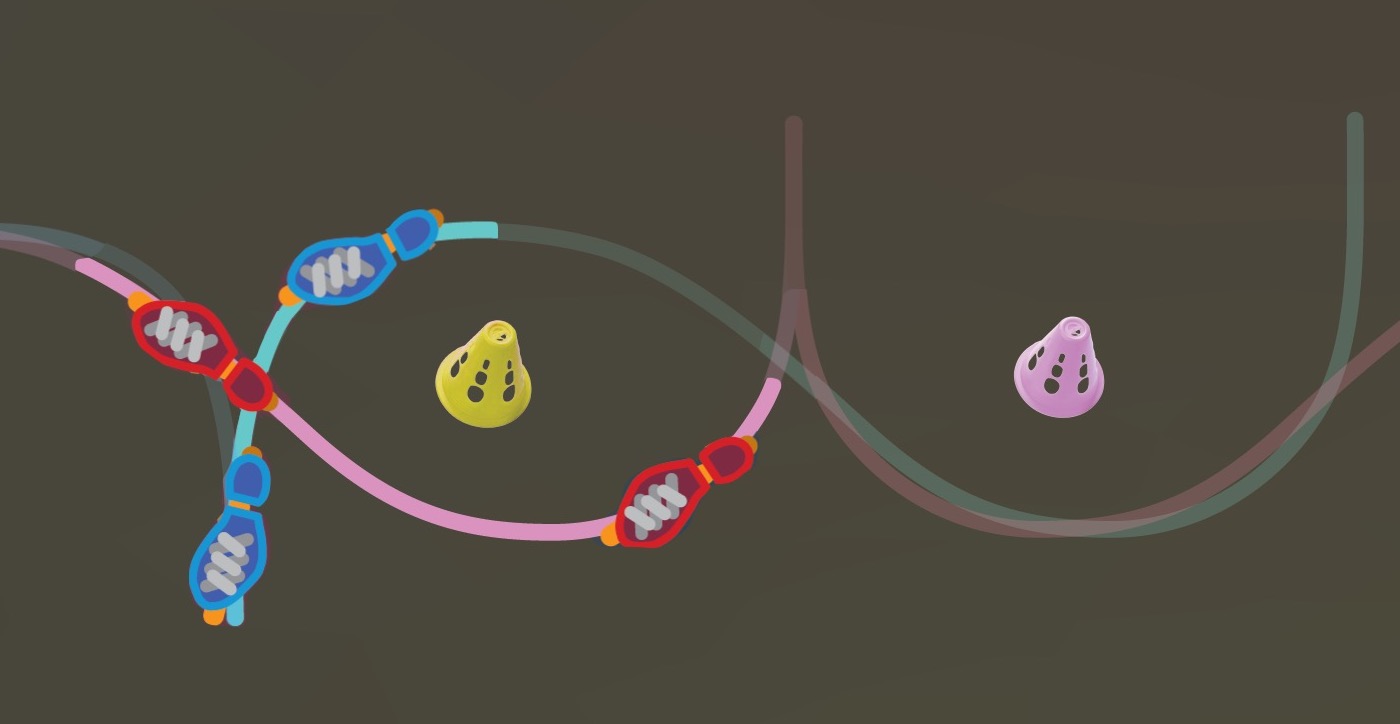
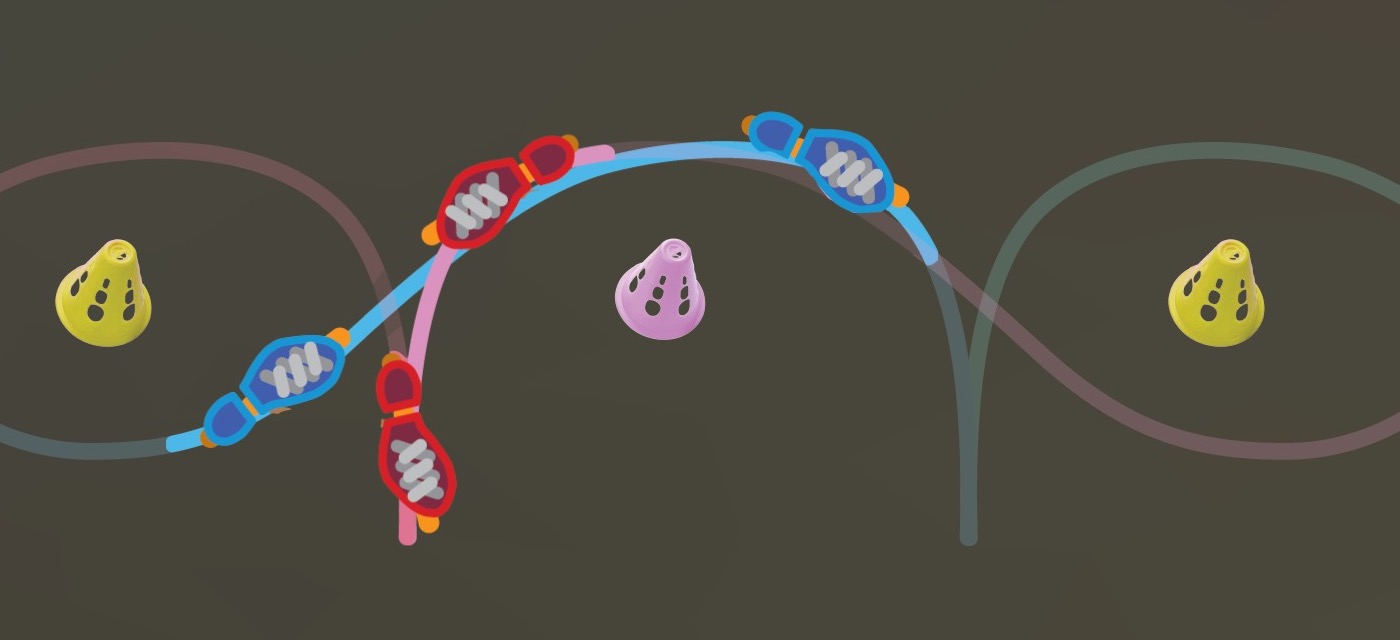
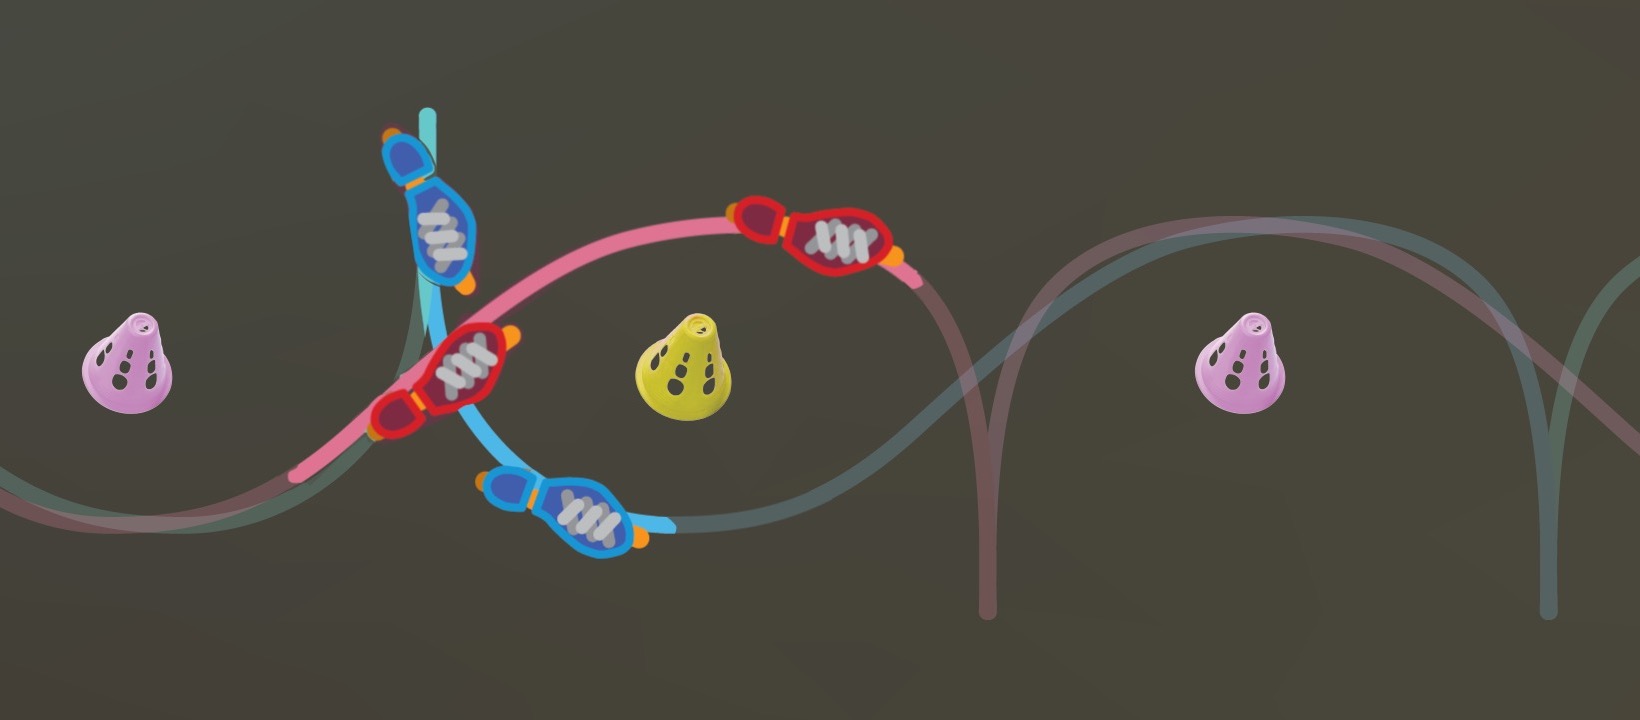
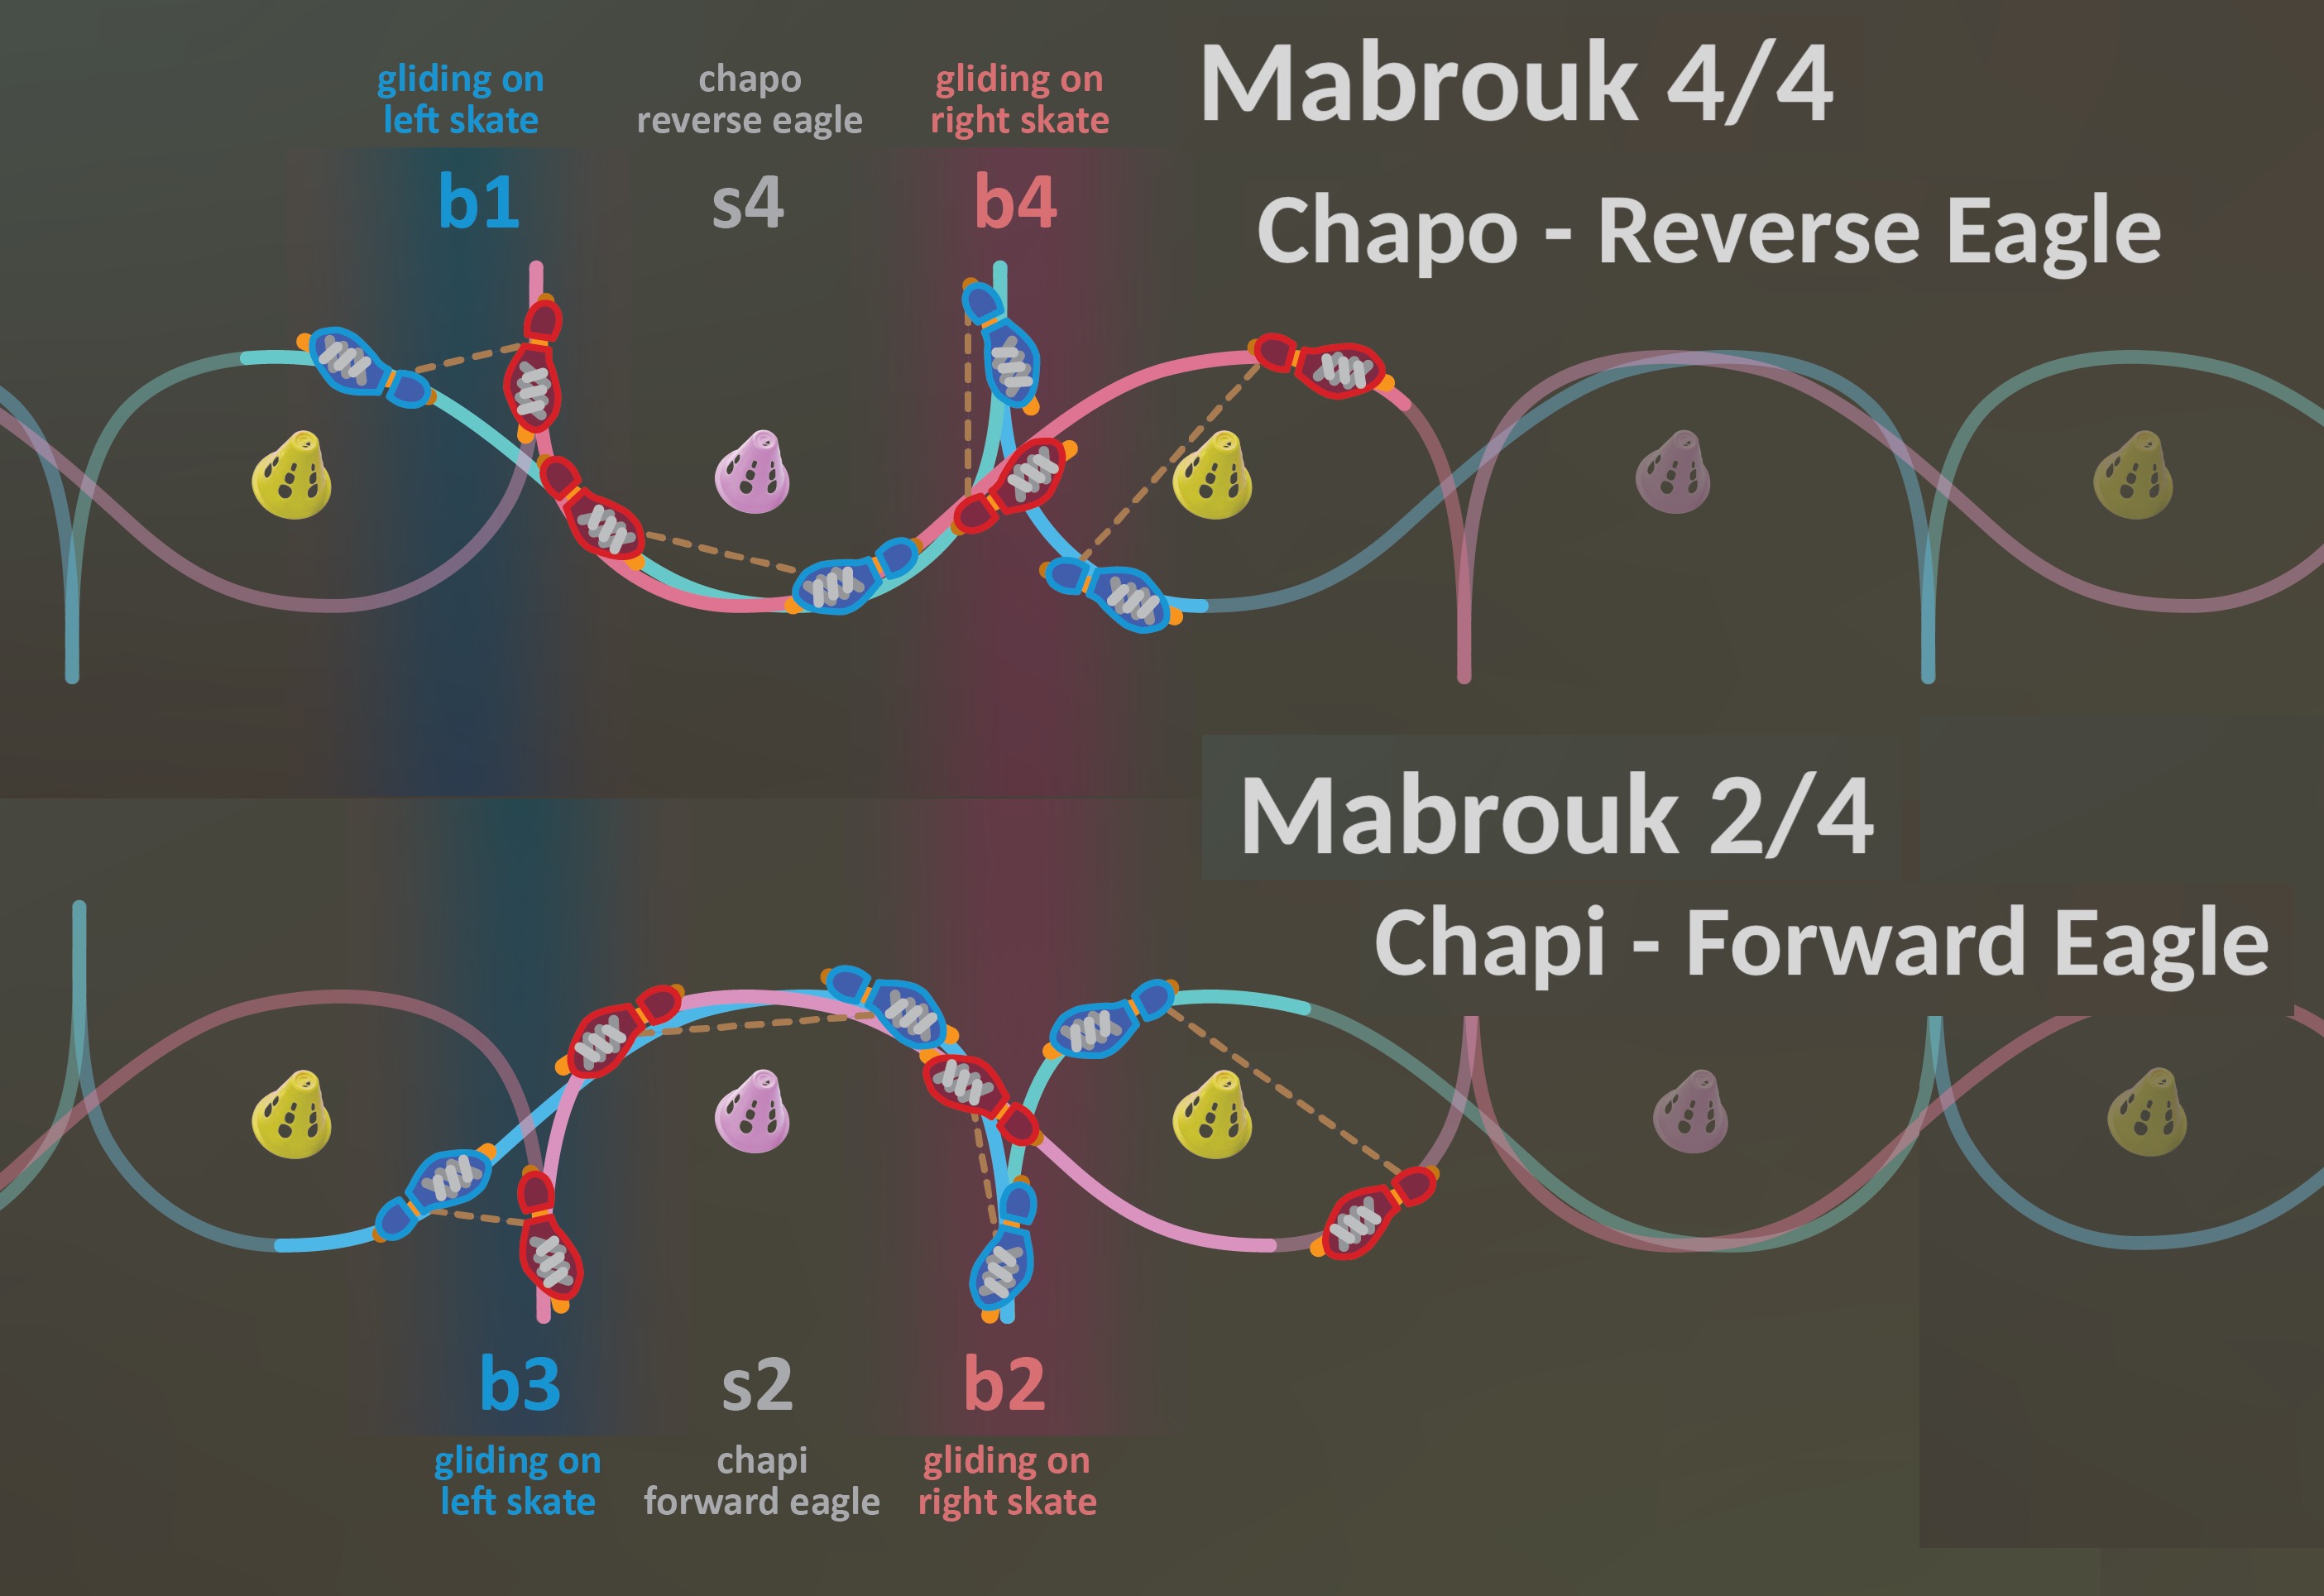
The mirrored nature of component 4 is clearly seen in the comparison of two pattern diagrams shown below.
The simple instructions tell a learner to take a step before, and another step after spinning around a pink cone. Taking a step is not how Mabrouk will eventually be skated, as already discussed in the mirror component 2. But it is a good approximation of the eventual two-footed skating, as the full instruction teaches.
The picture below shows a skater standing with equal balance on both skates at the preparation step p4. His projected center of gravity is located midway between the two skates as a result, indicated by a yellow circle. Recall from the discussion of component 3 earlier that from p4 through b4, the skater is “uncrossing” skates. Keep that in mind as you read on. The left skate is parked perpendicular to the line of body travel, and should remain unmoving on the pavement during this step. You want to move the red right skate from in front of the left skate (at p4) to behind the left skate (at b4). There are many ways to practice this step. You can lift your right skate off the ground, and plant it down behind you. To do that, with the left skate remaining immobile on the ground, you will need to twist your hip clockwise. To twist your hip, first turn your head clockwise to look at the pink cone behind you. As you have no doubt noticed throughout this article, I often urge a skater to initiate a skate movement by first turning the head, or lunging in a direction head-first. Where you head goes, your free skate follows.

Once you learn to use your head and hip to make a step with your right skate, you can stop lifting your right skate off the ground at p4. Instead, make an even more forceful head turning, causing your body and hip to pull on the right skate, and swing it gliding outward and backward. You stand still at p4, before turning your head. By turning your head and thus twisting your body clockwise, you inject enough energy into the move such that the right skate now glides past b4, and continues to glide backward.
In the next step, it is crucial that you maintain a reverse eagle stance. But don’t do a 180° reverse eagle. Instead, the two skates form roughly a 100° angle. Using the energy injected into the right skate from the previous step, the two skates at this angle allows you to spin around the cone. Don’t try to move your skates to trace this semicircle around the cone. Instead, focus on forming and keeping the correct angle such that your skates bring you to spin around the cone.
You have now reached the very last step of Mabrouk. This very last step should lead you back into the beginning of the slalom component 1 of Mabrouk. In fact, this very last step from s4-to-b1 is almost the same as the preparatory step from p1-to-b1 that you have already practiced earlier. This step leverages kinetic energy generated in the s4 reverse eagle spin. Your upper body and you hip continue the clockwise turning from s4, adding even more kinetic energy. But your right skate eventually comes to a stop, as its heel points outward your right side. You now lean your head forward towards the yellow cone, bring your center of gravity off the parked right skate, towards the yellow cone. Follow the yellow circle in the diagram below, to see how your center of gravity moves from between two skates at s4, to being completely under the left skate at b1. You channel all kinetic energy into the left skate, causing it to glide, while the right skate serves as leverage against the pavement. You then catch your balance at balance moment b1. And a new Mabrouk cycle starts.

There is a reason I preach starting to learn Mabrouk with the strange step p1-to-b1. This is from my personal experiences. For a long time I could not gracefully connect the end of a Mabrouk cycle to the beginning of the next cycle. This transition was a part that plagued me for a long time. I used to start a Mabrouk cycle using a lemon as an entrance step to inject energy. It was a convenient crutch. But it prevented me from mastering the transition from s4 to b1 properly. Once I switched to the prep state p1-to-b1, I was finally able to perform perpetual cycles of Mabrouk.
To cone or not to cone
As I mentioned earlier, it took learning slalom Mabrouk for me to truly understand Grapevine. And cones really brought the four slalom components of Mabrouk into focus. While manipulating around a cone, I am forced to concentrate on executing a slalom component. When in between cones, I shift my attention to stringing two slalom components together via a smooth transition.

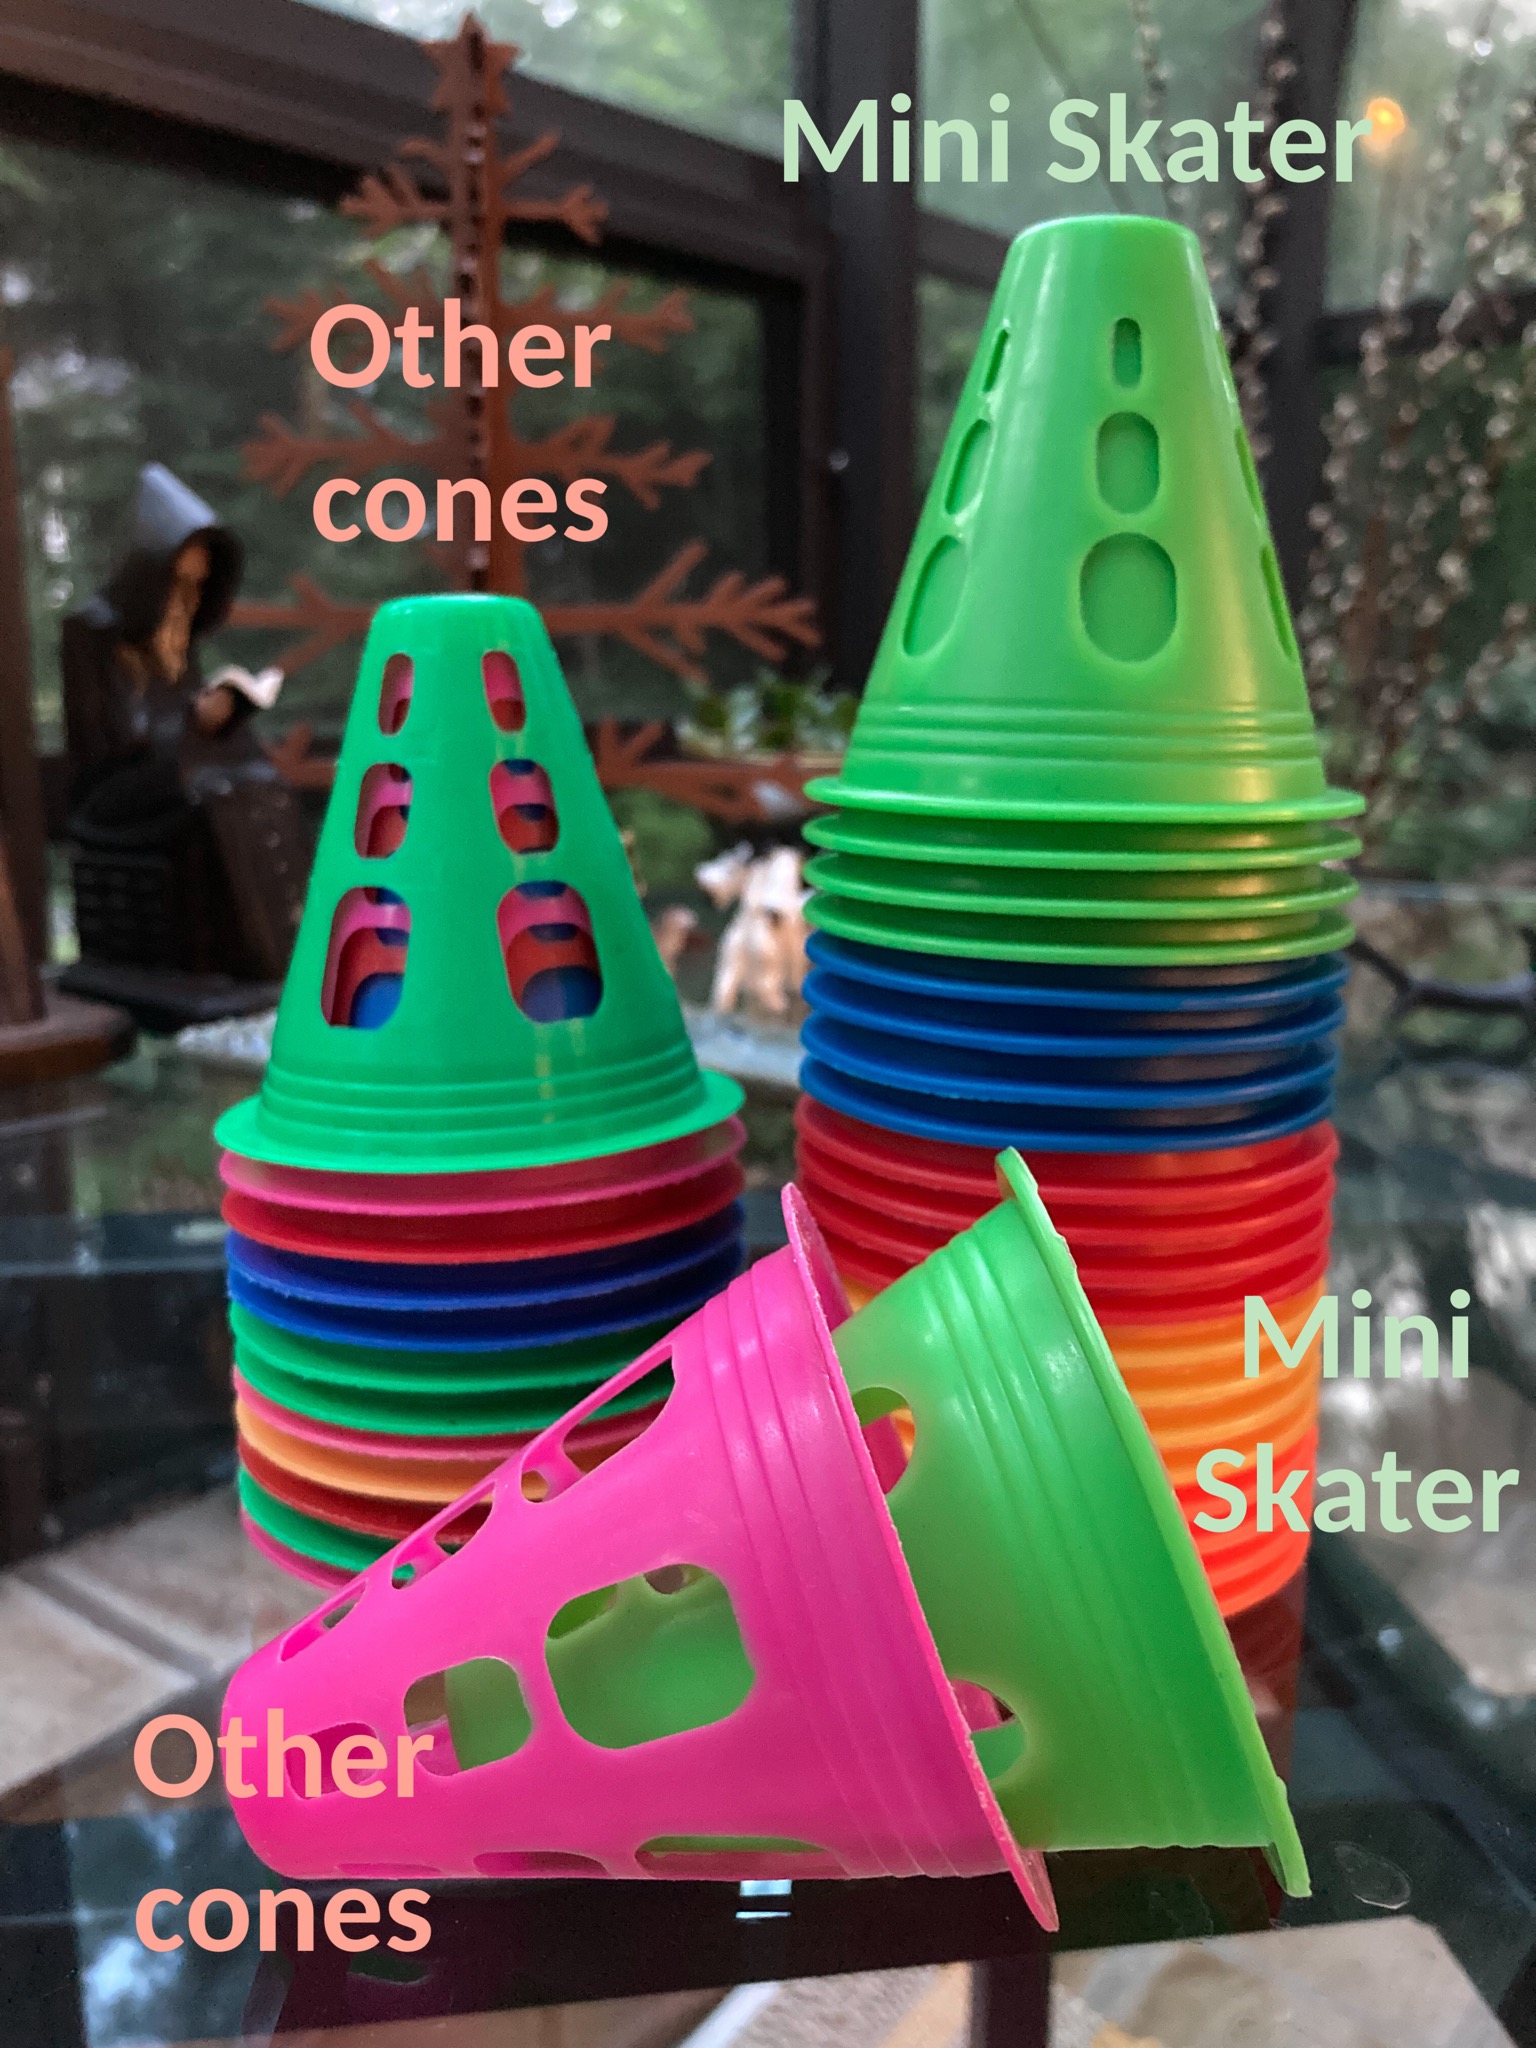
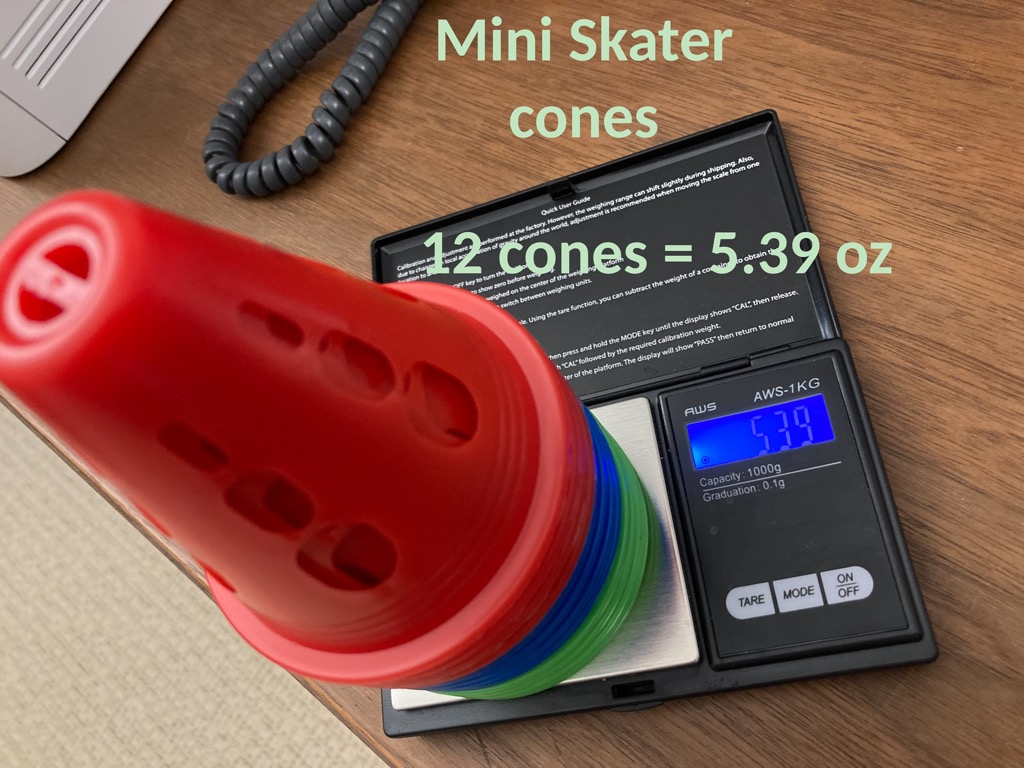
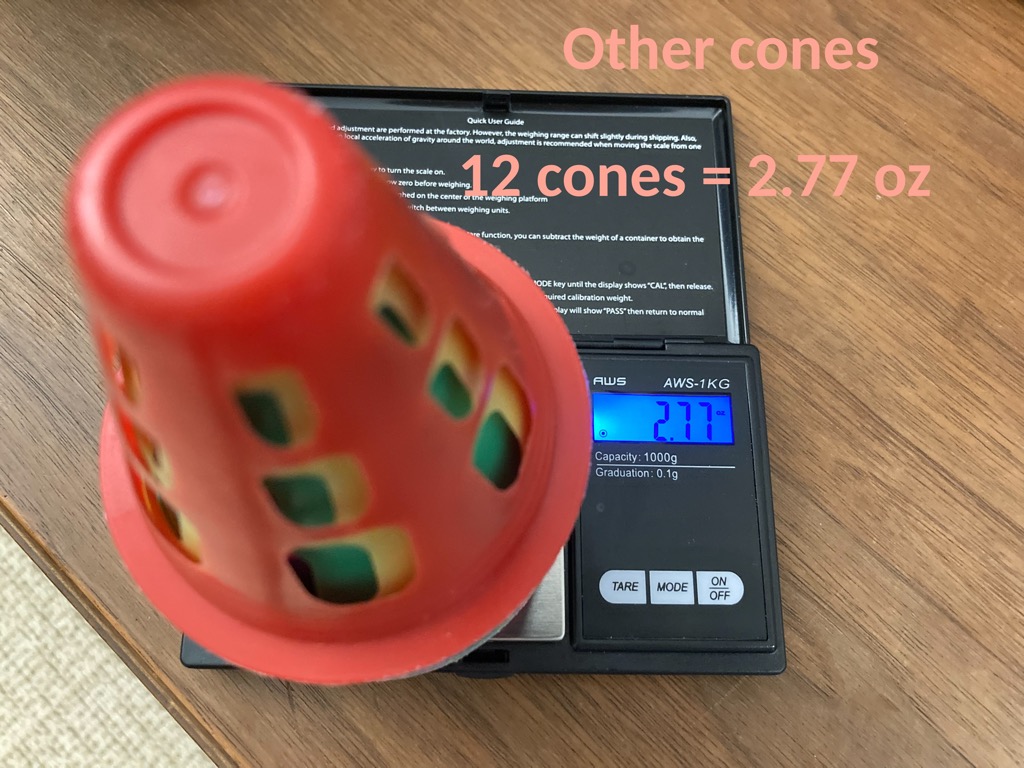
But in the beginning, cones may be a nuisance before you learn to slalom properly. When I first started, I kept knocking cones off at every move. When it’s windy, cones are blown off spontaneously, all the time. Let’s address the easy part first. Get thick and heavy slalom cones, like the cones from Mini Skater, shown below. They are thicker than everything else on Amazon, and are twice as heavy. Even then, I still need to stack two cones at every spot on a windy day, so they don’t fly off.
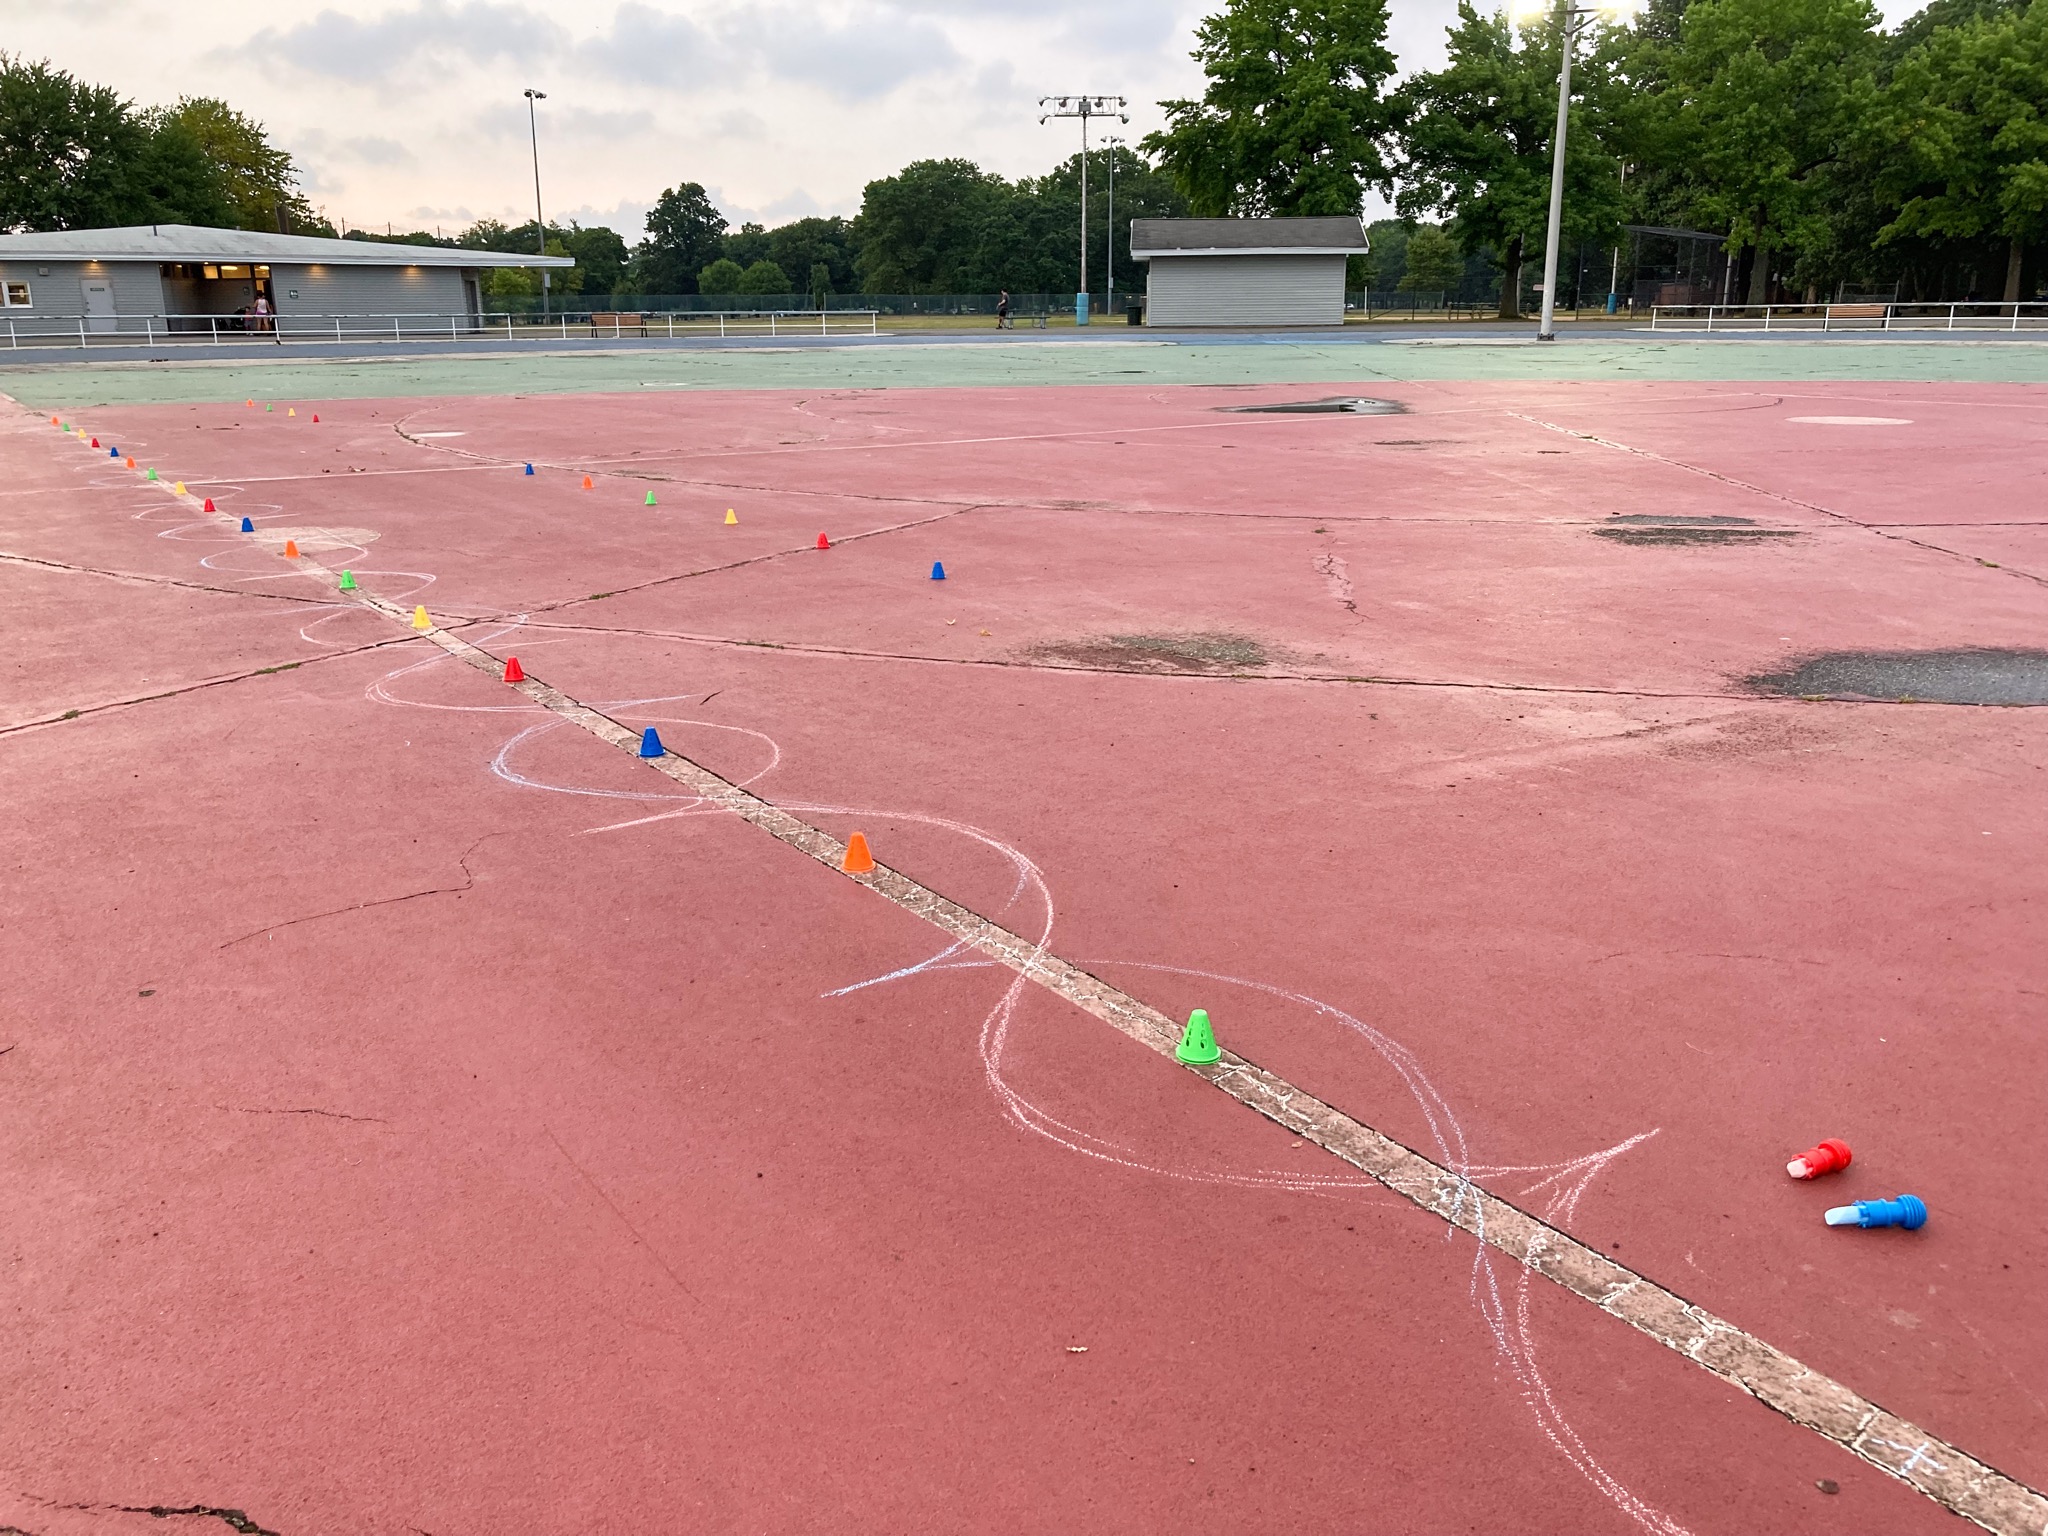
If you spend more time replacing cones than actually practicing Mabrouk, consider making circles in chalk instead, as shown below. Chalk marks will still help you practice slalom moves, but you don’t need to worry about replacing cones.
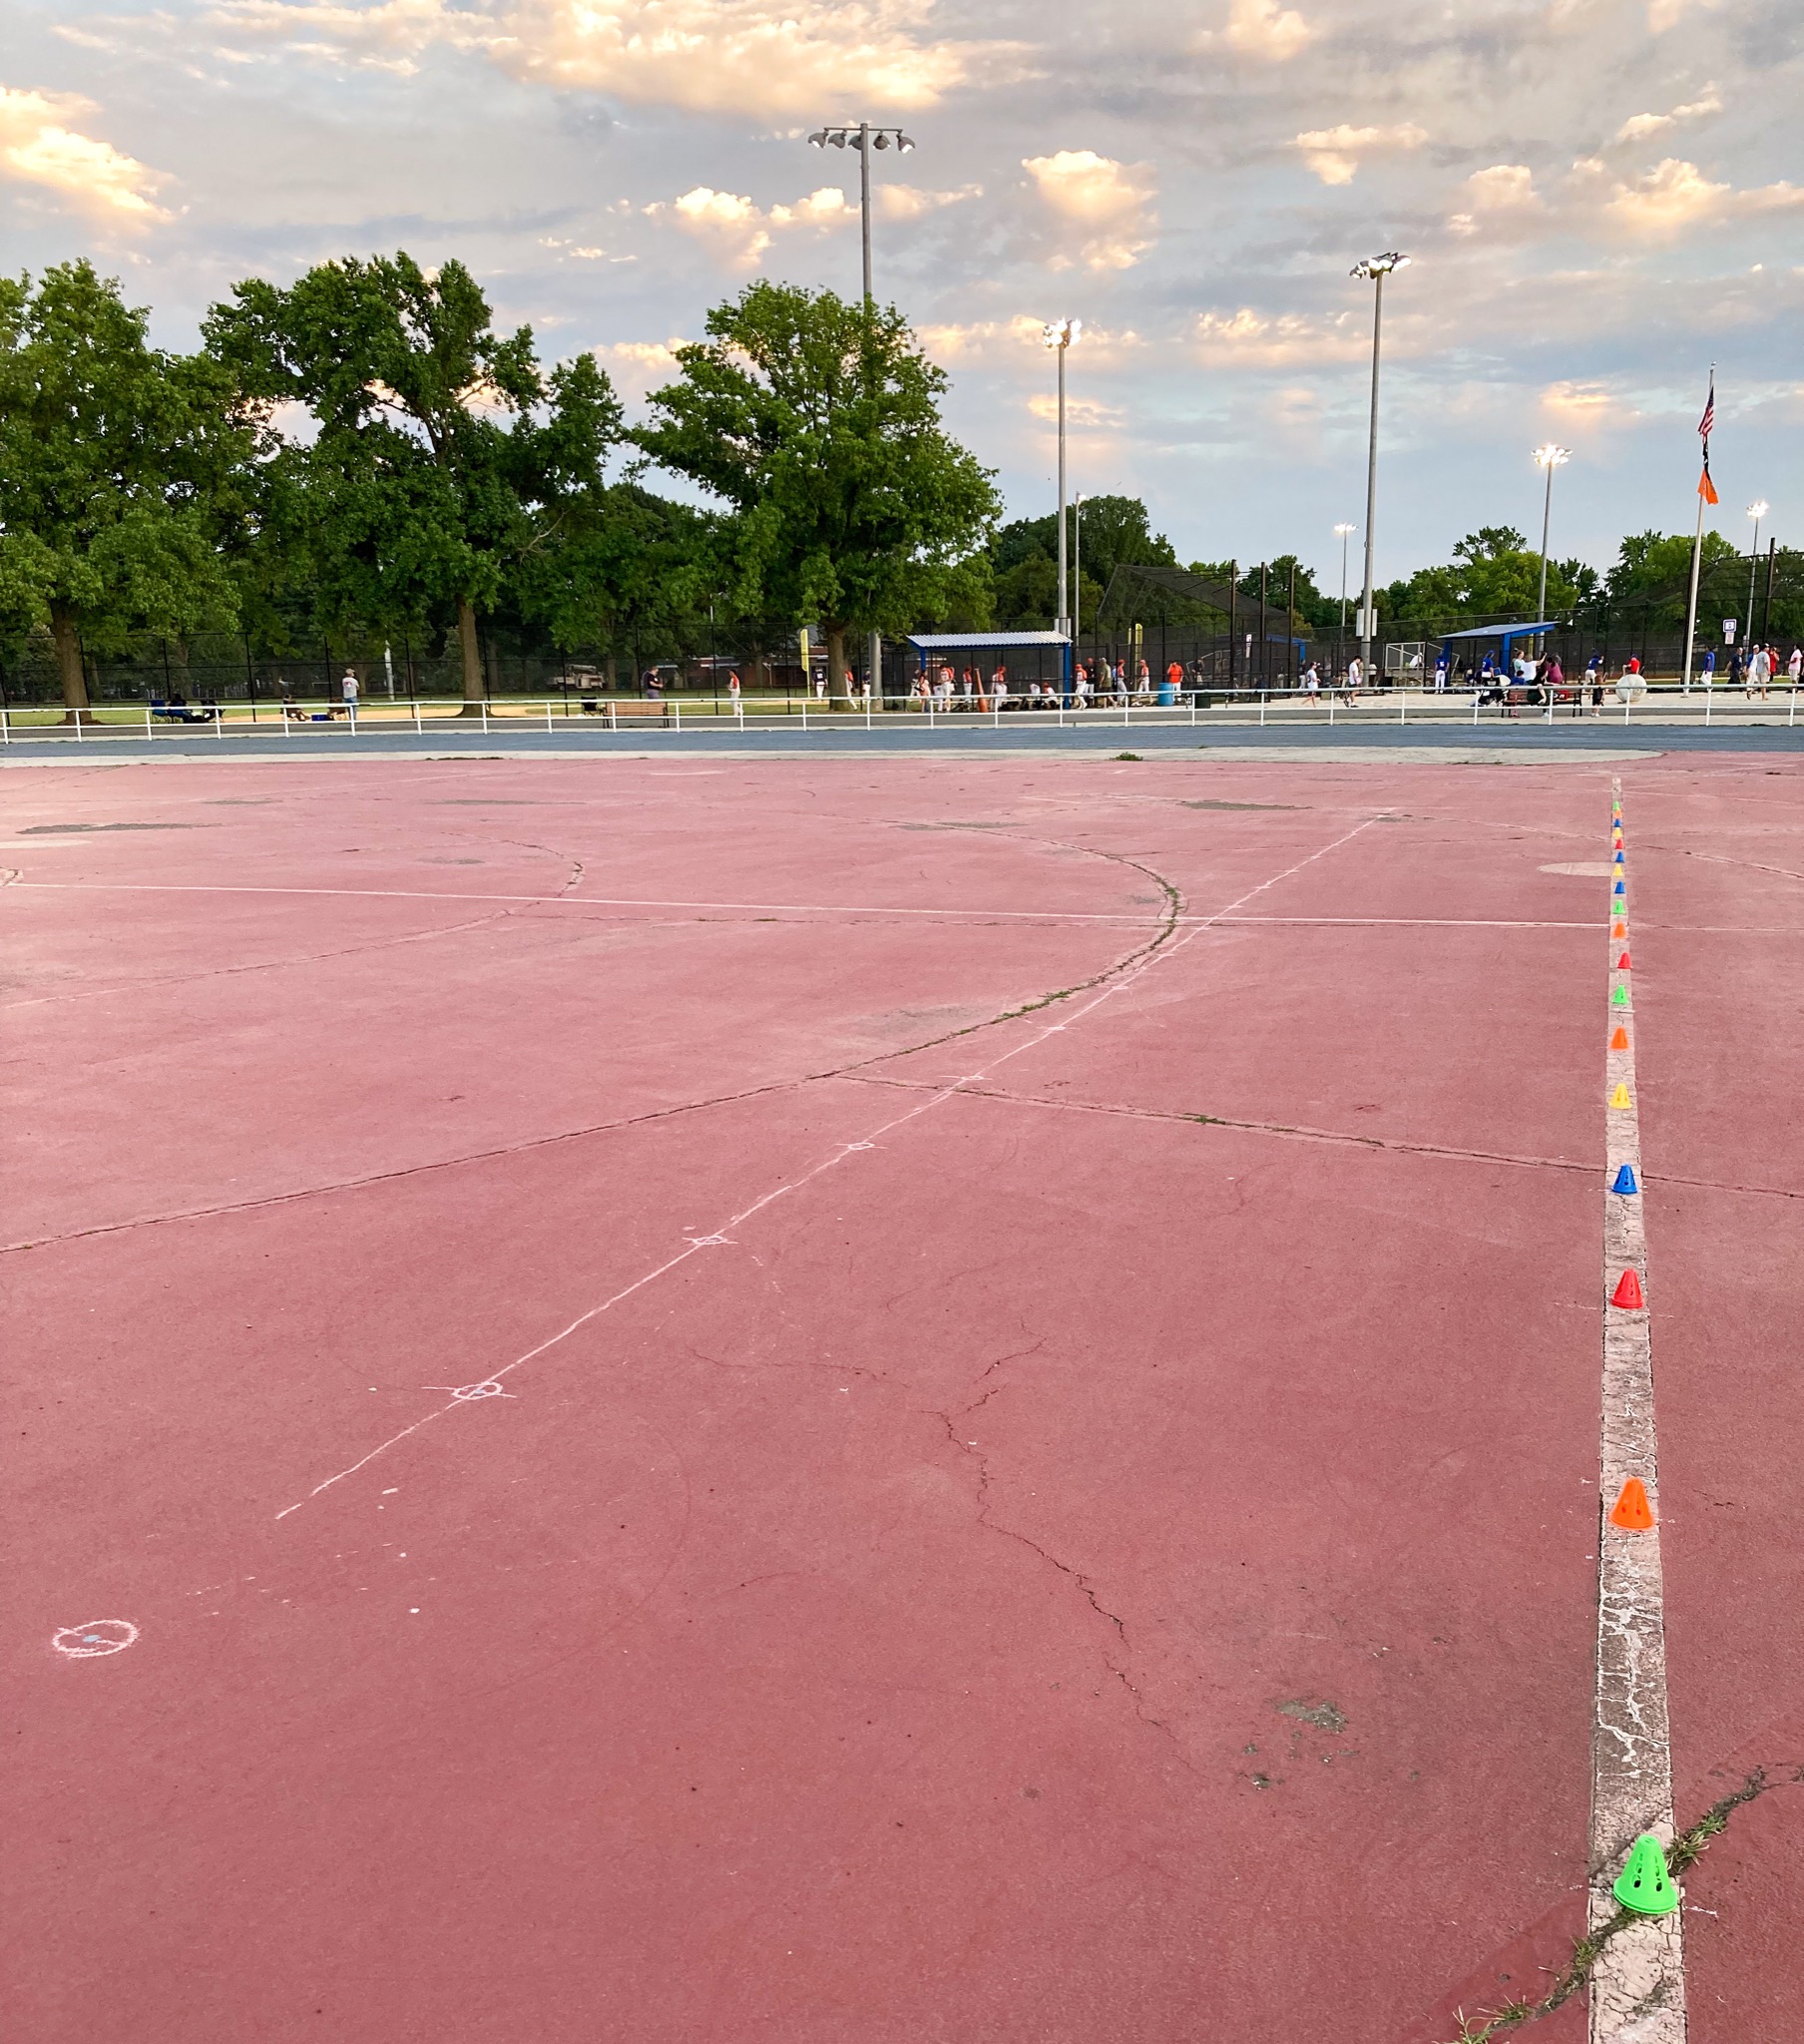
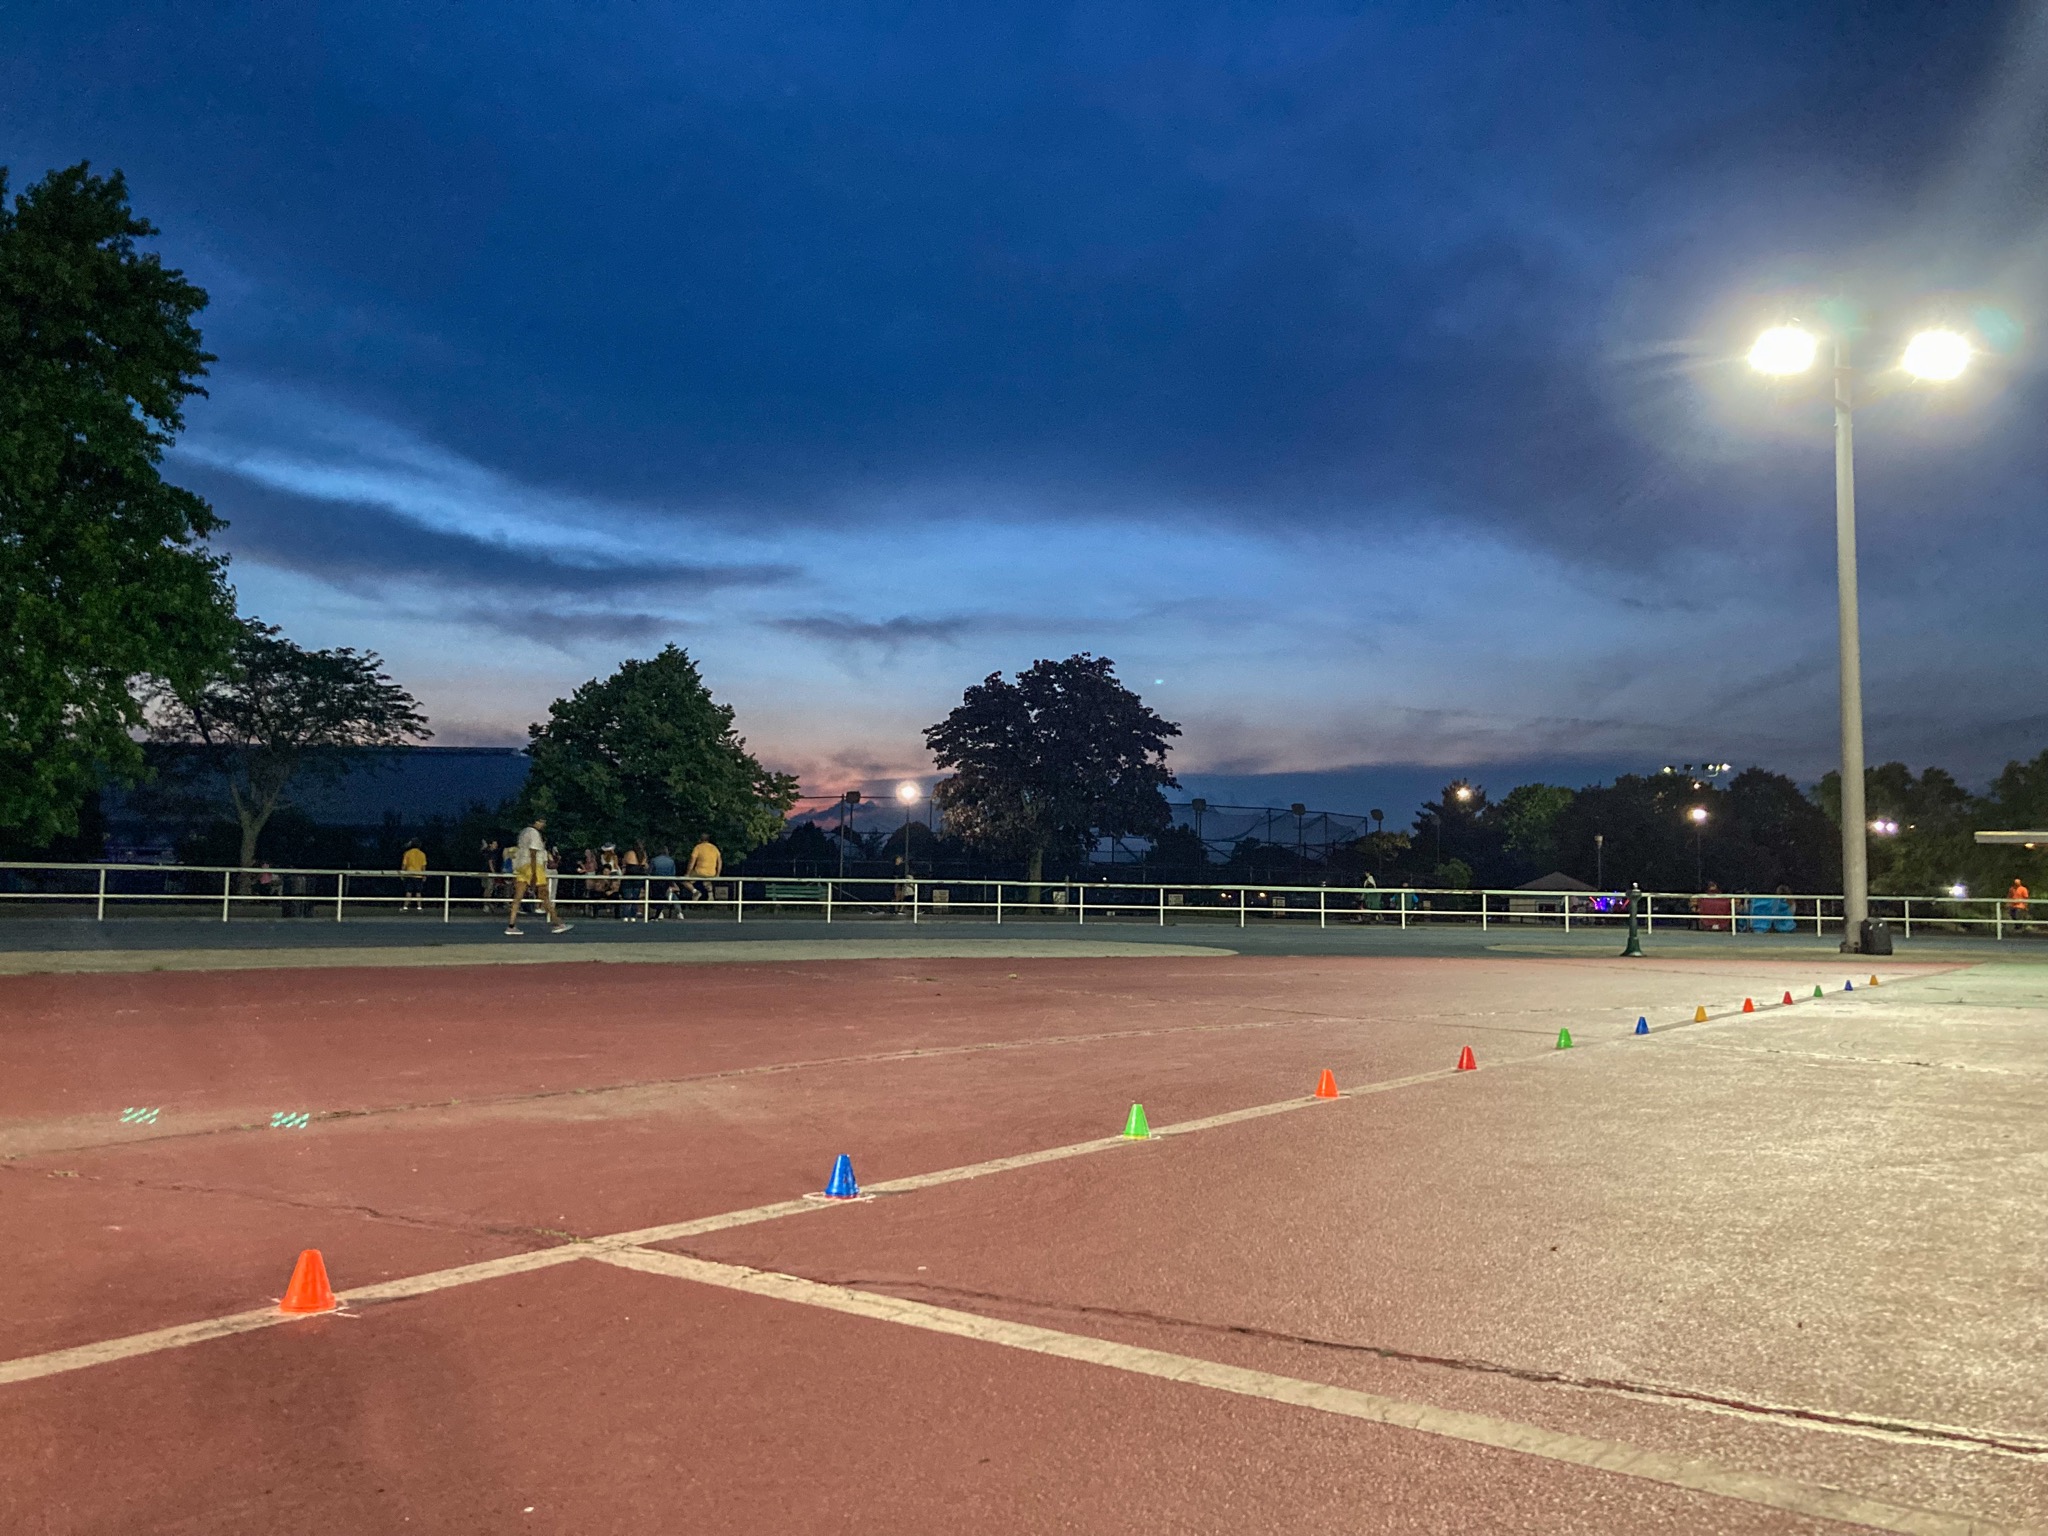
The wheelchair baseball court at Eisenhower Park is lit up at night, when adjacent baseball courts are in use. This is great because the park is too hot under the midsummer sun during the day. I take advantage of white boundary lines to lay down cones in a straight line.
It may help with your practice, if you draw idealized Mabrouk patterns on the pavement. I did not start to draw pattern curves on the pavement until late into my learning process. I believe doing so from the start would have greatly reduced the amount of time I spent.
Next steps
This is part 2 of my series on Mabrouk and Grapevine. It follows part 1: What is Mabrouk: a slalom variant of Grapevine, a summary. Part 3 will take a detour from academic discussions, and instead document how I actually learned Mabrouk, focusing on refining transitions between slalom components. It will recount how, in the process, I became proficient in related slalom moves, and finally in Grapevine.


where’s part 3 dude, i’d read it
I’ve got more materials. But I don’t know when I may go back to compile them. For now, check out this Crazy move. It’s literally called the Crazy move. https://www.youtube.com/watch?v=JIq1z2B_u_0