
This is a follow-up to my previous article: Learn to Skate the Two-foot Grapevine Analytically from 2016. The first article talked about skating Grapevine on ice. This article discusses how to skate the same Grapevine on inline skates. Almost everything from the first article applies to this article. Thus this article will not repeat the same prerequisite skills and context information about Grapevine that I already covered in the first article. This article will focus on showing differences found when skating this move on pavement, compared to ice.
Grapevine is a classic skating move skated exclusively on outside edges, which when done to perfection appears to an onlooker as if the skater had Jackson’s moonwalk power, and could magically propel herself indefinitely in a straight line while constantly turning forward and backward, and with both skates on the ground at all times without showing signs of any efforts to push herself onward.

I never did learn to skate Grapevine on ice with grace. I could do an ugly and rigid imitation of it, but never in a way that invites admiration form onlookers. And I never could sustain this movement past two rounds.
During the Covid pandemic, I picked up inline skating. And I tried to skate the Grapevine. I tripped, and I tripped. The pavement is very unforgiving of imperfect two-foot skating. On ice I could glide and turn on the ice with both blades flush against the surface. On the pavement with inline skates, the same task is near impossible to pull off.
So I turned back to the YouTube video of inline-skated Grapevine that I mentioned in the first article, to study how it was different from skating on ice. And I ended up discovering many reasons that explain why I never did manage to skate a graceful Grapevine on ice.
Table of Contents
- Ice vs. pavement at a glance
- The four pivots in Grapevine
- Skill 1: first heel pivot
- Skill 2: transitioning from first to second heel pivot
- Skill 3: third toe pivot
- Insights into how to skate Grapevine better
- Skill 4: transition from third to fourth toe pivot
- Skill 5: chaining four pivots into one move
- Skill 6: injecting energy into sustained Grapevine moves
- Only skate on outside edges
- Try to slow down your moves
- Make exaggerated figure-8 drawings
- Try the counterclockwise version of Grapevine
- Videos and stop motion sequences of counterclockwise Grapevine
- Mastering the third toe pivot
- Exaggerated second heel pivot sets up a great b3 pose
- Exaggerated first heel pivot sets up a great b2 pose
- Exaggerated third heel pivot sets up a great b4 pose
_
Ice vs. pavement at a glance
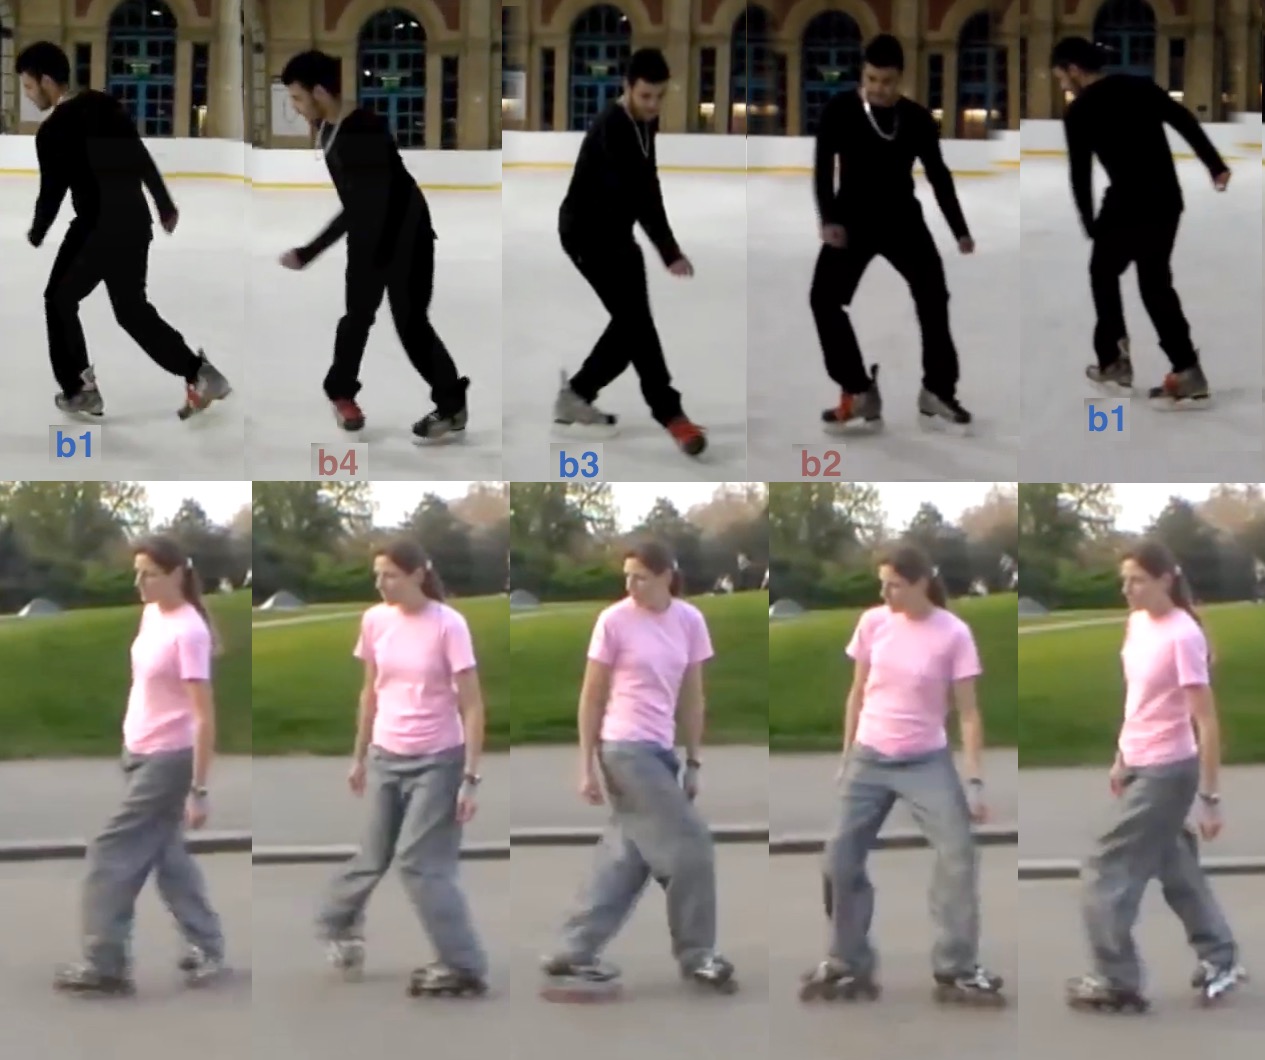
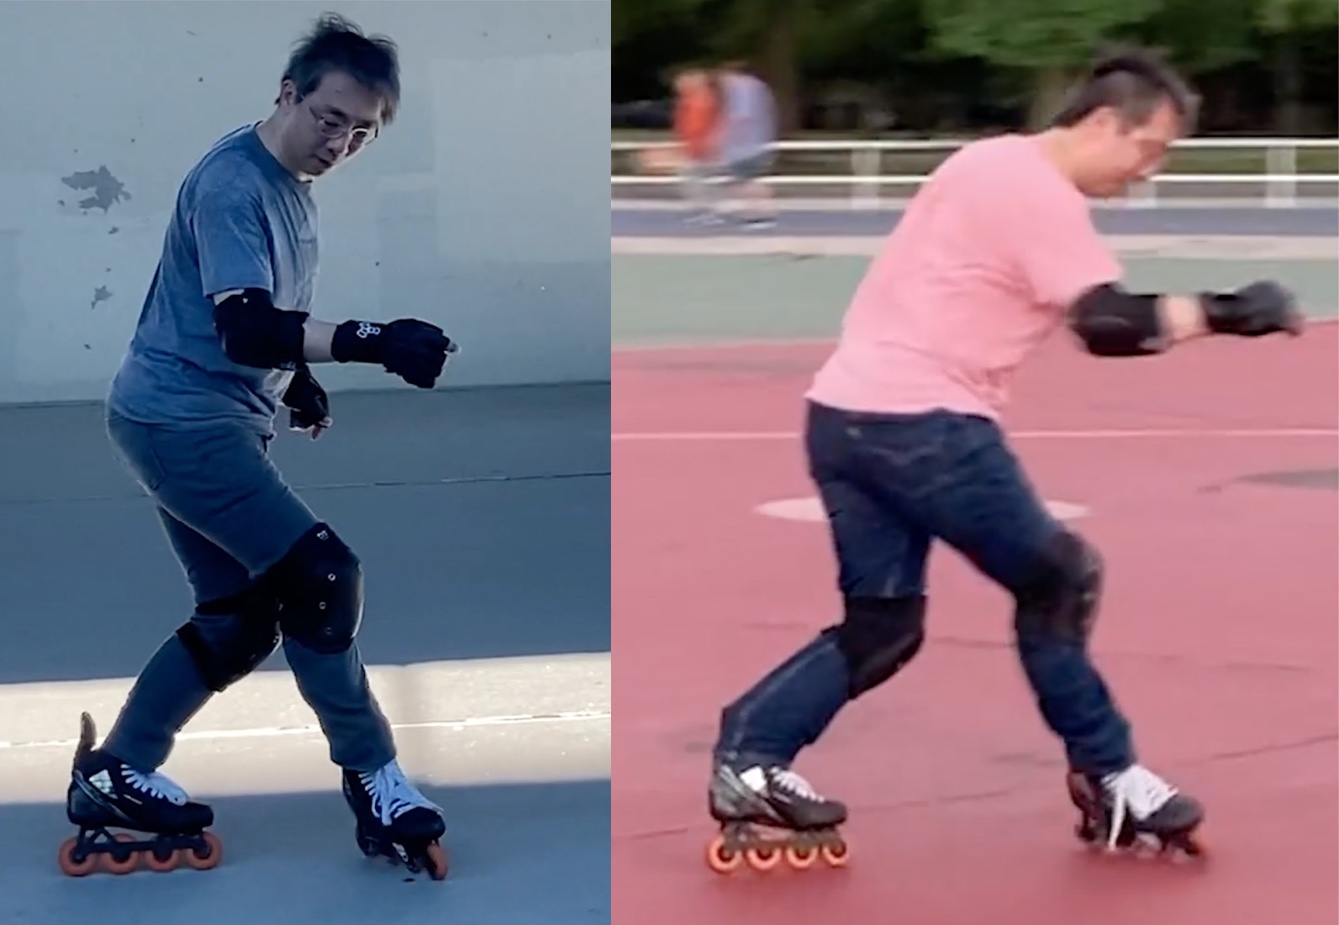
Let’s first examine the stop motion capture of this movement on ice (Jordan), compared to on pavement (Naomi). Control-click on the image below to show it on a separate tab or window, so you can zoom in on individual pictures. The Jordan sequence is from my first article. The Naomi sequence is from this excellent YouTube Grapevine video captured by Mike from londonskaters.com. Mike has granted me permission to use footage from his video, to create sequence images and short video clips that people can watch in loops for a hundred times until they internalize movements in Grapevine. Note that Naomi starts Grapevine on her left leg gliding forward on its heel. This is opposite of Jordan’s movement. So I mirrored Naomi’s footage to match that of Jordan, for easier comparison. Sorry, Naomi.

One can see right away that the move is skated the same way, on ice and on pavement. Event the balance moments b1, b2, b3 and b4 look identical.

However, observant readers may notice a few differences. First, Naomi’s leg movements are more exaggerated than Jordan’s movements. But these are probably personal preferences.
More importantly, Naomi almost never have both skates flush on pavement, at any given moment in this entire Grapevine sequence. One skate is always pivoting on toes, or on the heel. As Naomi explains in her video, Between b1 and b2, Naomi’s right foot pivots on her heel prominently. Between b2 and b3, her left foot pivots on the heel as well. Between b3 and b4, both her foot pivot on toes prominently. In contrast, Jordan only does a visible toe-pivot on his left foot, after balance moment b4.
This is the first insight I gained. It is a key visual difference between two-foot skating on pavement, compared to ice. The friction between pavement and wheels is so drastically larger compared to ice and blades, that inline skaters must leverage a single wheel to make a skate “pivot” on pavement. Ice skaters, on the other hand, can simply shift body balance to relieve pressure on one blade. As long as a blade does not bite into the ice, a skate can be made to spin on ice with its blade flush with ice.
Here is a visual summary to Grapevine.

When I first tried to apply my half-learned Grapevine on pavement, I tripped at every turn I tried to make. This is the reason why Naomi teaches inline Grapevine by first making a learner master four pivot turns: heel pivot on the right foot, heel pivot on the left foot, toe pivot on the right foot, and finally toe pivot on the left foot. In her mind, once you master these four single-wheel pivots, you get most of Grapevine already.
The four pivots in Grapevine
What Naomi doesn’t explicit teach, however, is how one generates forward momentum to sustain Grapevine indefinitely. It turned out that these four pivots are what generate energy to keep the momentum going, as I eventually discovered. One reason I never could sustain Grapevine on ice was that I never did fully understand how to generate this energy. I didn’t discover the secret to energy generation on ice, because I never did pivot on the heel nor on the toe. I spun my blade on ice without a firm purchase, thus never injected energy into Grapevine.
Now that I understand this secret by studying inline Grapevine, looking back at Jordan’s ice Grapevine, I can finally see what I failed to see then. Jordan, too, pivots on toes and heels, in exactly the same way Naomi does. Jordan, too, has to dig into the ice with these pivots, else he would not be able to sustain continued Grapevine. It’s just that these pivots are exaggerated on pavement, and greatly diminished in appearance on ice.
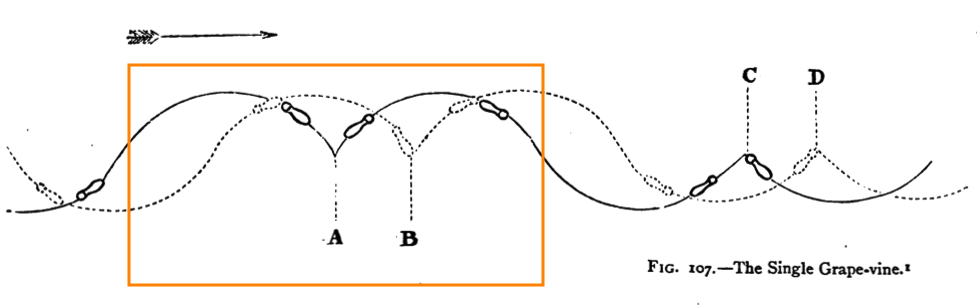
Before we dive into learning the Grapevine, let’s revisit a key diagram from the previous article. You will find this diagram helpful in understanding every part of the Grapevine move. It traces glide paths left by the two skates on the ground. The tracing diagram shows that the two feet end up skating identical paths. This is an important concept to keep in mind. While I was able to skate something remotely resembling Grapevine before, I never did manage to trace identical path with my two feet.

All four “pivots” Naomi stresses are clearly shown in this diagram. The orientation of both feet change constantly throughout the Grapevine move. As a foot turns its orientation, the body continues to move in a constant direction. At some point, the foot flips the direction of its travel, even as it continues to turn. For instance, at label A, the right heel continues to turn clockwise, but it now reverses the direction of its travel, going from forward to backward. There are four such direction reversals in Grapevine. They are marked A, B, C and D. They create four sharp corners in the two otherwise smooth curves traced by the two feet.
Two such sharp corners are labeled: b2 and b4, in the previous article, as we discussed balance moments b1, b2, b3 and b4. So sharp corner B roughly corresponds to balance moment b2. Sharp corner D roughly corresponds to balance moment b4.

Compare the tracing diagram above to the stop motion sequence from earlier, reproduced below. Appreciate the symmetry of the two feet with respect to paths they trace on the ground.
_
Skill 1: first heel pivot
The first skill to learn is the heel pivot. You should watch the following video clip a few times to internalize what a heel pivot is about. Focus on watching one thing at a time. For instance, start by focusing on and tracking her right foot, and ignore everything else. See how it starts with wheels flush with the pavement, and then stands on the rear wheel along. Track how this rear wheel pivots on a fixed point on the ground in this video. Now, switch to watching the left foot, and how this foot is always flush with the pavement throughout the move. Note how the left foot traces a big circle around the right heel which serves as the center of the circle.
Every discrete moment in this heel pivot is shown below, in a stop motion sequence. You can control-click on the image, to show it in its own tab or window. Watch the above video clip again, and compare it to the stop motion sequence.

While this circle tracing looks like the very first part of Grapevine, it is not exactly how Grapevine will eventually be skated. Naomi only uses the 4 steps of learning in her video, to show you preliminary skills that need to be acquired, before one can skate Grapevine. She shows these four pivots in forms that can be learned, not in exact forms they are actually skated in Grapevine.
For instance, in this preliminary skill, one has the left foot tracing a circle around the right foot heel pivot. In actual Grapevine, the left foot is not tracking a full circle, but instead will be gliding in a straight path. The right foot, with its heel pivot, will appear to be tracing a semi circle around the gliding left foot instead. Jump ahead to the next section on Skill 2, to see what this first heel pivot becomes, in a real Grapevine move. In short, only the first part of Skill 1 is actually used in Grapevine. You can see this by comparing the full heel pivot shown below left in Skill 1, to the first part of Skill 2, previewed below right.
Skill 1: full-circle heel pivot
Skill 2: semi-circle by right heel
But you must not skip this preliminary exercise. First learn to plant the right heel down on the same place on the pavement, and trace your left foot around it, in a full circle. Learn to tilt the entire right skate upward, as she does. The more exaggerated you can do it, the better. Note how she flattens her right knee, turning her right leg into one straight line. You must learn to make this seemingly over-exaggerated move. All these minute details are extremely important to your eventual success with Grapevine. By making a full circle around the right heel, you learn to lean on the right heel, to plan it down on the pavement, and to get a firm purchase. As alluded to earlier, this is how you inject energy into Grapevine to sustain it indefinitely.
Skill 2: transitioning from first to second heel pivot
Next you learn Skill 2, where you master the transition from the first right-foot heel pivot, into the second heel pivot, carried out on the left foot. Watch this short video clip ten time, or more. Again focus on one thing at a time. Start with the right foot. Observe how the first heel pivot is cut short after the right heel traces a semi circle around the left foot which glides in a straight path. Now switch to watching the left foot. The left foot in fact performs exactly the same semi-circle tracing. The left heel traces a semi circle around the right foot which by then is gliding in a roughly straight path, but backward this time.
At the transition between first and second pivots, observe how the right knee bends to flip the right foot from a heel pivot configuration back to a gliding configuration, with wheels flush with pavement. And at the same time, the left knee extends straight to flip the left foot into a heel pivot configuration. The Skill 2 video is trimmed for better looping, shown below.
This is the essence of the transition to be mastered here. The transfer of balance is key. In the first half of Skill 2, the left foot shoulders more weight. After the flips from the transition, the right foot shoulders more weight. Watch the stop motion sequence depiction of Skill 2 below. As you scan poses from left to right, you can see this transition of center of gravity from the left side of the body, to the right side. Now, keep in mind that her body rotates 180° during the two semi-circle tracings. So, effectively, the body is leaning towards the direction of the overall movement, at all times.

Paths traced by the two feet during the two heel pivots in Skill 2 are boxed in below in orange. Note how the right foot (shown in solid line) turns clockwise 180° within the orange box. The left foot closely follows the right foot, and makes the same clockwise 180° turn as well. As mentioned before, the right foot reverses its direction of travel at label A. Shortly after, the left foot does the same at label B. Both feet continue their smooth clockwise turns, even as they reverse direction of travel in the middle of these turns.
_
Skill 3: third toe pivot
The third pivot in Grapevine is a toe pivot. For the purpose of uniquely identifying it in this article, we call it the “third” toe pivot, even though it is the first time a toe pivot appears. Here is Naomi demonstrating it.
While the left foot glides backward, the right foot stands on its toes. The right foot presses down on the pavement, pinning the front wheel against the ground. The end result is that the left skate traces a semi circle around the right toe. But if you shift your point of reference, and pretend that the left skate is the center, you can also think of this move as the right toe tracing a semi circle around the gliding left skate. This alternative point of reference becomes important later, when we discuss energy generation in Grapevine.
This toe pivot is broken down into steps shown in the following stop motion sequence.

In Naomi’s video, she taught the third toe pivot together with the fourth toe pivot. I found that I did not have the mental faculties to learn these two pivots at the same time. I also found myself initiating the third toe pivot with inconsistent setups. In the end, I simply continued from Skill 2 into Skill 3. It sets up the two feet in the right position, and the body is moving backward as required.
My video from above lacks refinement. One, my knees are not extended straight. And my toe pivot does not pin my front wheel against a fixed spot on pavement.
Insights into how to skate Grapevine better
I made an important observation when learning this transition from Skill 2 into Skill 3. That is, I must keep my head looking in the direction of body movement, always. Even though my “torso” turns 180° during Skill 2, I must train my “eyes”, and therefore my head, to face where my body is going. This is not just so that I could see what I may bump into. Training my eyes in that constant direction turns out to make the third toe pivot much easier to master. The transition from Skill 2 into Skill 3 turns the “torso” counterclockwise. And having my head looking leftward over my shoulders facilitates this counterclockwise turn of the torso.
Watch Naomi skating Grapevine again. Now focus on her head. Do you see the uncannily steady head posture she keeps? You know how raptors have superior head stabilization? It’s like that.
I also found that keeping head trained this way prevents me from overturning at the end of the second heel pivot. Until I figured this out, I kept overshooting the end of that pivot, thus failing to keep my body moving in a straight line as my torso rotated 180° back and forth. Following video clip captures what I did wrong when I was oblivious to this need. And yes, I do try to learn to skate Grapevine in both orientations.
In addition to this head issue, the above video demonstrates additional secondary issues with my Grapevine. Note the disproportional time I spent in the three pivots. My first heel pivot gets more time than the second heel pivot. Thus the second heel pivot does not trace as big a semi circle. My second heel pivot spends barely any time on the rear wheel with the knee of that leg extended flat. These make the second pivot less effective in energy generation which we’ll discuss later. Also, I lingered for too long between the second heel pivot and the third toe pivot.
In comparison, watch Naomi again. Or rather, listen to her skate. Note how she skates to a 4/4 time signature. It’s as if she were skating to music. Every one of these four pivots gets equal time. You can hear her inject energy into the move at every reversal of skate direction. I think in time I’ll be able to learn to space out these four pivots to make them sing as well.
Skill 4: transition from third to fourth toe pivot
Once you mastered the third toe pivot from Skill 3, you cut it short. Just like the Skill 2 transition cuts the full-circle turn from Skill 1 into a semi circle, the Skill 4 transition does the same with the third pivot turn. So you lean your body forward at the end of the semi-circle turn from the third toe pivot. Your left skate is leaning prominently on the outside edge, and you are about to fall forward. This is the transition point. Now pull the two legs together, moving the right skate forward, as it plops down flush against the pavement. Then the right skate glides forward, shouldering your weight as it captures your fall.
Following is a stop motion version of the same transition.

As noted earlier, these skills are for practice only. They do not match exactly how Grapevine actually works, when all four pivots are chained into one continuous motion with constant energy injection into the move. If you compare this Skill 4 clip to the full Grapevine sequence, you will see that they are very different. However, the exaggerated actions in Skill 4 is how you learn to activate muscles and to change body balance. The grace of the Grapevine move will come later through continued practice.
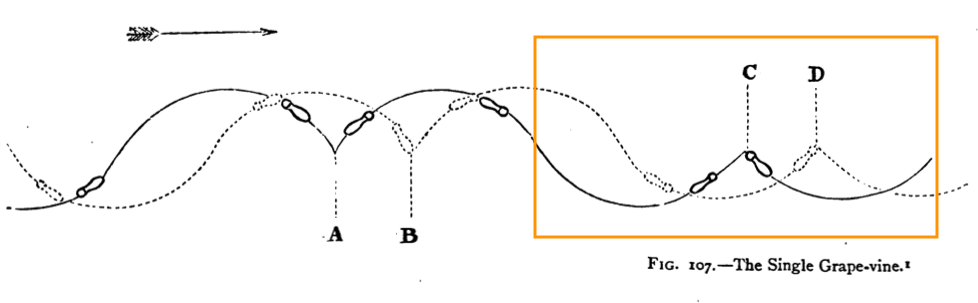
Specifically, the fourth toe pivot does not look like a pivot at all, in this Skill 4 exercise. And neither foot is tracing a circle or a semi circle. Instead, the right skate glides straight forward. The left skate is planted fixed on the pavement on its outside edge during this exercise. But this is just an intermediate stage in your learning. Once you internalize this exercise, you will be able to later morph this step into a shape where the left foot is on its toes, and traces a semi circle around the gliding right skate, as shown in the boxed-in part of the diagram shown below. When done right, both toe pivots trace identical paths on pavement.
_
Skill 5: chaining four pivots into one move
In the next video clip Naomi chains all four pivots into one single Grapevine move. She intentionally slows down all four pivots, and gives them exaggerated movements. While the four pivots are chained into one move, the four pivots remains discrete components that you can focus on individually.
During the fourth toe pivot, she lunges into a configuration that allows her to start the first heel pivot of the next cycle. But as is the case with Skill 4, in this learning step, the fourth toe pivot is not really a pivot. In the next learning step this will be fixed. See the stop motion sequence below.

_
Skill 6: injecting energy into sustained Grapevine moves
The last step in the learning process is here. You need to learn to skate a sustained Grapevine that keeps going indefinitely. When fully mastered, Grapevine looks like magic. At no time does the skater appear to “push off” in the traditional skating sense. Yet somehow the skater continues to move at a constant speed in one direction despite pavement friction.
Our goal here is to move beyond those discrete pivots acquired from Skill 1 through Skill 5, shown below left. We want to end up with the graceful, final product, shown below right.
Compare the stop motion sequence of Skill 5 to Skill 6 below.

Rest of sections are dedicated to various aspects that improves the energy generation. In the process, we will also make transitions from pivot to pivot smoother and more graceful. In particular, we will fix the false fourth toe pivot in Skill 4 and Skill 5, and make it trace a real semi circle.
Only skate on outside edges
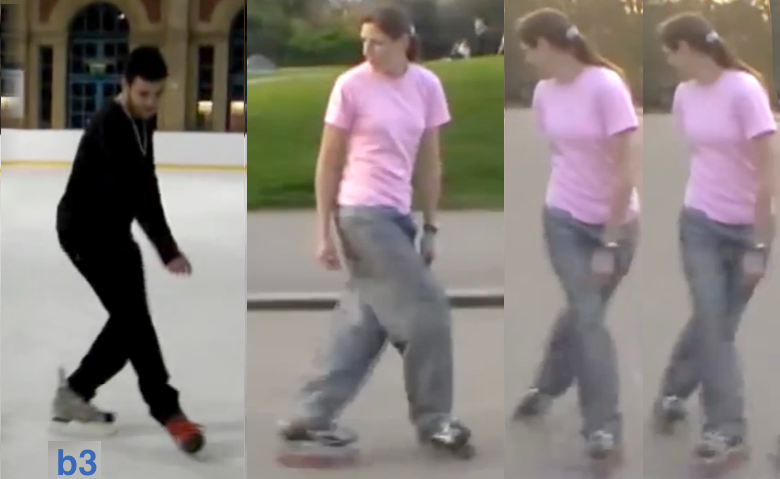
There are many subtle things to master, before one skates a graceful Grapevine. Now we come back to the balance moments I mentioned in the previous article. These four key moments are shown below. Remember that at all four balance moments, and in fact throughout the entire Grapevine, you skate on the outside edge of both skates. Confirm that that is the case in every single image shown below. If at any moment in your Grapevine, you are not on the outside edge, then you still have homework to do.
The use of the outside edge is obvious at balance moment b1 and b3 where legs are crossed. At balance moment b2, the two skates form a V shape, with both feet standing on the outside edges. The balance moment b4 corresponds to the sharp corner D. The configuration of the two skates between sharp corner C and D is a signature moment of Grapevine. This is known as an inverted V shape. Any one can do a weak inverted V shape… with inside edges. But you won’t be painting this mesmerizing inverted V shape, if you don’t standard on your outside edges. The inverted V shape on outside edges does not come naturally. It requires conscious efforts.
These outside edges, together with heel and toe pivots, enable energy generation in Grapevine.
Try to slow down your moves
Let’s start with an example of what NOT TO DO. Below is my attempt to skate Skill 5 as taught by Naomi. But unlike Naomi’s Skill 5 example, I am not injecting any energy into the move. I am barely coasting on the initial energy throughout the four pivots. The first right heel pivot needs a completely straight knee, so that I can put weight on the rear wheel to pin it to the pavement. I need to swing the right leg such that the rear wheel “grabs” and “pulls” on the pavement, in the process launching my left gliding skate forward. I imagine that when I finally get it, it will be similar to the feel of a freestyle swimmer “grabbing” and “pulling” water column past their body, in the process launching her body forward.
My second left heel pivot is even worse. I am not even extending my left knee. My left skate does not even lift off the ground, and definitely is not pivoting on the rear wheel. I am not putting weight on the left skate. And thus it is not pulling on the pavement. Zero energy is generated here.
My third right toe pivot is a bit better. This is a result of a lot of practice and falling. As one can see, I am protected. I even wear padded underpants. But only the first half of this toe pivot is good. I need to “pull” the right skate even further apart from the left skate, until it is standing on its outside edge, forming that signature inverted V shape. In this video, the second half of this toe pivot ends prematurely with the inside edge, and remains too close to the left skate. This is a bad set-up for launching the fourth left toe pivot.
Let’s look at Naomi’s Skill 5 video again. I said earlier that she explicitly slowed down all four pivots for a clear demonstration. Now that we’ve discussed difficulties in injecting energy into the move, we can much better appreciate what she did here. Because she deliberately slowed down her moves 5 times her regular pace, she couldn’t coast on just her initial momentum. At every pivot, in this slow motion demonstration, she had to grab and pull on the pavement with one skate, in order to make the other skate glide. Thus, one way to learn to inject energy is to slow down moves. This will force the body to learn to grab and pull on the pavement.
_
Make exaggerated figure-8 drawings
Here is a different view of Naomi skating Grapevine. Earlier I mentioned that a learner must make exaggerated heel pivots and toe pivots. And one must attempt to trace big semi circles. If you follow any one foot through its transitions between heel pivots and toe pivots, you will noticed that the foot draws a figure-8 in every cycle of Grapevine. Take the right foot for instance. It draws a clockwise circle on the right side on its heel. Then it glides backward flush with the pavement briefly. It then draws a counterclockwise circle on the left side on its toes. Then it glides forward flush with the pavement briefly. Then it repeats.
Now look at the left foot. It draws exactly the same figure 8 as the right foot, just one second after the right foot.
Examine these stop-motion sequences of figure 8s.


_
Try the counterclockwise version of Grapevine
I call the version of Grapevine shown in this article so far the “clockwise” version of Grapevine. The label “clockwise” refers to direction of rotation of the two heel pivots that start the move. Each heel pivot makes a clockwise circle. As mentioned in the “figure-8” section, the two toe pivots make circles too, in the opposite direction.
Sometimes the clockwise Grapevine doesn’t work for you, depending on which of your legs is the proverbial “strong” leg. I don’t actually know which of my legs are my strong leg. Nor is there a consensus about whether the strong leg should start the heel pivot or not. But after two weeks of re-learning Grapevine on pavement, I have come to the conclusion that the clockwise Grapevine doesn’t work for me very well. Following is the awkward way I skate the clockwise Grapevine at the Skill 5 step, after two weeks of hard practice.
Every time my muscles tire from a clockwise Grapevine practice, I switch to the opposite one, the “counterclockwise” Grapevine. This is where you initiate the first heel pivot with your left skate. You draw the first semi-circle with the left heel on the left side of your body, turning the heel and your body counterclockwise. I find that I learn faster and move more gracefully with the counterclockwise Grapevine. In fact, I don’t even need to practice much in this direction. Things just happen. Following is my counterclockwise version of Skill 5. It still looks odd and awkward, just like my clockwise version. But I haven’t put much work into it at all.
_
Videos and stop motion sequences of counterclockwise Grapevine
So, here are the same videos, and stop motion sequences, now inverted to serve as models for those of us that find the counterclockwise version easier to learn.


_
Mastering the third toe pivot
My bottleneck had been with the third toe pivot, and even more severely with the fourth toe pivot. As mentioned above, my third toe pivot was an abridged version of what it should have been: circle in the figure-8 view of the movement. And my fourth toe pivot was a “pivot” alright. But in the figure-8 view, it was like a dot, and not a circle. This bottleneck plagued both my clockwise Grapevine, and my counterclockwise Grapevine.
I have since switched to practicing mainly on the direction that comes natural to me, the counterclockwise Grapevine. And I finally had a breakthrough. I am now able to make a full figure-8 circle with my third toe pivot, while practicing Skill 5.
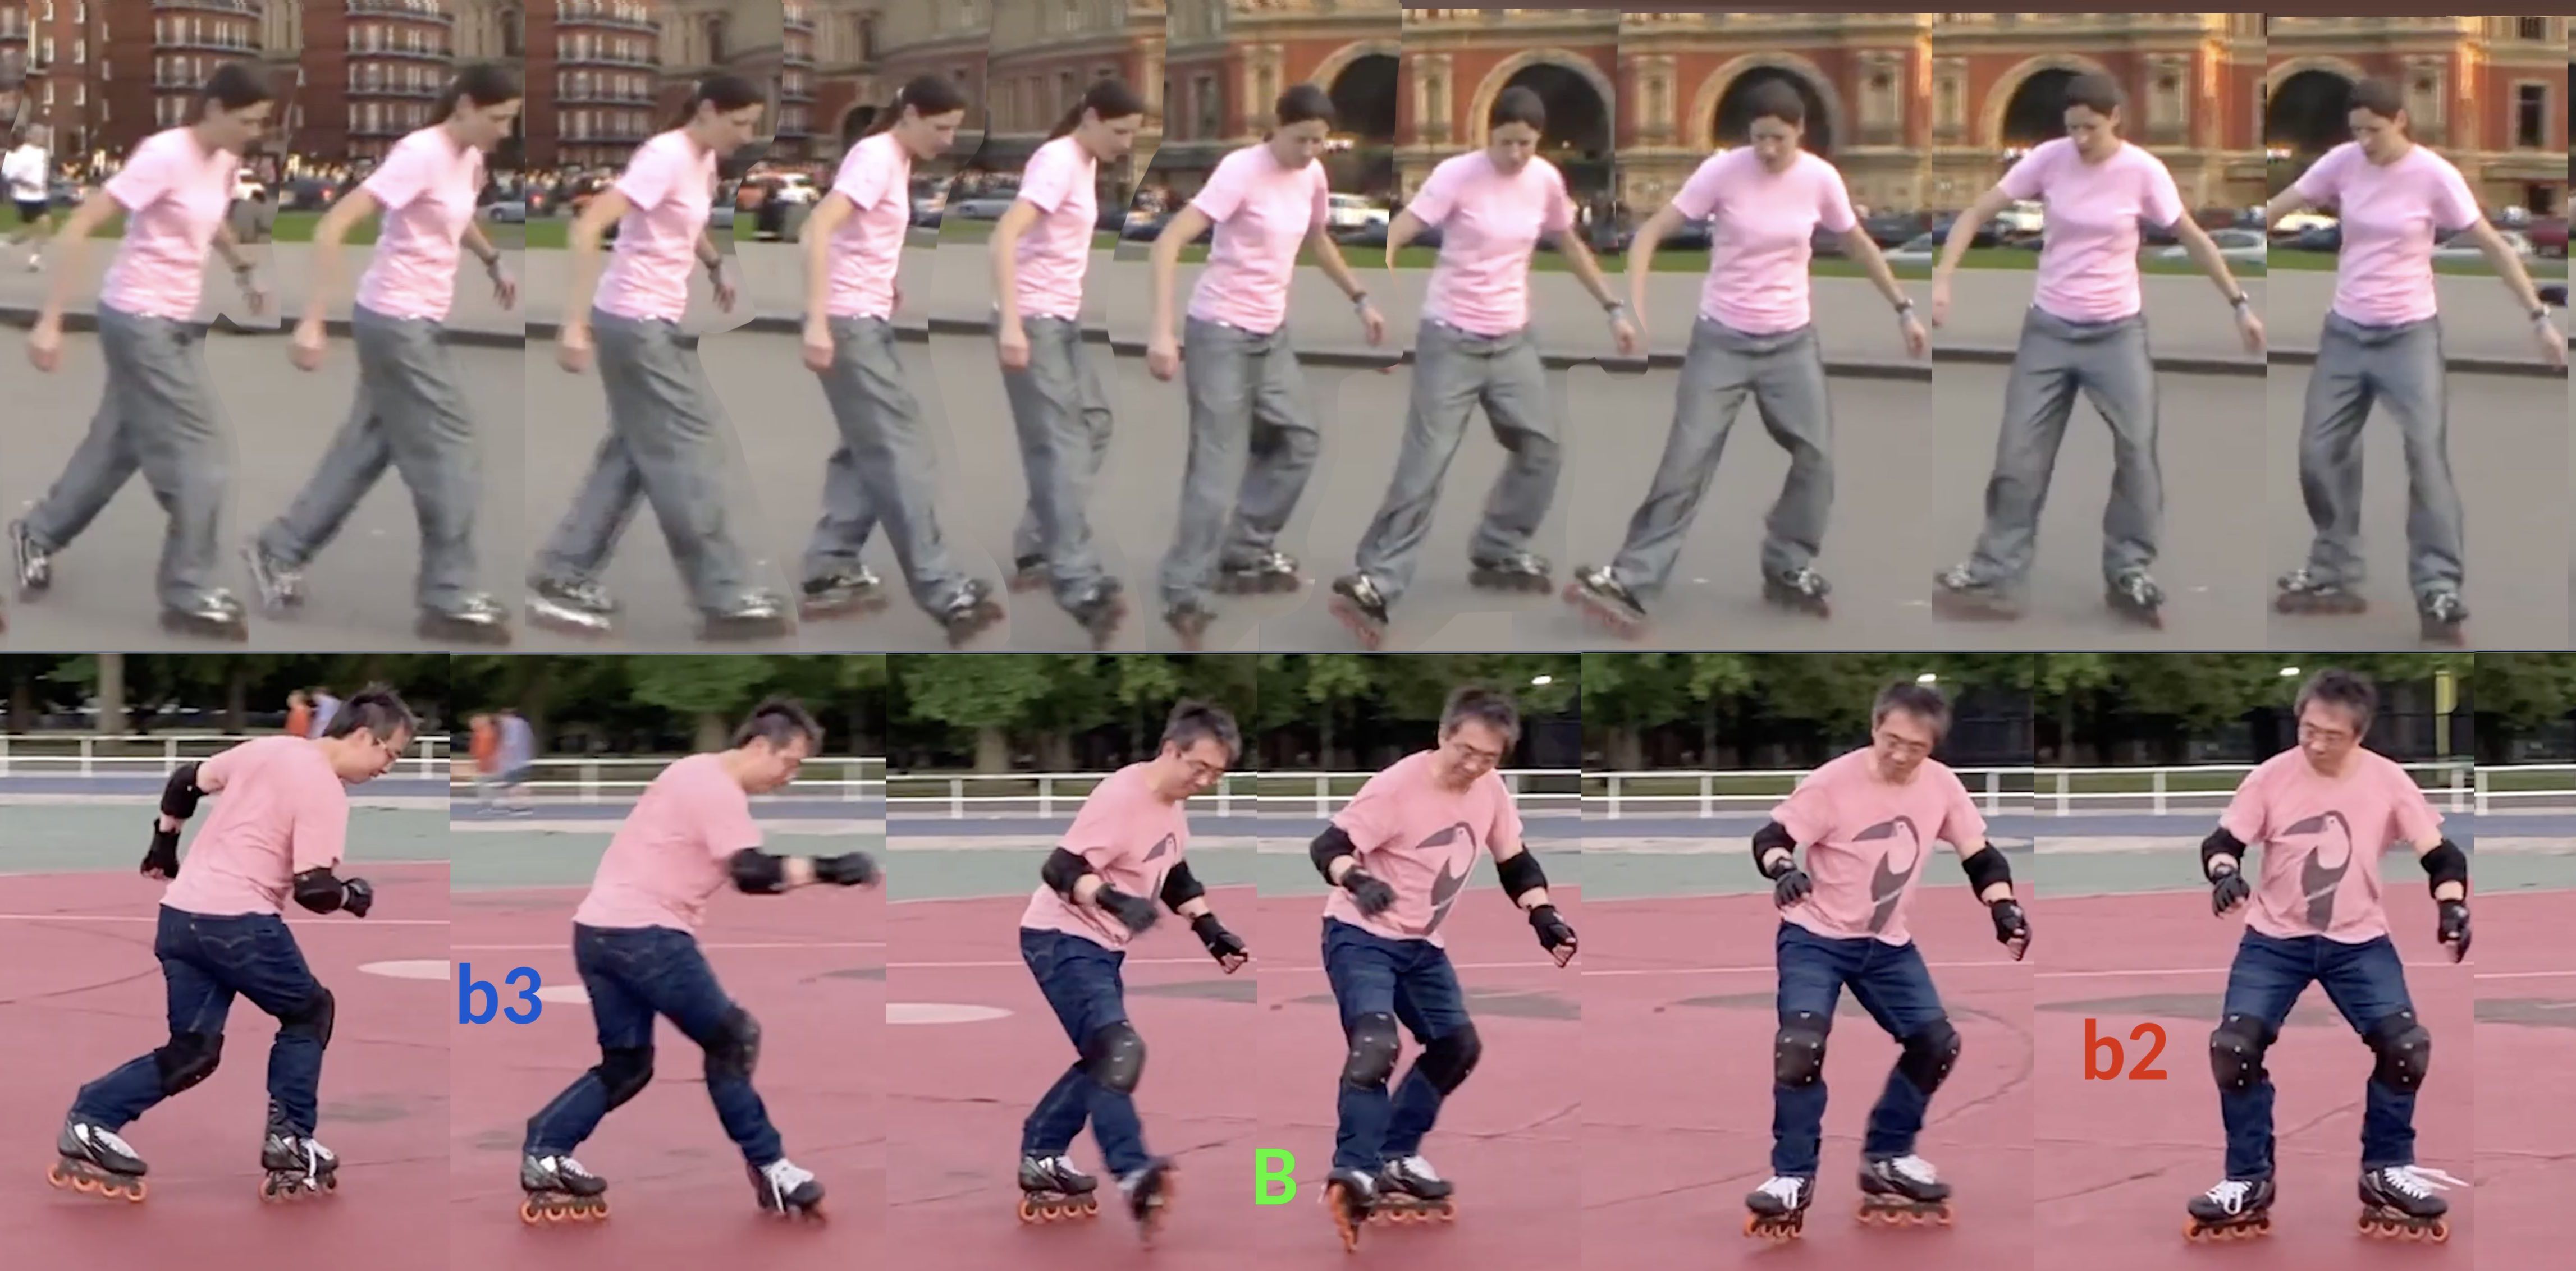
Several conscious changes in my skating make this breakthrough possible. For comparison between “before”, and “after” breakthrough, see these two clips:
Following is a stop motion sequence showing this breakthrough, compared to Naomi’s model postures. It is a breakthrough for me, because finally my move starts to resemble Naomi’s steps. Sharp corners A, B, C and D are labeled on this sequence. So are moments b1, b2, b3 and b4.

_
Exaggerated second heel pivot sets up a great b3 pose
A bottleneck in a step is often caused by bad setup by the previous step. So I went back to practice a better second heel pivot. I made it carve out a wider circle in the figure-8 movement, by extending my knee flatter. This wider second heel pivot sets up the balance moment b3 with the two skates further apart from each other, and with more pronounced crossedness with respect to each other. The two skates lean further on their respective outside edge at b3.
Subtle differences between “before” and “after” are illustrated below:
Here are additional pictures showing how the two feet should be, at balance moment b3. I cannot stress enough the importance of having the two legs exaggeratedly crossed, and having both skates leaning exaggeratedly on the outside edge, at moment b3. Every time I enter into the third toe pivot from moment b3 with an exaggerated crossedness and exaggerated outside leaning, I make a wide and powerful third toe pivot. Every time I relapse on crossedness or outside edge, I end up with an abridged and feeble third toe pivot.
_
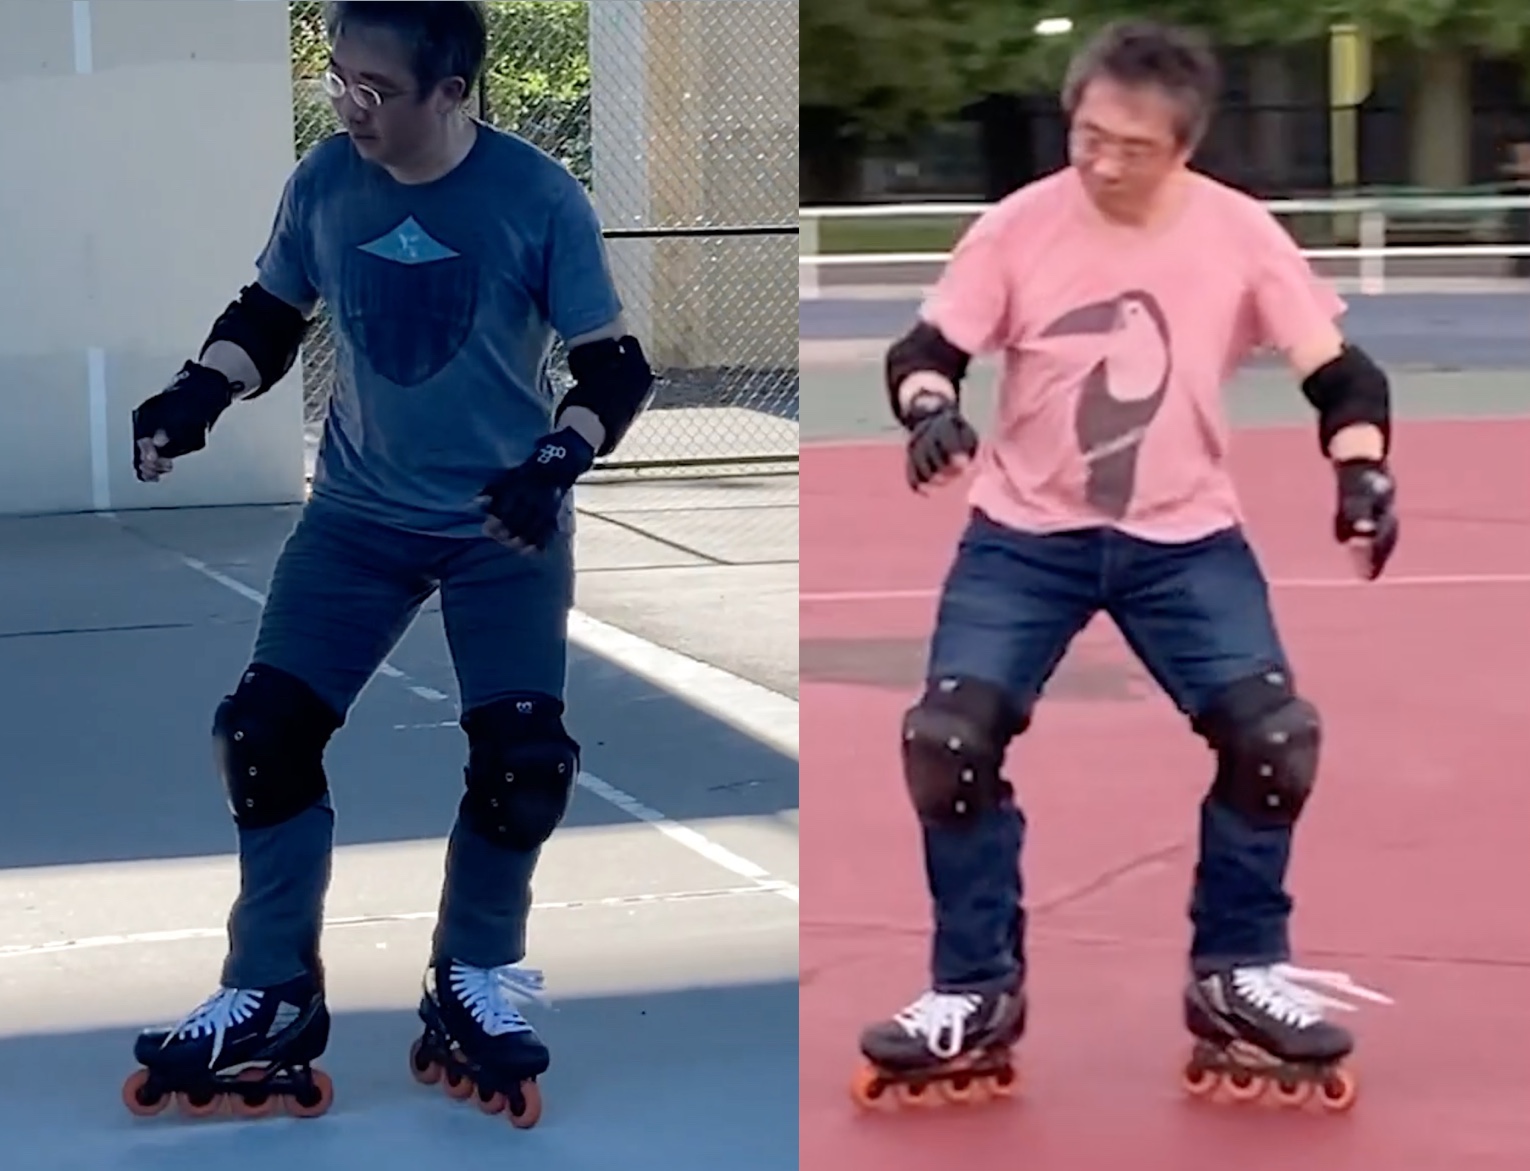
Exaggerated first heel pivot sets up a great b2 pose
Similarly, in order to make a wider second heel pivot as shown above right, I had to go back and make a better first heel pivot. A better first heel pivot sets up a better stance at b2, with better separation and orientation of skates, for you to launch into a better second heel pivot.

Subtle differences between “before” and “after” are illustrated below:
_
Exaggerated third heel pivot sets up a great b4 pose
So a better first heel pivot sets up a better launching configuration for the second heel pivot. A better second heel pivot sets up a better launching configuration for the third toe pivot. As a result, the third toe pivot can now end up with a passable inverted V configuration at balance moment b4, starting at sharp corner C and ending at sharp corner D, for launching into the last move of the Grapevine.

Subtle differences between “before” and “after” are illustrated below. Note how much the two skates are separated in the inverted V shown below right.
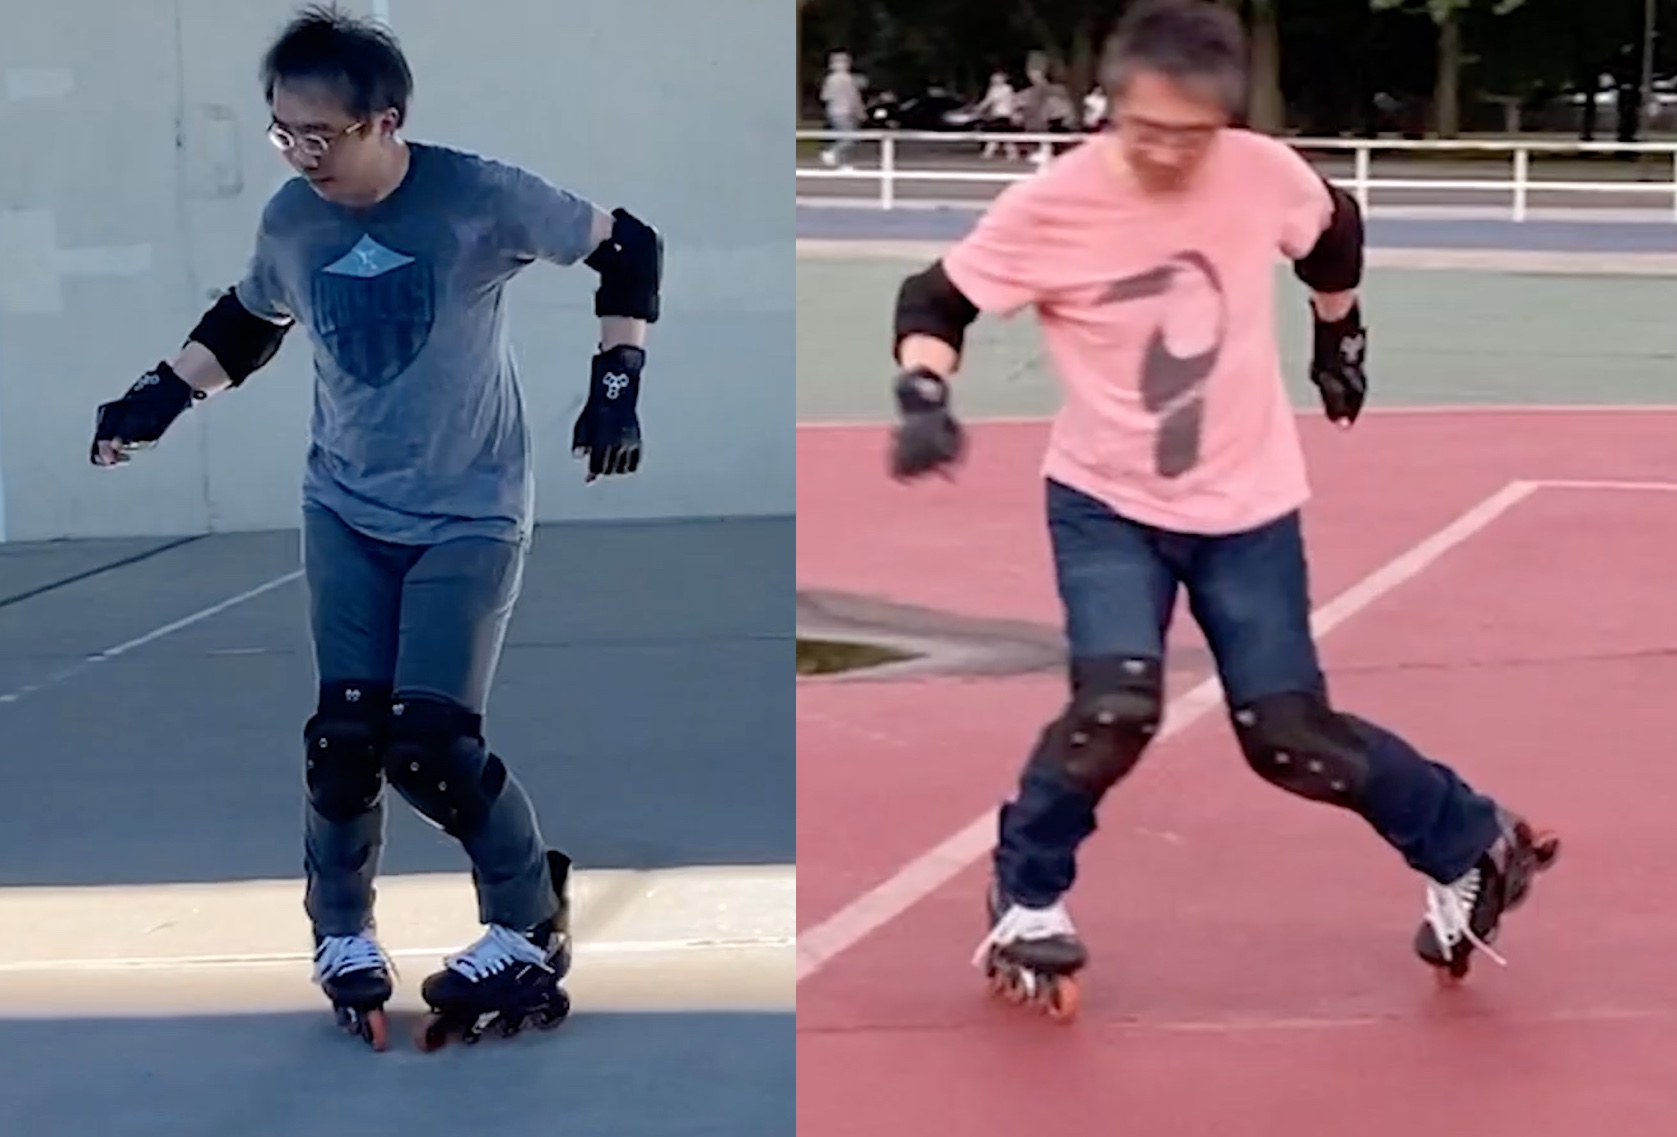
Unless one’s knee and angle joints are hypermobile, the only way to get the far separation between skates as shown above right is to pivot on the left toes. Before and up until the balance moment b4 as shown above right, the two legs strived to pull the two skates away from each other, from the configuration of balance moment b3. At the exact moment b4, the two skates have reached their peak separation. If this proper posture at moment b4 is reached properly, what follows next does not require the skater to make any conscious effort to achieve.

What happens automatically is that your body continues to move along its trajectory by inertia, which is leftward in the example we use here, shown above. This pulls your left leg back towards the center. Your muscles happily comply with this coercion from body moment, and from effects of gravity on your left leg releasing potential energy into kinetic energy. Your left skate snaps back to flush against the pavement, and glides forward lining up with your body movement. This left leg movement induces your hip to turn clockwise, even if you don’t help it with a conscious hip turn. This hip turn in turns causes the right skate to continue its circle-tracing, initiating the fourth toe pivot. You simply will your body and leg muscles to follow these natural movements, aiding them without much effort. For instance, your leg muscles bring the two skates closer, by pushing the left skate in its forward gliding, using the right skate planted on pavement on its outside edge as leverage. With a proper inverted V setup, energy is thus injected into the Grapevine move.

