The availability of skateable trails on Long Island is pitiful, compare to that in New York City. Despite having a much larger landmass, Long Island features very few publicly-accessible trails with paved and clean surfaces. To wit, click on the follow image to look at biking trails and bike-friendly roads in Nassau county compared to NYC, Queens and Brooklyn.
Biking trails and inline-skating-friendly roads in Nassau county, NYC, Queens and Brooklyn
But not all biking trails and bike-friendly roads are suitable for inline skating. Some trails go significantly uphill and downhill – a challenge for beginner skaters. Some trails are not regularly maintained, and are full of debris that can trip an oblivious rollerblader. Furthermore, sharing a road with actual traffic is not something an inline skater would normally do, except of course, if you do go on a rampage with a few hundred fellow skaters on a Wednesday Night Skate NYC event.
You know UV rays from the sun burn your skin and damage your eyes. So you apply sunscreen and put on sunglasses before you head out. Sunscreen bottles usually come with an SPF number (Sun Protection Factor). But your sunglasses usually carry no indication of its effectiveness. When your sunscreen fails, you know right away within the hour – simply look at your skin. But when you wear sunglasses that fail to block UV rays from reaching your eyes, you only find out years later, after your ophthalmologist tells you that you have already developed cataracts, and suffered cornea and/or other permanent damages.
How do you know your sunglasses actually block out all UV rays? The best and the safest way is to walk into your local eyeglass store. They will usually check your sunglasses for UV protection, for free. It takes only a few minutes.
But you are reading this article. So obviously that isn’t how you roll. You want to check and confirm that your glasses block out UV rays, on your own, in the comfort of your own home. Following picture illustrates the basics of a procedure for just that.
How to check your sunglasses for UV protection at home
All you need is a proper UV flashlight and a proper UV tester card. If your sunglasses block out UV rays, the test strip at the top will only turn purple, where the strip is not covered by your sunglasses. Watch this video clip:
How to check your sunglasses for UV protection at home
But this simple procedure invites more questions than it answers.
For instance, how do I know that the UV flashlight is representative of the UV rays I get from the sun outdoor? After all, there are UV-A, UV-B and UV-C. The flashlight may be emitting only one of these types. What if the flashlight emits only visible and harmless blue light, and the test strip is instead just reacting to shortwaves in the visible spectrum?
Suppose the flashlight does emit UV rays. How do I know my eyes are not being damaged looking at the UV light reflecting off the tester card? Ah, OK. I should wear a pair of safety goggles certified for UV400. But if I wear these goggles and they actually block out all UV lights, then how do I see the card react to UV rays from the flashlight?
As mentioned previously in Playing Bach Cello Suite 1, I picked up cello playing seriously again, after two decades of neglect. For months now, I’ve playing with great enthusiasm the first suite of unaccompanied cello music from Bach. In the process I discovered a general lack of music written for an unaccompanied solo cellist.
It became obvious to me that very few people make a distinction between “solo” and “unaccompanied solo”. The great majority of music advertised as “cello solos” are in fact cello with piano accompaniment, cello-piano duets, other forms of duets, ensembles, or even music with entire orchestra backing. The rest are sheet music with simple melodic lines. There appears to be a large gap between “accompanied solos” and “single-voice solos”.
There is a lack of knowledge about multiphonic music written for a single cellist to perform. I am talking about music that delivers a full-range sonic experience through the use of arpeggios (broken chords), double-stops, and the likes commonly found in Bach’s cello suites. In fact, most amateur cellists will only be able to name Bach Cello Suites as an example of this genre. And I counted myself among them – just a month ago, I would not have been able to name anything other than Bach’s suites.
Professional cellists do know better. Such unaccompanied cello music does exist in abundance, now that I’ve researched it for weeks. But my initial attempts using search engines and LLM models such as ChatGPT yielded mostly misleading results. The few unaccompanied ones were difficult to play for folks other than virtuoso cellists. Cello Solo Sonata by Zoltán Kodály being a great example. And most of these explored the extremes of sound-making, giving off grand soundscapes, but failing to provide melodic lifelines for unschooled folks such as myself to cling to.
So I wrote one for myself to play. This was initially inspired by Youtube videos. I’ve watched many cellists attempt to play The Swan by Saint-Saëns, alongside Prelude in G major from Bach. Folks have made valiant efforts at forcefully marrying these two pieces, in a sort of cello “double solos”. But I thought, why not simply rewrite The Swan in the style of Bach solo?
For two decades I’ve kept a year-end routine starting after Thanksgiving, lasting through Christmas, and usually ending shortly after New Year’s Eve. I would take my cello out of the closet, and dust it off. I would practice for a few hours every two days, building up calluses anew. I transcribed Bach Cello Suite 1 in 2016 without any bowing, fingering or phrasing from modern cellists. And I’ve been playing the suite ever since, every December. Just when I no longer had to worry about finger blisters from practice, and when I finally rebuilt my muscle strength, I put my cello back in cold storage. This had not been conducive to the improvement of my skills. But I did enjoy re-learning to play every holiday season.
This year I took my cello out a week before Thanksgiving, and continued to play past the New Year’s Day. It was quite a wonder what a few more weeks allowed me to do. For the first time I got past getting the notes played clearly and mostly in tune. I could stop worrying about moving muscles, and start to feel and find the rhythm that I wanted to hear from my cello.
When I started in 2016, I tried to imitate Yo-Yo Ma. But very quickly I understood that I never would be able to do that. For one, his rendition of the suite was far too fast for me. His long phrasing and smooth notes were unattainable goals for me. I remember looking online for clues on how folks approached Bach, and stumbled upon Tim Janof’s musing about the suites from the Internet Cello Society. That released me from my angst, and allowed me to go about it my own ways.
Once I got past the mechanics this year, I started to rewrite my fingerings and bowings to make these pieces sound the way I wanted. For the first time in my life I mustered the courage to record myself playing. And I was shocked when I listened to and watched these recordings. That notes were not in tune was beside the point – that was expected. The explosive sound of the bow hacking a string to get a note started surprised me. At times that was called for. But most of the times it wasn’t. I also found a new appreciation for the need to sustain certain bass notes beyond what was written in a score.
I’ll be using recordings from 2023 year-end to continue to improve my delivery. I uploaded them to mark my foot-in-the-door moment. If I overlook the occasional noises and the lack of great intonation, I can almost listen to these latest recordings without too much cringing. I think that is a small personal milestone worth celebrating. LOL
I’ve always wondered about the slot car craze of the 70′. I heard so much about it. But I never did understand its lure. Unlike RC flying, slot car racing provides a racer with only one degree of control. You go fast, or even faster, until your slot car derails, and flies off a track.
Classic slot car racing
After I bought a starter kit recently, I now appreciate why classic slot car racing can be a hobby, and not just a toy. I get that at the enthusiast end of the spectrum, die-hard collectors and racers build elaborate custom tracks and cars. I know that at the toy end of the spectrum, cheap slot car kits are available for $30 to keep toddlers entertained.
But the majority of potential customers for slot cars do not belong to either end of this spectrum. There is a reason why slot cars soon faded from the popular stage. Most casual users find the experience thrilling only for a brief moment. After an initial adrenaline rush, the game soon become repetitive and one-dimensional for casual users.
This is part 2 of a series on Mabrouk. In this part I describe in excruciating details the four slalom components of Mabrouk previously summarized in What is Mabrouk: a slalom variant of Grapevine. I learned to skate a sustained Mabrouk by first practicing the four slalom components, and by connecting them with rudimentary transitions. I later refined these transitions to make the entire Mabrouk sequence flow, but that is for part 3 and beyond of this series.
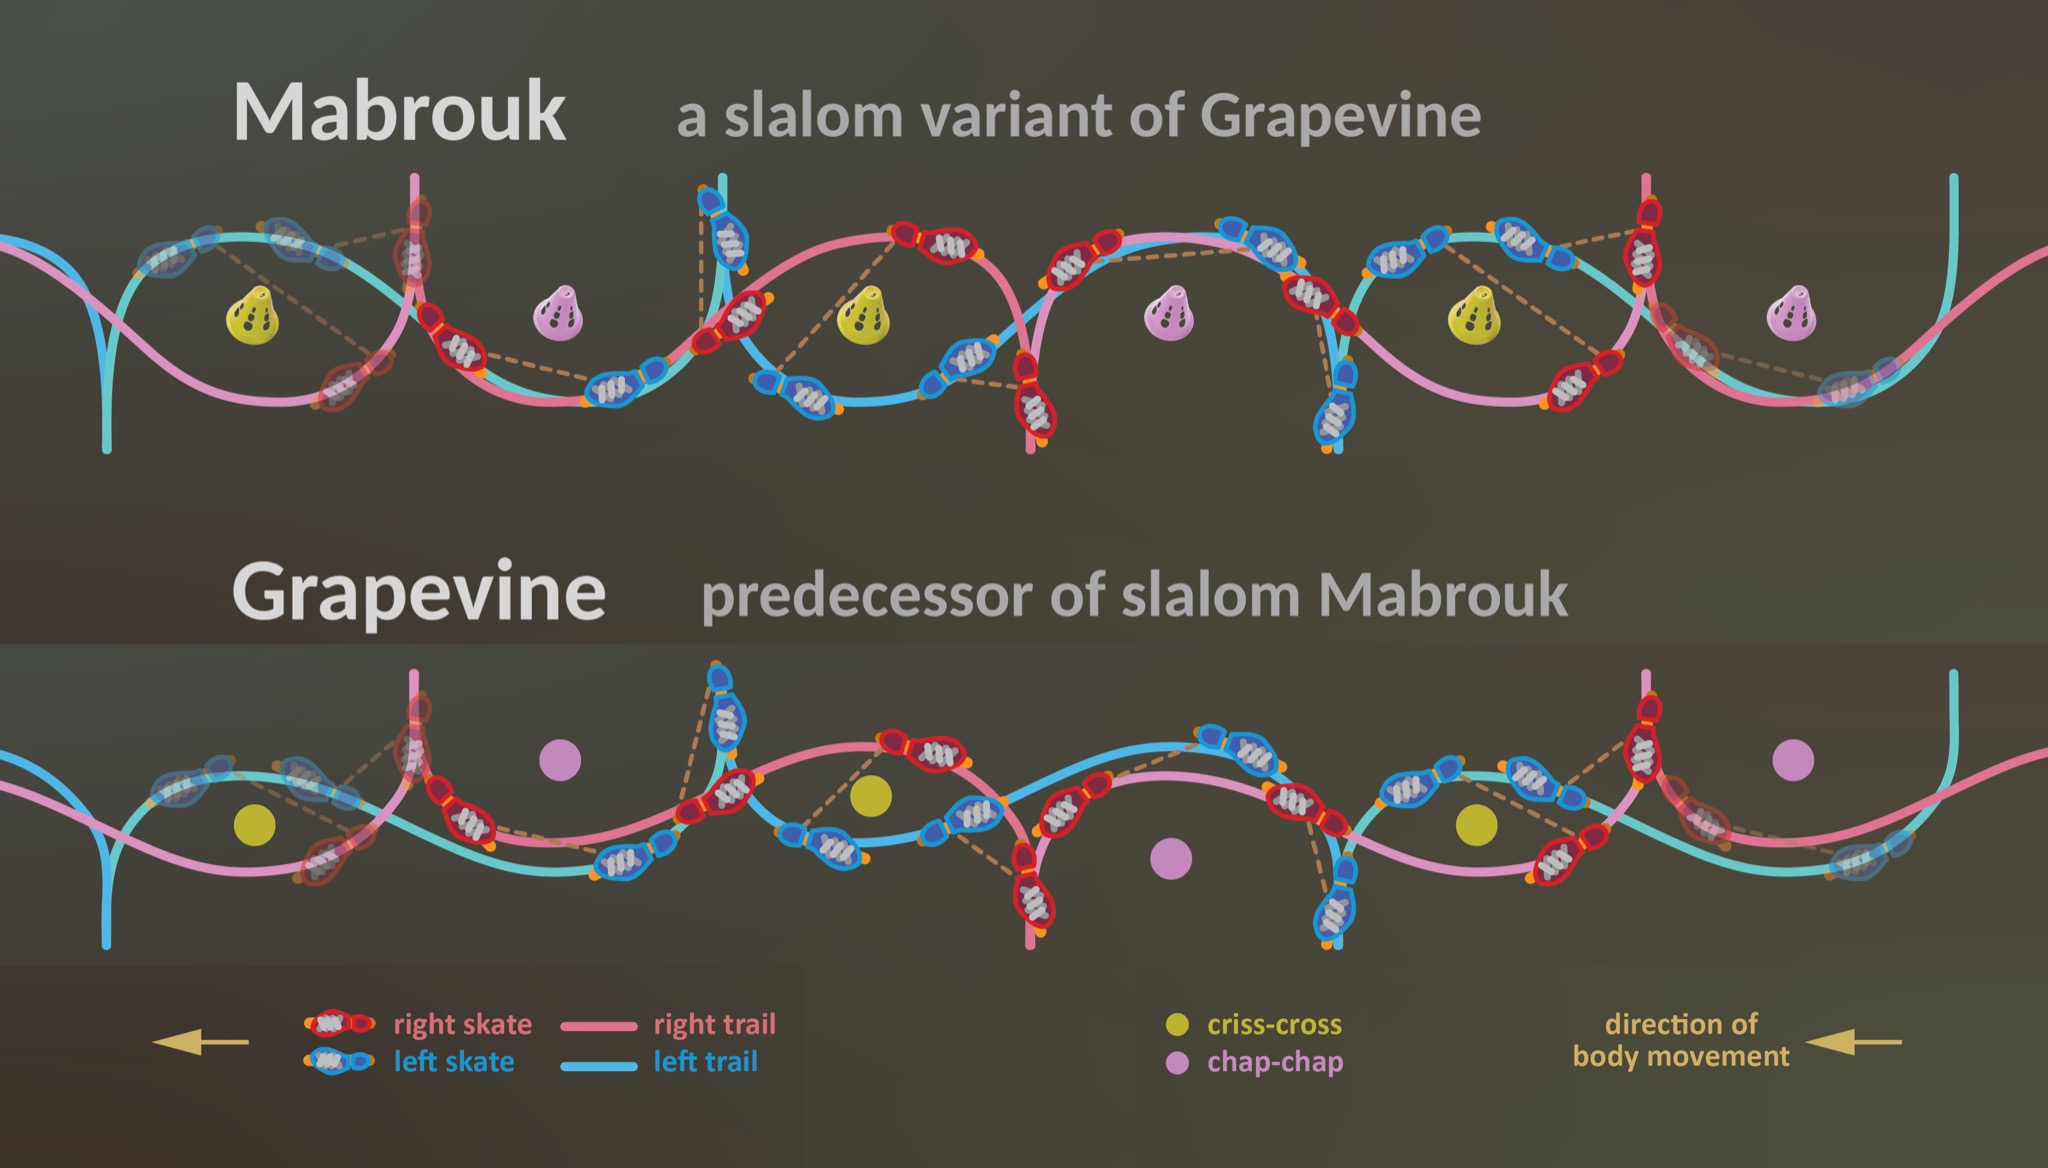
Following diagram and filmstrip recap key takeaways from part 1. Remember to read them from right to left, as indicated by the yellow arrow showing the direction of body movement. Labels s1, s2, s3 and s4 denote the four slalom components of Mabrouk. Transitions are annotated by balance moments b1, b2, b3 and b4. Vertical blue and pink bands show when left and right skates glide alone as the primary bearer of body weight. Thus, the blue left skate can be seen bearing weight and gliding around balance moments b1, and later around balance moment b3. The red right skate can be seen bearing weight and gliding around b2, and later around b4.
Summary diagram showing key ingredients of Mabrouk, a slalom variant of GrapevineKey frames of Mabrouk, for comparison to the summary diagram above
Similarly, the filmstrip above illustrates a full Mabrouk sequence, incorporating both slalom components s1, s2, s3 and s4, and balance moments b1, b2, b3 and b4. Remember to read them from right to left, as indicated by the yellow arrow showing the direction of body movement. At every component and moment, the projected center of gravity is indicated by a yellow circle on the ground. Slalom components are labeled in white – they are symmetric distribution points where both skates shoulder body weight equally. Balance moments are transition steps where one skate shoulders all body weight, colored blue when the left skate carries body weight and glides, and red when the right skate does so.
TLDR: for those of you who just want simple instructions on learning Mabrouk, search for the label TLDR on this page. You may ignore deep introspections and tedious expositions on Mabrouk. Those are really for academics, and for learners with too much time in their hands.
Mabrouk is a slalom variant of a figure skating move called Grapevine. The Grapevine skating pattern is described and diagramed as early as 1880 by Vandervell and Cox in “A System of Figure-skating”. The slalom version is presumably named after Swiss slalomer Eddy Mabrouk. Both Mabrouk and Grapevine employ the same exact 4 components, namely forward/backward criss-cross, and forward/reverse eagle.
While Mabrouk emphasizes four curved slalom footwork around equally spaced cones. Grapevine strives to have the skater move in a streamline without giving explicit thoughts to slalom components. This difference can be seen in patterns they trace on the ground as presented below.
Pattern traced by Mabrouk (top) compared to Grapevine (bottom)
While the two diagrams look very similar, in actuality these two moves are skated with distinct attitudes and goals. To skate Mabrouk, one has to keep the cones in view and constantly adjust skating patterns accordingly. On the other hand, Grapevine is skated more freely, with the eye trained in the general direction of body movement, despite the 180° turning of the hip from side to side. A skater primarily moves in a streamline in Grapevine. Thus the gliding skate will trace a slightly flattened slalom curve as there are no cones to avoid.
Daniel skating Mabrouk
Naomi skating Grapevine
Like Grapevine, Mabrouk is also skated exclusively on outside edges. This when done to perfection appears to an onlooker as if a skater had Jackson’s moonwalk power, and could effortlessly propel herself indefinitely around cones, while turning forward and backward, without ever lifting any skates from the ground.
I have previously written much about Grapevine already. I started by trying to learn the ice skate version Grapevine, even before I could skate much. That journey was documented in Learn to Skate the Two-foot Grapevine Analytically. But I never quite managed to sustain the move indefinitely on ice, even though I understood intellectually how it would be done. I subsequently tried to skate Grapevine on inline skates. This turned out to be even more difficult, due to much stronger friction between wheels and pavement, compounded by my unfinished Grapevine training. However, instructions from Naomi Grigg on toe pivots and heel pivots proved to be enlightening, as I recounted in Learn the Two-foot Grapevine on Inline Skates. While I still couldn’t sustain Grapevine indefinitely on pavement, I was finally able to do so on ice by applying these pivots.
It wasn’t until I followed a great YouTube video on Mabrouk from Daniel of SkaMiDan fame that I truly managed to string all four component moves of Grapevine into a continuous sequence. In other words, the Mabrouk way of looking at the same four components was eye-opening. Breaking the sequence into four distinct and common slalom components allowed me to learn to cleanly transition from one component into the next. It taught me how to inject energy into the sequence at every one of these four components. I finally had a mental model for how to articulate these transitions, and to string the four components into a single sustained flow.
This article is part 1 of a series of articles that together document my learning journey for anyone in the same position. But first, go watch Daniel’s video, and subscribe to his channel. Daniel has gracefully allowed me to use his excellent video as a source material for illustration in this article. Thanks, Daniel!
Asian Americans who bike or skate know that helmets sold in America are generally not shaped properly for their heads. This is a phenomenon alien to most non-Asian people. Lately some brands have come out with so-called “Asian Fit” models. After an extensive research, I think these are just hot air, except for possibly a few exceptions.
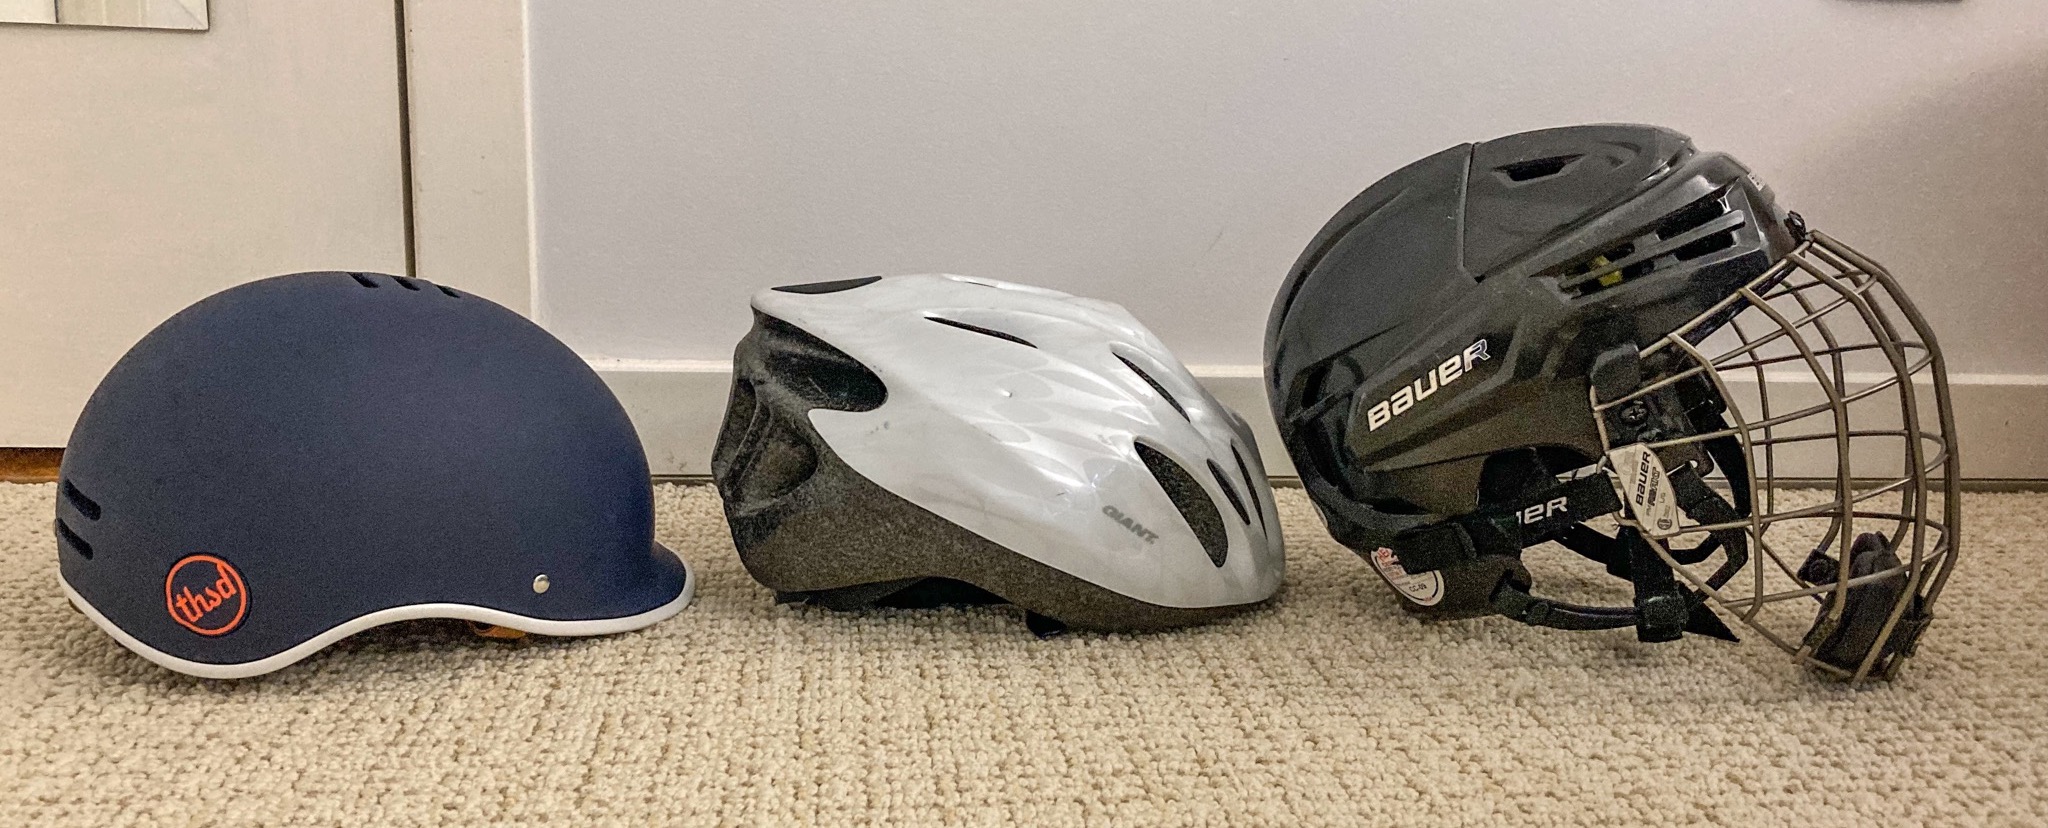
Three types of helmets: skating, biking & hockey
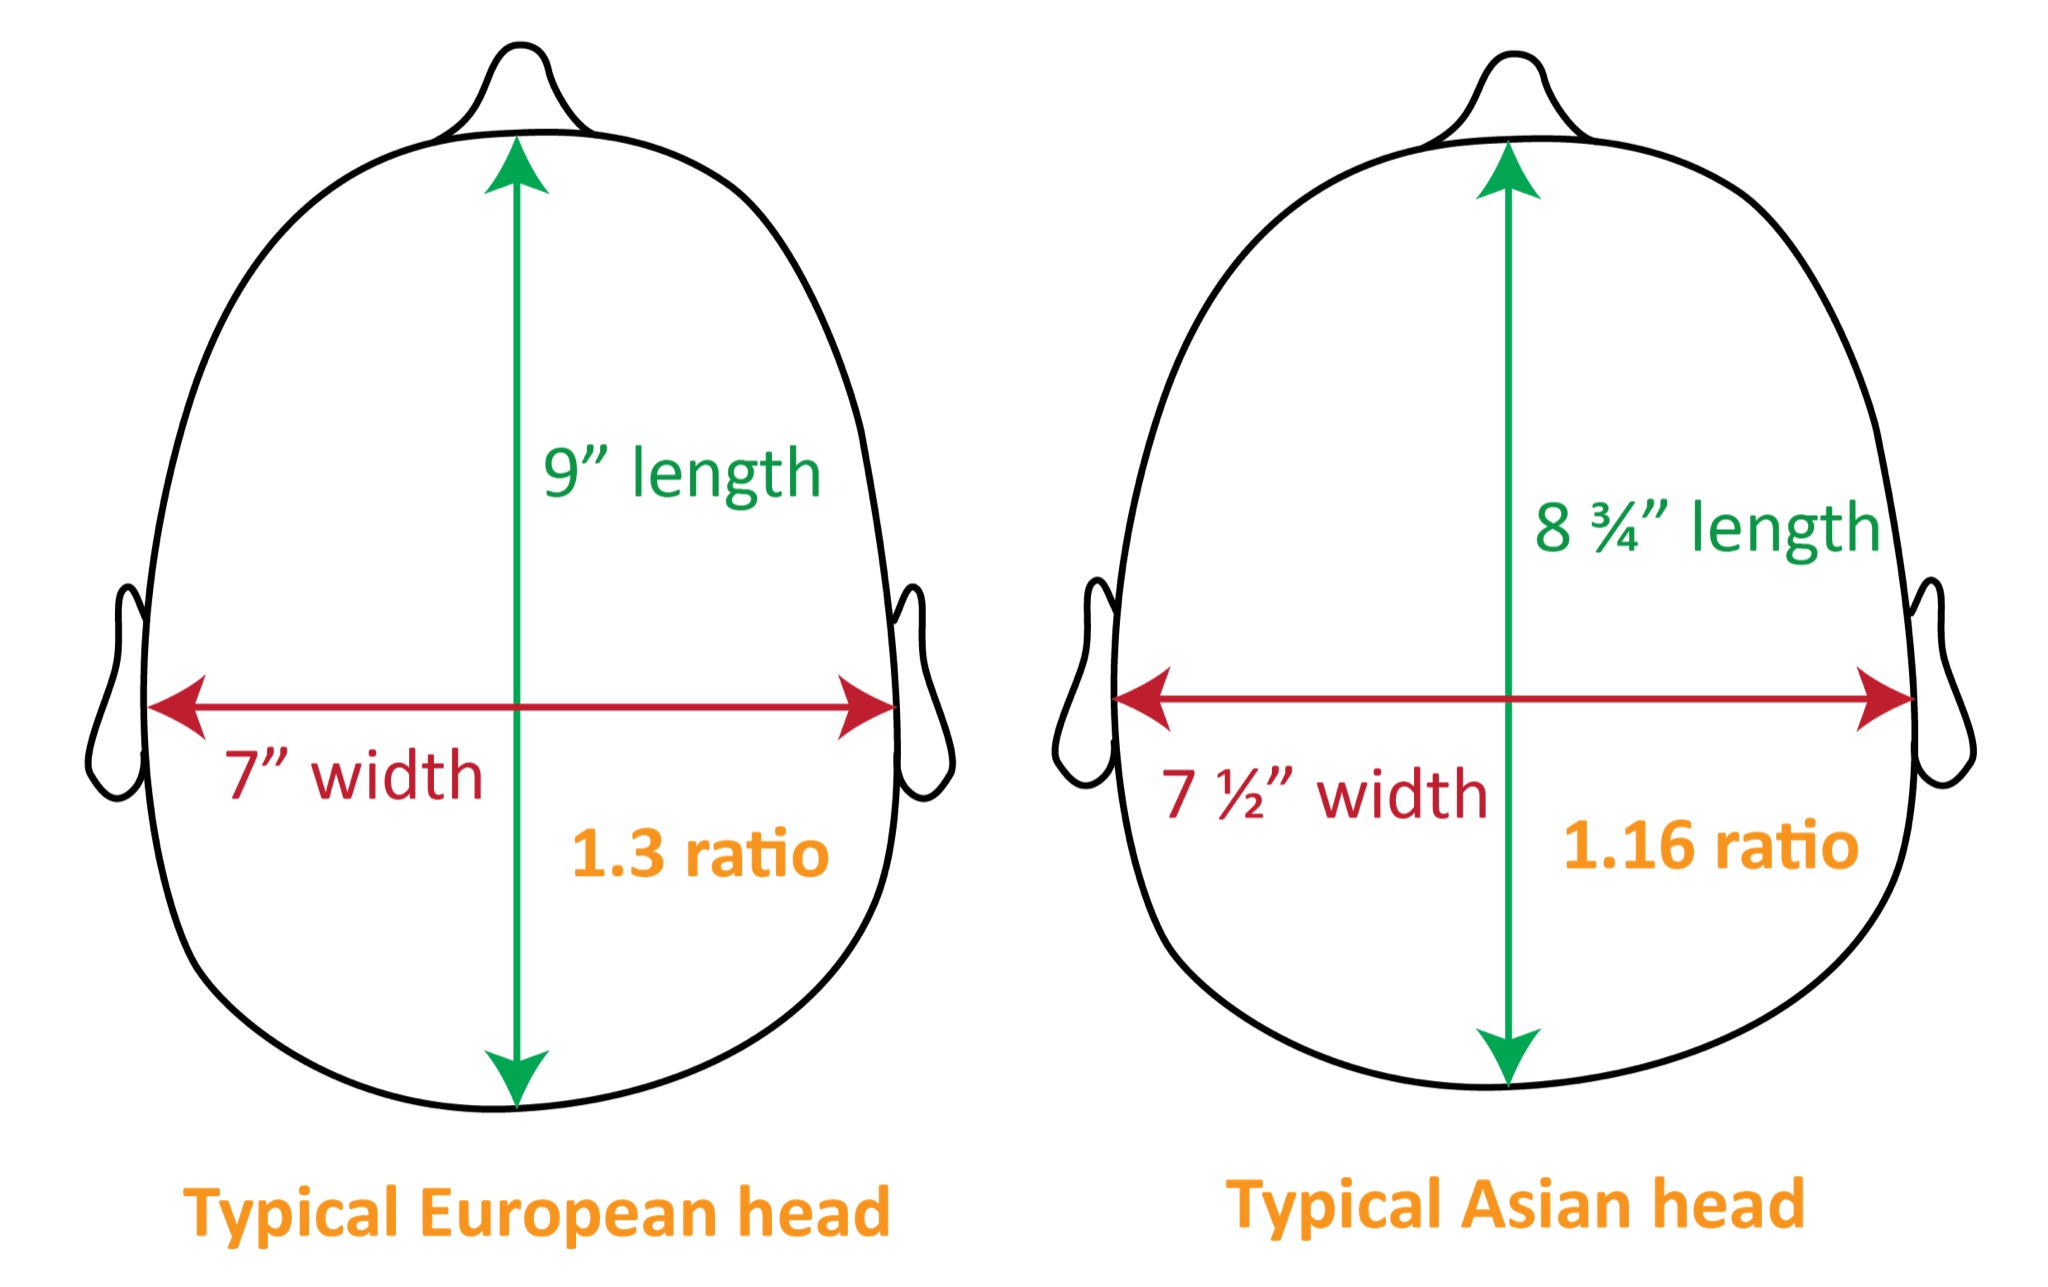
Helmets sold in the US are molded to the average shape of European heads, roughly with a 1.3 ratio expressed in length over width of the head. In visual terms, you can picture a human head measuring 9″ from forehead to the back, and 7″ from ear to ear, shown below left. It’s got the shape of an oval, if you look at the head from top down. But Asians have a rounder head shape, with an average ratio of 1.16 instead. Picture a human head measuring 8 ¾” from forehead to the back, and 7 ½” from ear to ear, shown below right.
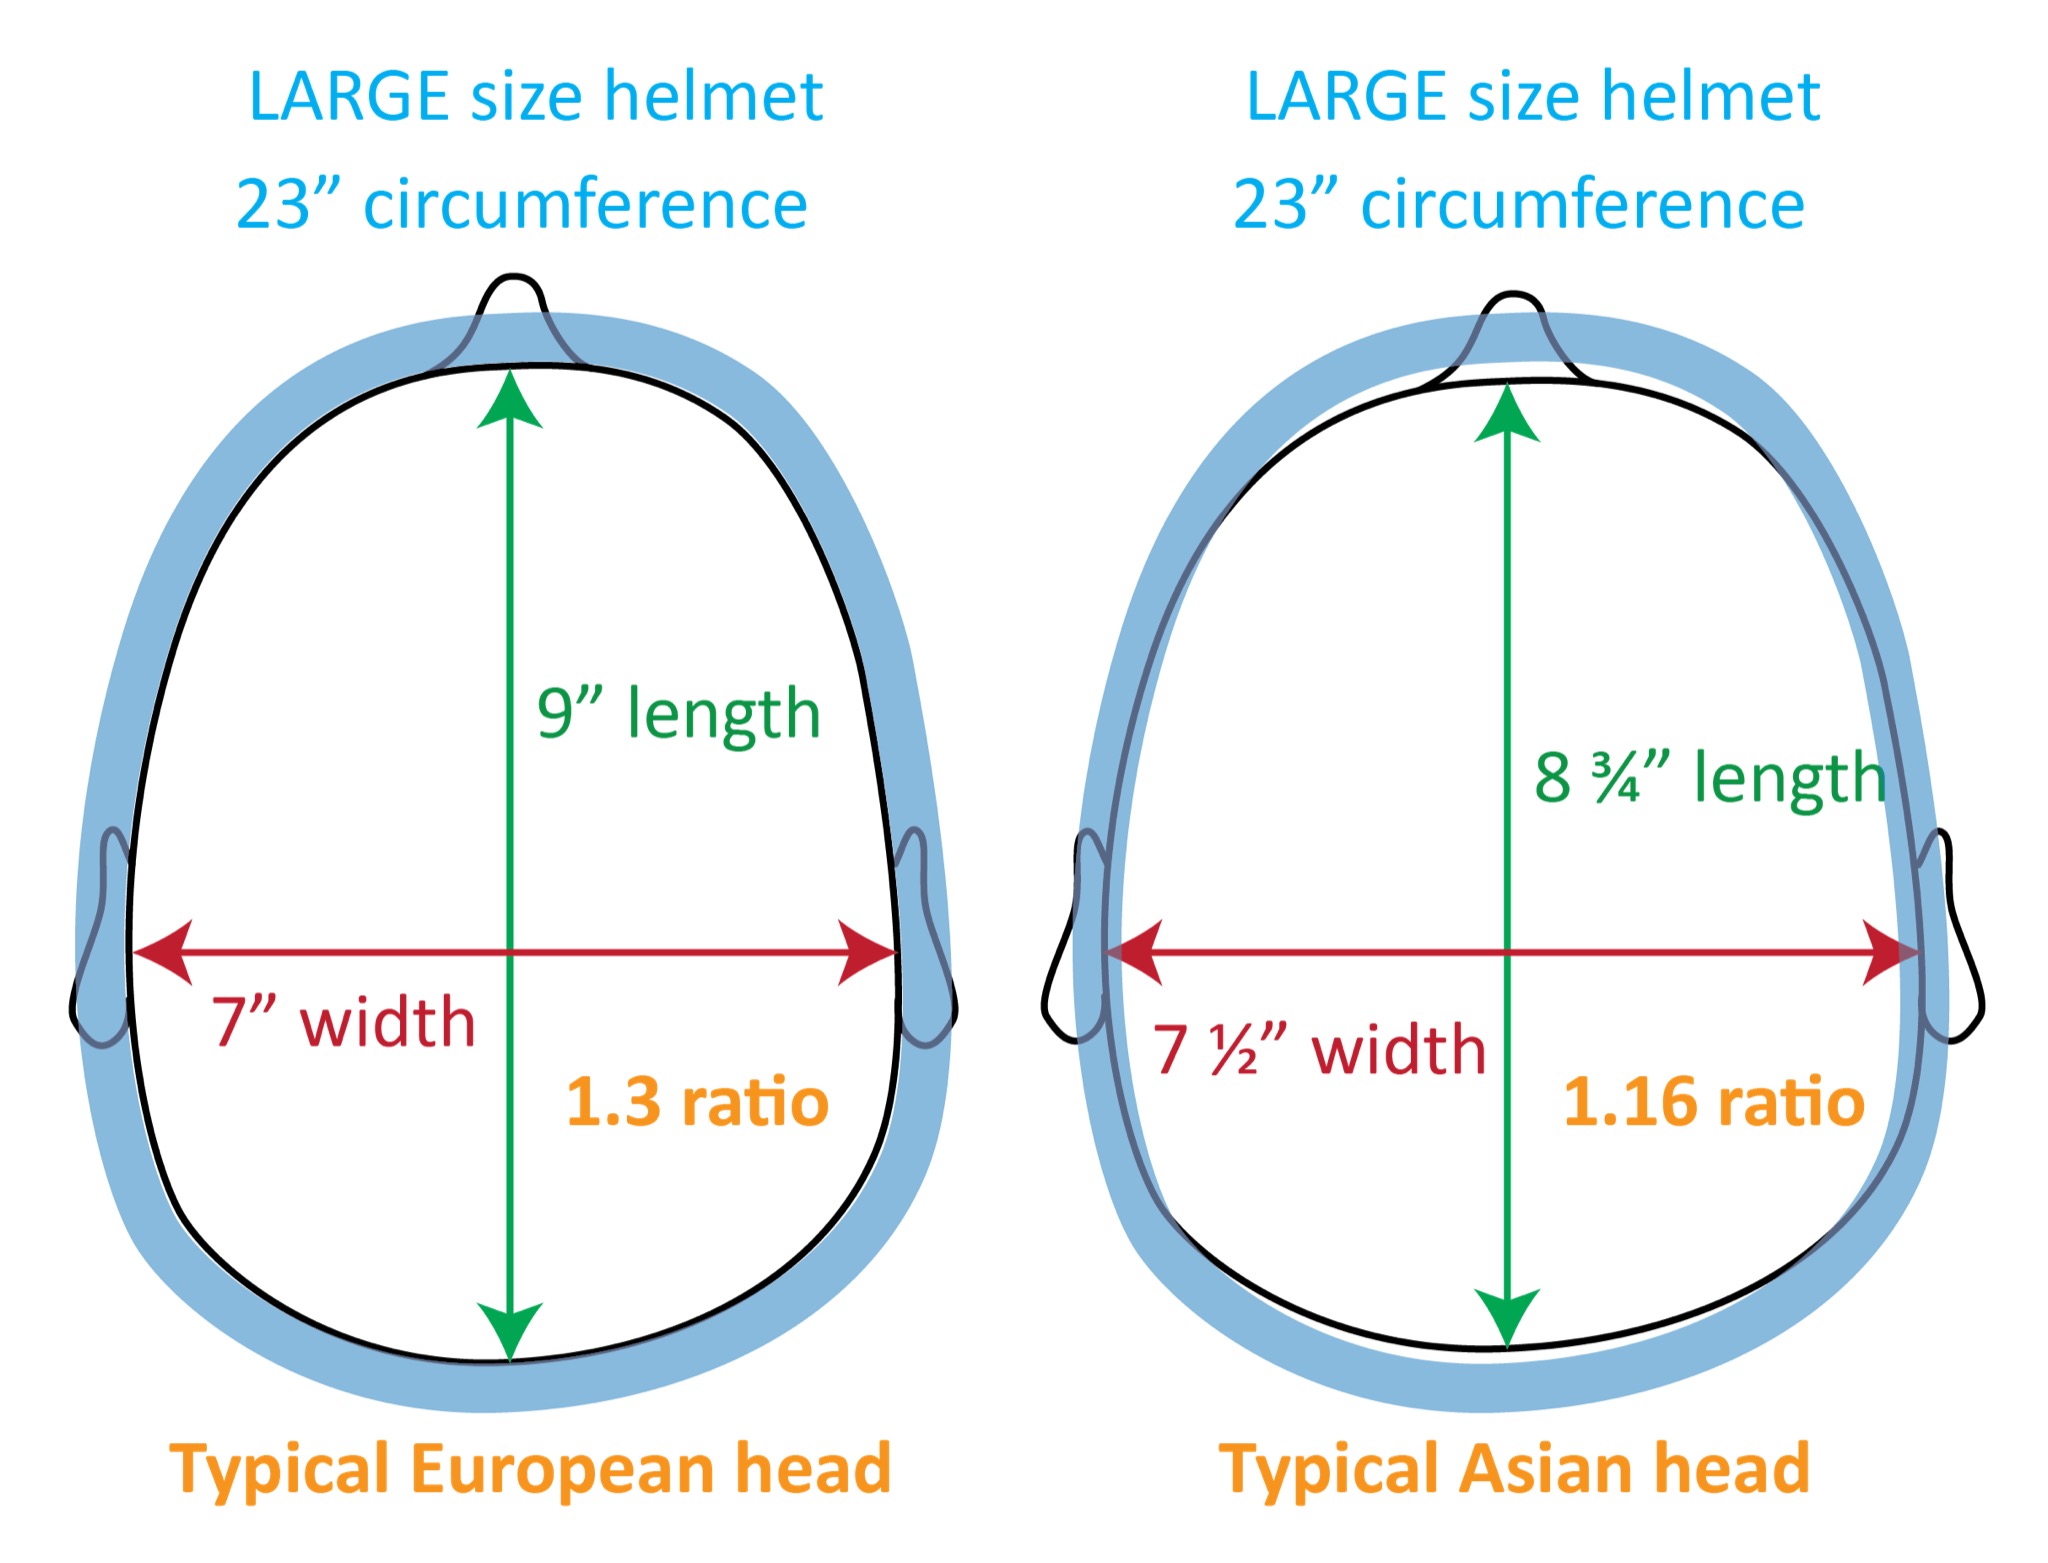
Most helmets sold in the US are sized by the circumference of a typical European head. A typical LARGE-size helmet targets an oval-shaped head with a circumference of 23″, or slightly larger. This LARGE helmet fits snug on a European head measuring 9″ long and 7″ wide, as shown below left. Often people order helmets online, based on advertised sizing charts. If an Asian American makes the mistake of buying a LARGE helmet thus, sight unseen, they will be disappointed. The helmet will not fit at all, as the sides of the helmet will be too narrow for an Asian head, as shown below right.
Wednesday Night Skate NYC is also known as WNS NYC. It’s one of several well-established groups in the city. Some say it’s the biggest group of them all. WNS is run by volunteers since the late 1990s. Every Wednesday from April to October, weather permitting, organizers show up wearing yellow-green vests at the south-side steps of Union Square around 7:45pm. By then a sizable crowd of skaters have already gathered at the steps. At 8pm an organizer gives a brief safety speech and introduces the route planner of the week, as even more skaters materialize all of a sudden at the steps. One organizer is appointed the leader of the day, and another the sweeper. Folks are told not to skate ahead of the leader. The sweeper makes sure to leave no skater behind. Shortly after, skaters launch like a swarm of giant locusts, to descend upon the streets of New York City at dusk. The leader signals followers to take breaks at pre-designated stops along the route, so that the rest of the group may catch up, with the sweeper being the last person to arrive at each stop. The route circles back to Union Square, where a day’s skating concludes.
Slalom bladers practice at a well-paved area behind Mist Garden at Flushing Meadows Corona Park in Queens. The surface of Mist Garden is quite smooth for inline skating as well, when it’s not spewing fog and mist. You will find Mist Garden right next to the Unisphere which skateboarders and bladers alike have also turned into a skating rink.
This article is not about a skatepark with street and transition elements, but I include it as a honorable mention as a part of my Public Skateparks on Long Island series. Also check out the article on Maloof Skatepark which is just 3-minute away by skates.
Slalom area with the Mist Garden and the Unisphere in the backgroundContinue reading →