
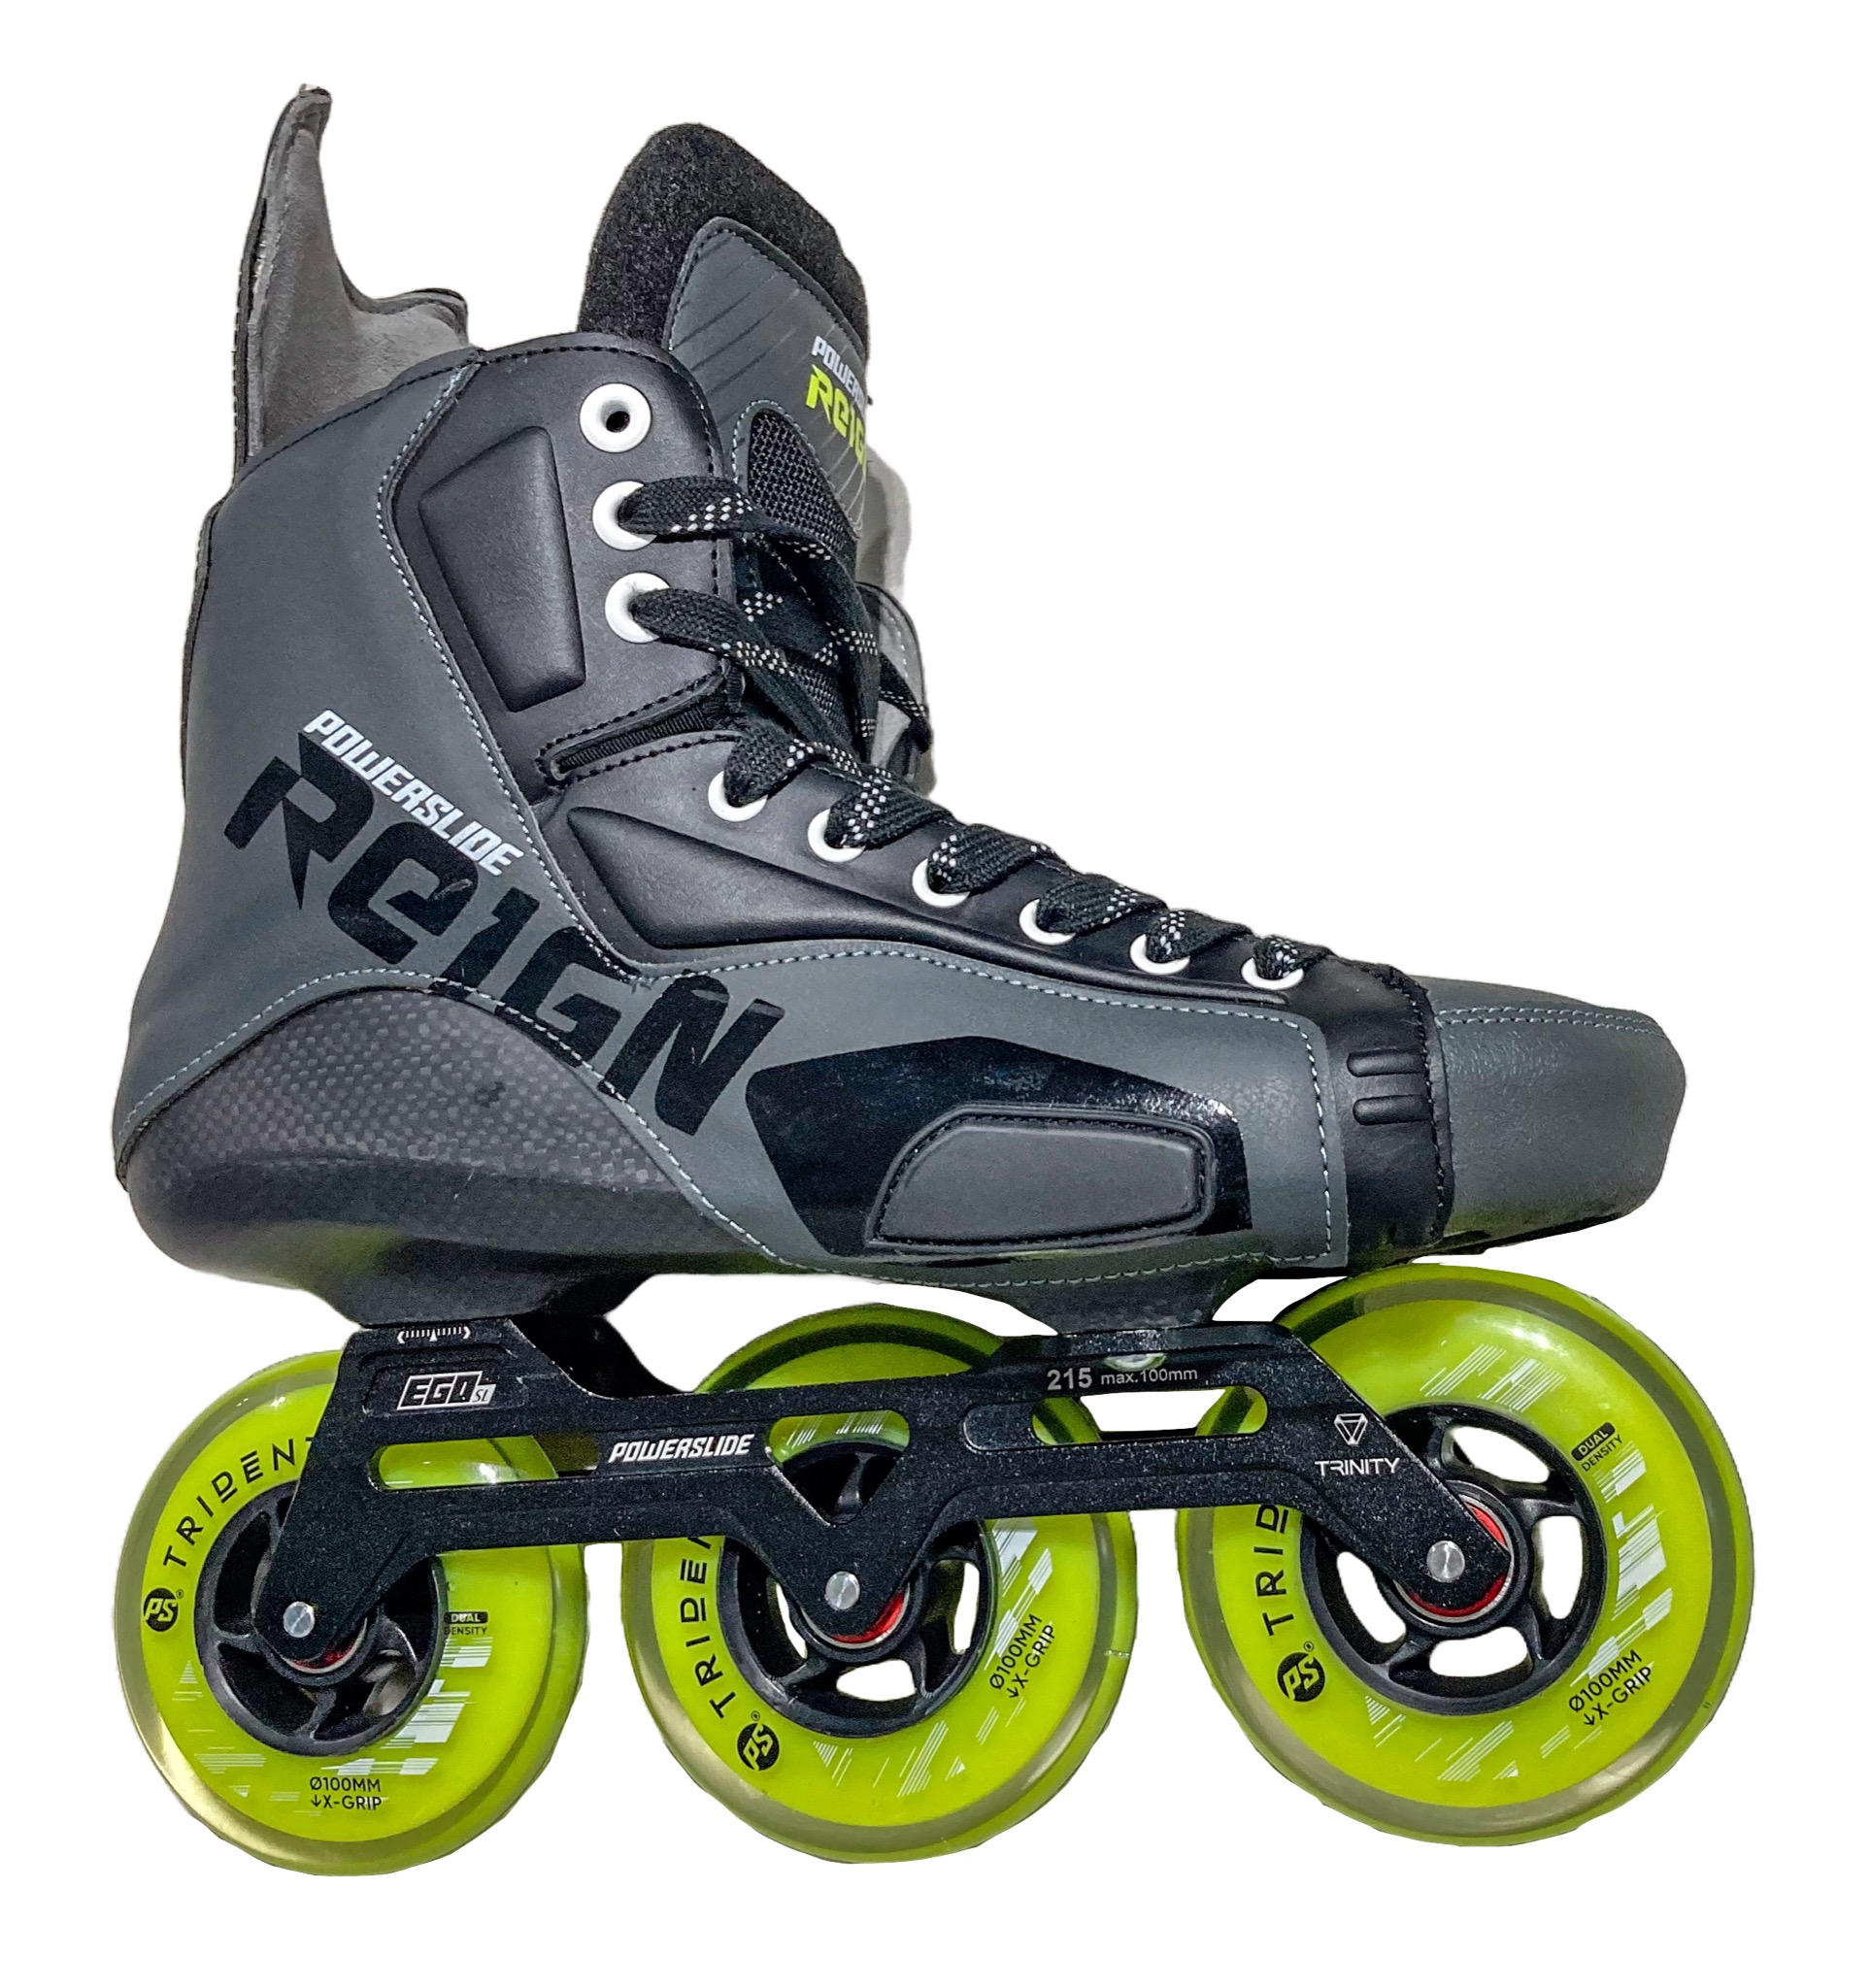
As a postscript to Big Wheels on Carbon Hockey Skates, I mentioned that I discovered Powerslide Reign Ares 100. They look like carbon hockey skates. Yet they’re equipped with Trinity mounts for big wheel configurations, such as 3x110mm. These skates seemingly disproved my assertion that “you simply can’t buy skates with big wheels on full-bodied, carbon hockey shells – they don’t exist“.
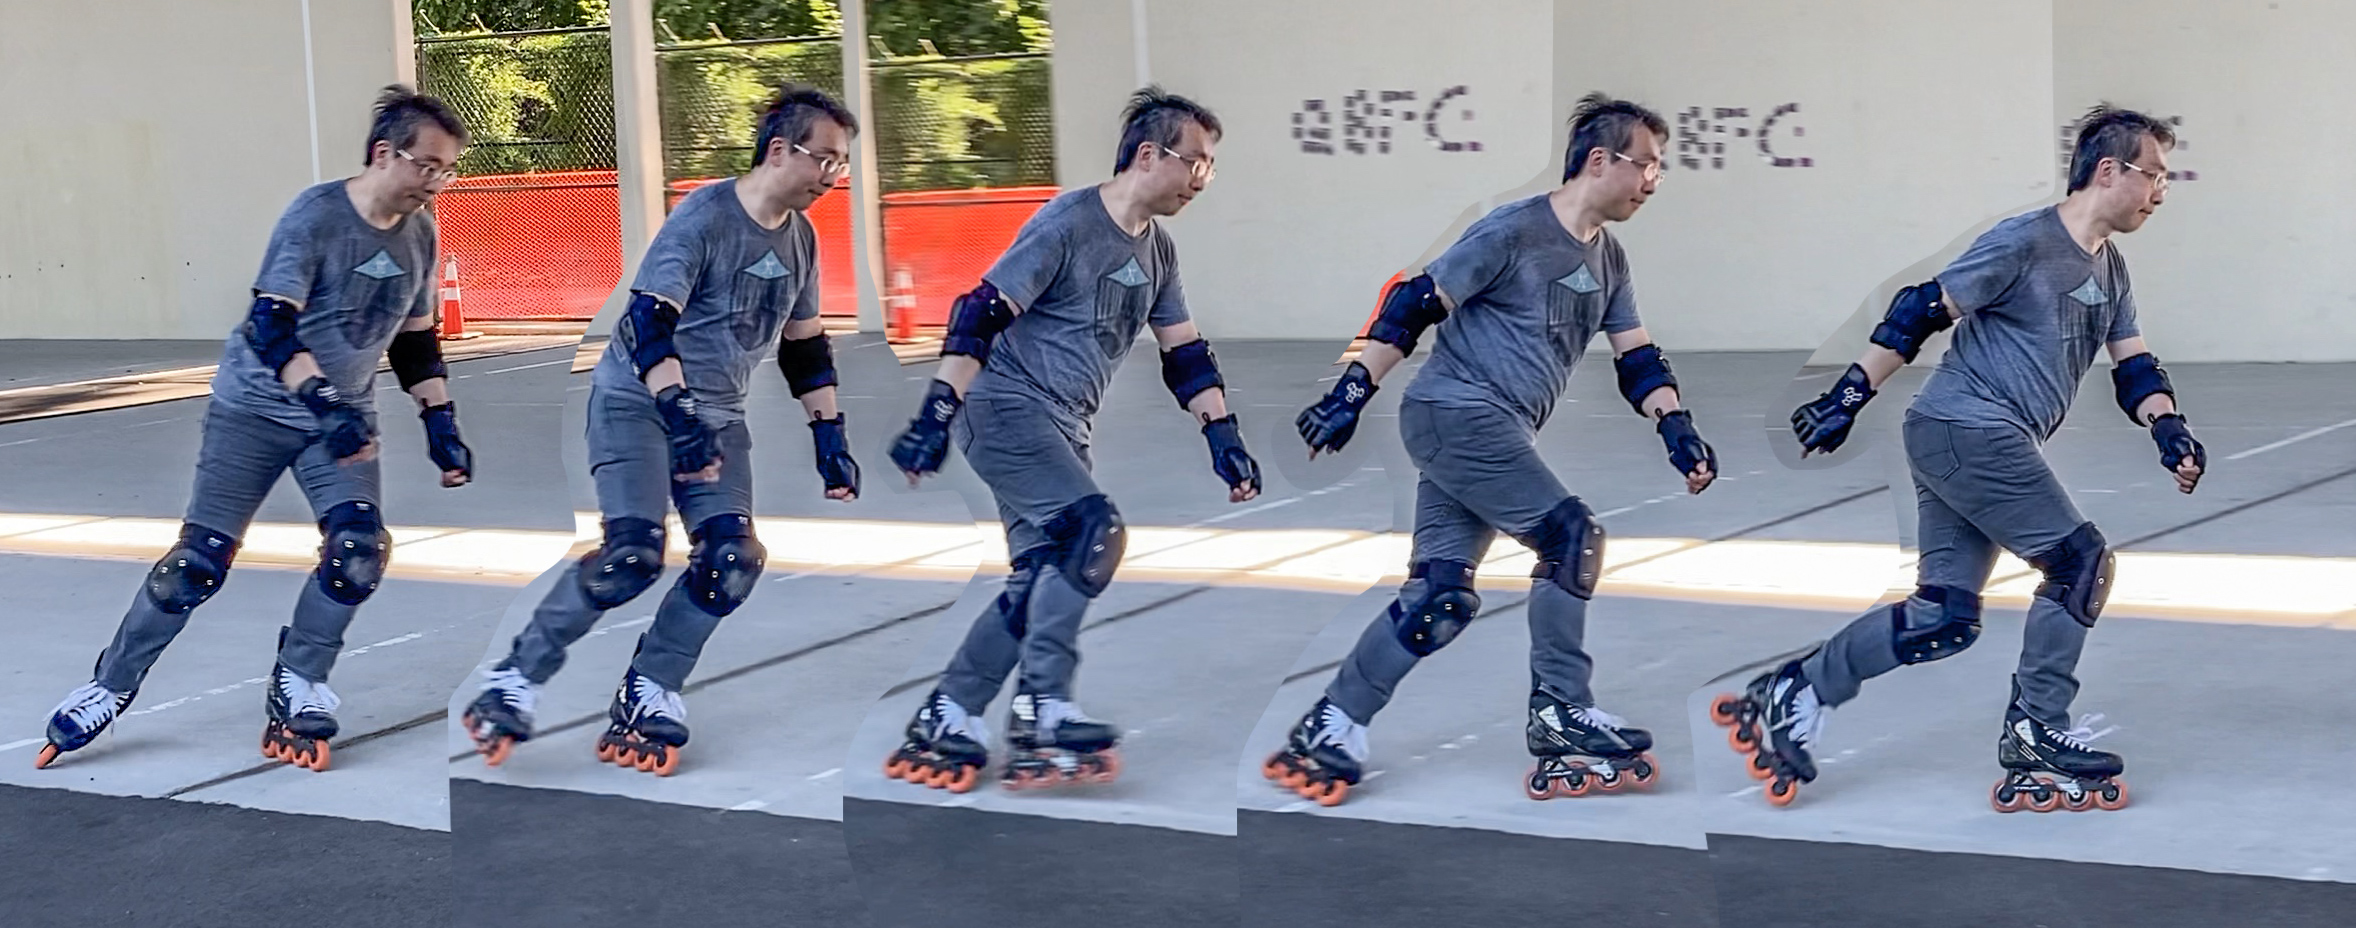
I bought a pair of Reign Ares, heat-molded them, and skated on them. I replaced its frame with a Endless 90 Trinity frame, and mounted Undercover Team Blank wheels on them.

I’ve examined them, and pondered on the internal structure of these skates for a week now. I’ve done all I could, to divine how they are made, short of cutting my new skates up. I can confidently say that, “they are no carbon hockey skates“.


But I love them. I think they are the best answer to my quest to find big wheels on carbon (almost) hockey skates. This long post documents my journey to customize and set up Reign Ares. I turned them into the right big-wheel skates for me, for urban marathons such as Wednesday Night Skate NYC.

- Urban vs. hockey skates
- Urban carbon shell with hockey quarter panels
- Interchangeable Trinity frames
- Trinity mounting specifications
- Hockey-style eyelets, tongue and liner
- Heat-molding Reign Ares
- Fake hockey quarter panels
- Gaps between cuff and leg
- Reshaping cuff with spot heating
- Factory frames too short for big wheels
- Installing Endless 90 Trinity frame
- Bearings and bearing spacers
- The art of choosing the right bearing spacers
- Anatomy of a wheel assembly
- Bearing spacers and preloading
- Factory bearing spacers too short
- There are no perfectly-machined parts
- Finding the perfect spacer for the best spin
- Learning from shredders
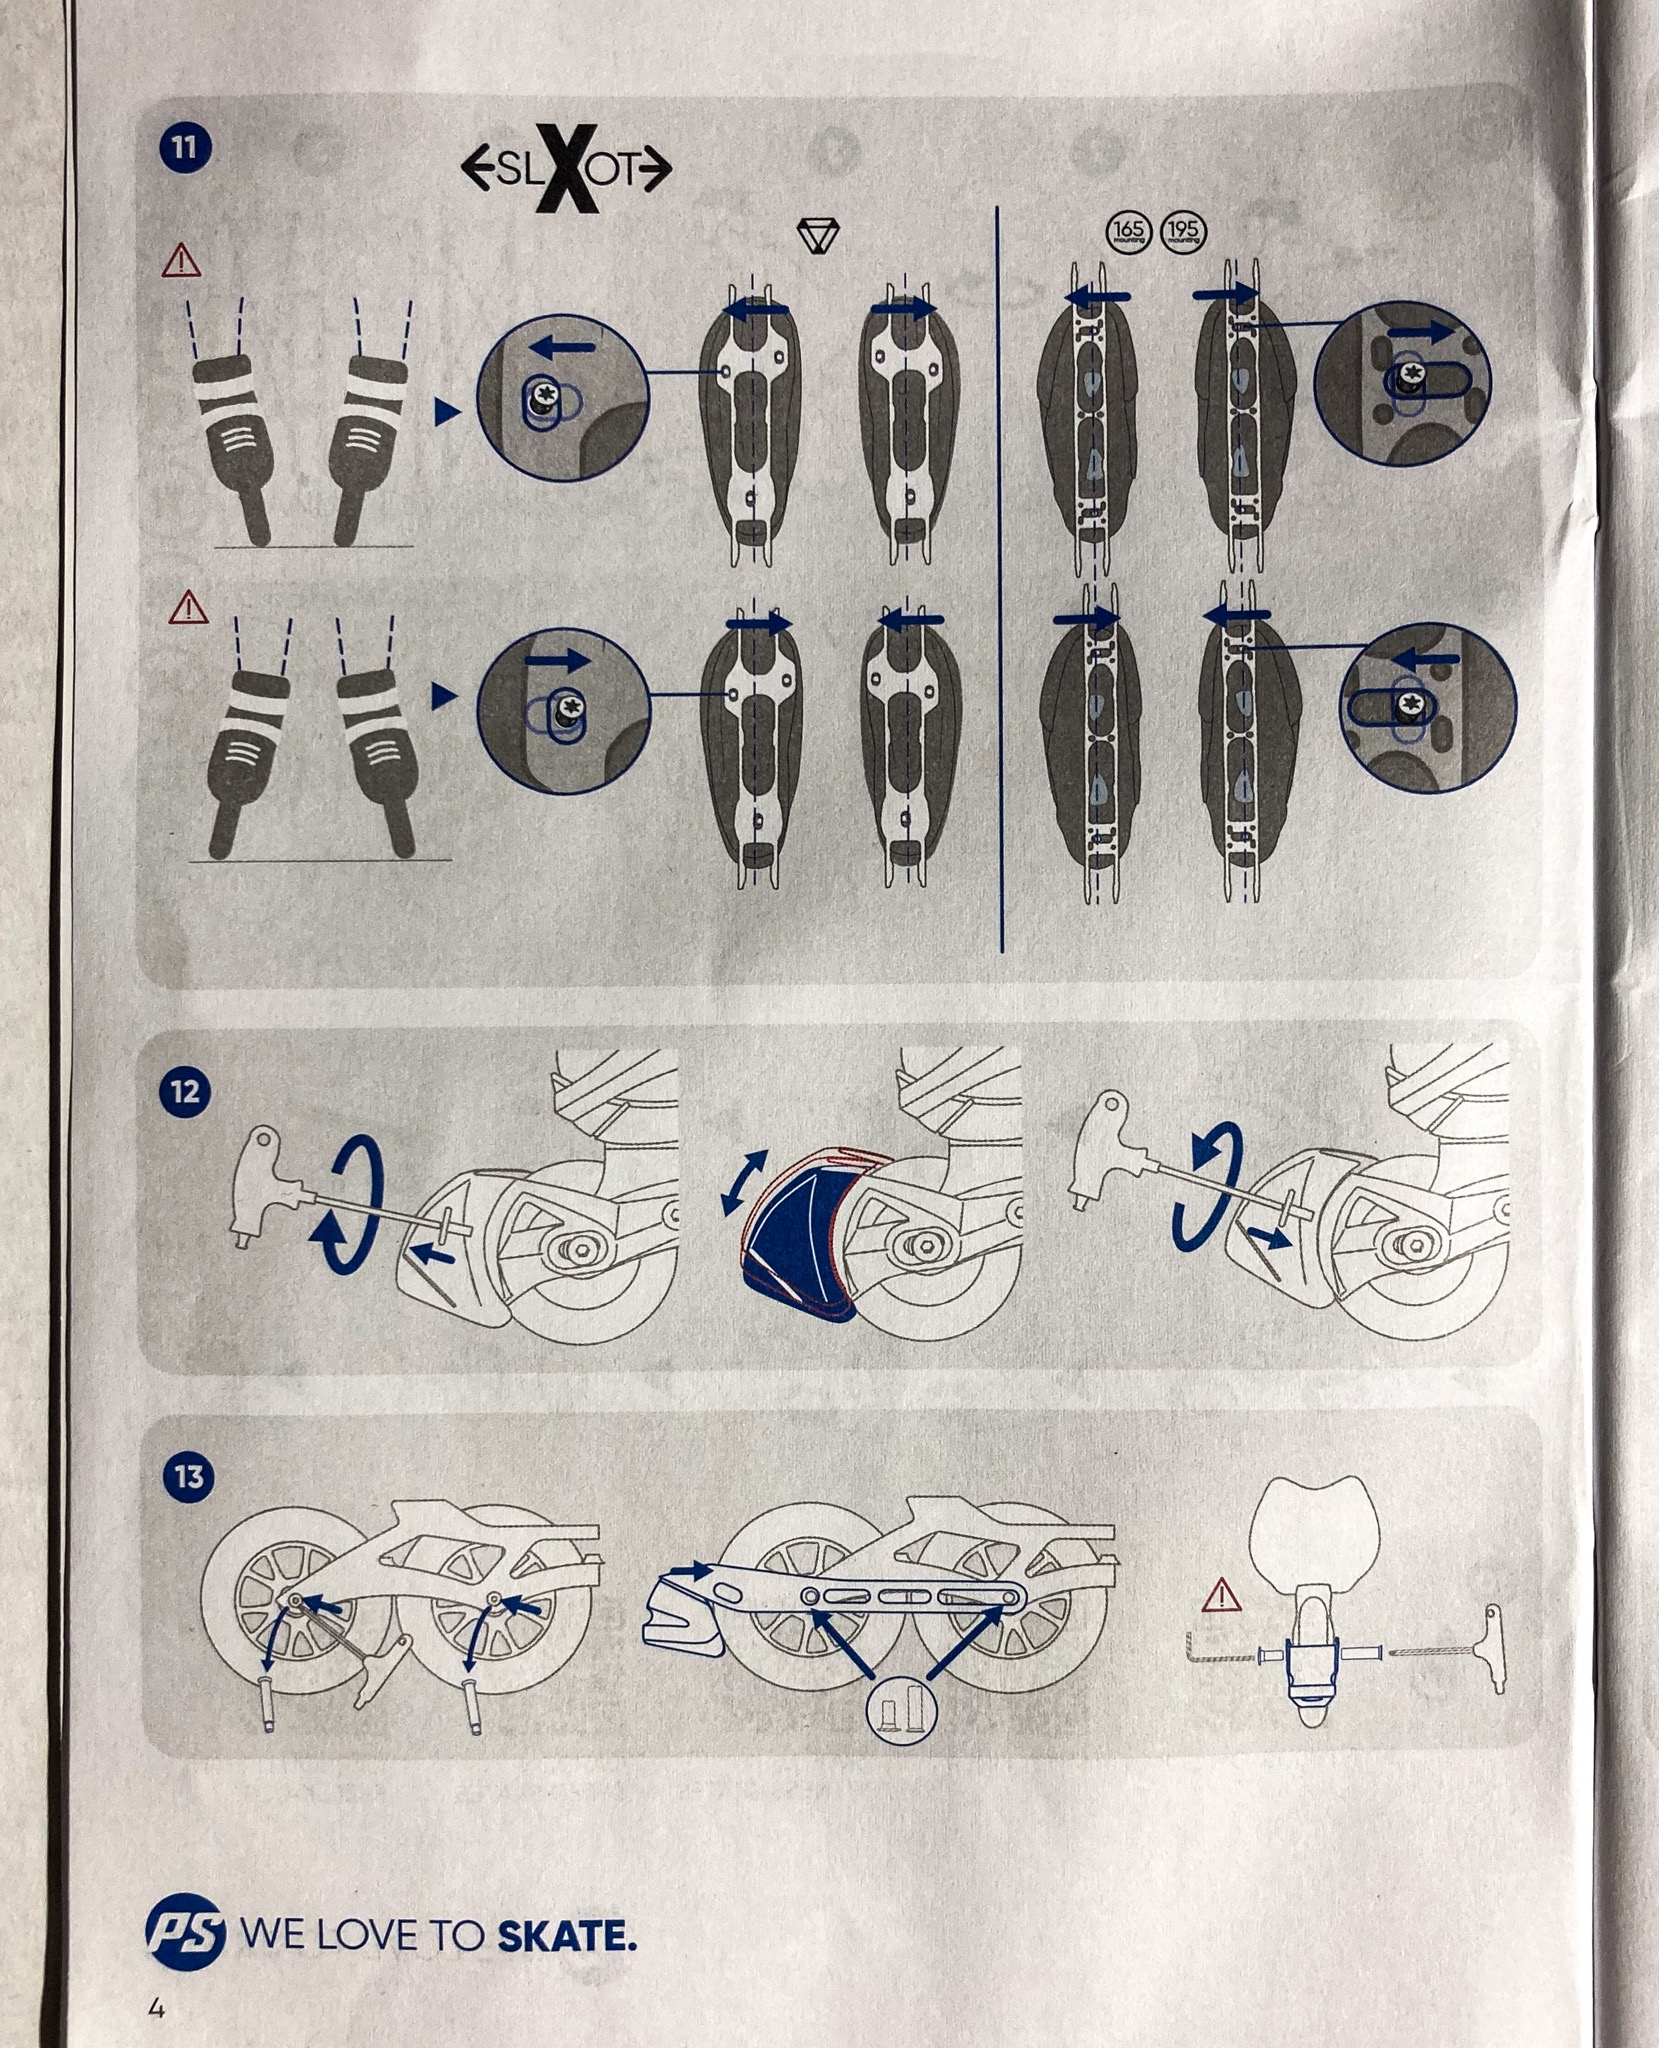
- Adjusting frame placement and orientation
- Terse and confusing instructions on frame adjustment
- Adjusting frames based on single-skating gliding
- Blisters and loose cuffs
- Runner’s loop lacing
- Updates
Urban vs. hockey skates
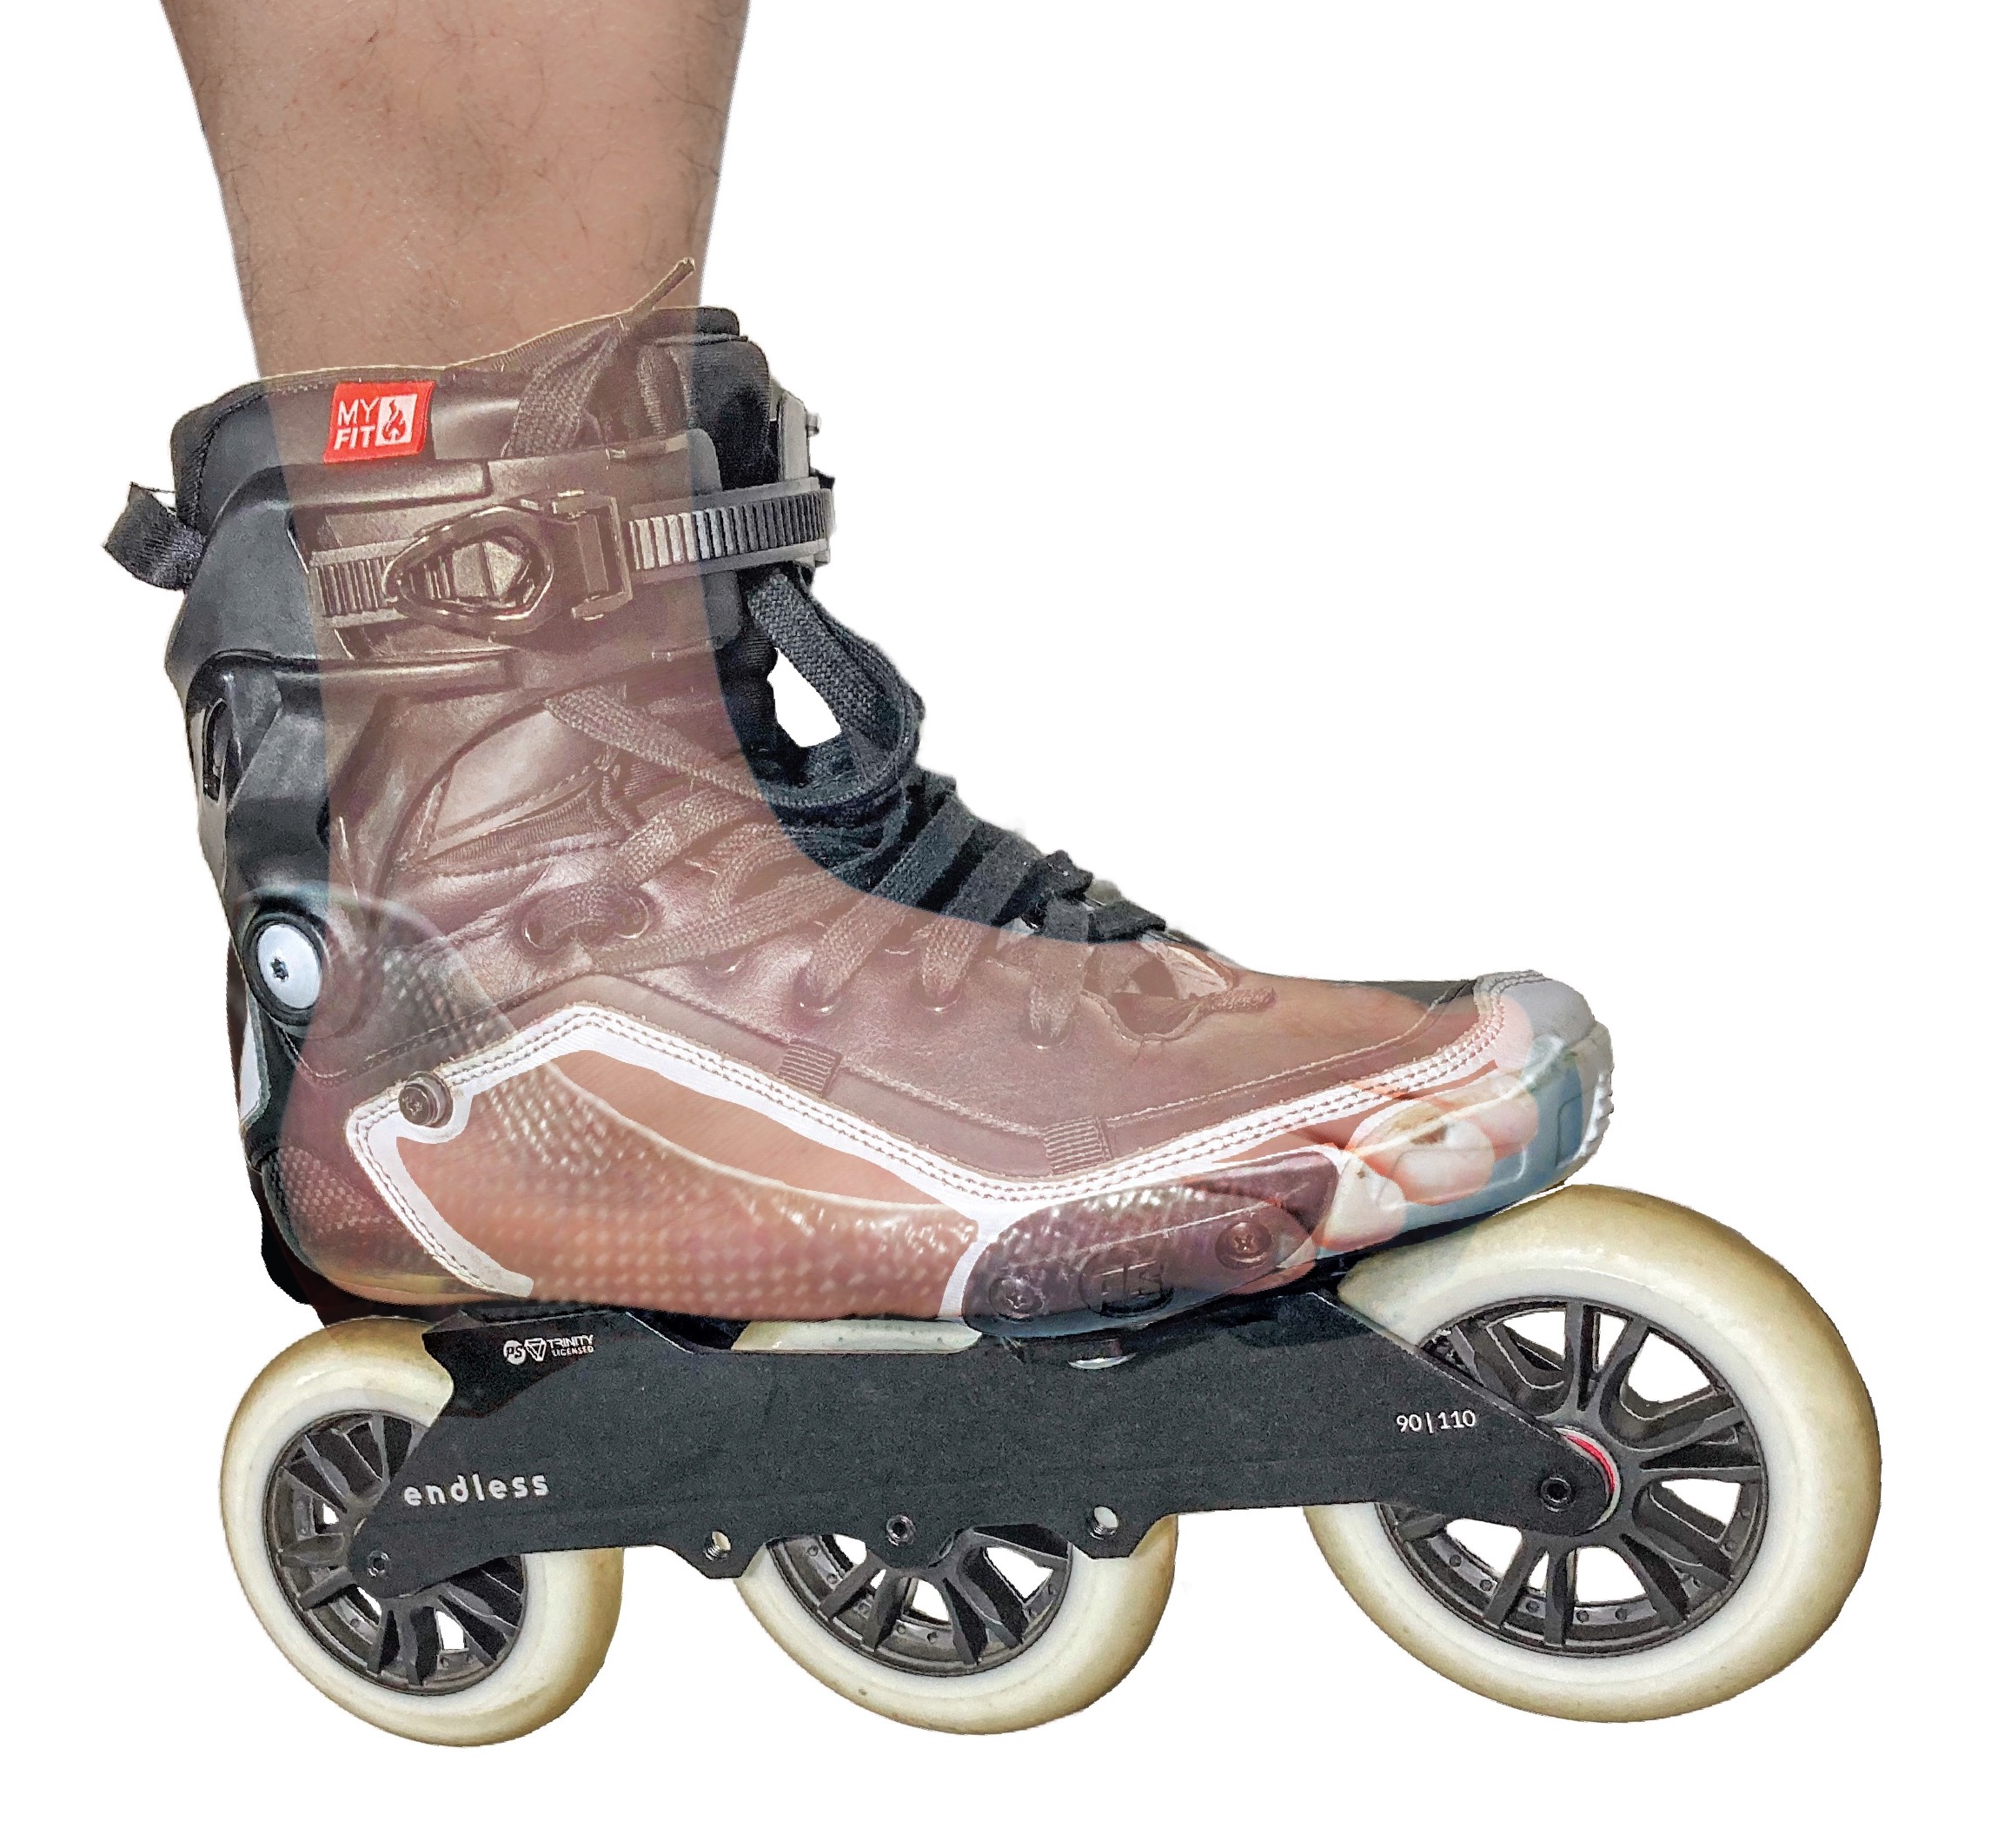
Before you read on, let’s agree on what exactly “carbo hockey skates” means, and how they are different from carbon urban skates. Following illustrations show these two types of skates, with their carbon shells marked out in colored overlays.


The low-profile shells in urban skates cause skin-chafing for some skaters, including yours truly. This skin-chafing issue lead me to investigate, and then write a lengthy post on What are carbon-fiber inline skates?

Urban carbon shell with hockey quarter panels
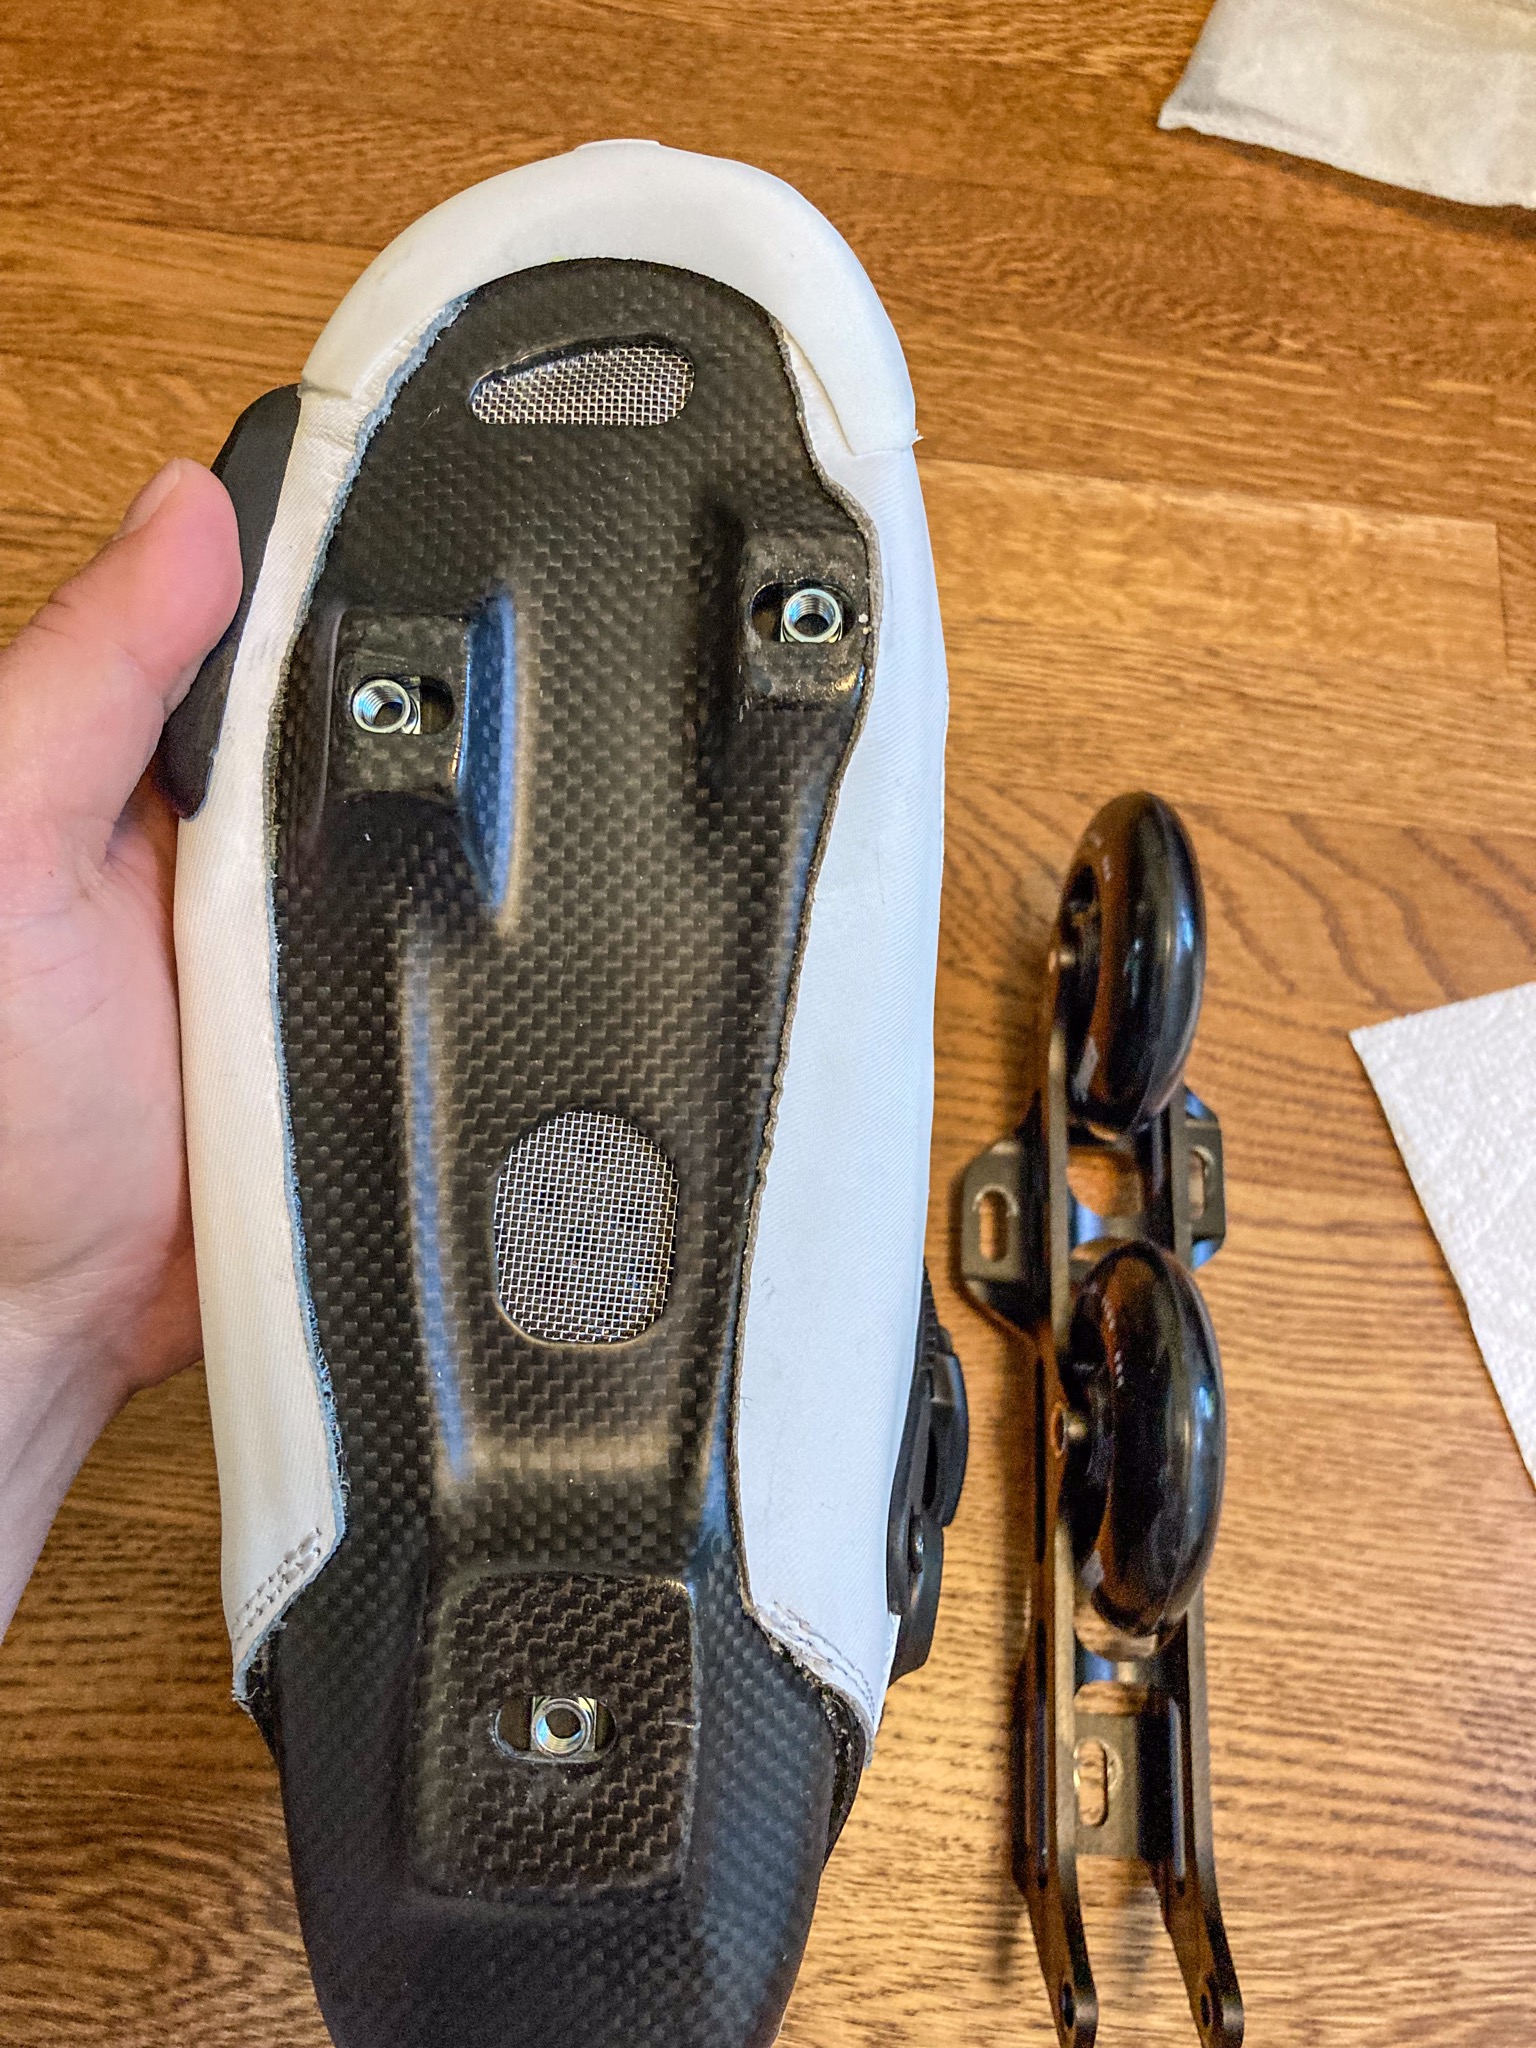
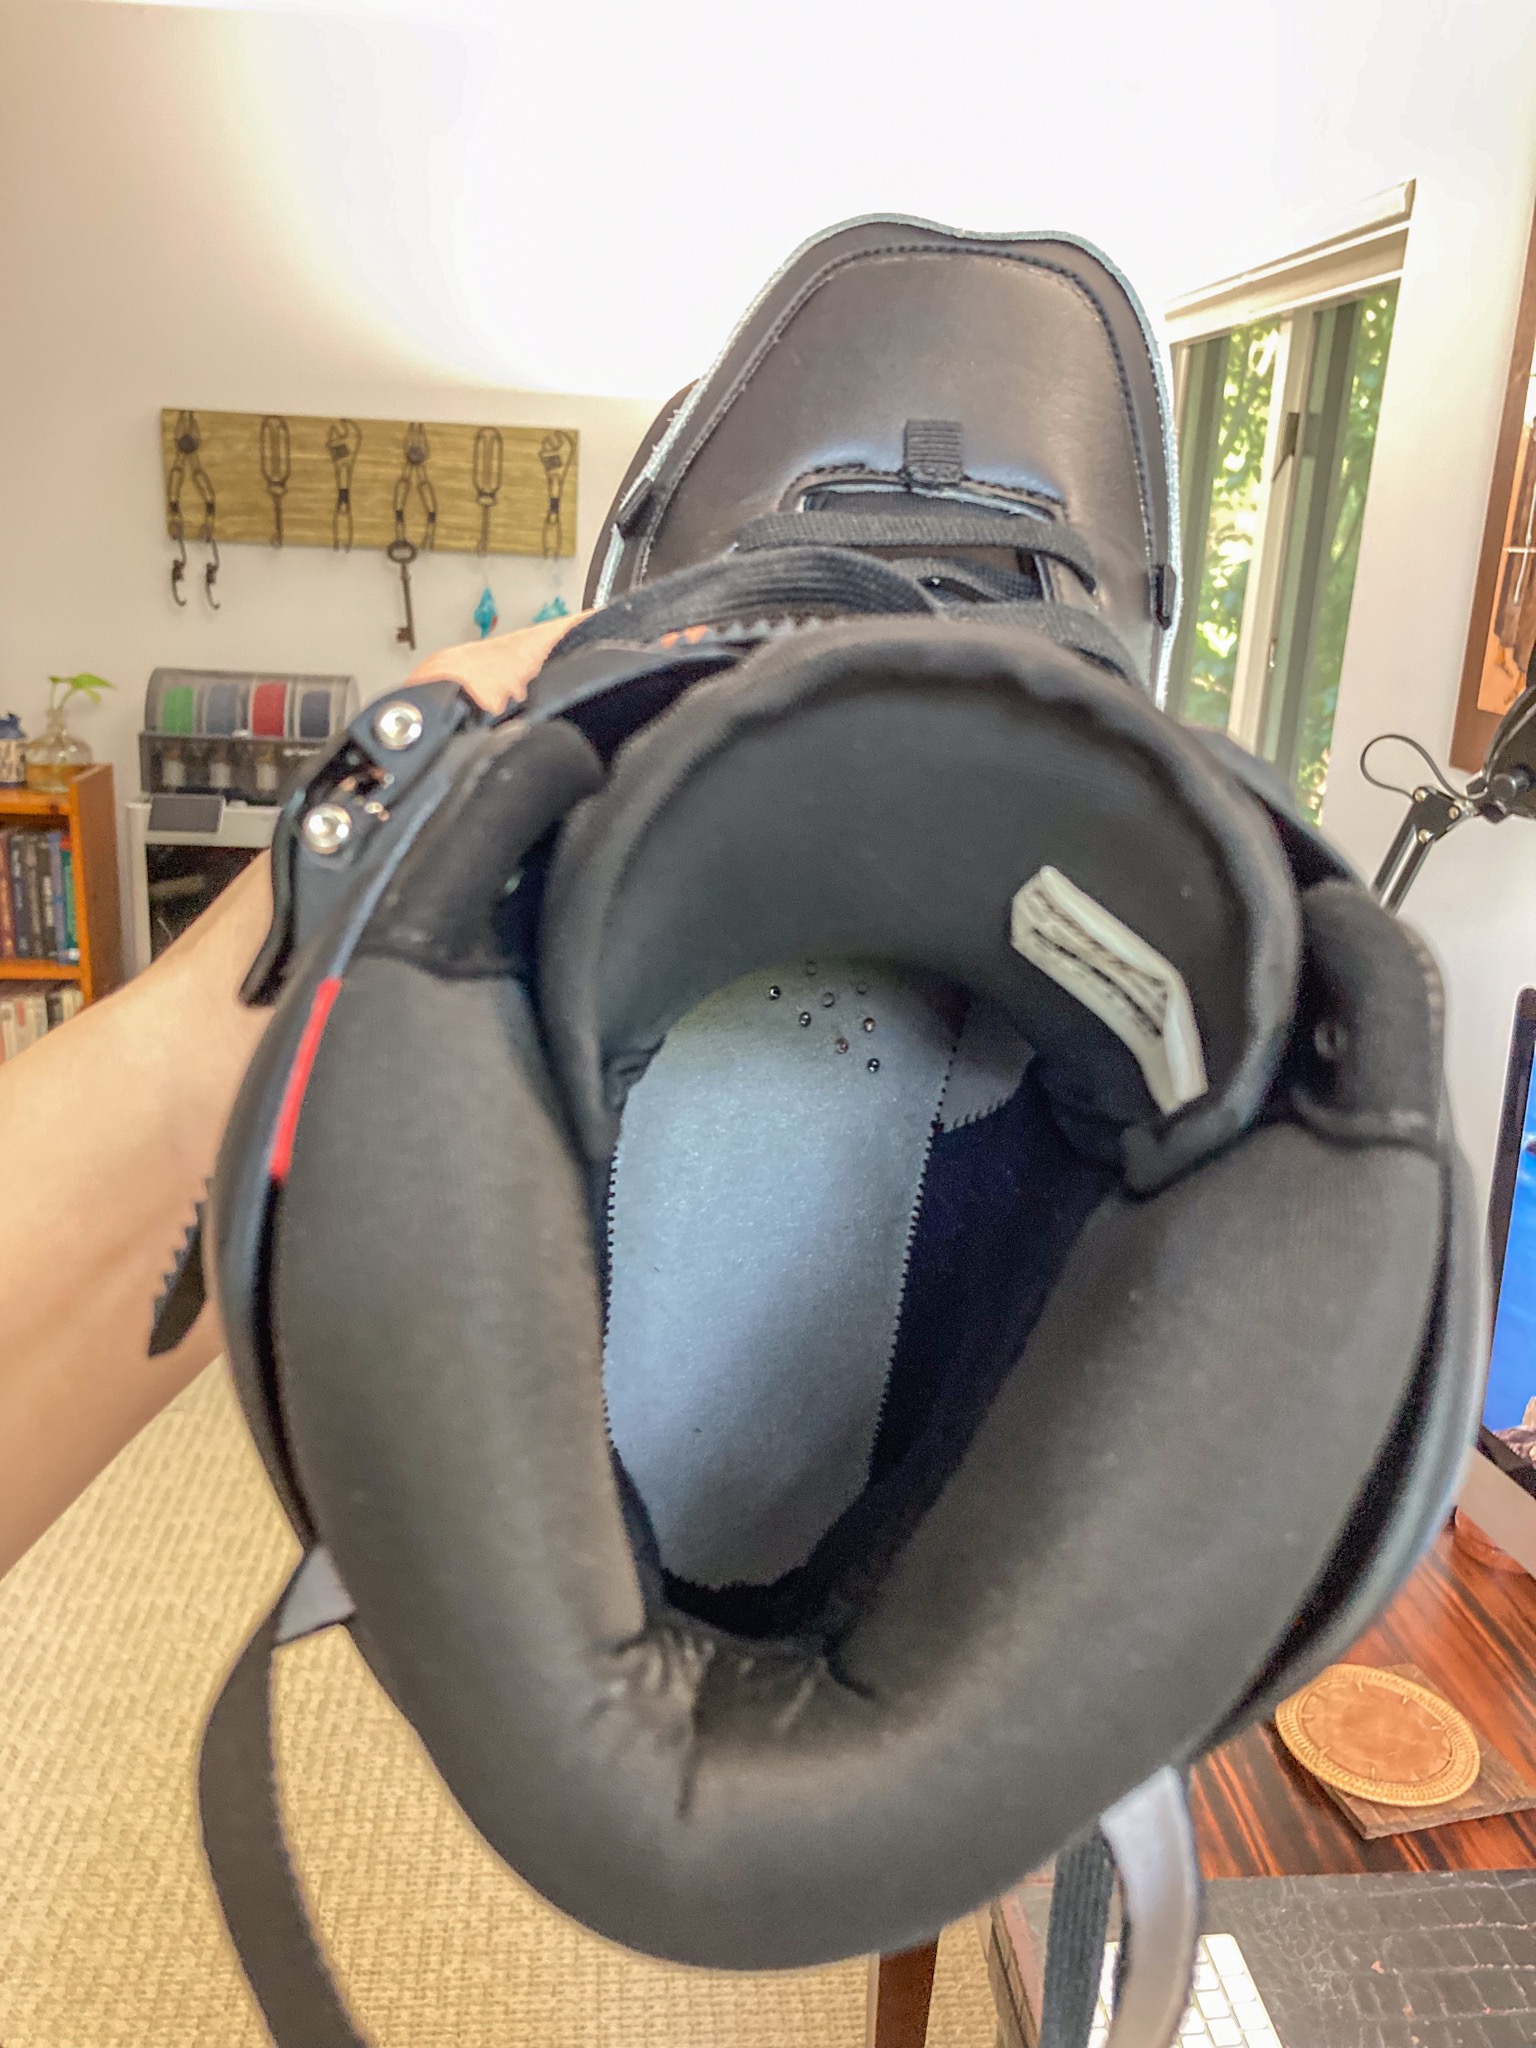
Based on feeling around the inner liner to find shell edges, I can confidently say that Reign Ares skates use low-profile carbon shells just like the Powerslide Tau, a lesser-known variant of HC Evo. Having spent so much time and effort agonizing over shell edge bites on my Tau, I can tell right away that Ares is made just like Tau, by mating an upper assembly onto an urban shell. Ares is not made like TRUE, by gluing decorative panels onto a self-sufficient hockey shell.

See Part of Leather Work Boot, and Parts of a Hockey Boot, for illustrations of terms such as upper assembly, carbon shell, and quarter panel.
I suspect that in Ares, two thermoplastic quarter panels are stitched into the upper assembly. And these quarter panels are cleverly fused with the urban shell, together with the upper assembly. I can’t feel any seams or edges between quarter panels and the carbon shell. But clearly the quarter panels are not carbon. They are stiff, but remain somewhat pliable at room-temperature. And I could easily heat and bend them with just a hair dryer. Another similarity is that for both Ares and Tau, eyelet tabs are part of the upper assembly, not punched out of carbon shells or quarter panels.

I can now conclude that, Powerslide Reign Ares are urban carbon skates with integrated hockey quarter panels.
With that being said, I really do love Reign Ares. I love that all those annoying straps and buckles from urban skates are gone. The plastic urban cuff is also gone. That cuff and its cuff buckle on Tau gave me headaches whenever I laced my Tau skates. They were always in the way, as I laced my Tau boots. On top of that, this cuff assembly didn’t properly support ankle bones and lower legs anyway, due to its pliable nature. I documented these in What are carbon-fiber inline skates ?
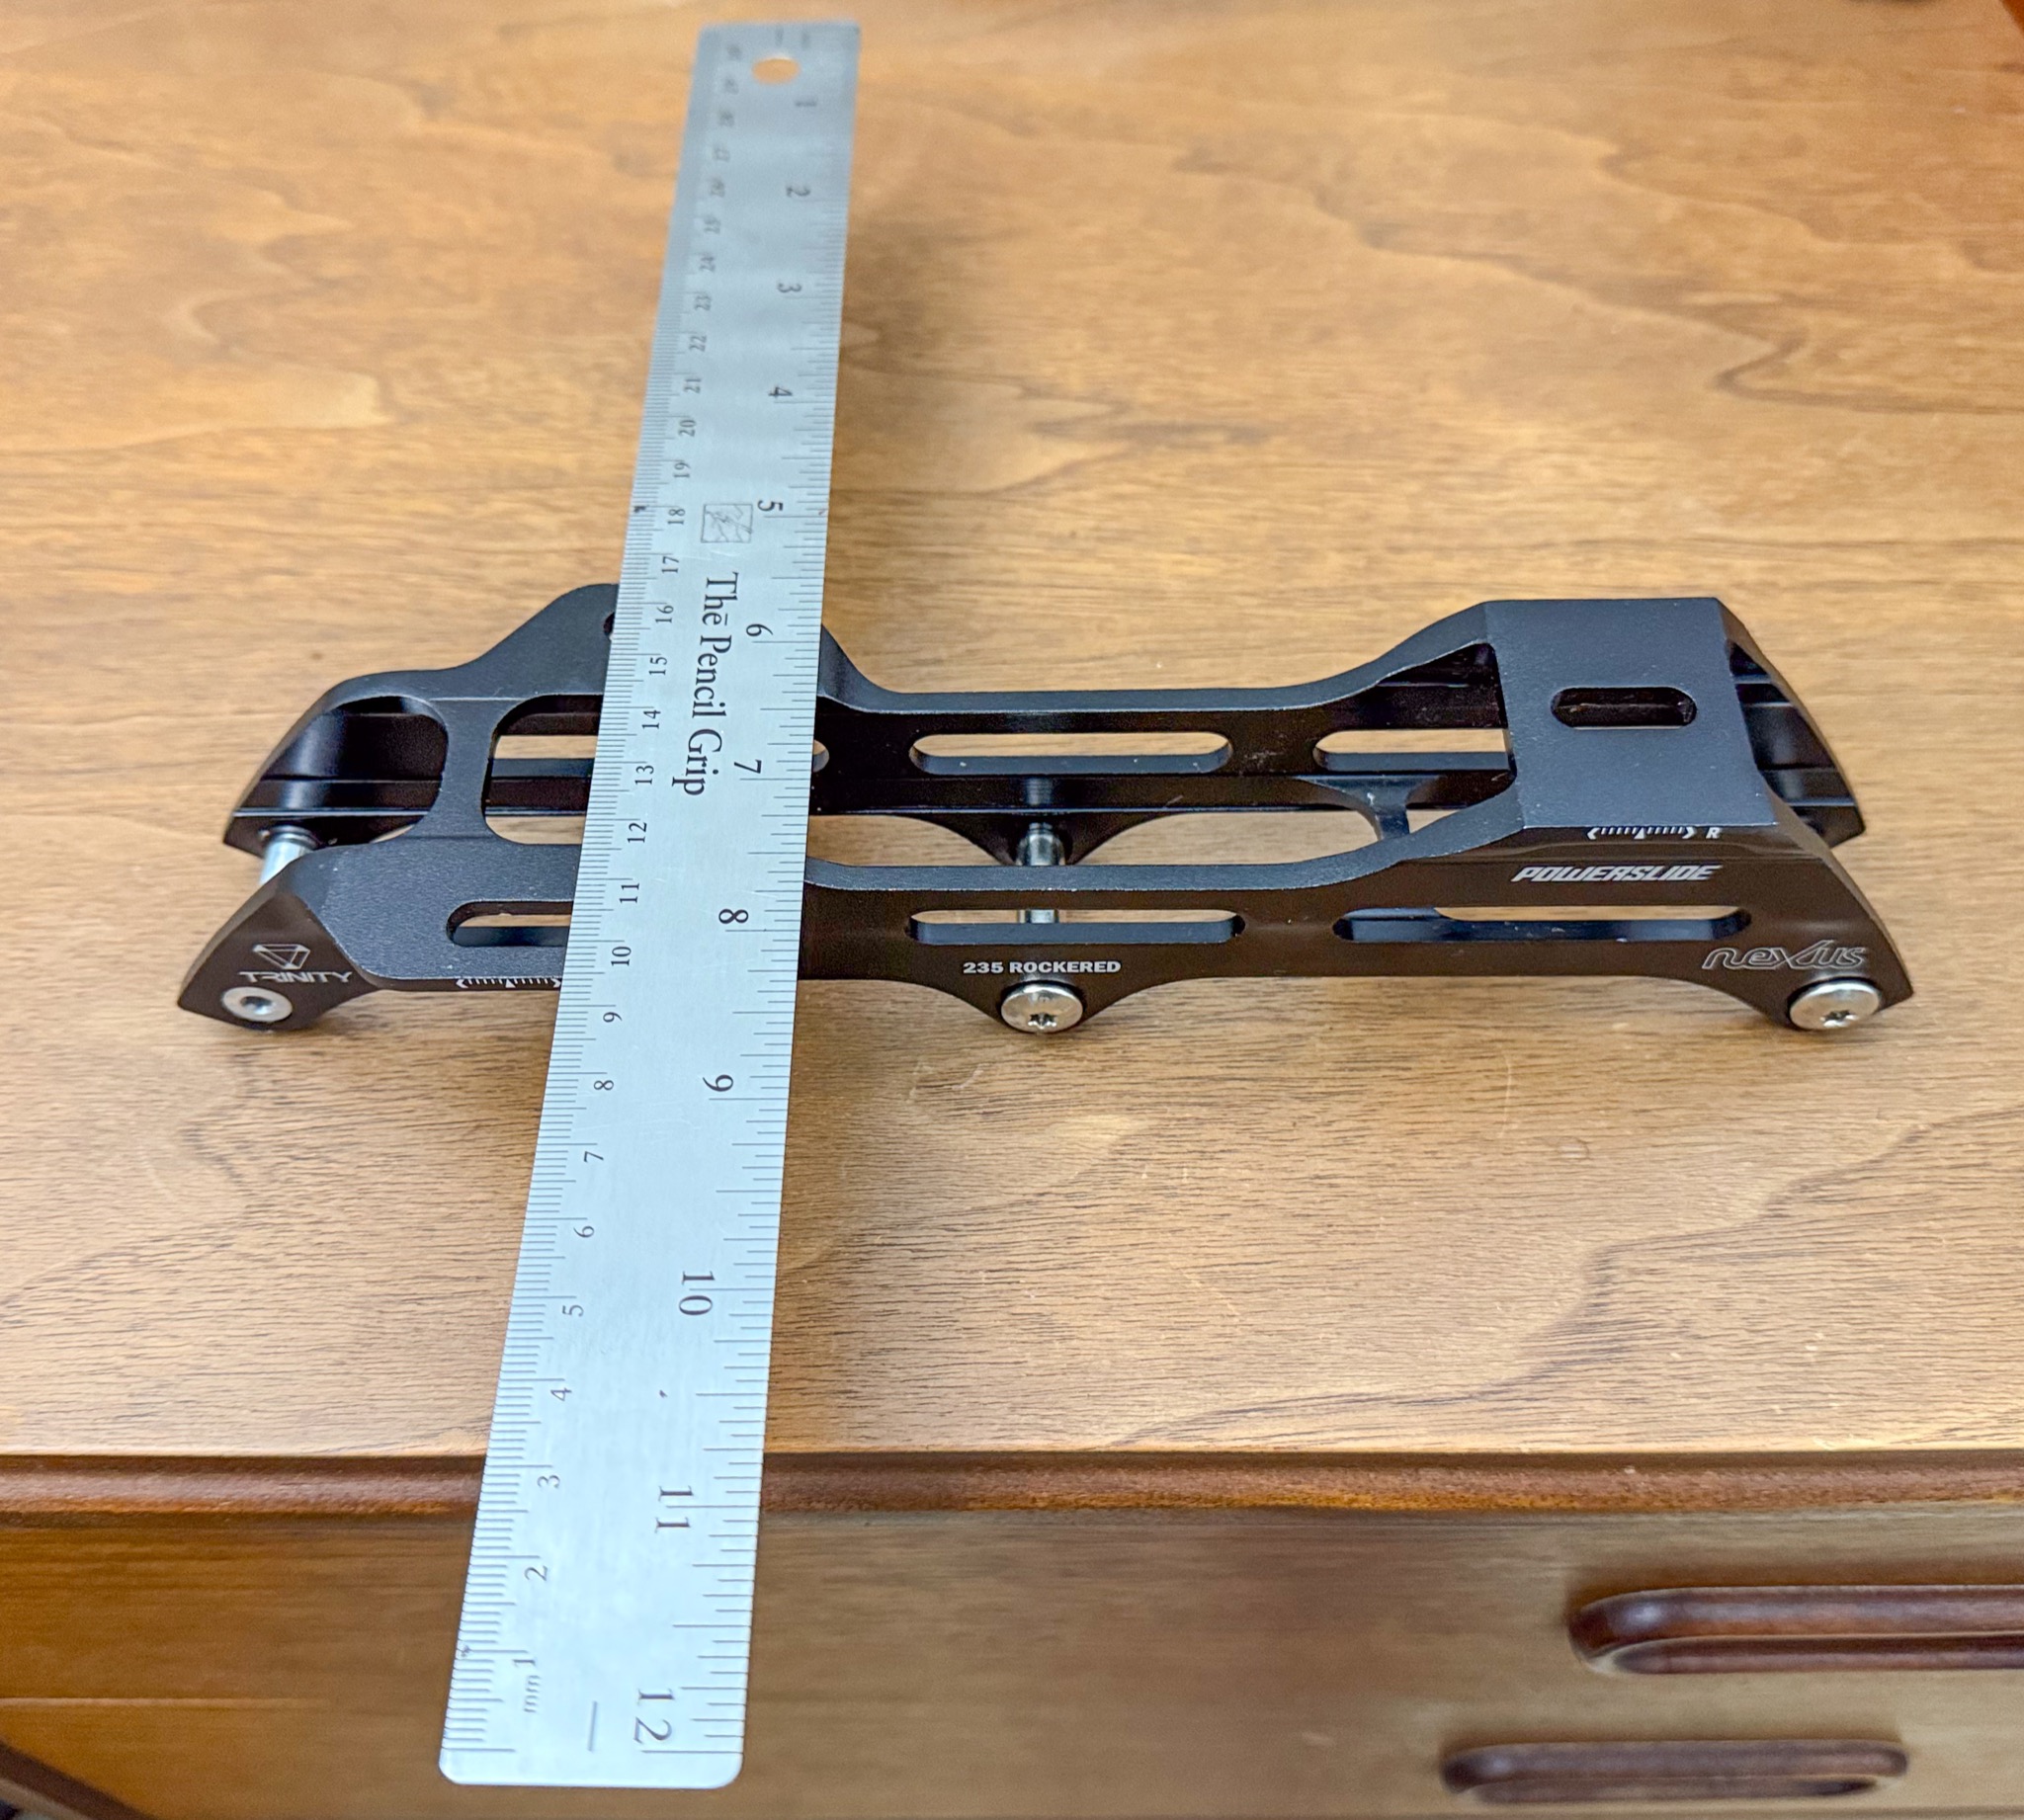
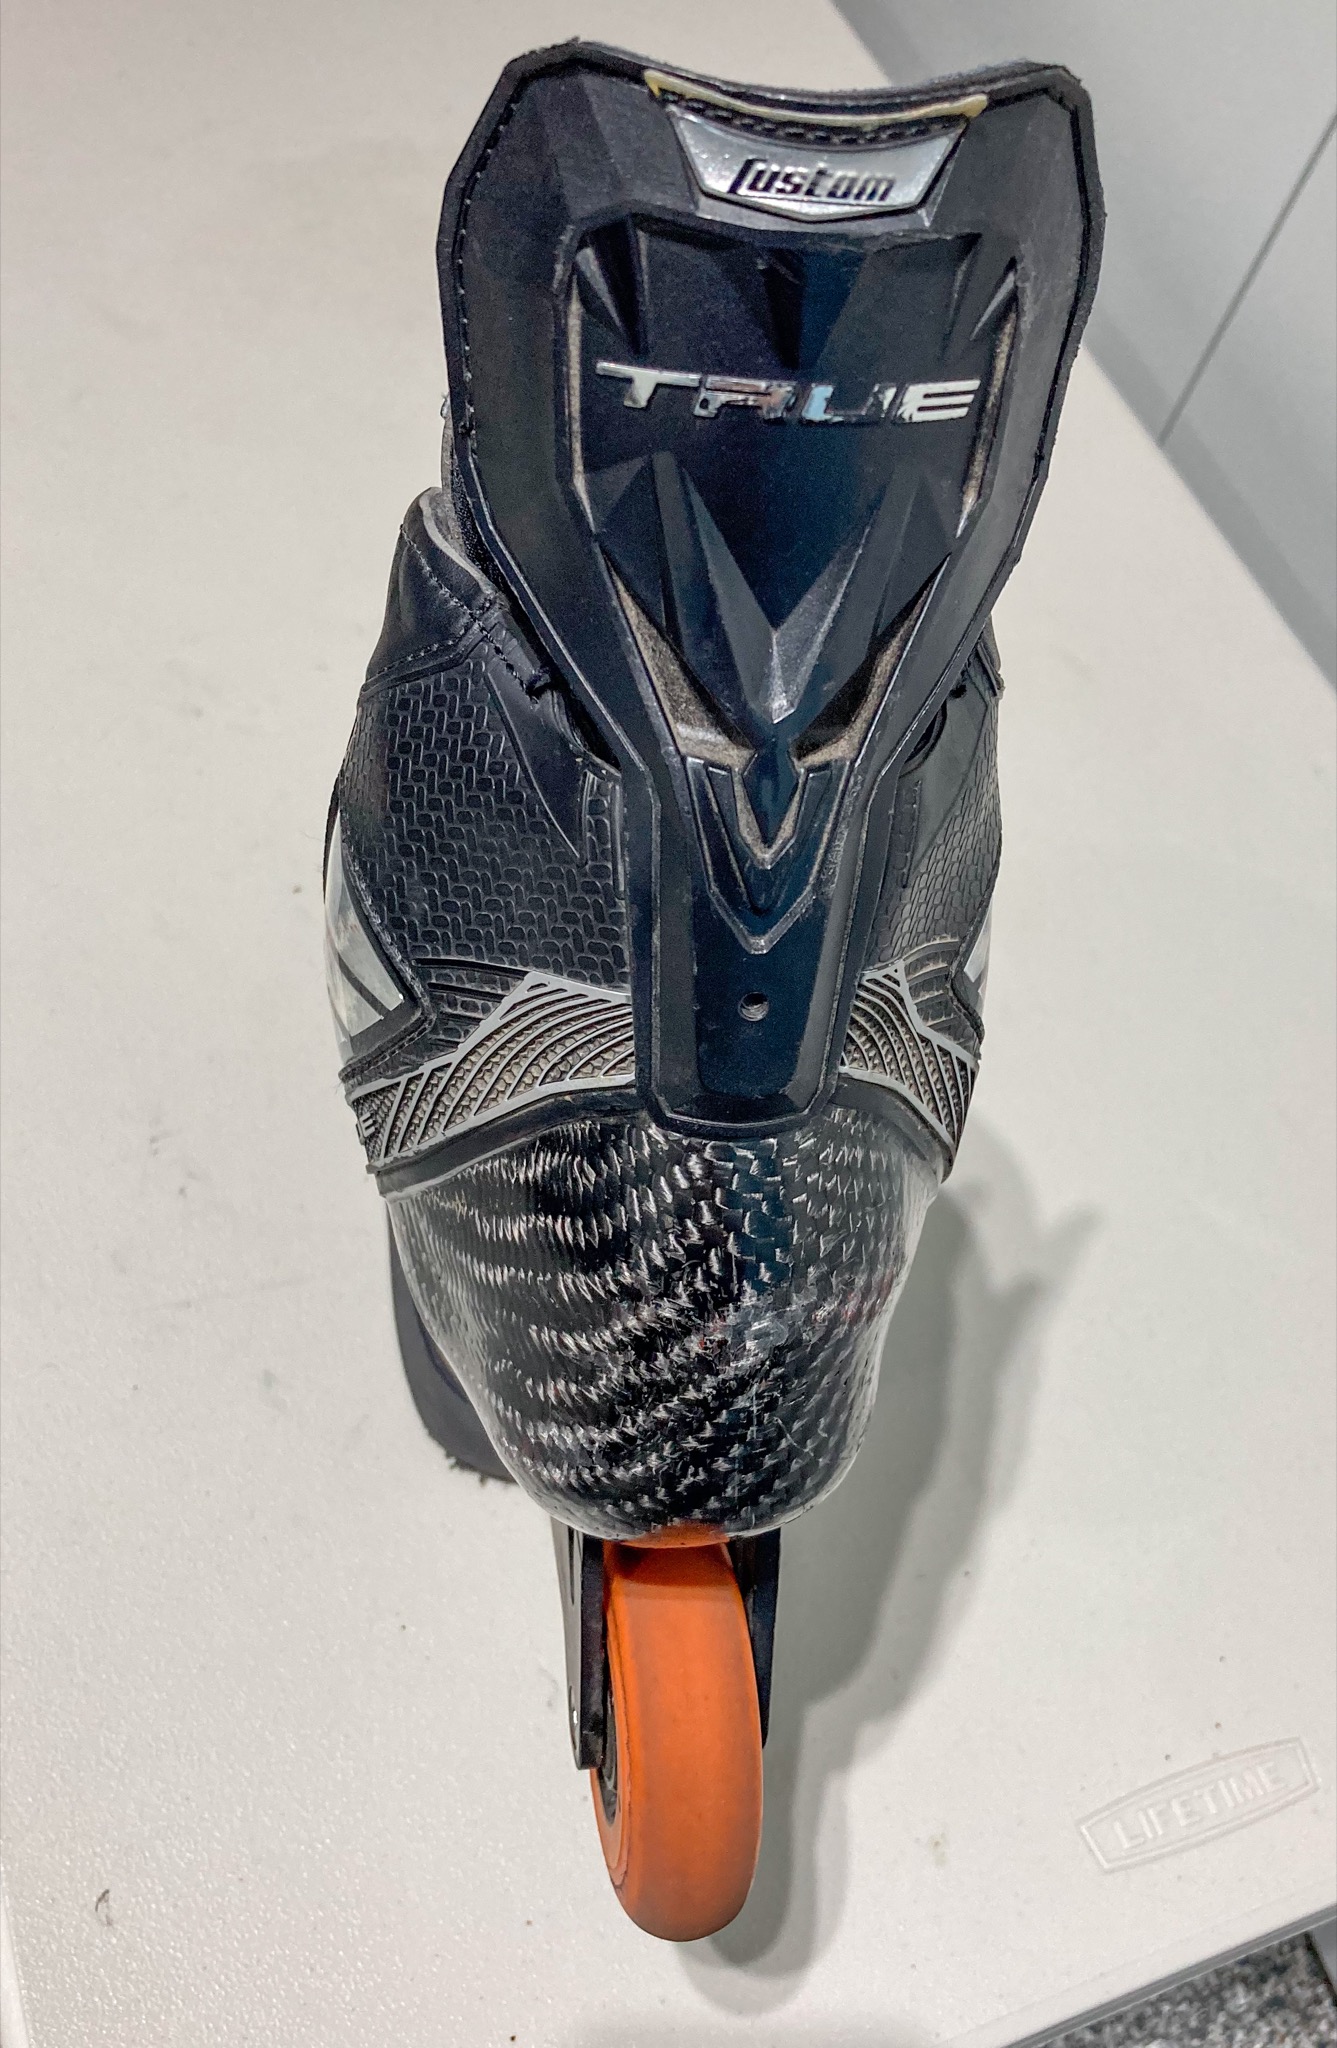
Interchangeable Trinity frames
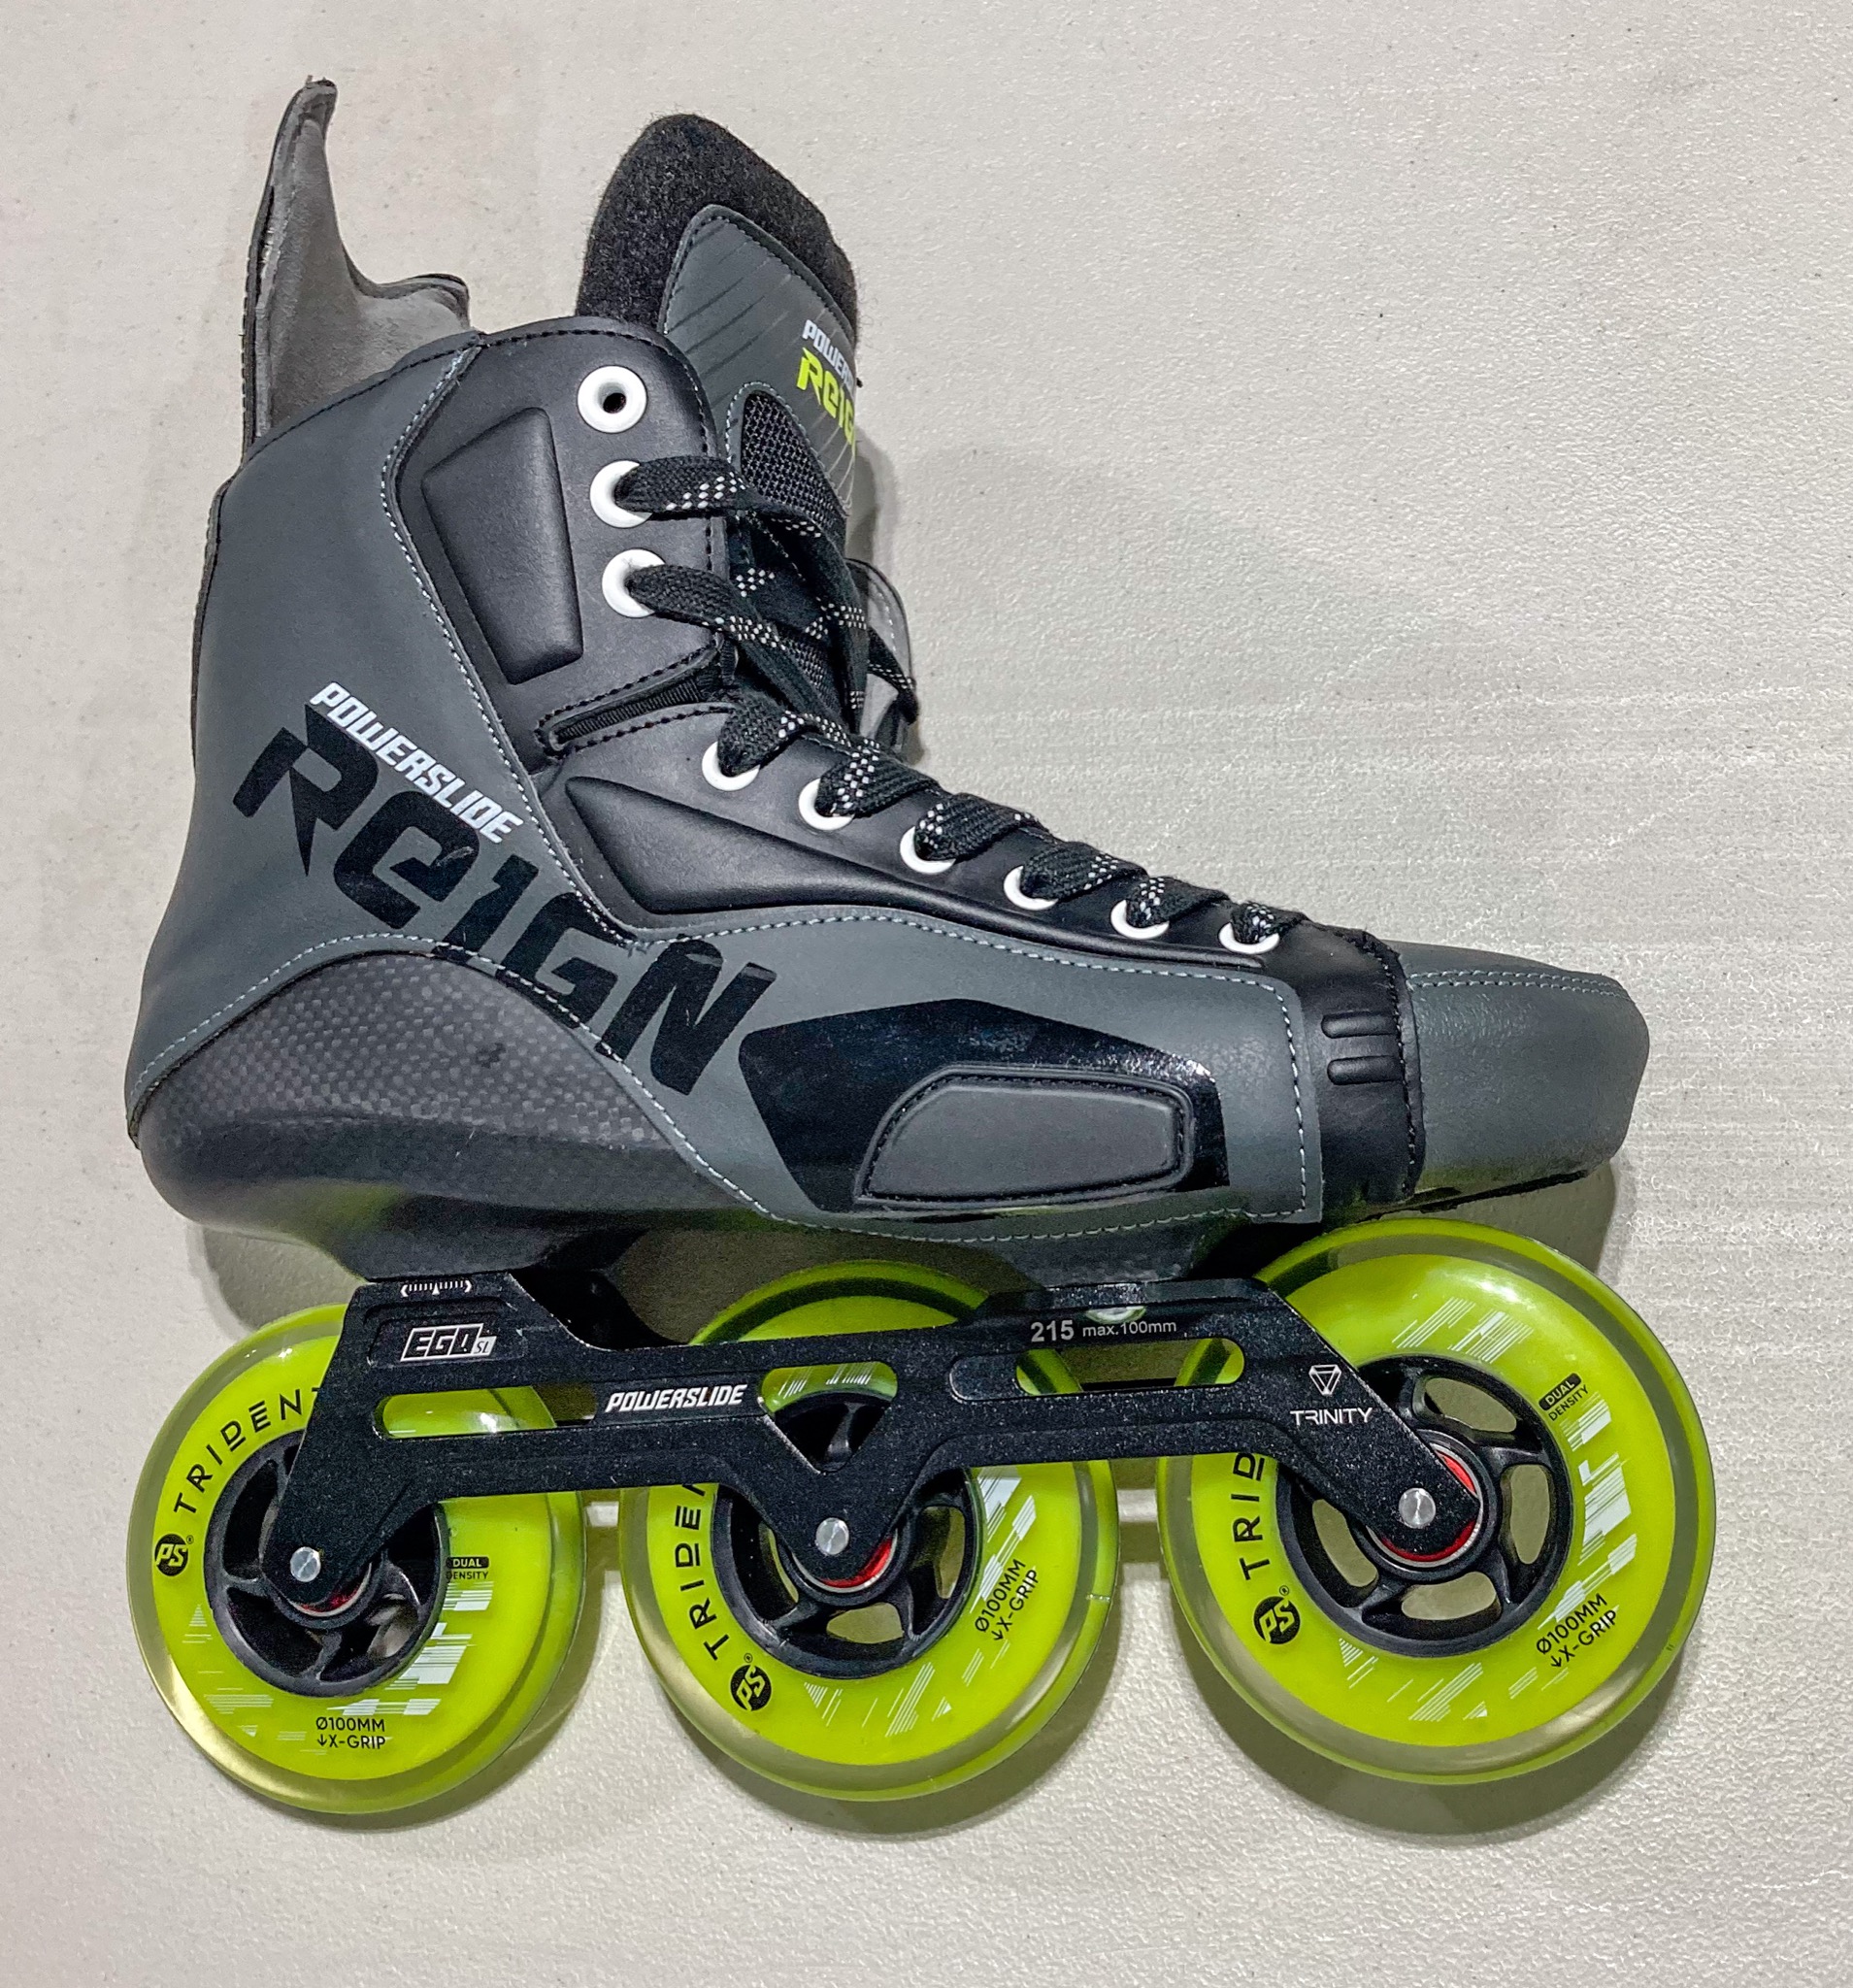
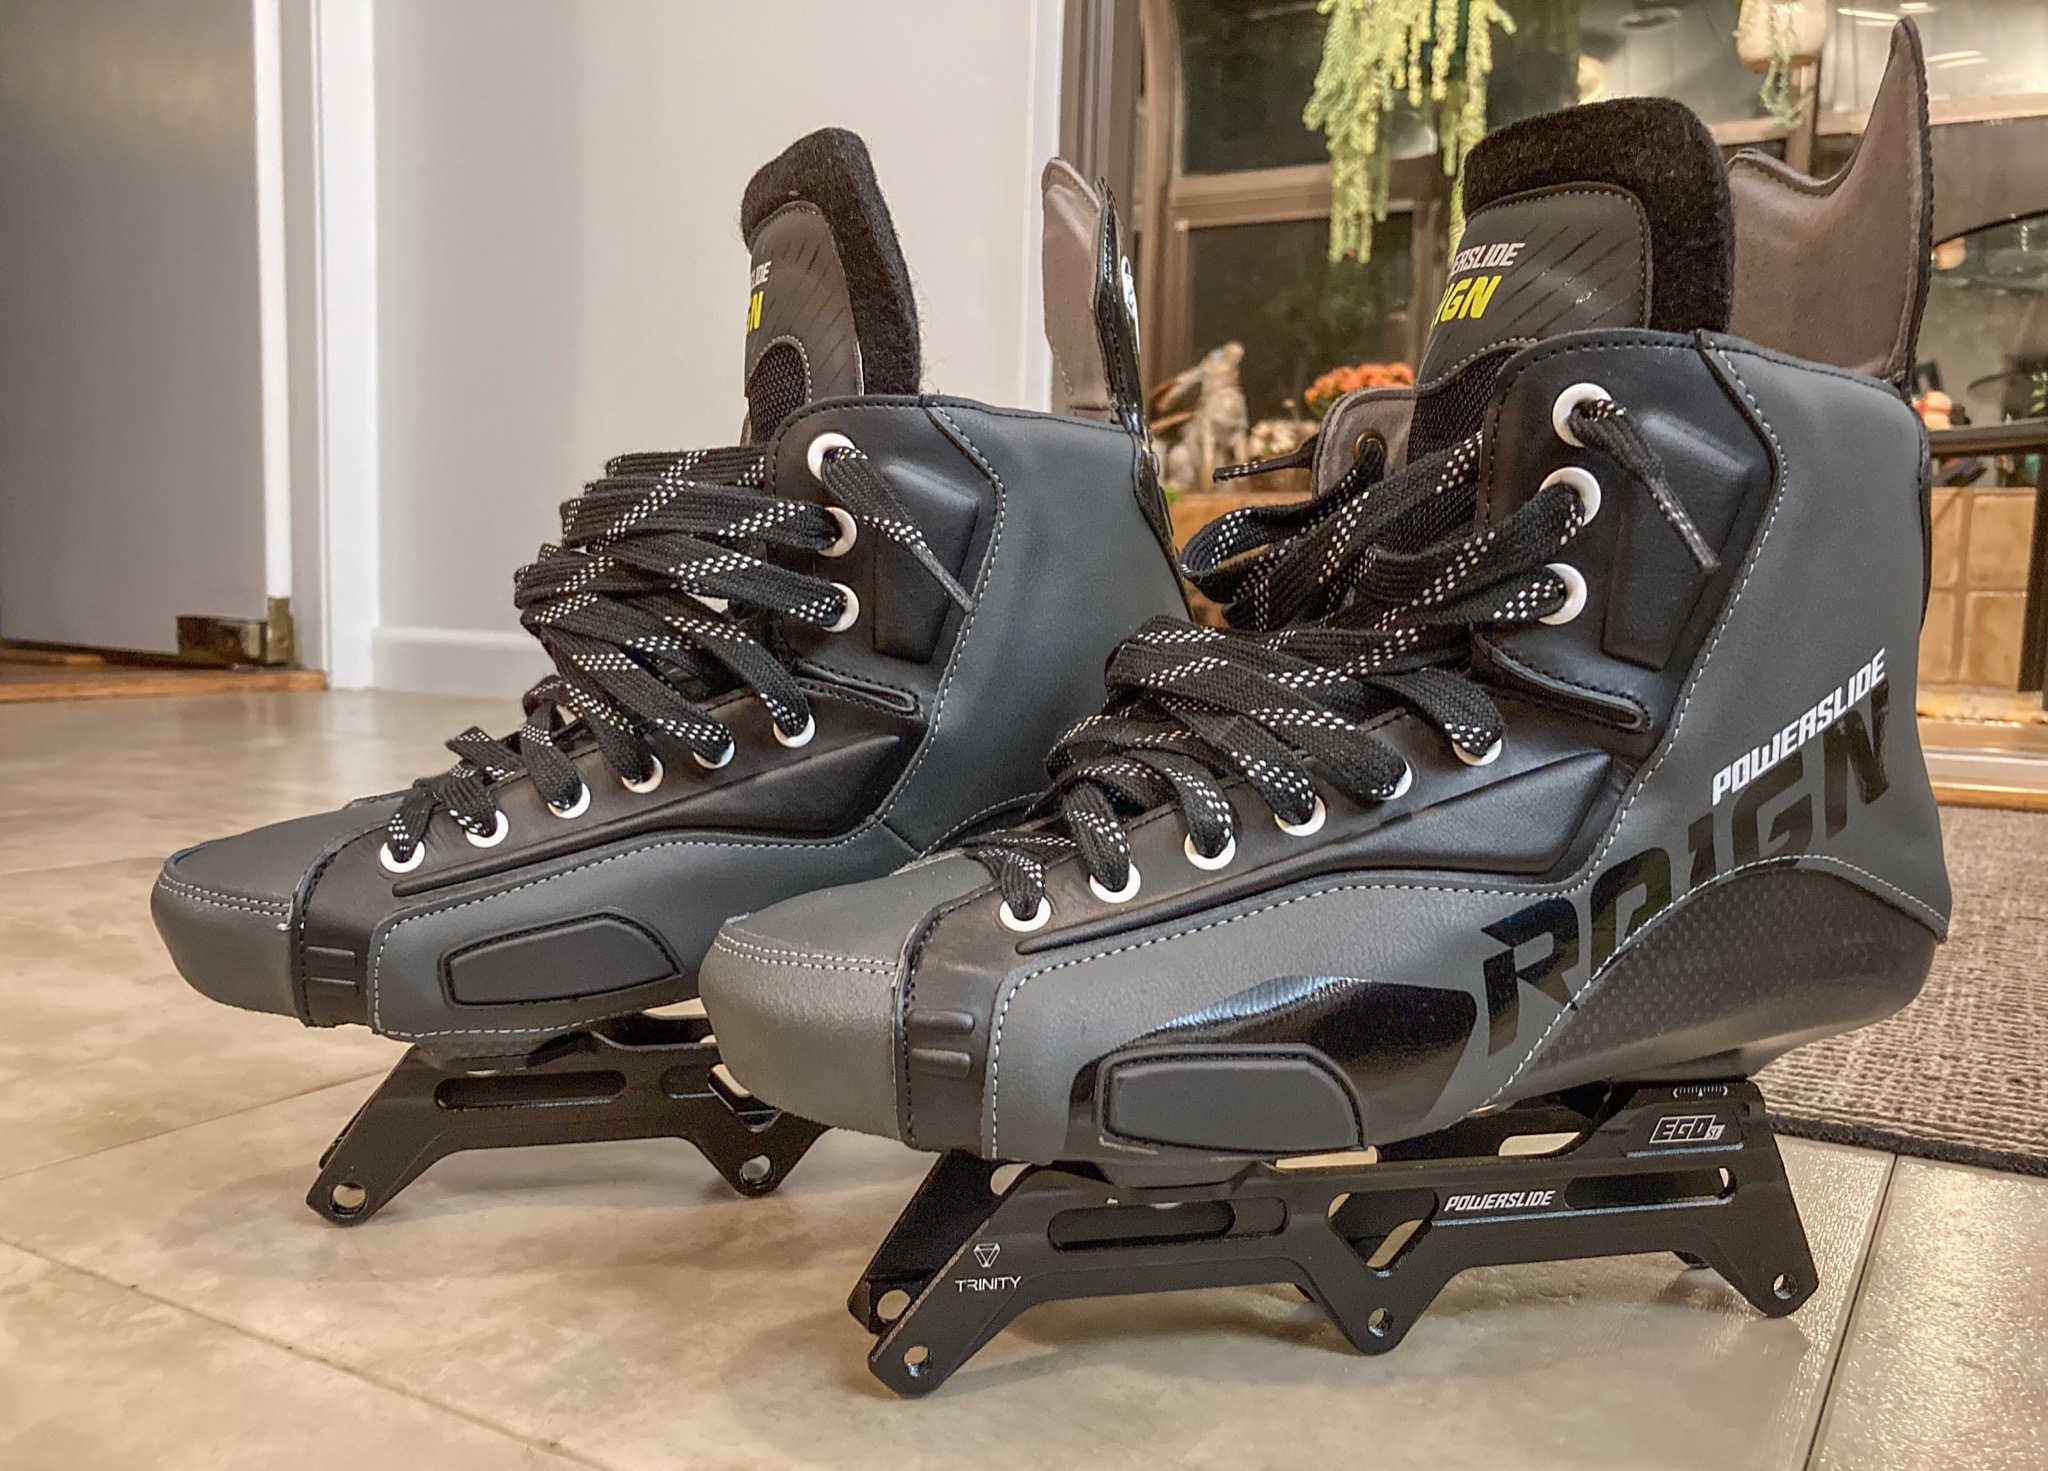
Reign skates are the only option on the market with both 1) interchangeable frames, and 2) hockey-like boots. Reign Ares 100 skates came with Powerslide’s own Trident 100mm wheels, mounted on a 215mm Ego SL frame. Note how close the front wheel is to the bottom of the foot, under the toe box. The front wheel is a mere millimeter or two away from the sole. This is possible because Trinity’s two front mounts are located away from the centerline. It lowers the center of gravity, by bringing the entire boot as close to the ground as possible.


The carbon shell and Trinity mounting decks and aluminum nuts/brackets are identical on both Reign Ares and Tau.

As I asserted in Big Wheels on Carbon Hockey Skates, no carbon hockey skates supported interchangeable frames that allowed me to mount big wheels on them. Even top-of-the-line hockey skates such as TRUE offered no interchangeable frames. Their street skates all have riveted frames.
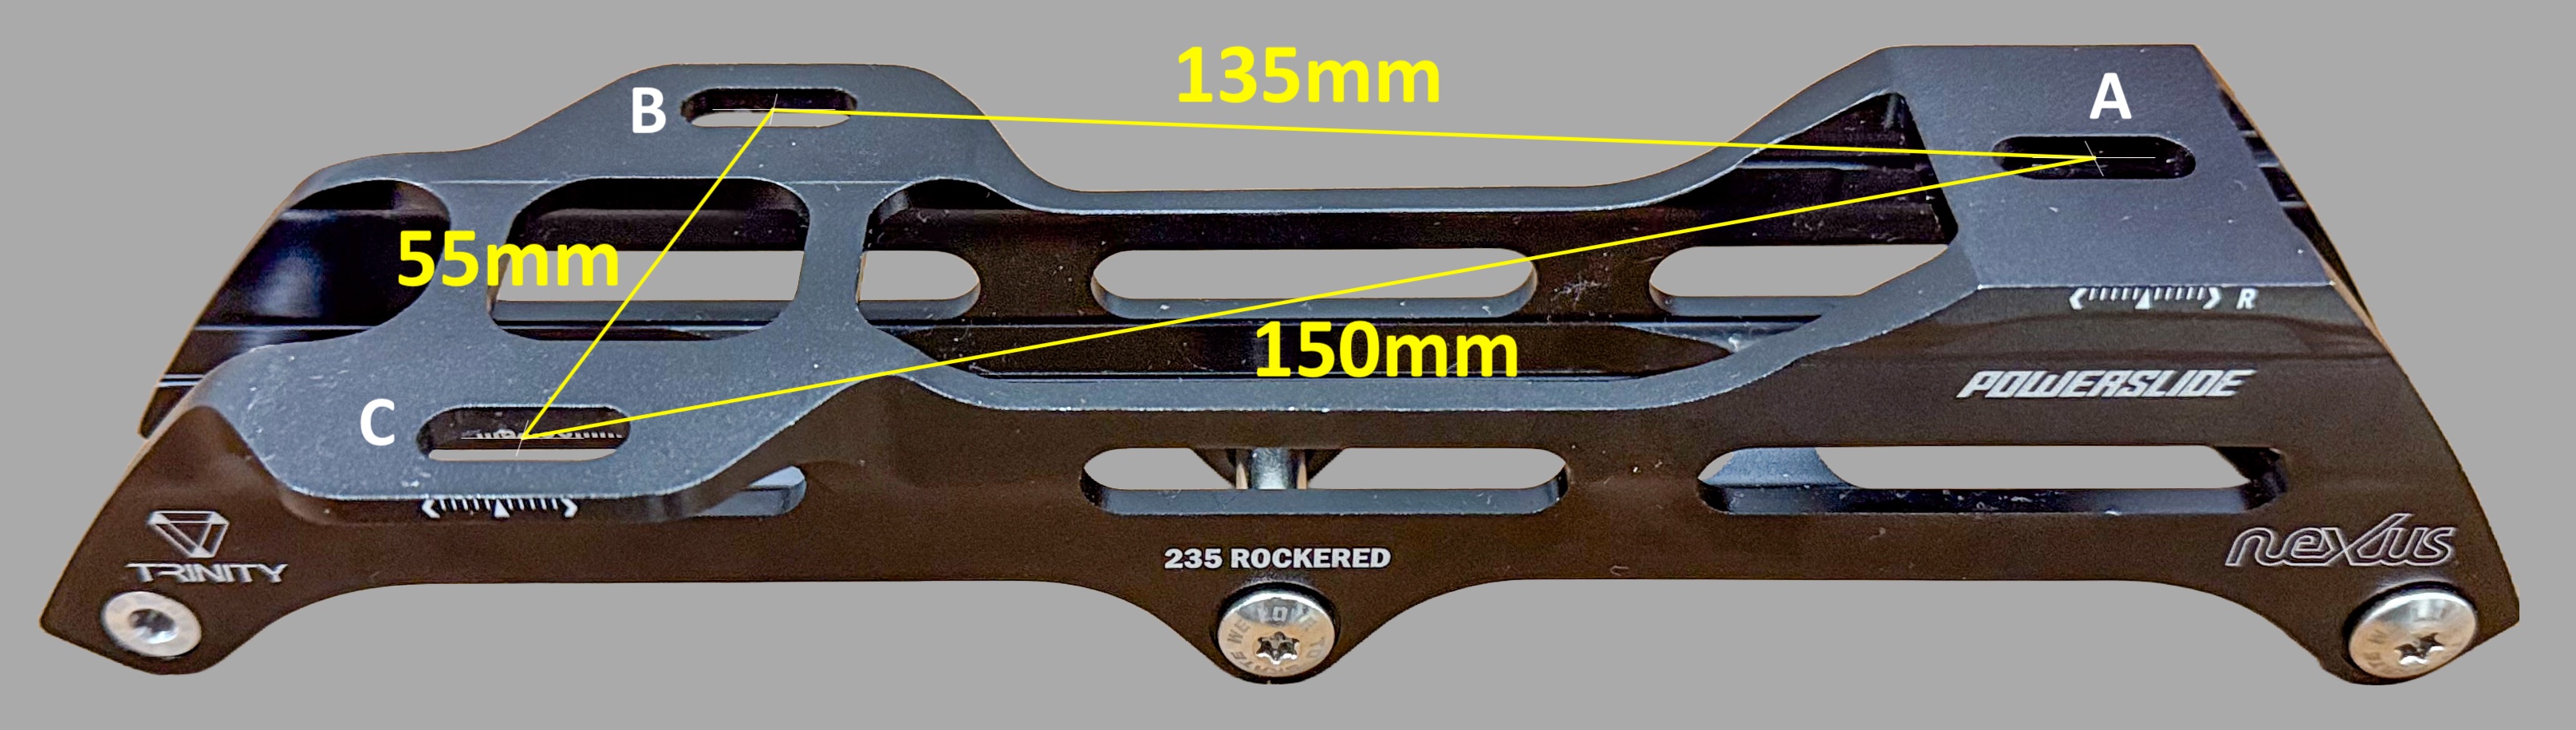
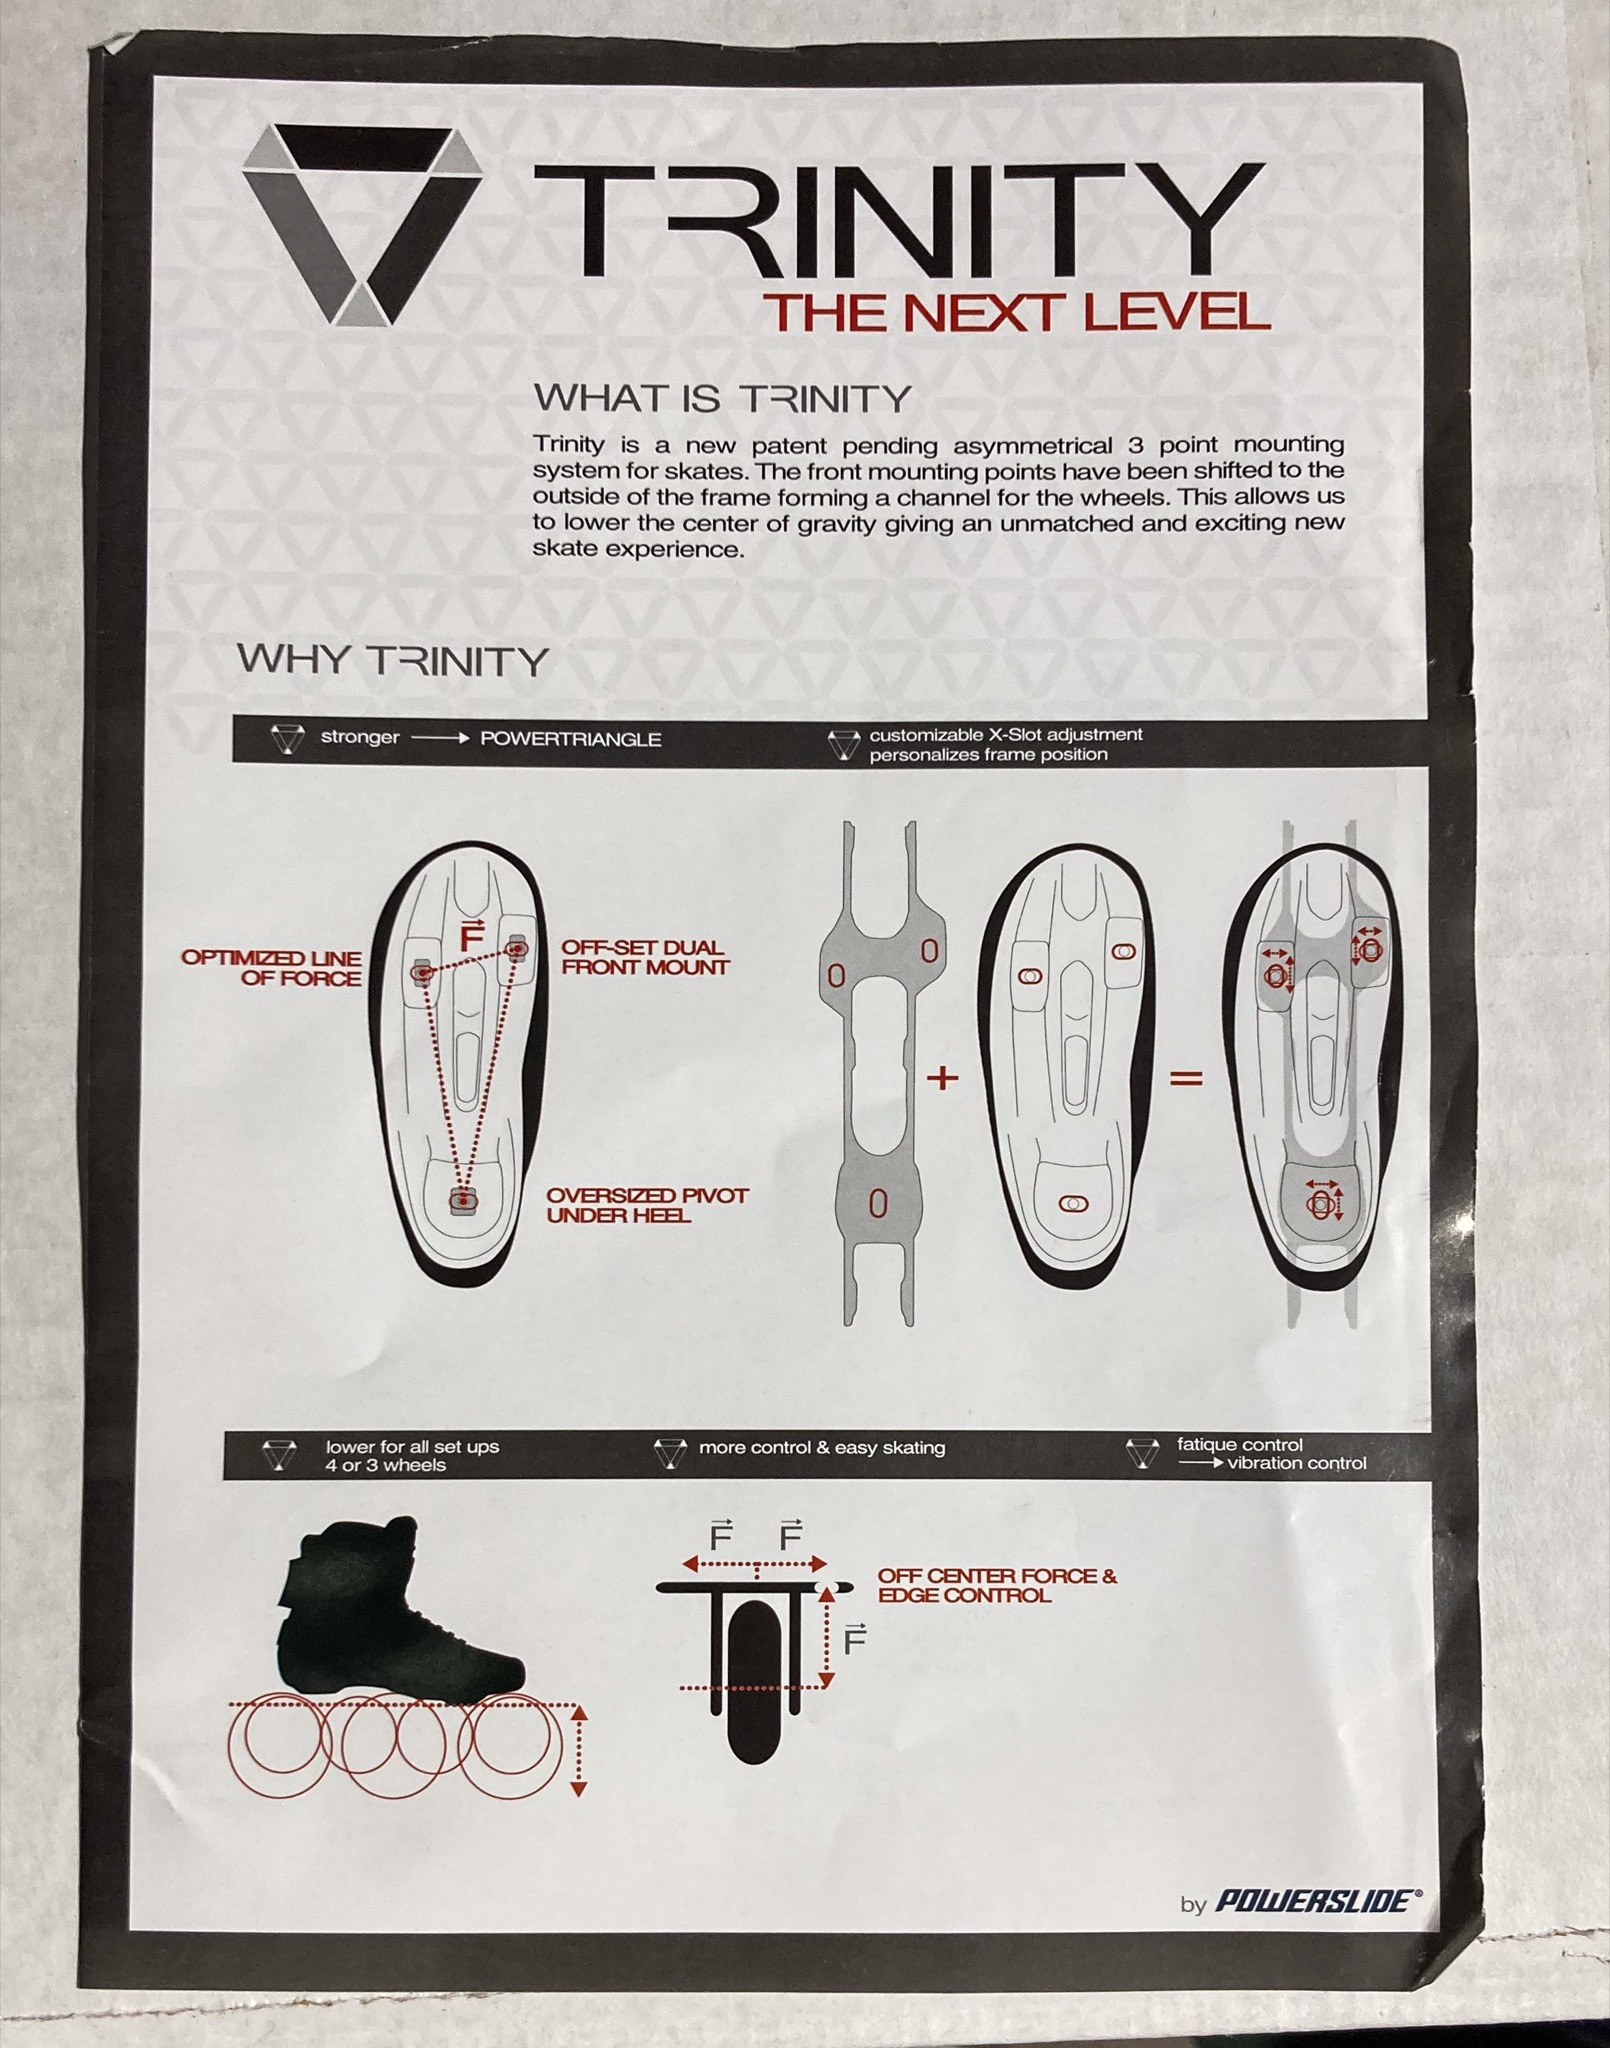
Trinity mounting specifications
I was disappointed that the actual specification of the Trinity mounting standard cannot be found online. For instance, I wanted to know whether the two front mounting holes in Trinity is farther away from the rear mounting hole than the 165mm standard. I did not manage to find an answer to my question online. And I could not compare them physically, as I did not have any 165mm frames or boots.
There are no images showing Trinity and 165mm mounting side by side. The Trinity patent does not specify dimensions. The few glimpses of Trinity near an actual 195mm frame (and later a 165mm frame) came from this Powerslide video that Pascal Briand made. But I still couldn’t tell whether Trinity holes span longer or smaller distances than 165mm.
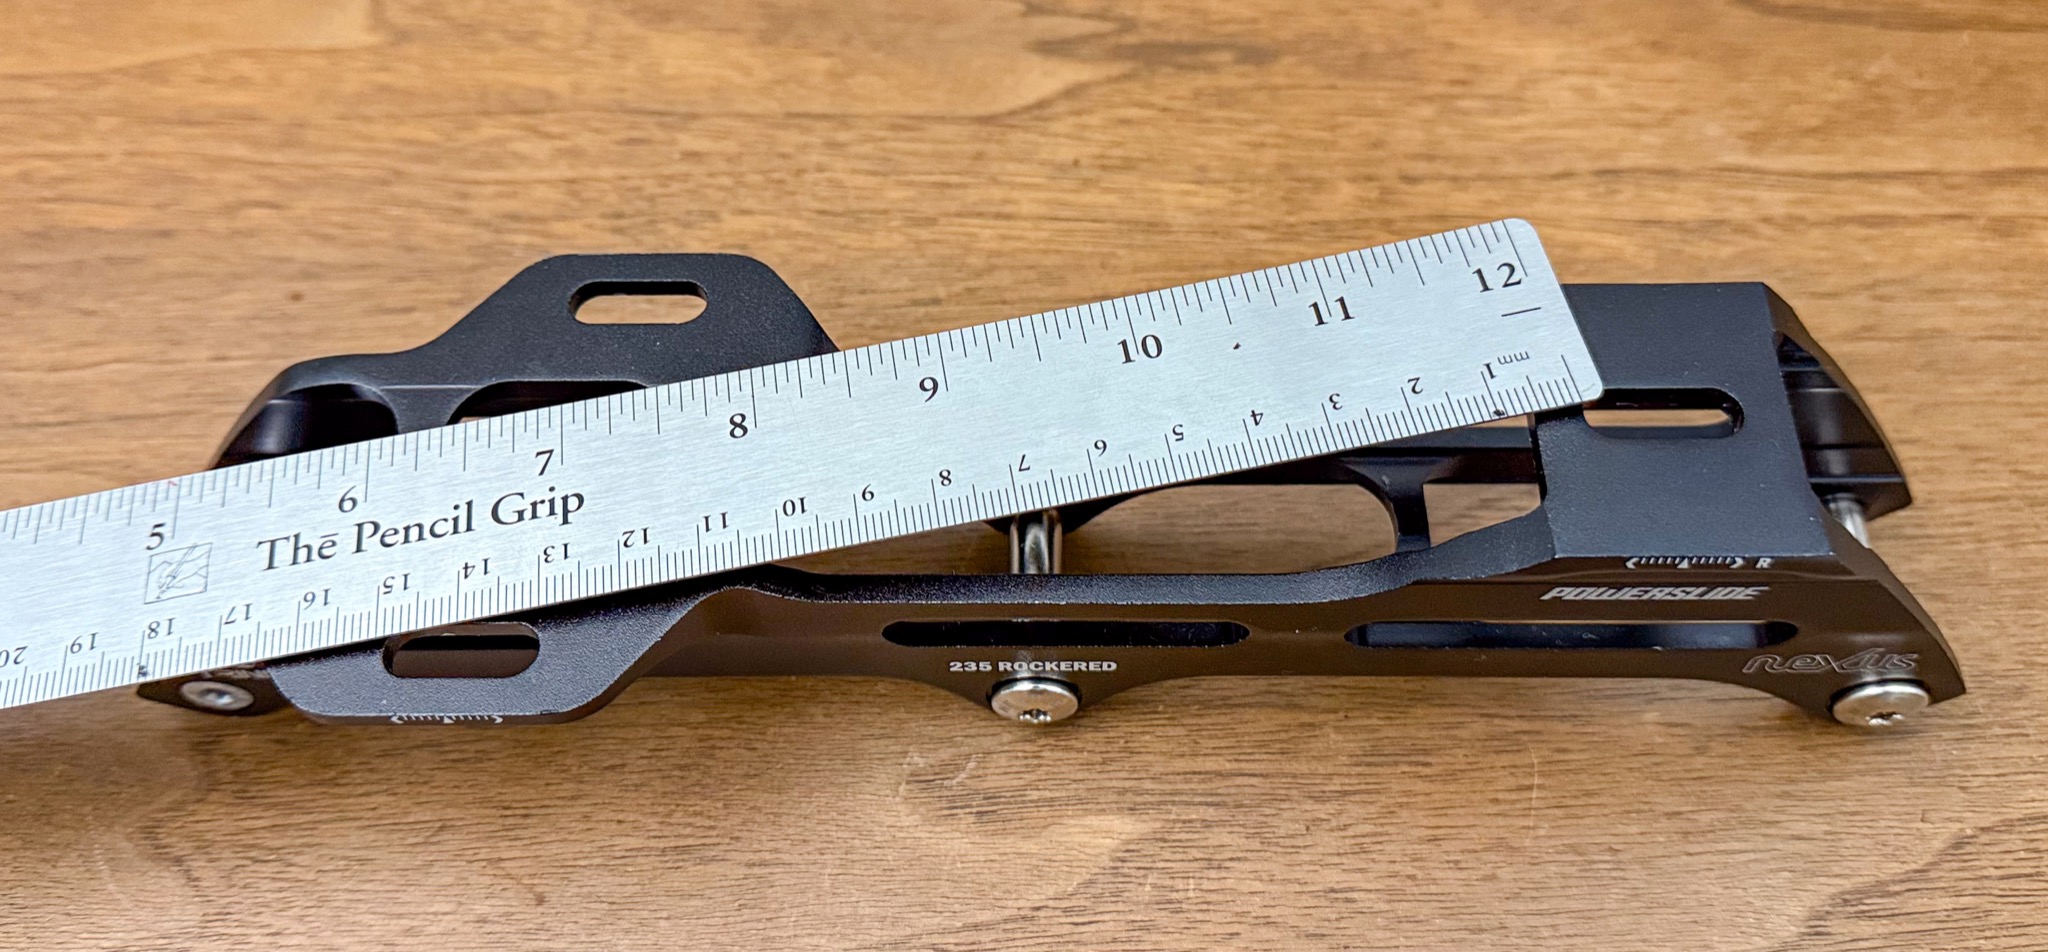
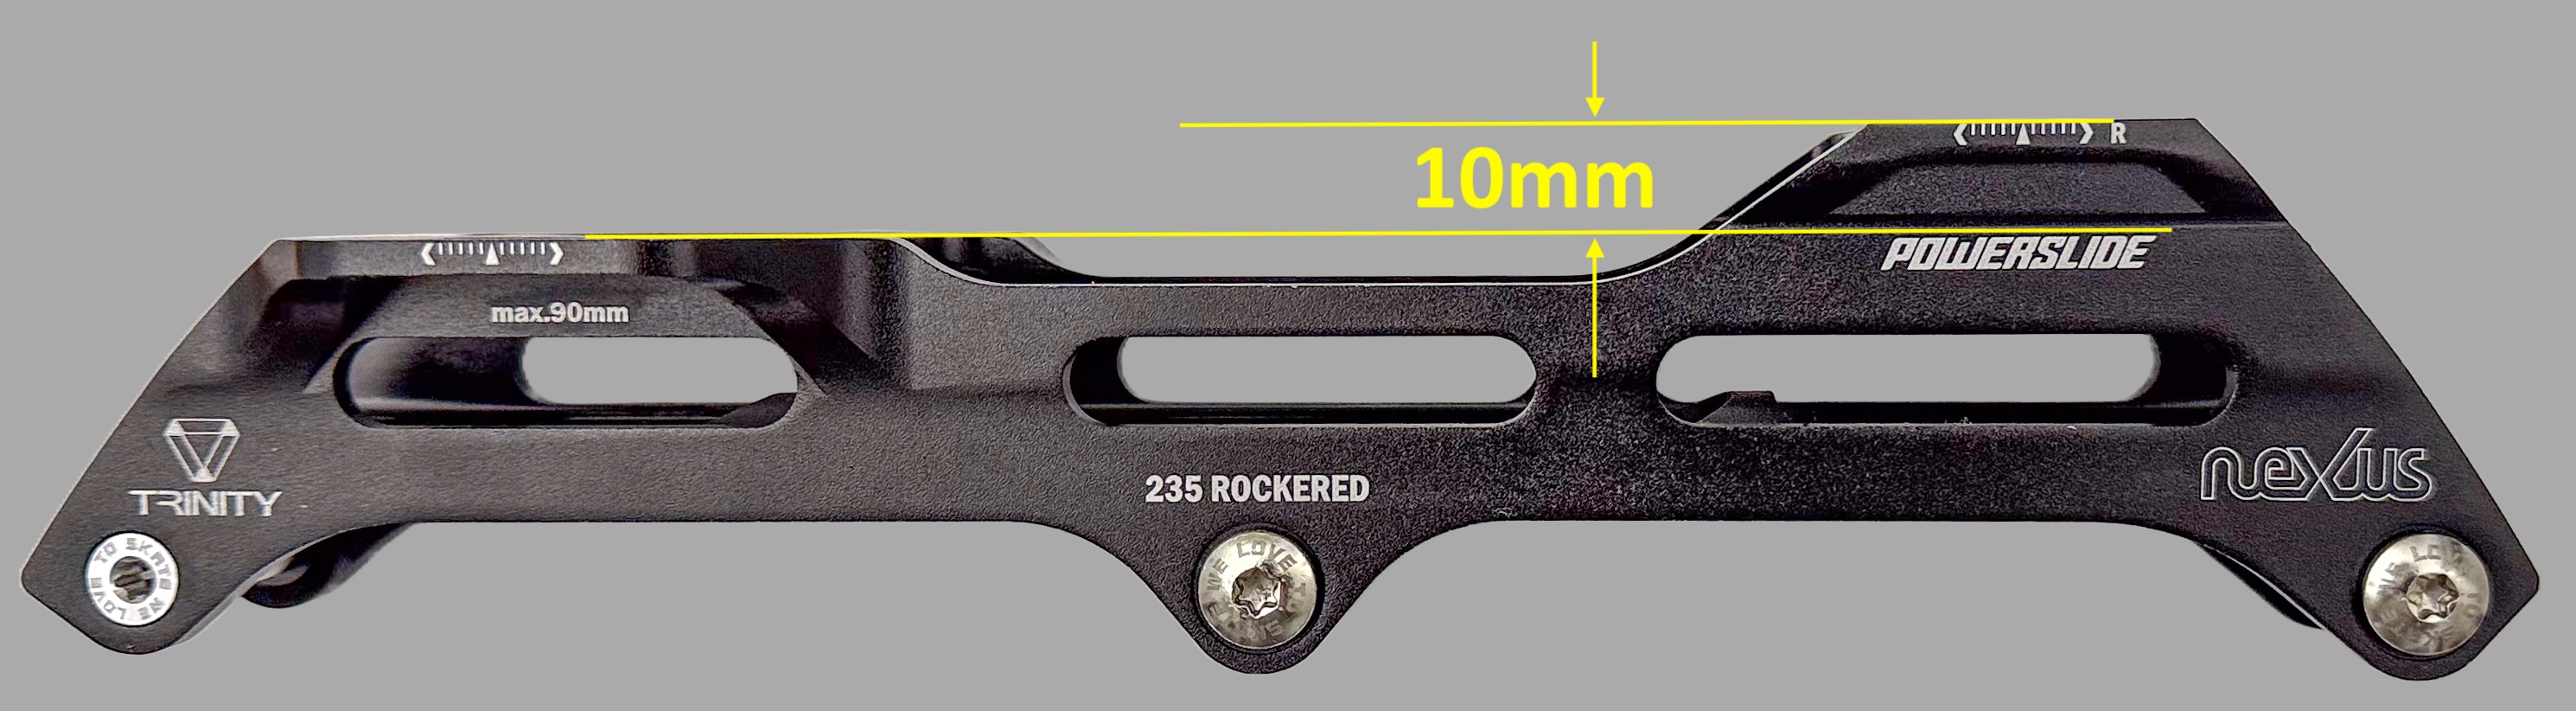
So I took it upon myself to measure these distances and publish them. These are only approximate measurements, of course. Note that the two front holes are offset from each other longitudinally, thus asymmetrical. And the rear mounting platform is raised about 10mm higher to create a traditional heel lift as found in almost all inline hockey skates, with the exception of UFS mounting from aggressive skates. In addition, these are not holes but rather longitudinal slots. They give a skater a degree of adjustment when mounting a frame. The boot provides slots that allow for lateral adjustments.

Following are orthographic projections. Clockwise from upper right: top view, front view and profile view.


Following establish the lateral offset of the two front slots and the vertical offset of the heel lift. The two front slots are set 53mm apart, measured from centers of slots. The heel lift measures 10mm.


The following image shows that no mounting holes in Trinity are separated as far as the 165mm standard.

Following images show that hole distances measure: 135mm (from 1 to 2), 150mm (from 1 to 3), and 55mm (from 2 to 3). I show measurement from one end of a slot to the same end of another slot. These are roughly equivalent to center-to-center measurements.
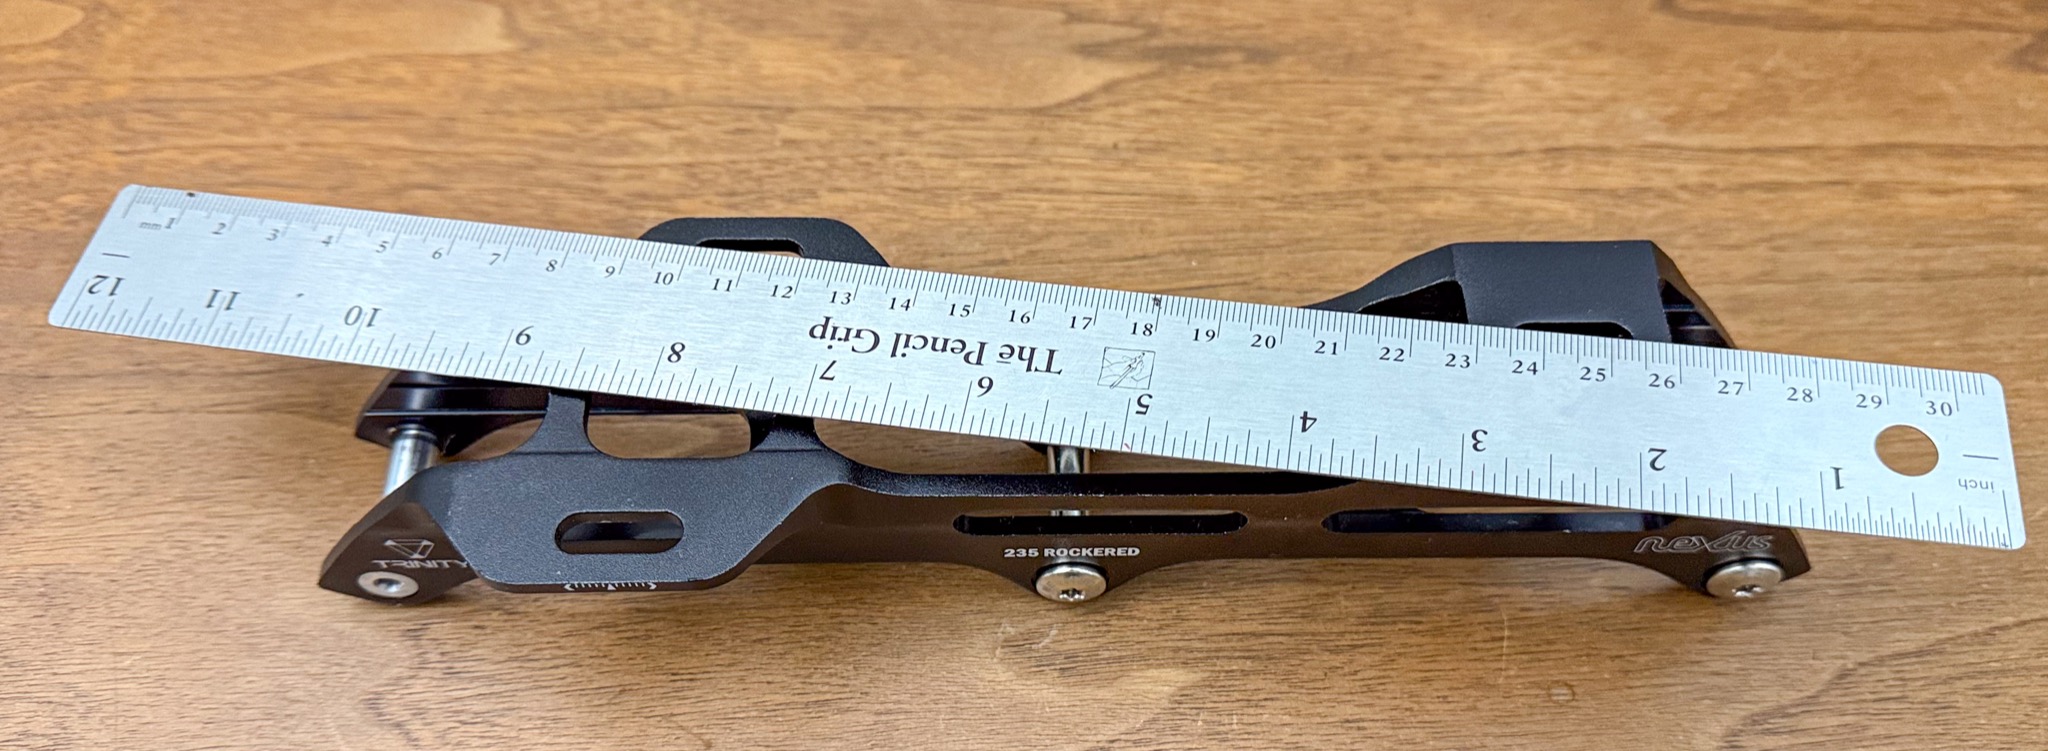

Finally, I present to you annotated perspective, top and front views showing these measurements.

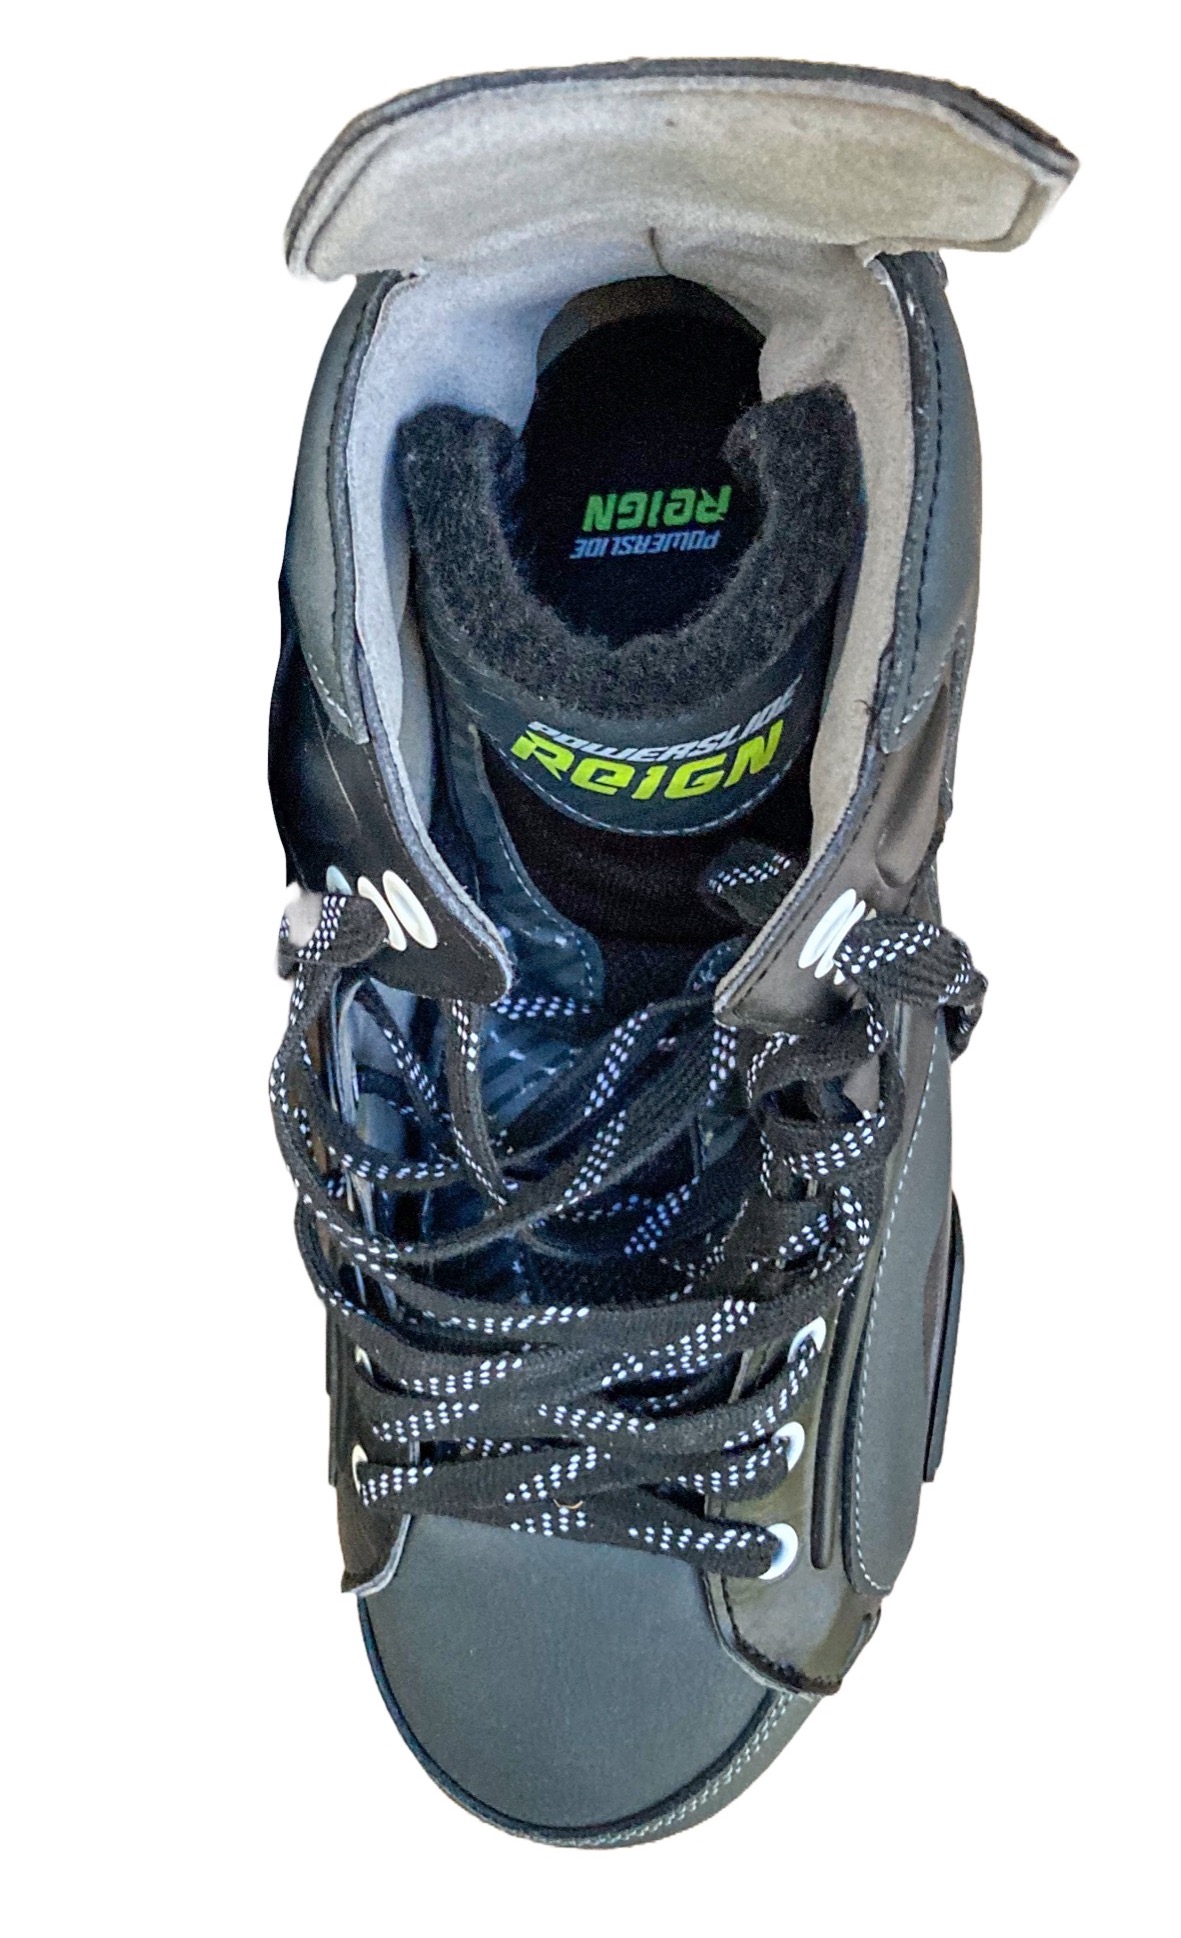
Hockey-style eyelets, tongue and liner
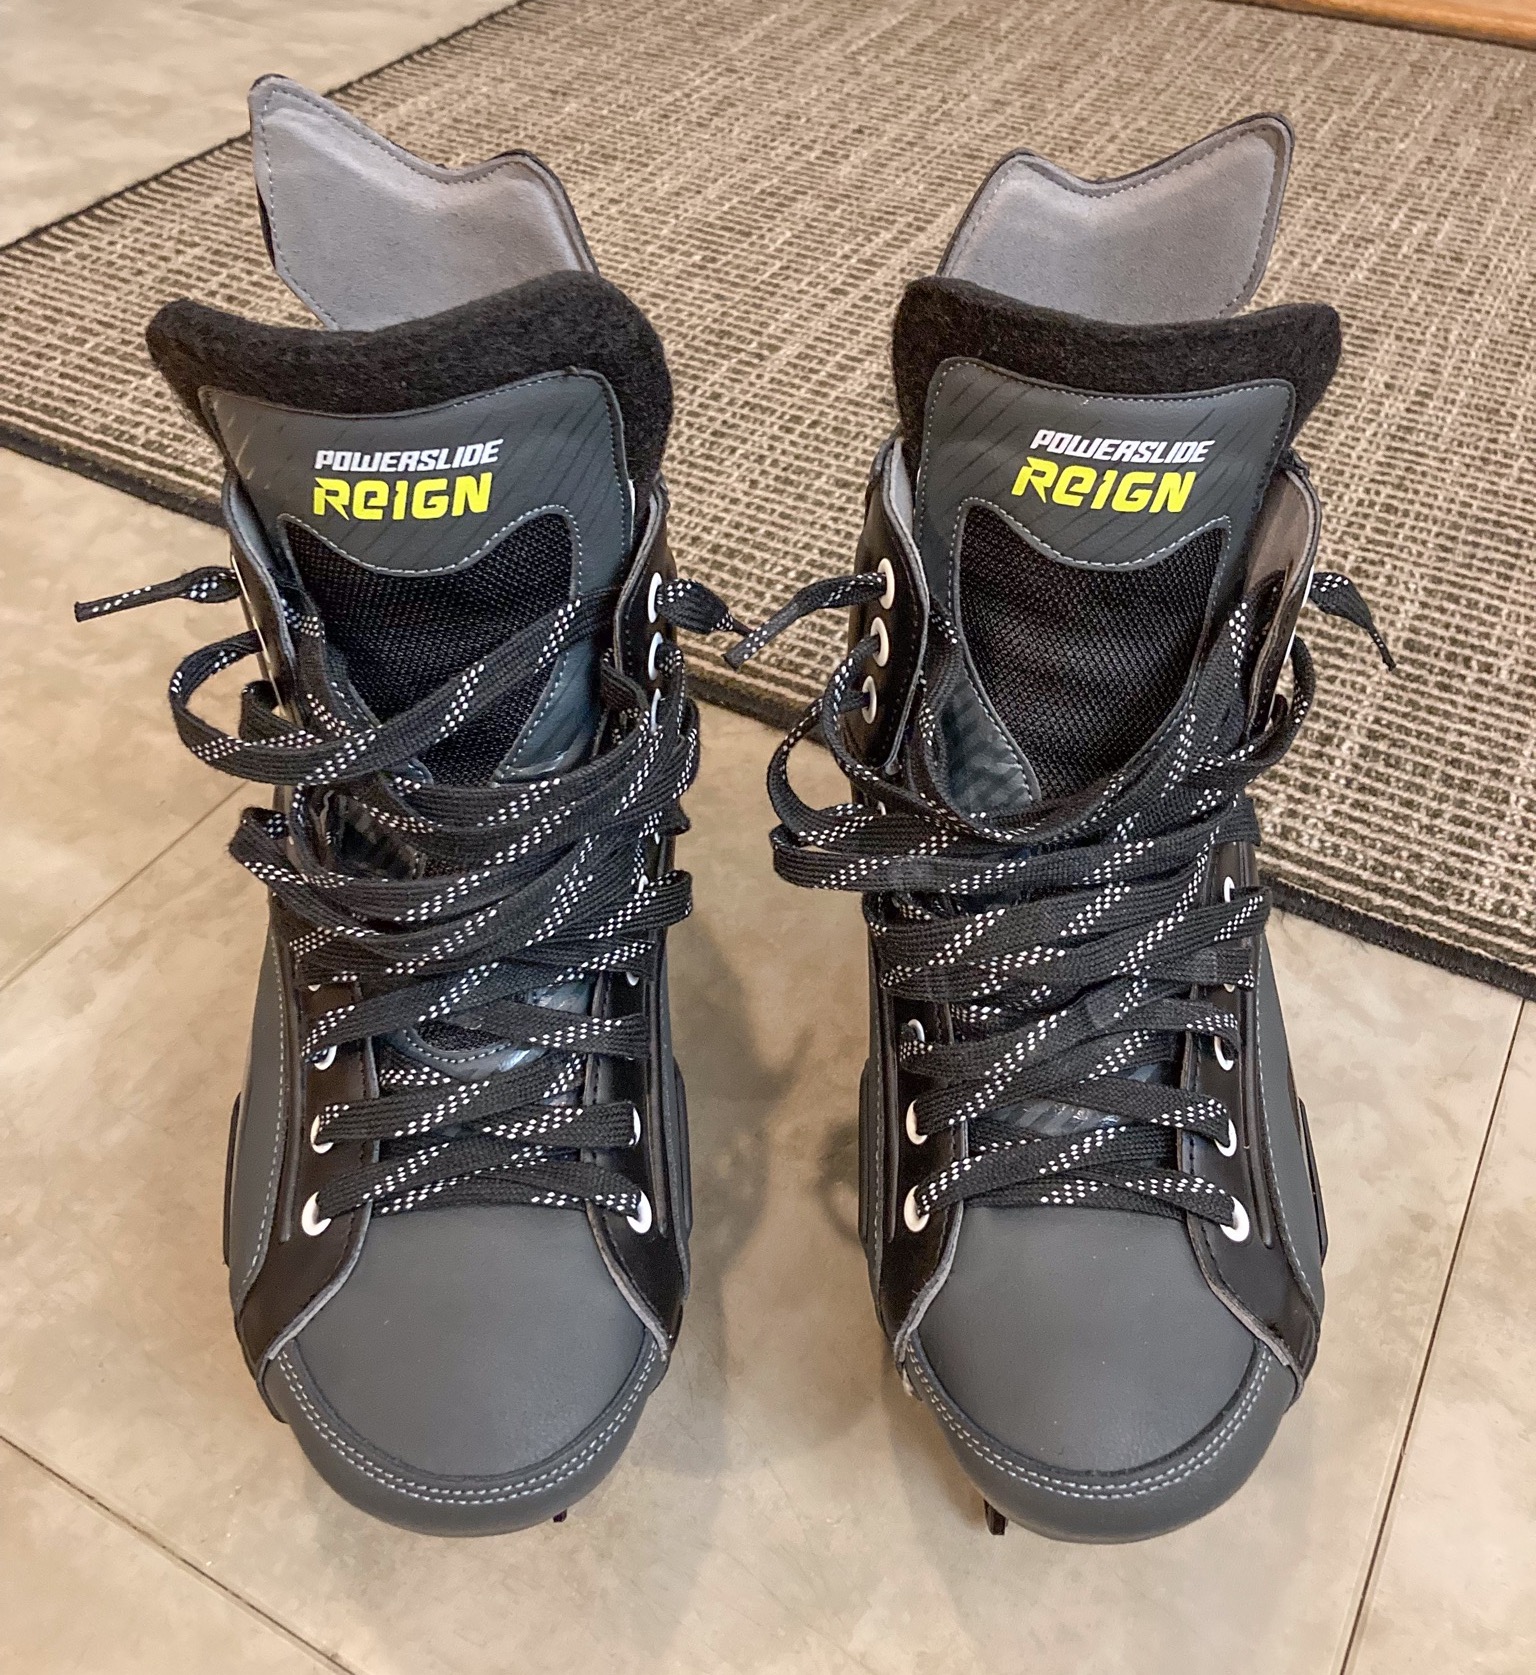
Reign Ares sports a clean, hockey look. The eyelets, the thick tongue, the integrated liner, and the tendon guard make these skates almost indistinguishable from hockey skates.

I previous tried to find urban skates with hockey skates’ clean looks. I bought the PS Tau, and then removed its 45° buckle. The result was still not ideal. Next to Reign, the Tau pales in the clean-look department.

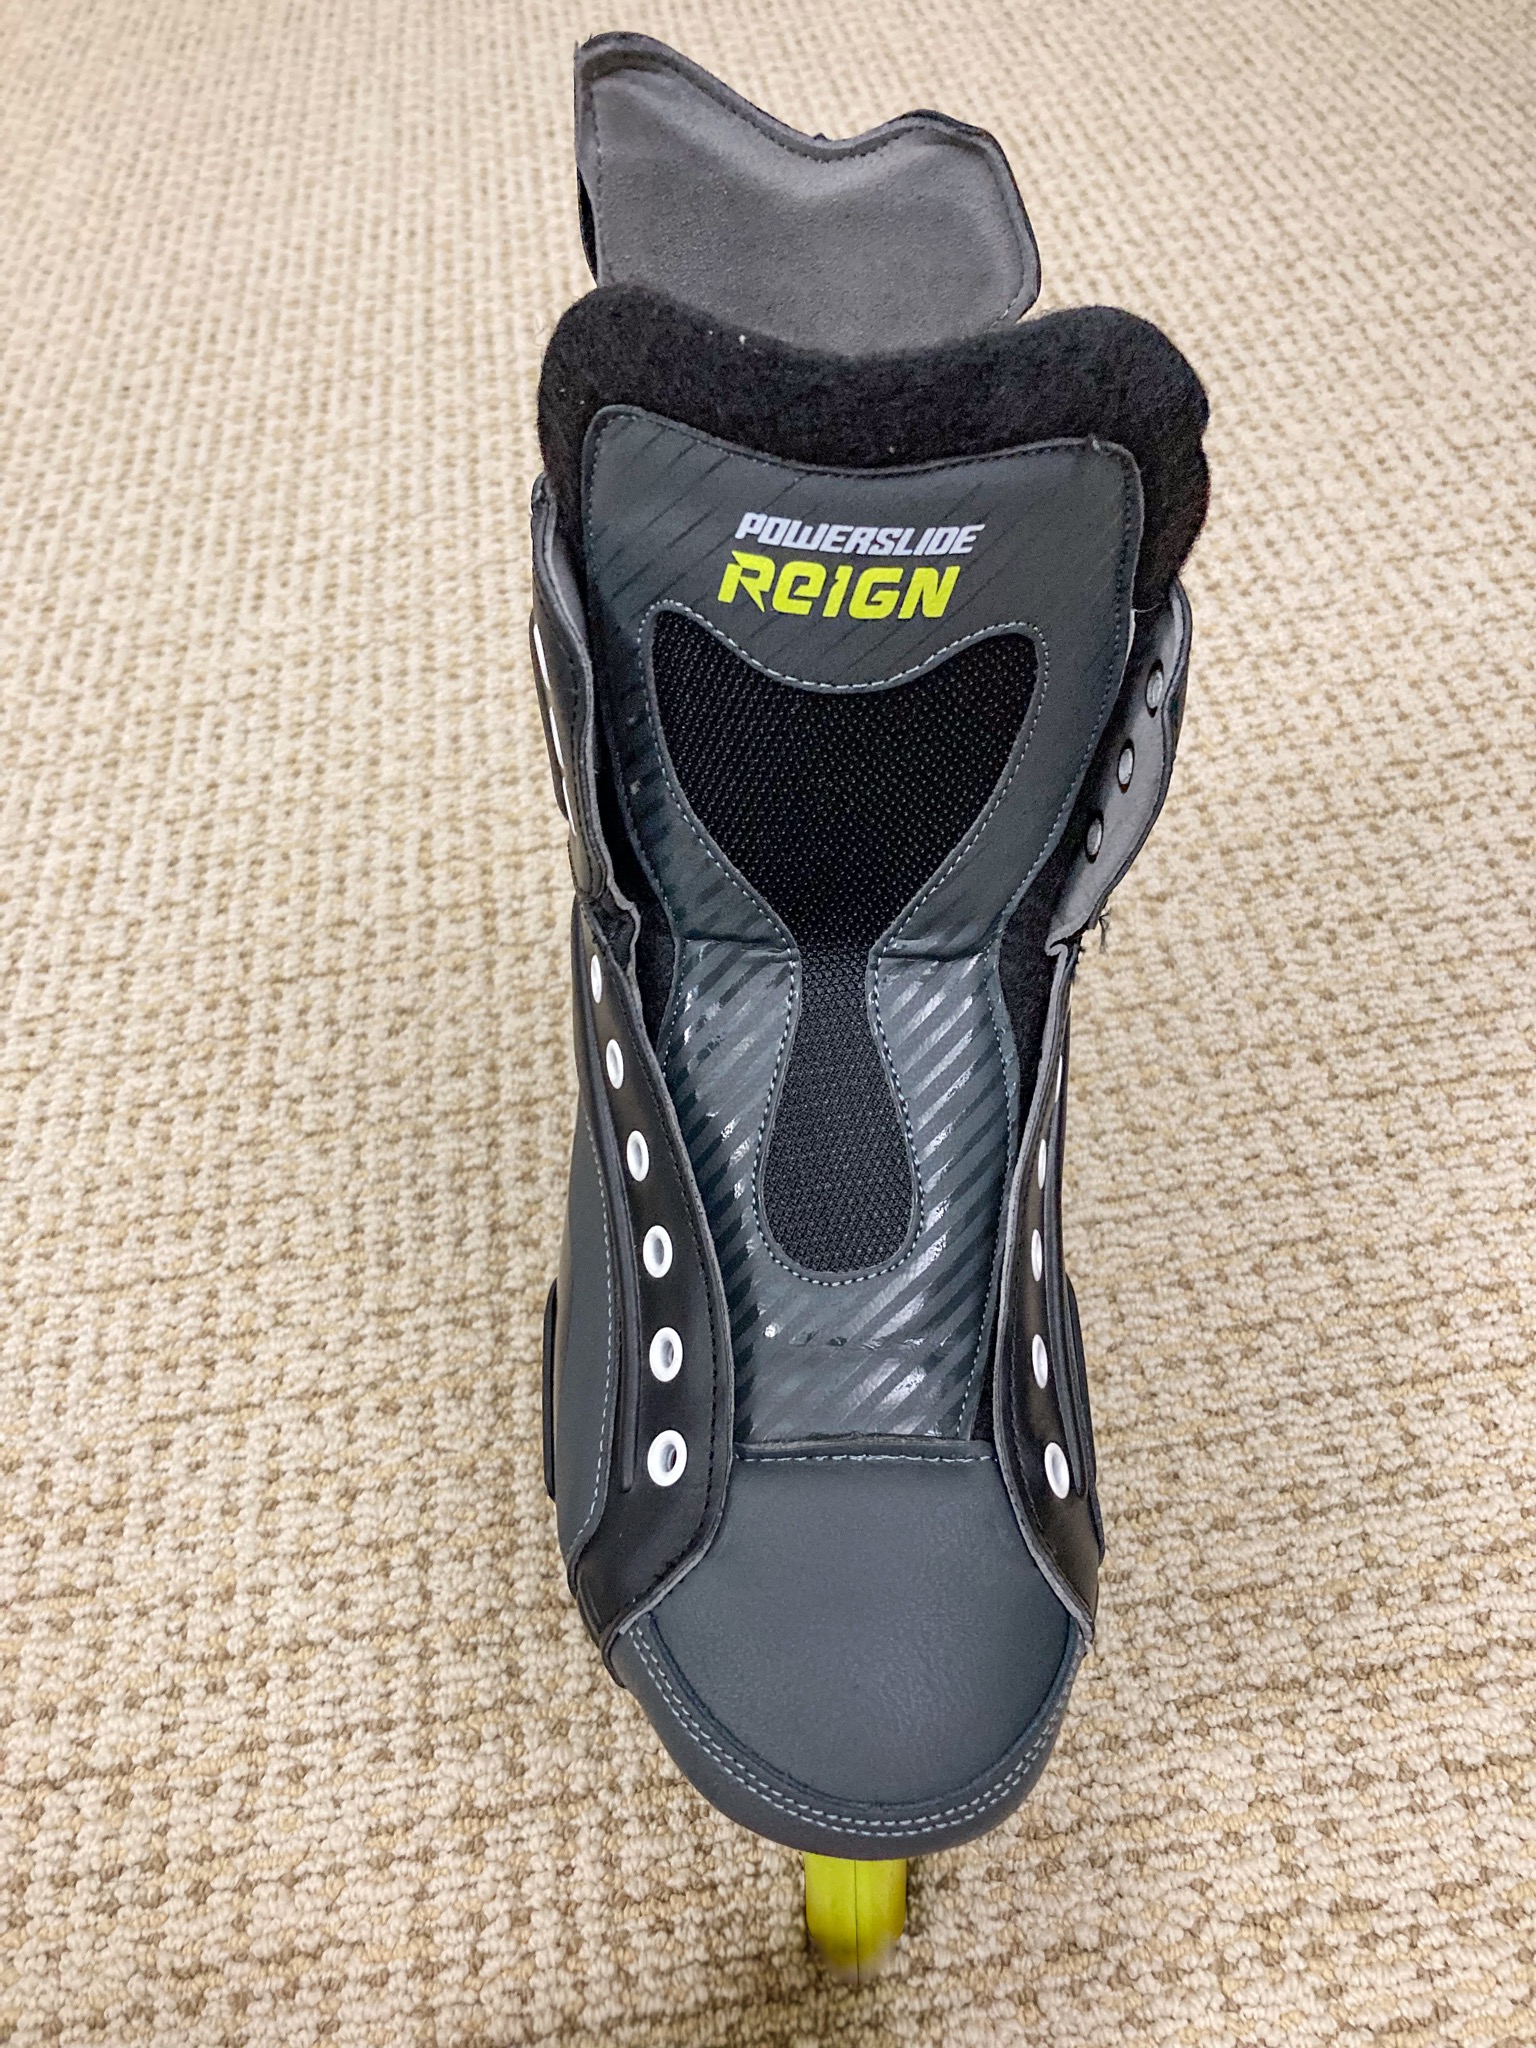
The integrated liner in Reign Ares is modeled after carbon hockey skates, unlike typical thick liners found in urban skates.


Heat-molding Reign Ares
Reign should be heat-molded like other Powerslide urban skates, such as Tau. Powerslide recommends baking at 90° Celsius (roughly 190° F) for 15 minutes. Before you bake your skates, remove wheels and the insole.

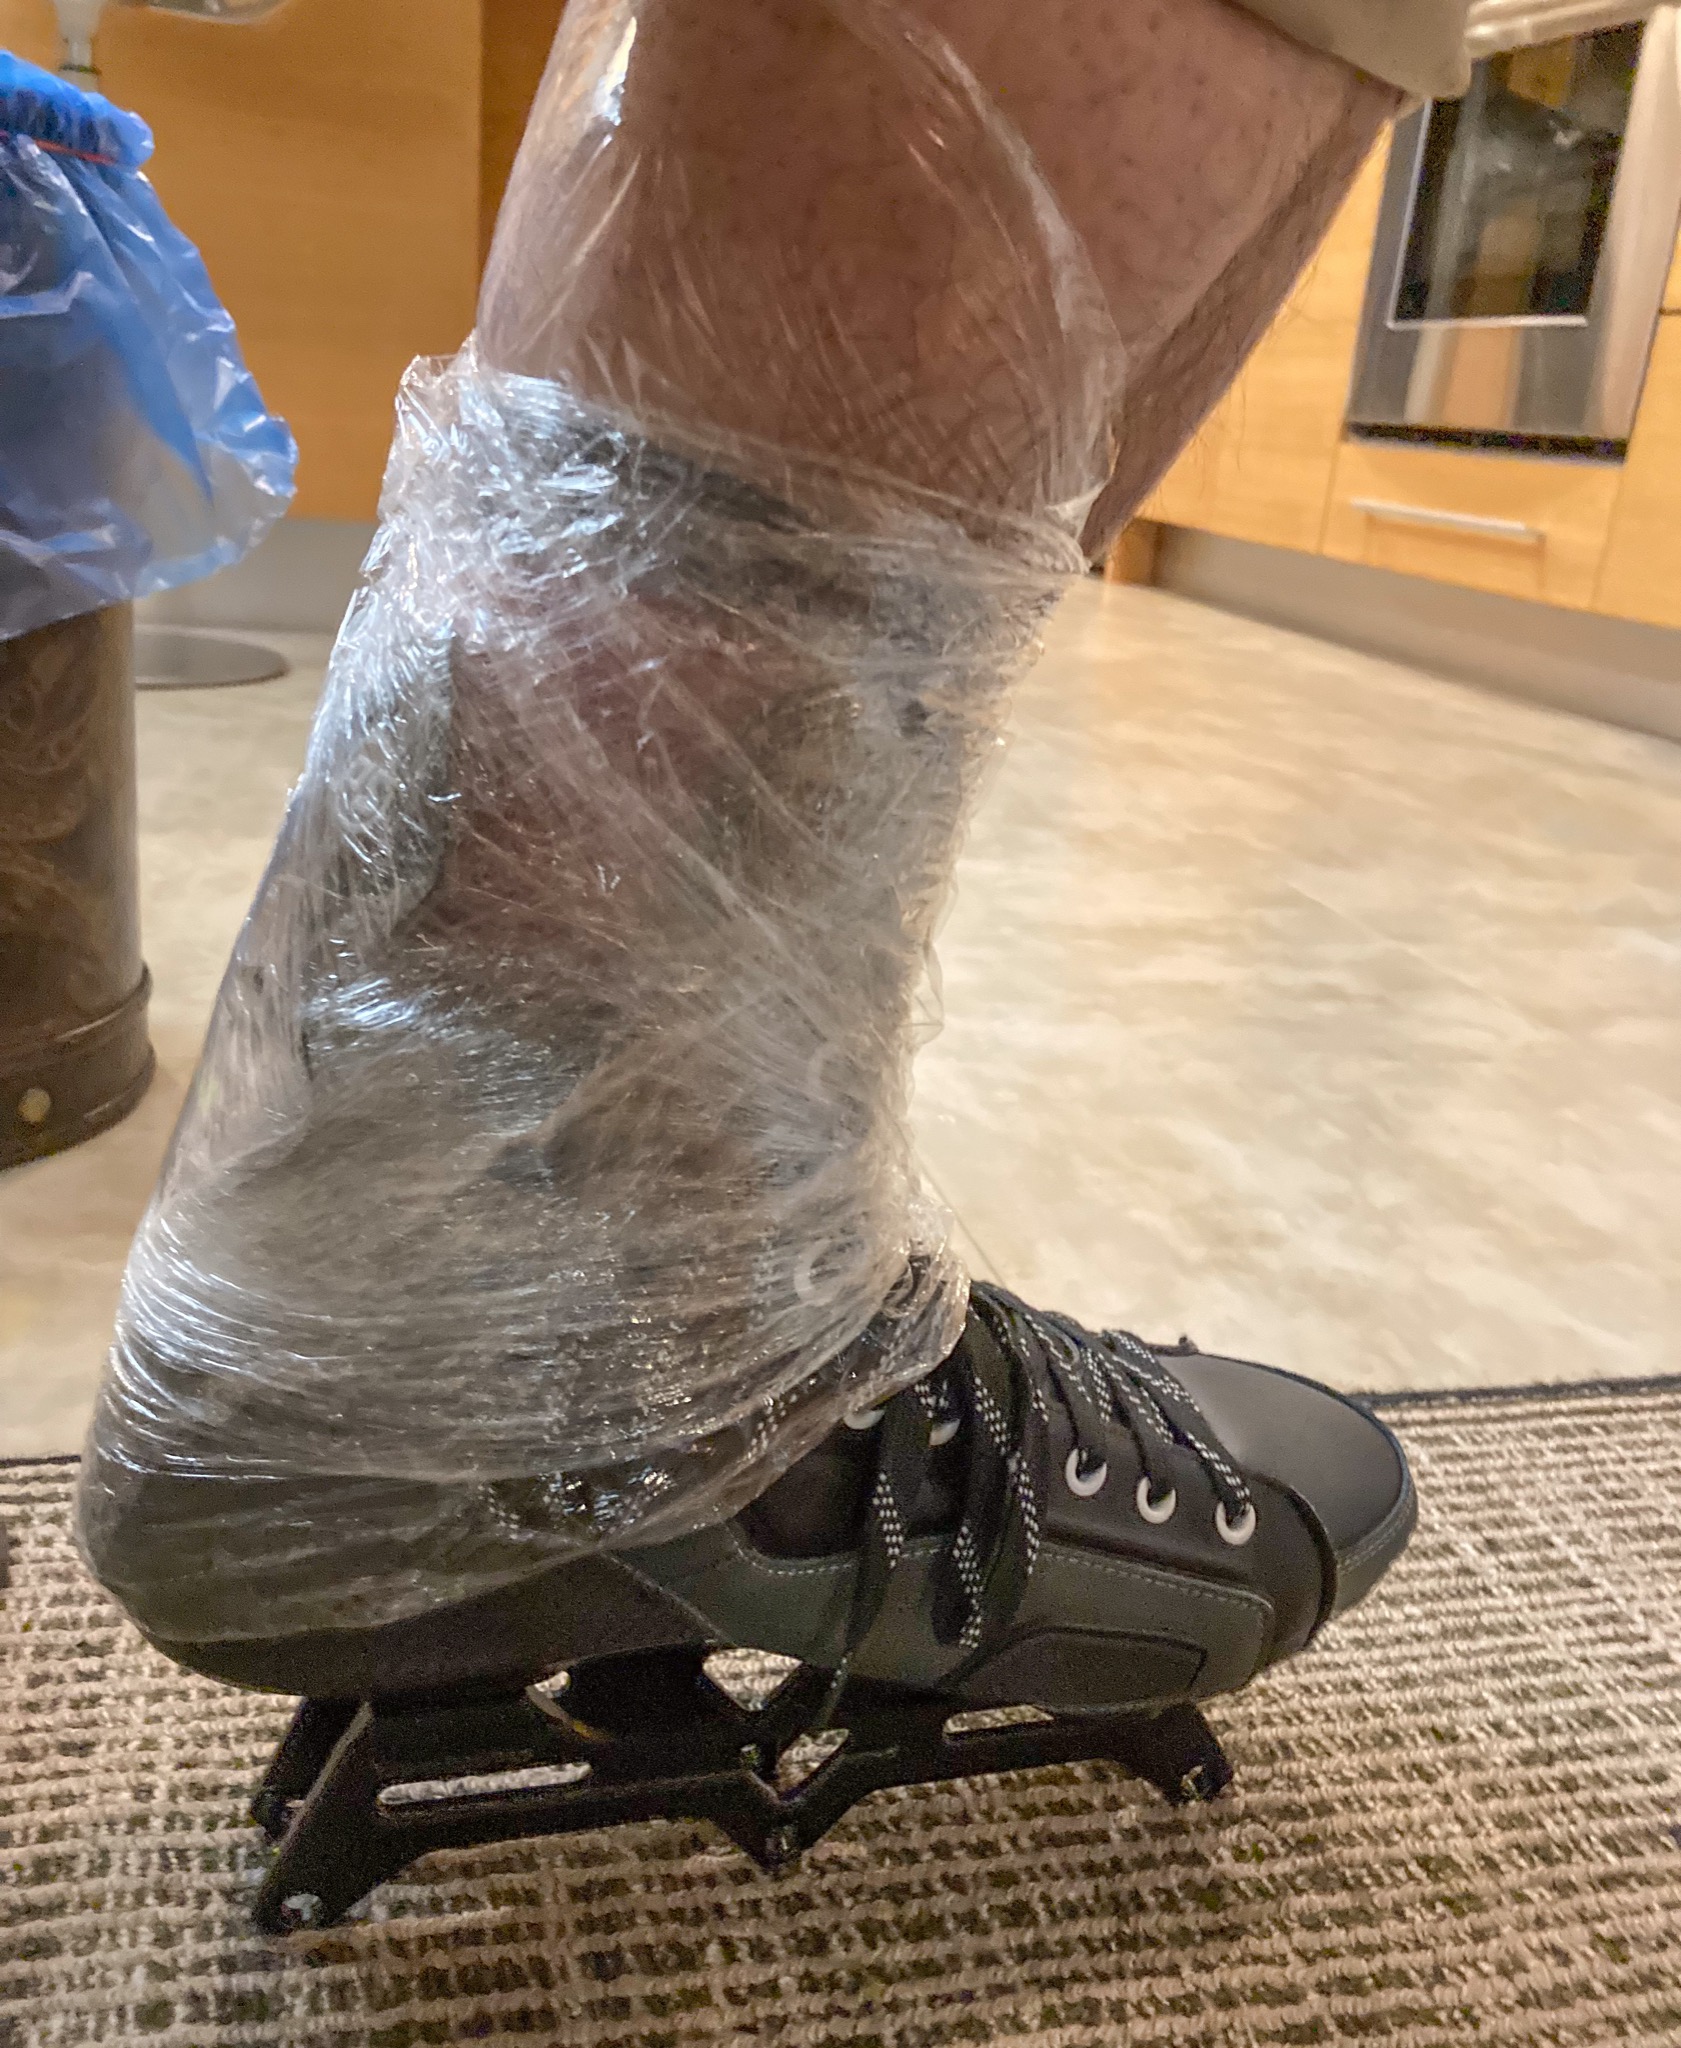
For those with wide feet, and especially bunion issues, pad your chronic pressure points. This will help punch out shells somewhat while molding. I wrapped the cuff of the boot, per instructions from TRUE skate molding. I thought it might help Ares too.

I am not convinced that baking at 90° C softens the bottom of the carbon shell at all. In fact, I don’t think it softens any parts of the low-profile carbon shell in Reign Ares. I feel the same about Tau’s carbon shell. But heat-molding does reshape the integrated liner. In Reign, this also reshapes quarter panels, somewhat.

For whatever reason, Reign Ares fit my wide feet with bunions much better than Tau. I did the same heat-molding with Tau. Twice, in fact. And I applied the same padding preparations for pressure points. Yet on the Tau, I still felt pressure on the front of my feet, somewhat. The issue is minor enough that I no longer mind them on Tau. But skating comfortably on Ares reminded me of this difference.

I have collected a few YouTube videos you will find useful, for heat-molding Reign Ares. Any heat molding videos on PS Tau also apply to Reign Ares. That is because they are both made from the same hand-lasted process, with compression molded carbon composite. The key parameters to remember are: bake at 90° Celsius (roughly 190° F), for 15 minutes.
Reign Kronos is the previous generation of Reign skates. So you can also watch videos made for Kronos.
Following is a great video. But if you don’t speak Spanish, just open the transcript panel, copy all text, and paste into Google Translate to see what’s going on.
Lastly, you can also consult heat molding videos on the popular HC Evo, even though it’s made by a wet layup process instead of compression molding. Temperatures cited may be slightly different from the 90°C for Reign Ares and Tau. Otherwise, the process is the same.
Fake hockey quarter panels
Reign Ares doesn’t have real hockey quarter panels. The boots surely do look like hockey boots. But these quarter panels are not rigid enough to functions like hockey quarter panels. They flex, bend and twist at room temperature. They fail to provide sufficient support for your ankles and lower legs, if you skate often on either the inside edge or the outside edge. See Parts of a Hockey Boot for terms such as quarter panels.
One would naturally believe that carbon hockey skates should provide better support in this regard, compared to urban skates with pivoting plastic cuffs. But Ares doesn’t have carbon-fiber quarter panels. While the Tau has even more pliable plastic cuff and cuff buckle, these are substantially bulkier, and are situated higher. Thus the Tau cuff ends up providing better support for outside edge skating, from my own personal experiences.

The quarter panels of Ares don’t tightly hug your feet and ankle, even after heat molding. I already went through the trouble of shrink-wrapping the cuff during heat molding. And still the these quarter panels flare out from the heel, unlike heat-molded carbon hockey skates such as TRUE.


I had to spot-heat just the heel section of these quarter panels, to manually bend them into the shape I needed. More on spot-heating later.
But spot-heating didn’t help much. I took a closer look, after spot heating. Only then did I realize that the quarter panels of Ares are shaped flat. It’s as if Powerslide did not anticipate that human feet would have protruding ankle bones on both sides of each leg. In comparison, all real hockey boots have convex quarter panels. This is so that an anatomical hull of a boot can hug your leg with no gaps left anywhere.
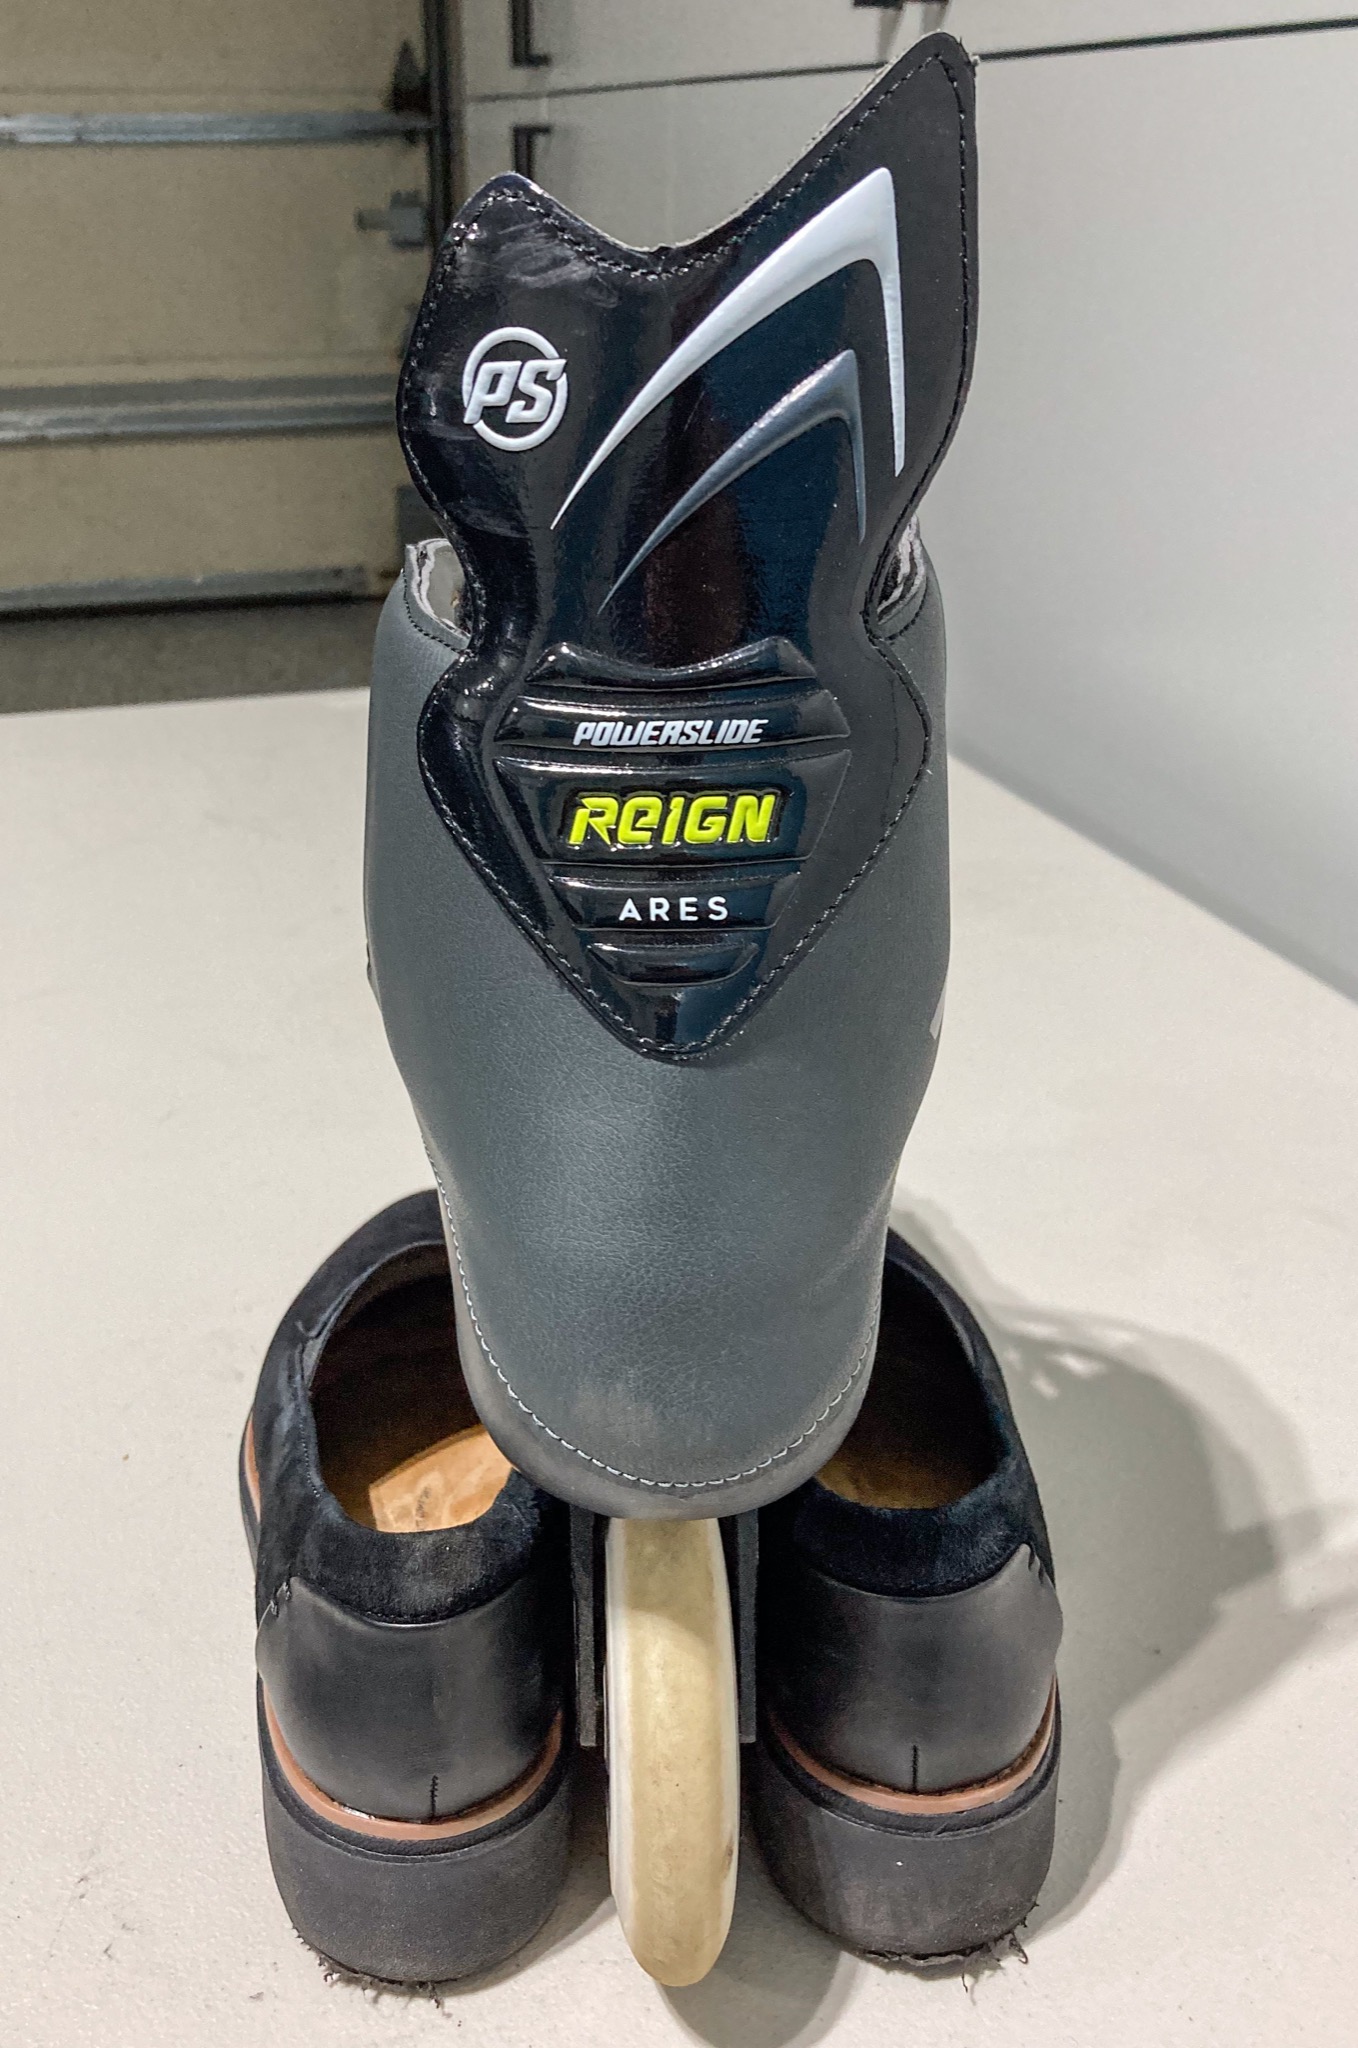


Observe how in a real hockey skate, the hull and cuff are designed and molded to the shape of a human leg.


That shape is not created at home by heat-molding. The boot was made that way at the factory, with layers of carbon fiber pressed against a last with anatomical ankle bones. The end result was a rigid hull with an anatomical shape. See Making Carbon-fiber Hockey Skates for details.

Gaps between cuff and leg
The flat quarter panels in Ares renders it impossible to eliminate gaps between its cuff and your leg.


Before you ask… no, you can’t lace the cuff so tight as to completely eliminate gaps. I mean, you can physically do that. But you shouldn’t. If you did, then you wouldn’t be able to pivot your shin forward into an athletic stance which is essential for skating. Your leg would be locked into a non-pivoting 90° angle with your foot, which I termed the ankle-cast posture.


You may be tempted to relax your lace to accommodate the extreme athletic stance, which I think of as the squatting posture. But then you don’t get proper leg support when skating on an edge. This is especially true if you are not always on this extreme squatting posture. The two quarter panels revert back to their normal shape, when the shin isn’t resting entire body weight on the tongue and the lace. Your leg wobbles from side to side, making edging harder on your ankles.
On real hockey skates, you can pivot your shins aggressive, or lay back. In both cases the cuff of the skates continue to provide the same account of lateral support for your lower leg.


Reshaping cuff with spot heating
Despite the non-ideal and pliable quarter panels, obviously you will still want to reshape the cuff of the Reign Ares to the extent possible. I simply used a hair dryer. I know from prior experience, and as reconfirmed with an infrared thermometer, that my hair dryer just about heats the surface of the boot to 90°C, when I keep it about an inch away. I manually bend those quarter panels into the shape I needed. It really did feel like bending softened plastic


I again used shrink wrap to keep the cuff in the right shape. Then I let the boots cool down to room temperature.


Factory frames too short for big wheels
Reign Ares 100 came with a 215mm Ego SL Trinity frame, and three 100mm indoor wheels. I swapped out those indoor wheels for cheap outdoor wheels from Powerslide One Zoom 100. Then I skated on this default factory setup. Having skated successfully on my Tau big wheels, I made the mistake of debuting these skates at the Setauket Greenway Trail.


I happened to be near Stony Brook on this day. When I looked up biking trails on Google Maps, I found the Greenway. So I drove there, and put my skates on. I am sure this is a great skating trail during the warmer half of the year, despite its hilly terrain. But with leaves and dead branches everywhere in autumn, I fell forward only minutes into the skate. Zooming downhill at high speed made my skates wobble. Standing still took conscious effort, lest my skates roll forward, and tipped me backward.
In retrospect, this was inevitable. The factory frame was so short, even compared to hockey skate frames. And the 100mm wheels moved the boot much higher above ground. One needs to explicitly re-train to become stable and proficient, on this short-frame configuration.


I am not sure whom the target audience of Ares 100 are, even though I am thankful Ares boots exist, for me. It is not clear to me that big wheels provide any advantages, within the confined space of a hockey rink. The higher ground-clearance and the short frame are real showstoppers for hockey. Ares 100, as came out of the box, is clearly not intended for high-speed or marathon skating. There is a reason all speed skates come with ridiculous-long frames. As mentioned, trying to skate downhill at high speed on the factory configuration of Ares 100 is akin to kamikaze.
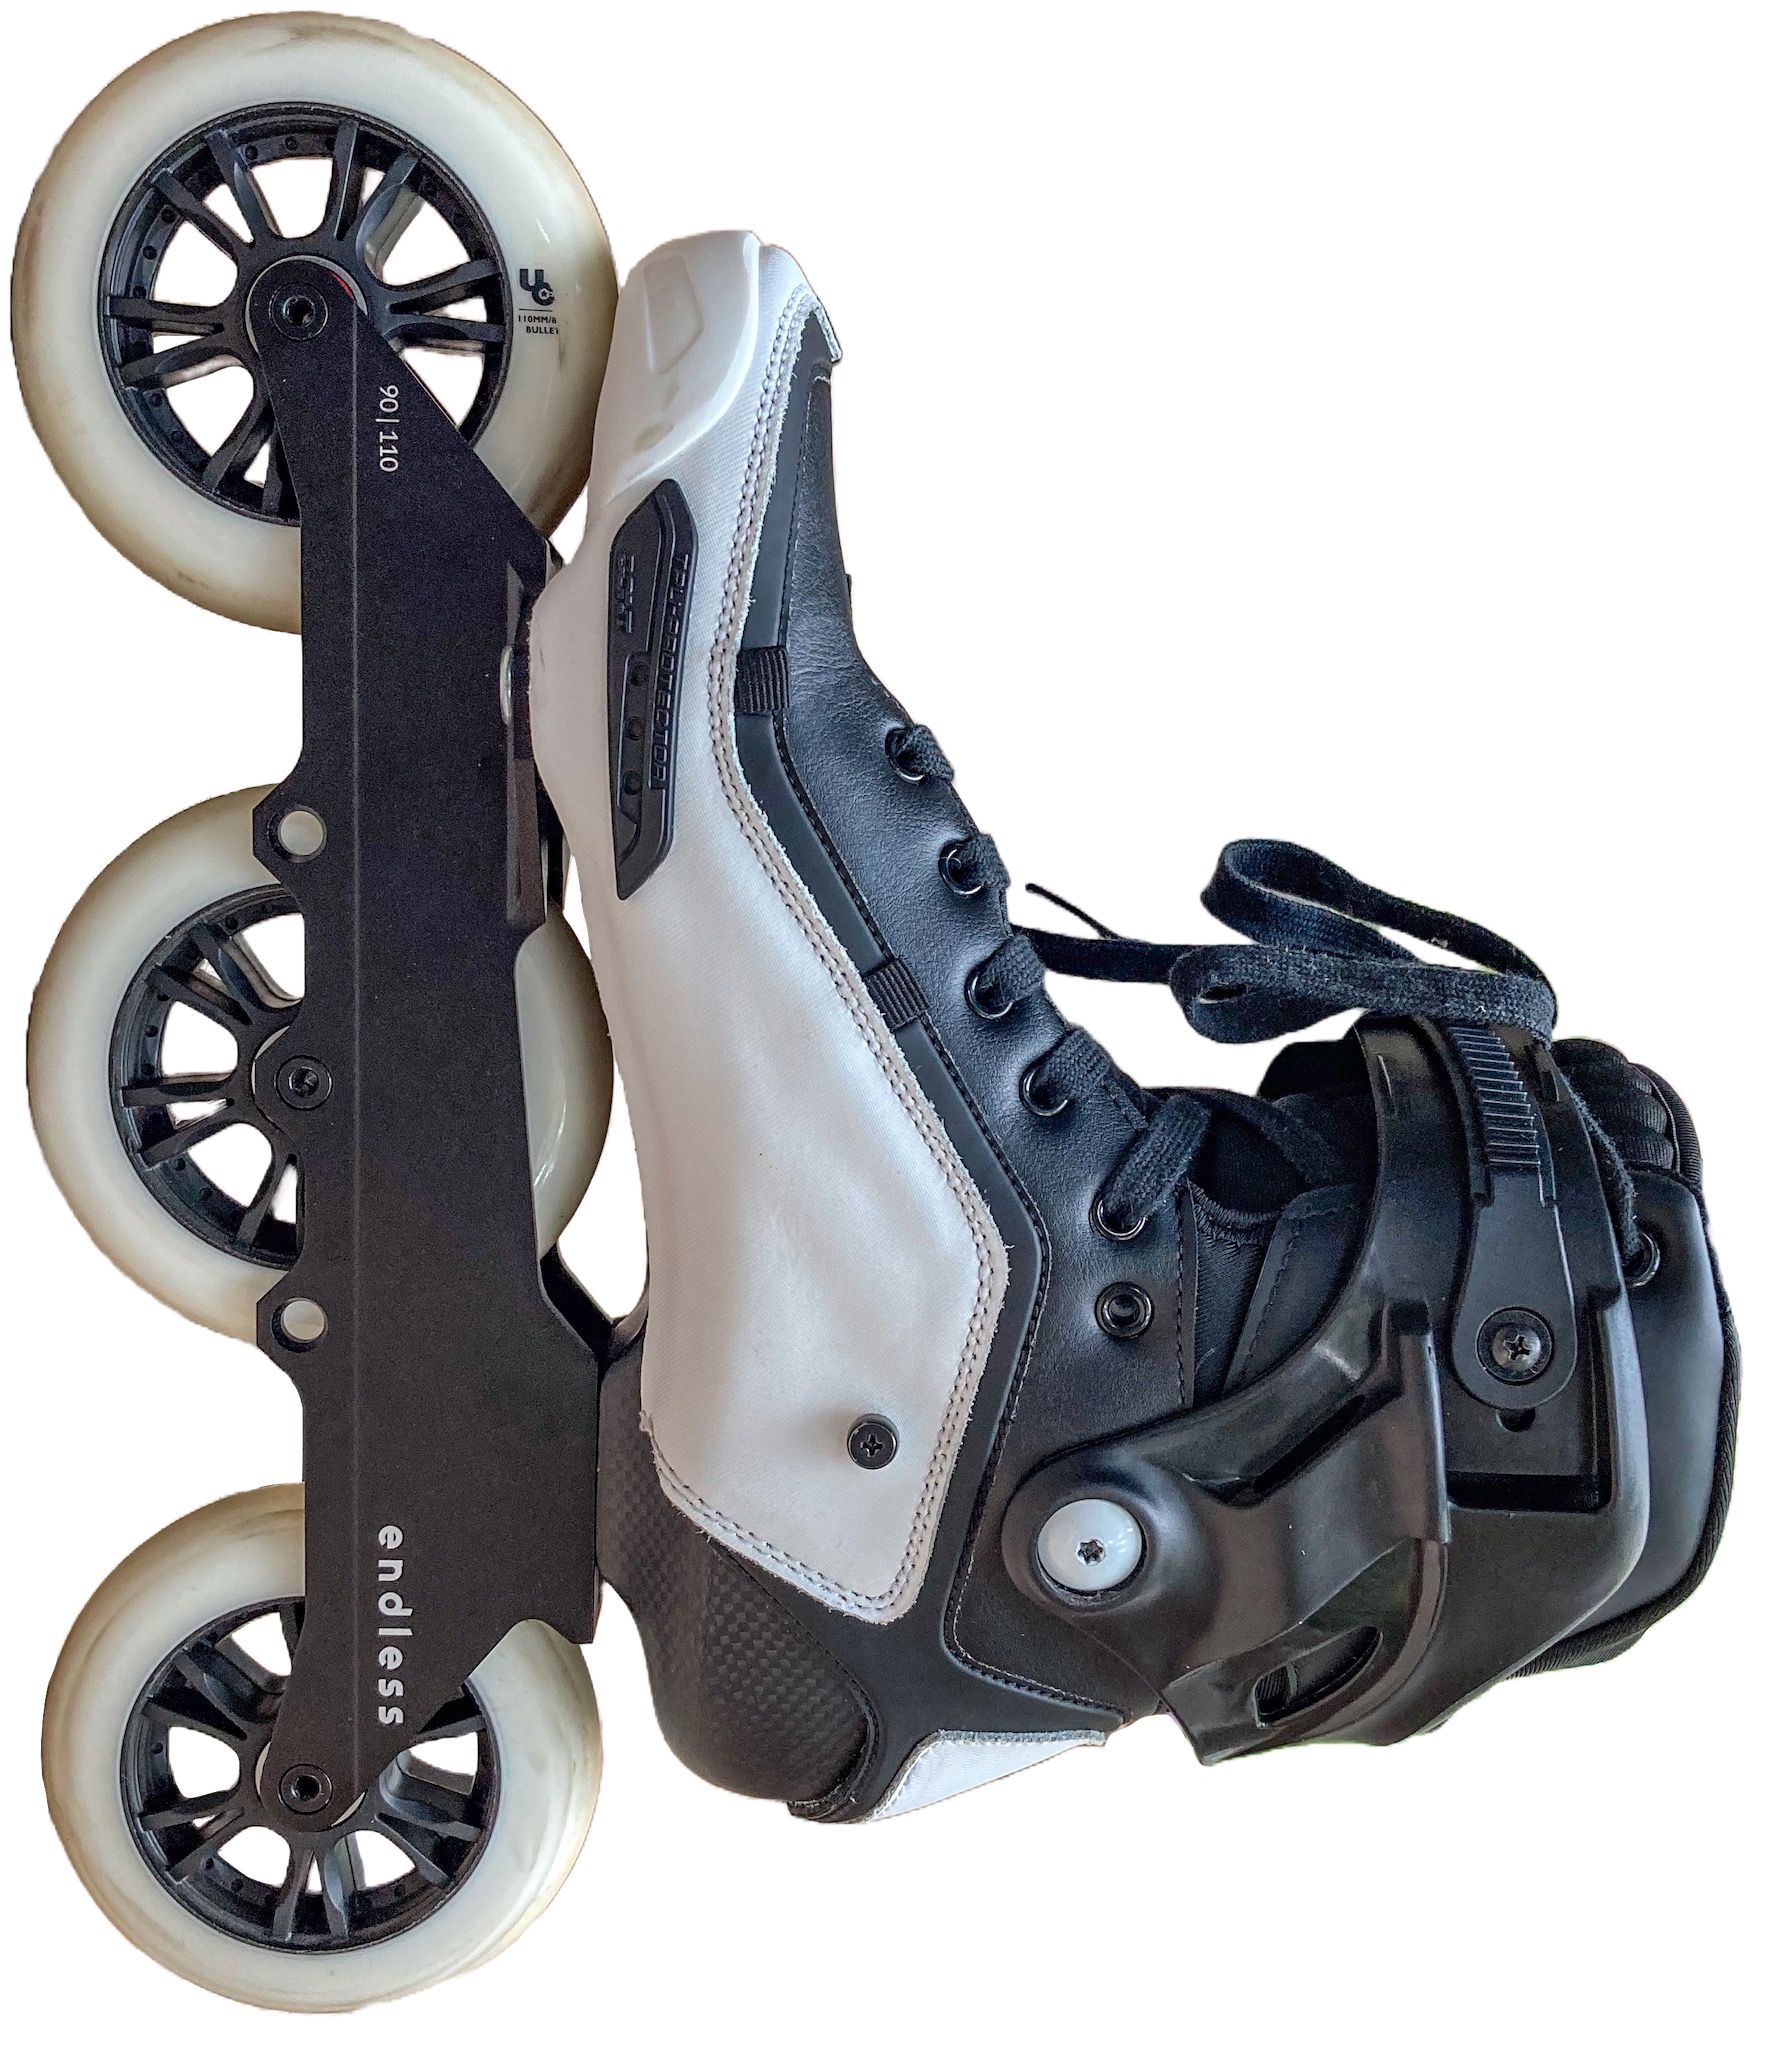
I previously felt comfortable on my Tau, because I swapped in a relatively long Endless frame, with 110mm wheels.

This is really too bad. Because the short frame does look nice. Oh well.


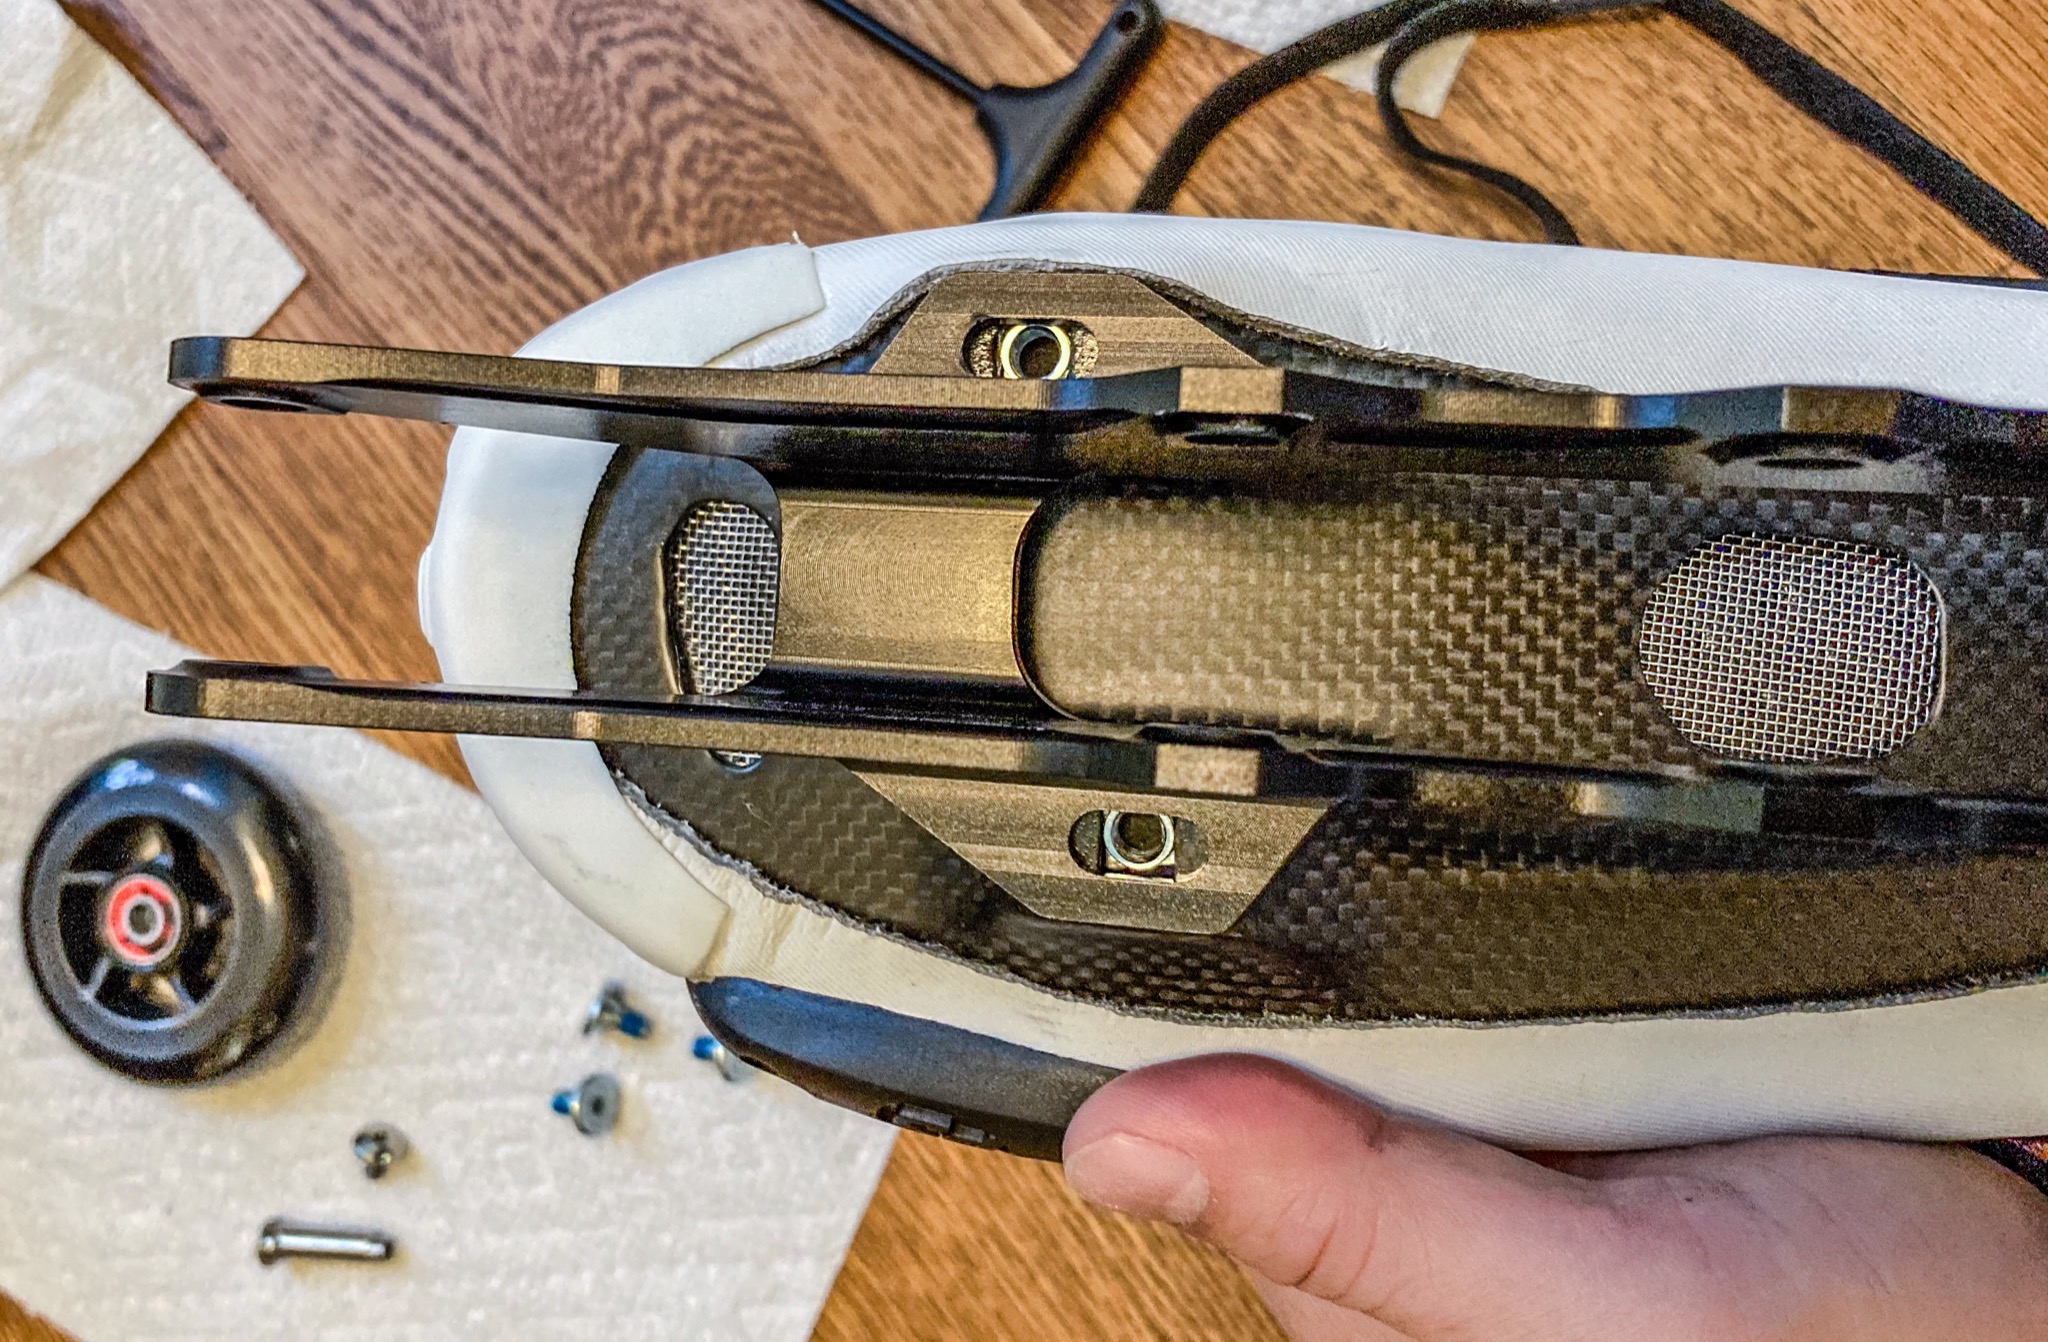
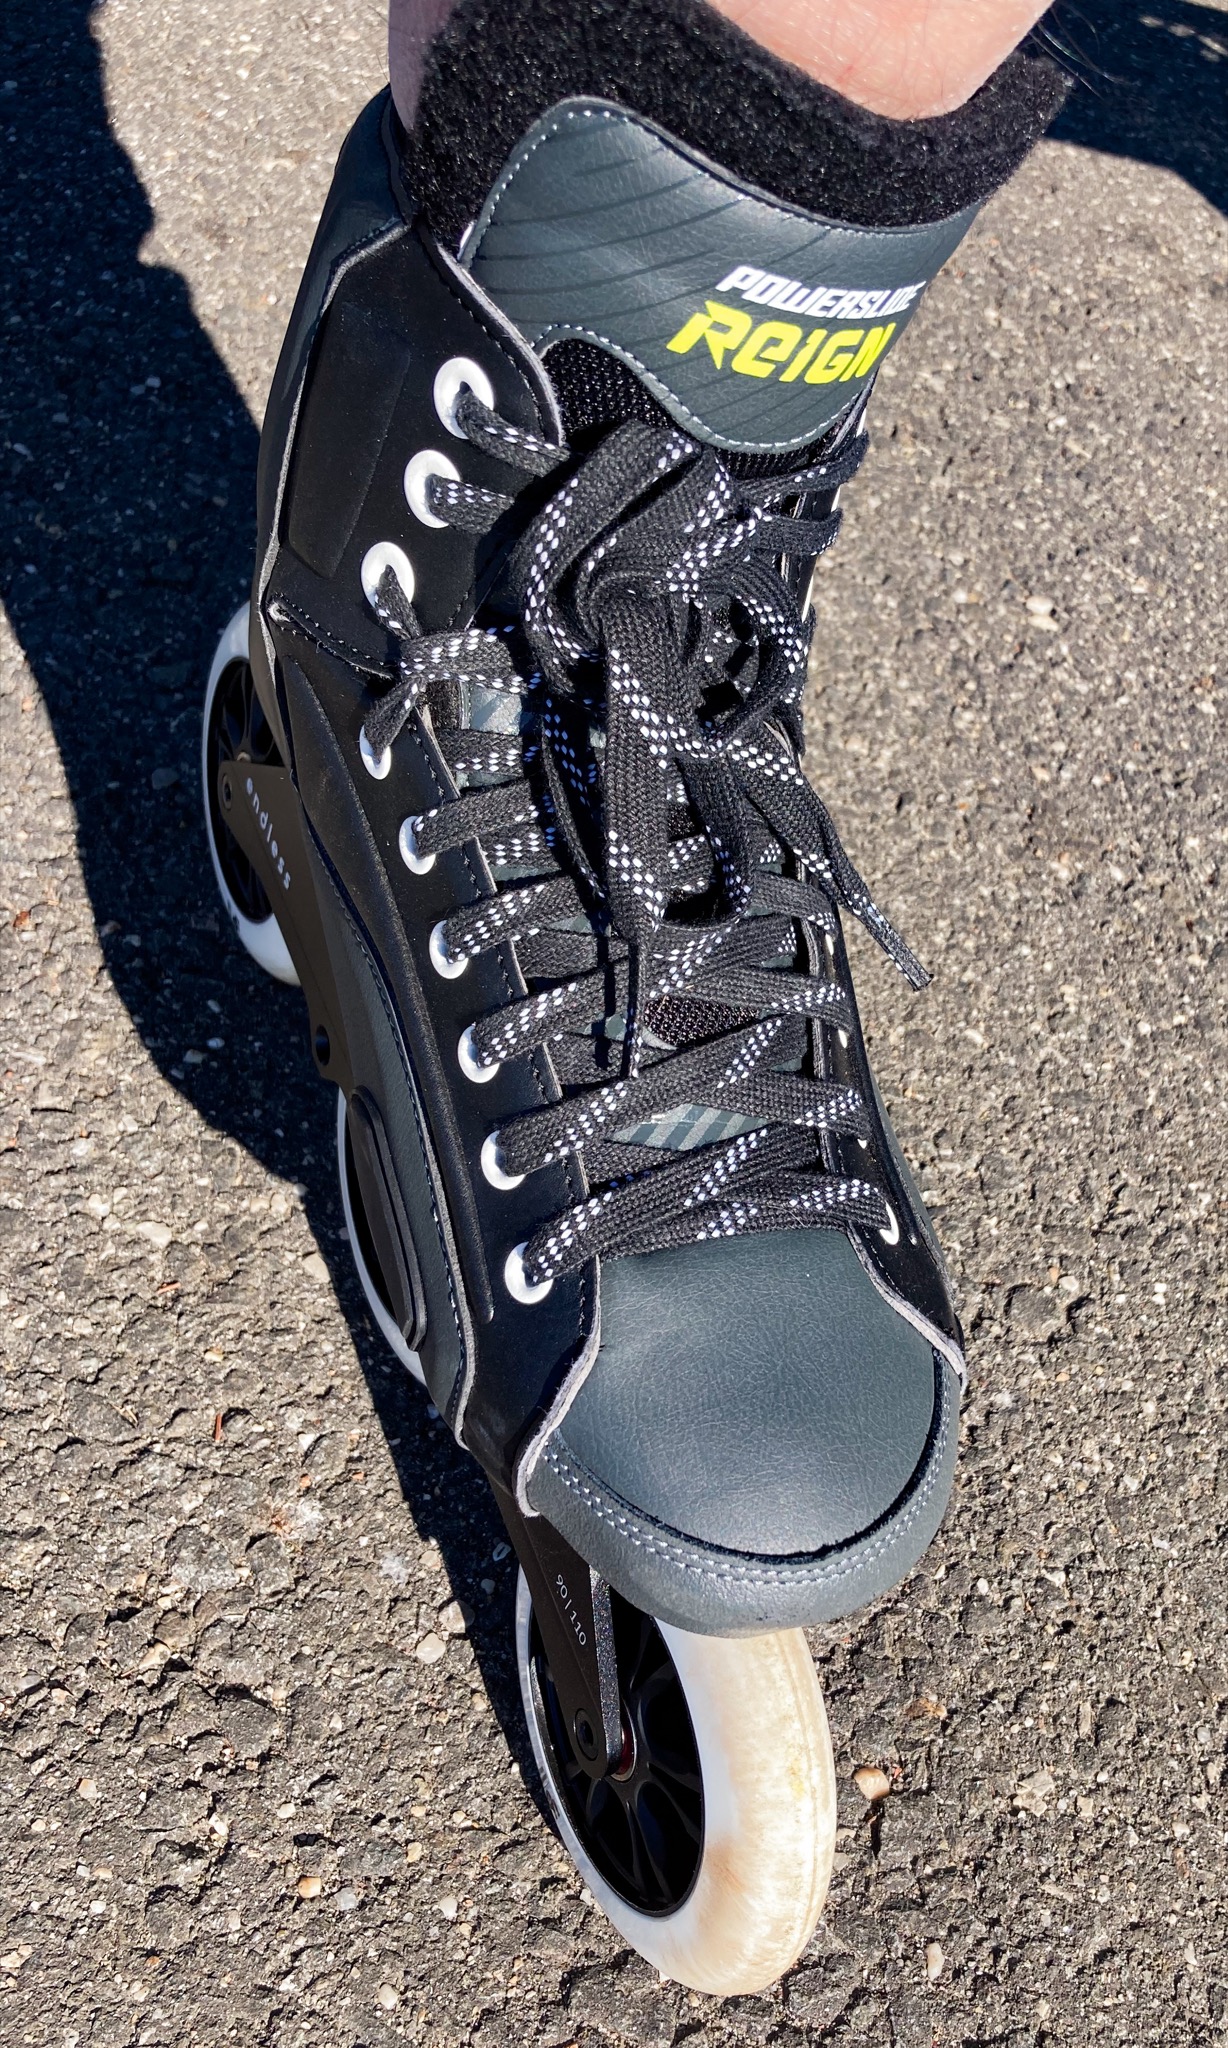
Installing Endless 90 Trinity frame
Frame replacement is very straightforward with the Trinity mounting system. Reuse screws that came with Ares. Endless doesn’t ship screws in their packages. There is only a bag of axles in the package beside the two frames.

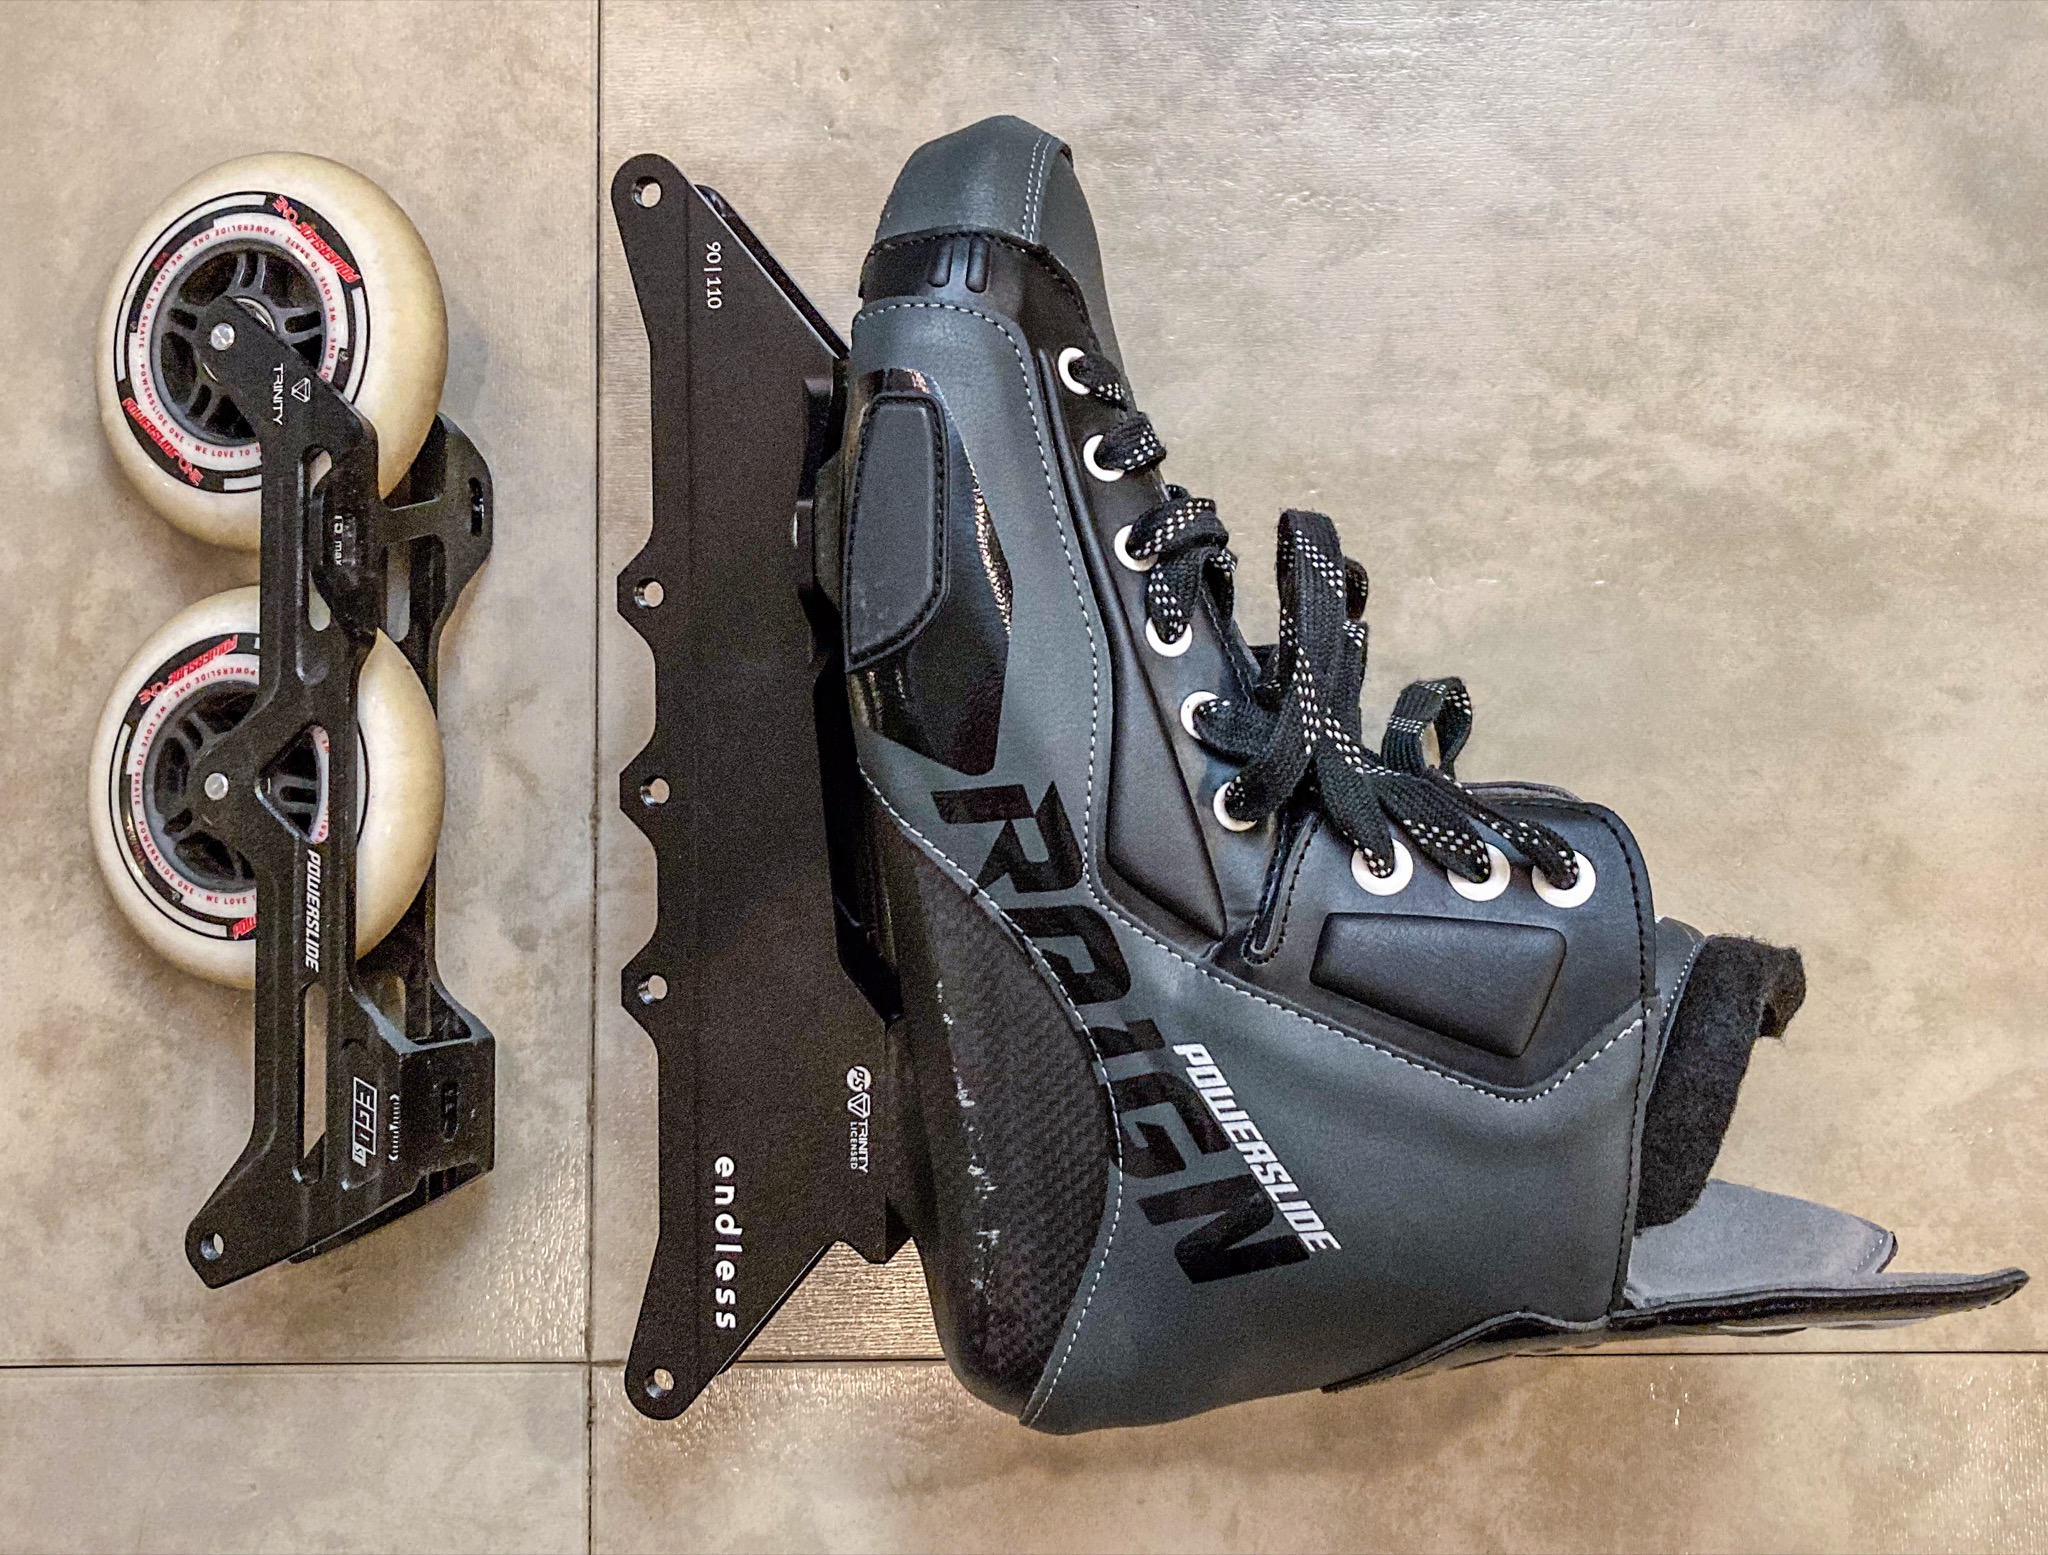

The long Endless frame works so much better for me. Here is a stark contrast between the original frame and this long Endless frame, mounted on the same Reign Ares boot.
More glorious views of the finished pair of skates, before we move on.
Bearings and bearing spacers
Don’t rush to install wheels on your new frames just yet. Don’t be like me in the past. It wasn’t until I replaced frames on my Tau, that I started to pay attention to frames, wheels, bearings, and spacers. By sheer lock, I installed the right bearing spacers, with relatively cheap bearings, into good Undercover wheels. Then I mounted these wheels on good Endless frames.
That was when I first understood what people meant by 100% power transfer in skating.
Clearly, rigid and foot-hugging carbon shells transmitted power efficiently through rigid and precision-made frames to wheels and ground. This much I knew from my TRUE hockey skate days.
What I did not anticipate was how smooth these wheels rolled on load, and how little noises they made. My skates now refused to stop rolling when I simply coasted on them. Part of this could probably be explained by increased rotational energy captured by bigger and heavier wheels. But what I’ve been missing all these years is that rolling of wheels didn’t have to suck as much as I took for the norm. I neglected how bearings were installed, and what bearing spacers actually did for maximum energy efficiency.
I now look back to my ignorant past, and I can’t stop wondering why nobody told me the right way to install bearings, or the proper procedure for findings the right spacers for individual combinations of a wheel and two bearings. I have been forcing bearings into wheel hubs by pounding a wheel on the floor, by hitting a bearing with a rubber hammer, and by pushing on the inner race of a bearing with a bearing tool. These are all wrong. I sometimes loosened an axle until a wheel spun more freely. At other times, I keep trying to tighten an axle more than humanly-possible, in an attempt to make a wheel not rattle. These are all disastrous, if not outright dangerous.
It didn’t help that popular influencers continue to say the wrong things on YouTube. For instance, you will find people advising all imaginable wrong ways to install bearings, including every wrong way I’ve adopted in the past. Now I know better. Just get yourself a bearing press. It may seem expensive. But at the cost of a pack of Bones Swiss bearings, or 3 Undercover Team Blank wheels, just buy a bearing press, and be happy ever after.
Following video was made for skateboarders. But it’s equally useful to inline skaters. It explains why you should not push on the inner race of bearings to force them into a wheel hub. Until I stumbled on this video, I had been unintentionally deforming bearing shields, and introducing unnecessary frictions in my skate wheels.
The art of choosing the right bearing spacers
Few can explain just exactly what bearing spacers do for inline skates. And nobody tells you that spacers are the only parts of your skate setup where you don’t know their required size, until you have all other parts in your hands. You must experiment repeatedly, with different spacer sizes, until your wheels roll frictionless.
I lied. There is one video on this topic for inline skates. See this excellent video on spacers by Pascal Briand.
Each “wheel” you attach to a frame actually includes the wheel, two bearings, and a spacer. If you bought your own wheels, they usually do not come with bearings and spacers. You will buy your own bearings and spacers. These three types of components need to fit precisely, for the entire wheel to work well, when fastened to a frame with an axle bolt.

Anatomy of a wheel assembly
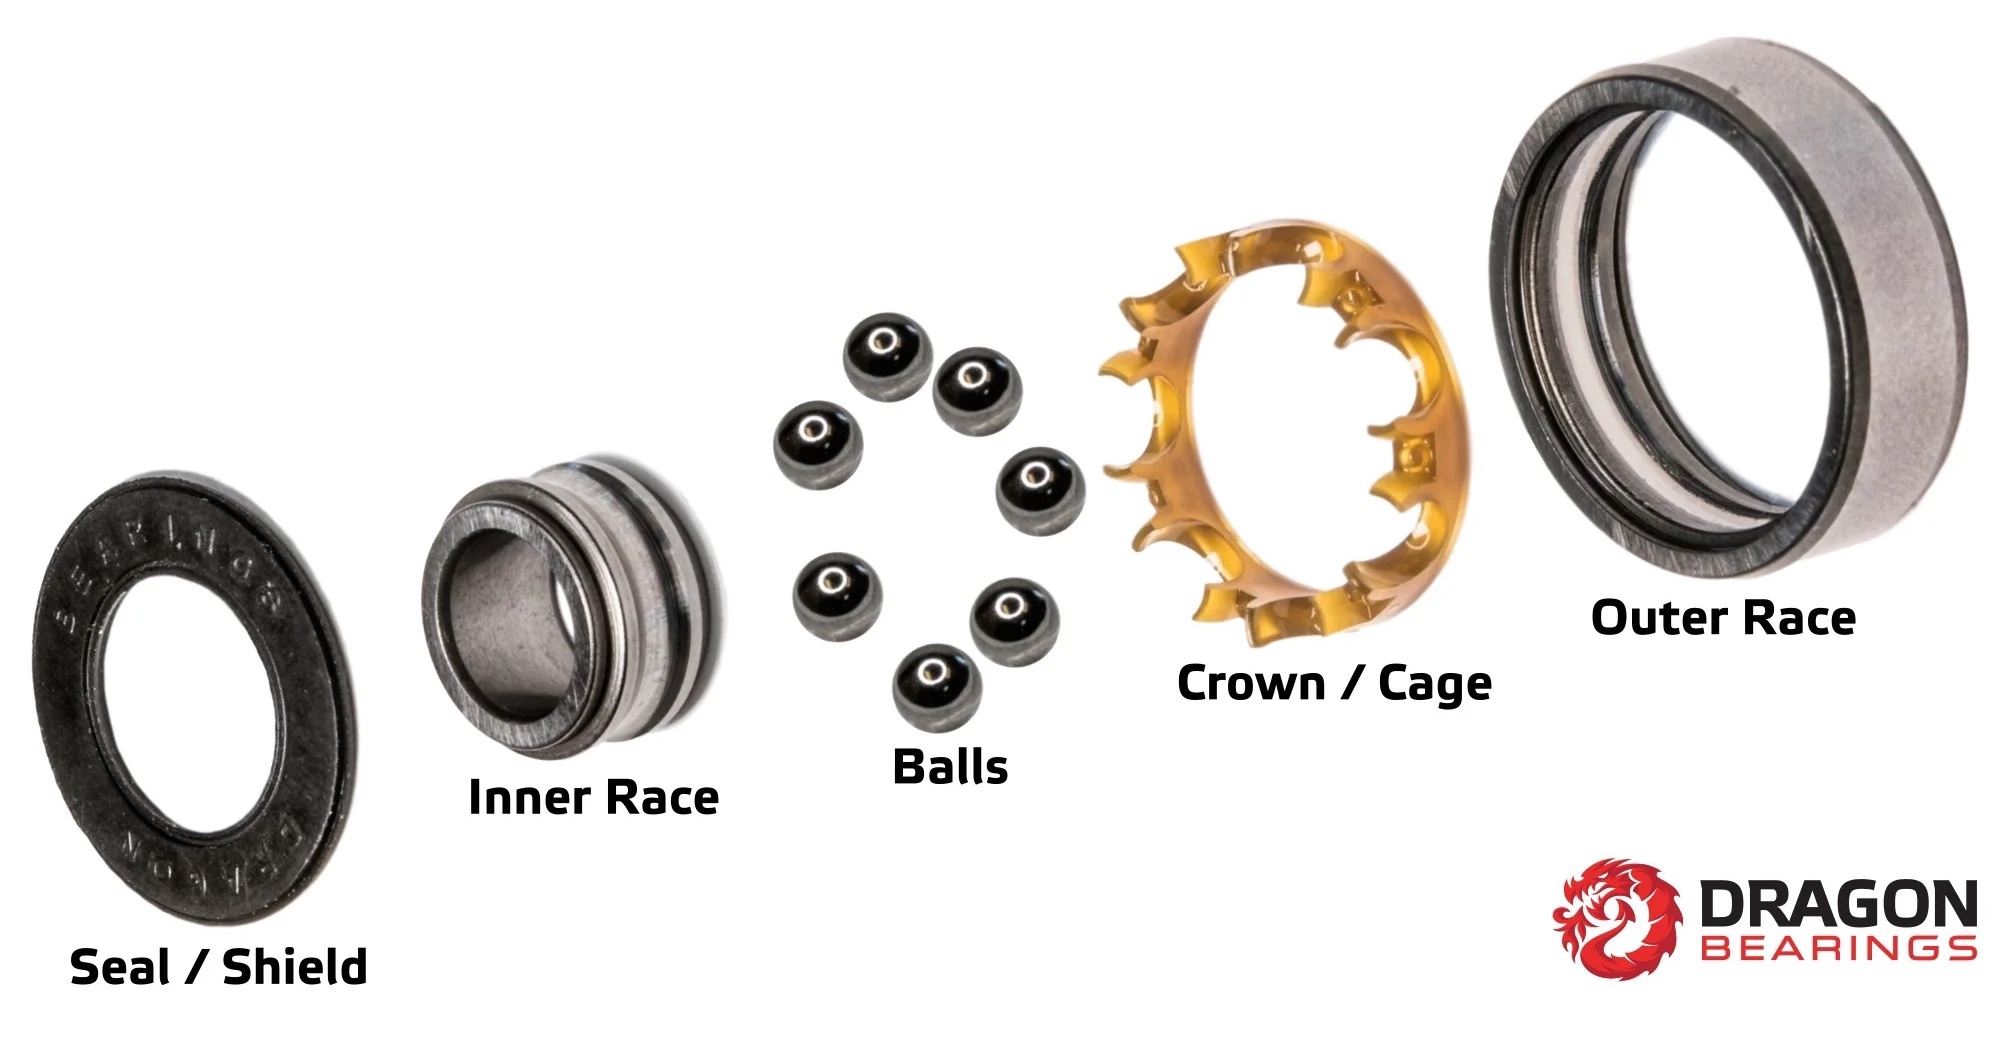
A bearing itself comprises several internal components, including: outer race, inner race, balls, crown and shield. The purpose of a bearing is to decouple the outer race from the inner race, such that they can rotate against each other with as little friction as possible. That’s the job of the balls that sit in between the outer race and the inner race. The crown and the shield are used to secure these three components into single unit.

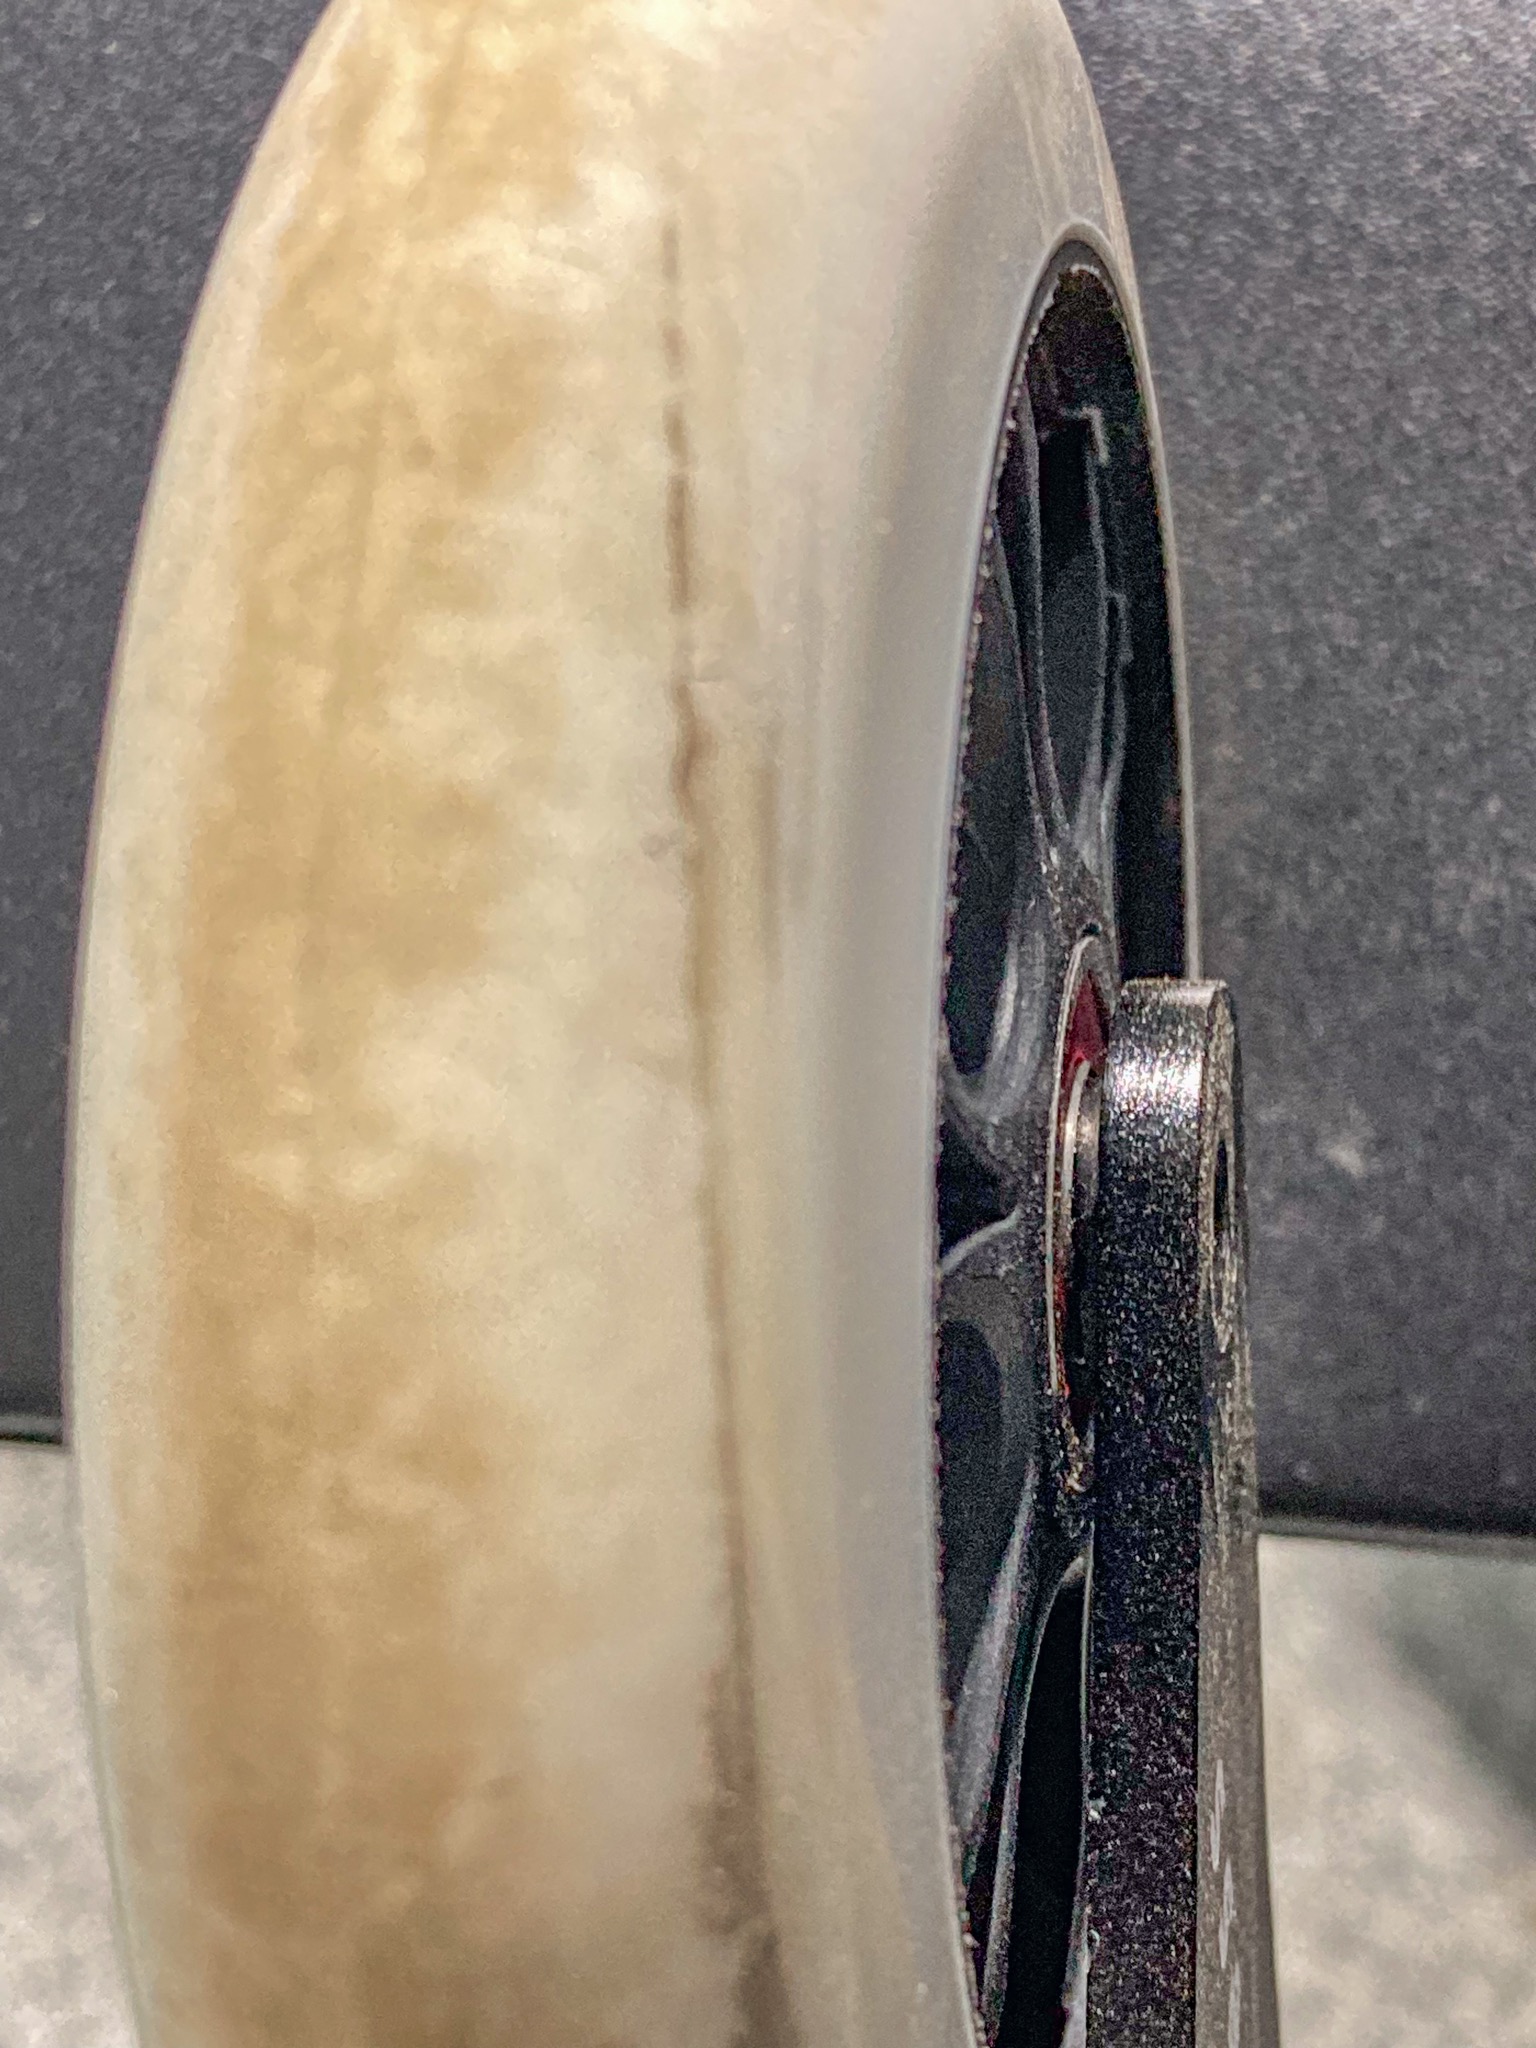
Following cross-section view illustrates various components in a wheel assembly. Note how they fit with one another. These components include: a frame, an axle, two ball bearings, a spacer, a hub and a polyurethane tire. You would use a bearing press to push bearing onto the wheel hub, with a spacer trapped inside the now-confined hub space. You then slide this wheel unit into the frame, and secure it with an axle bolt. When done right, the wheel unit spins freely within the frame.
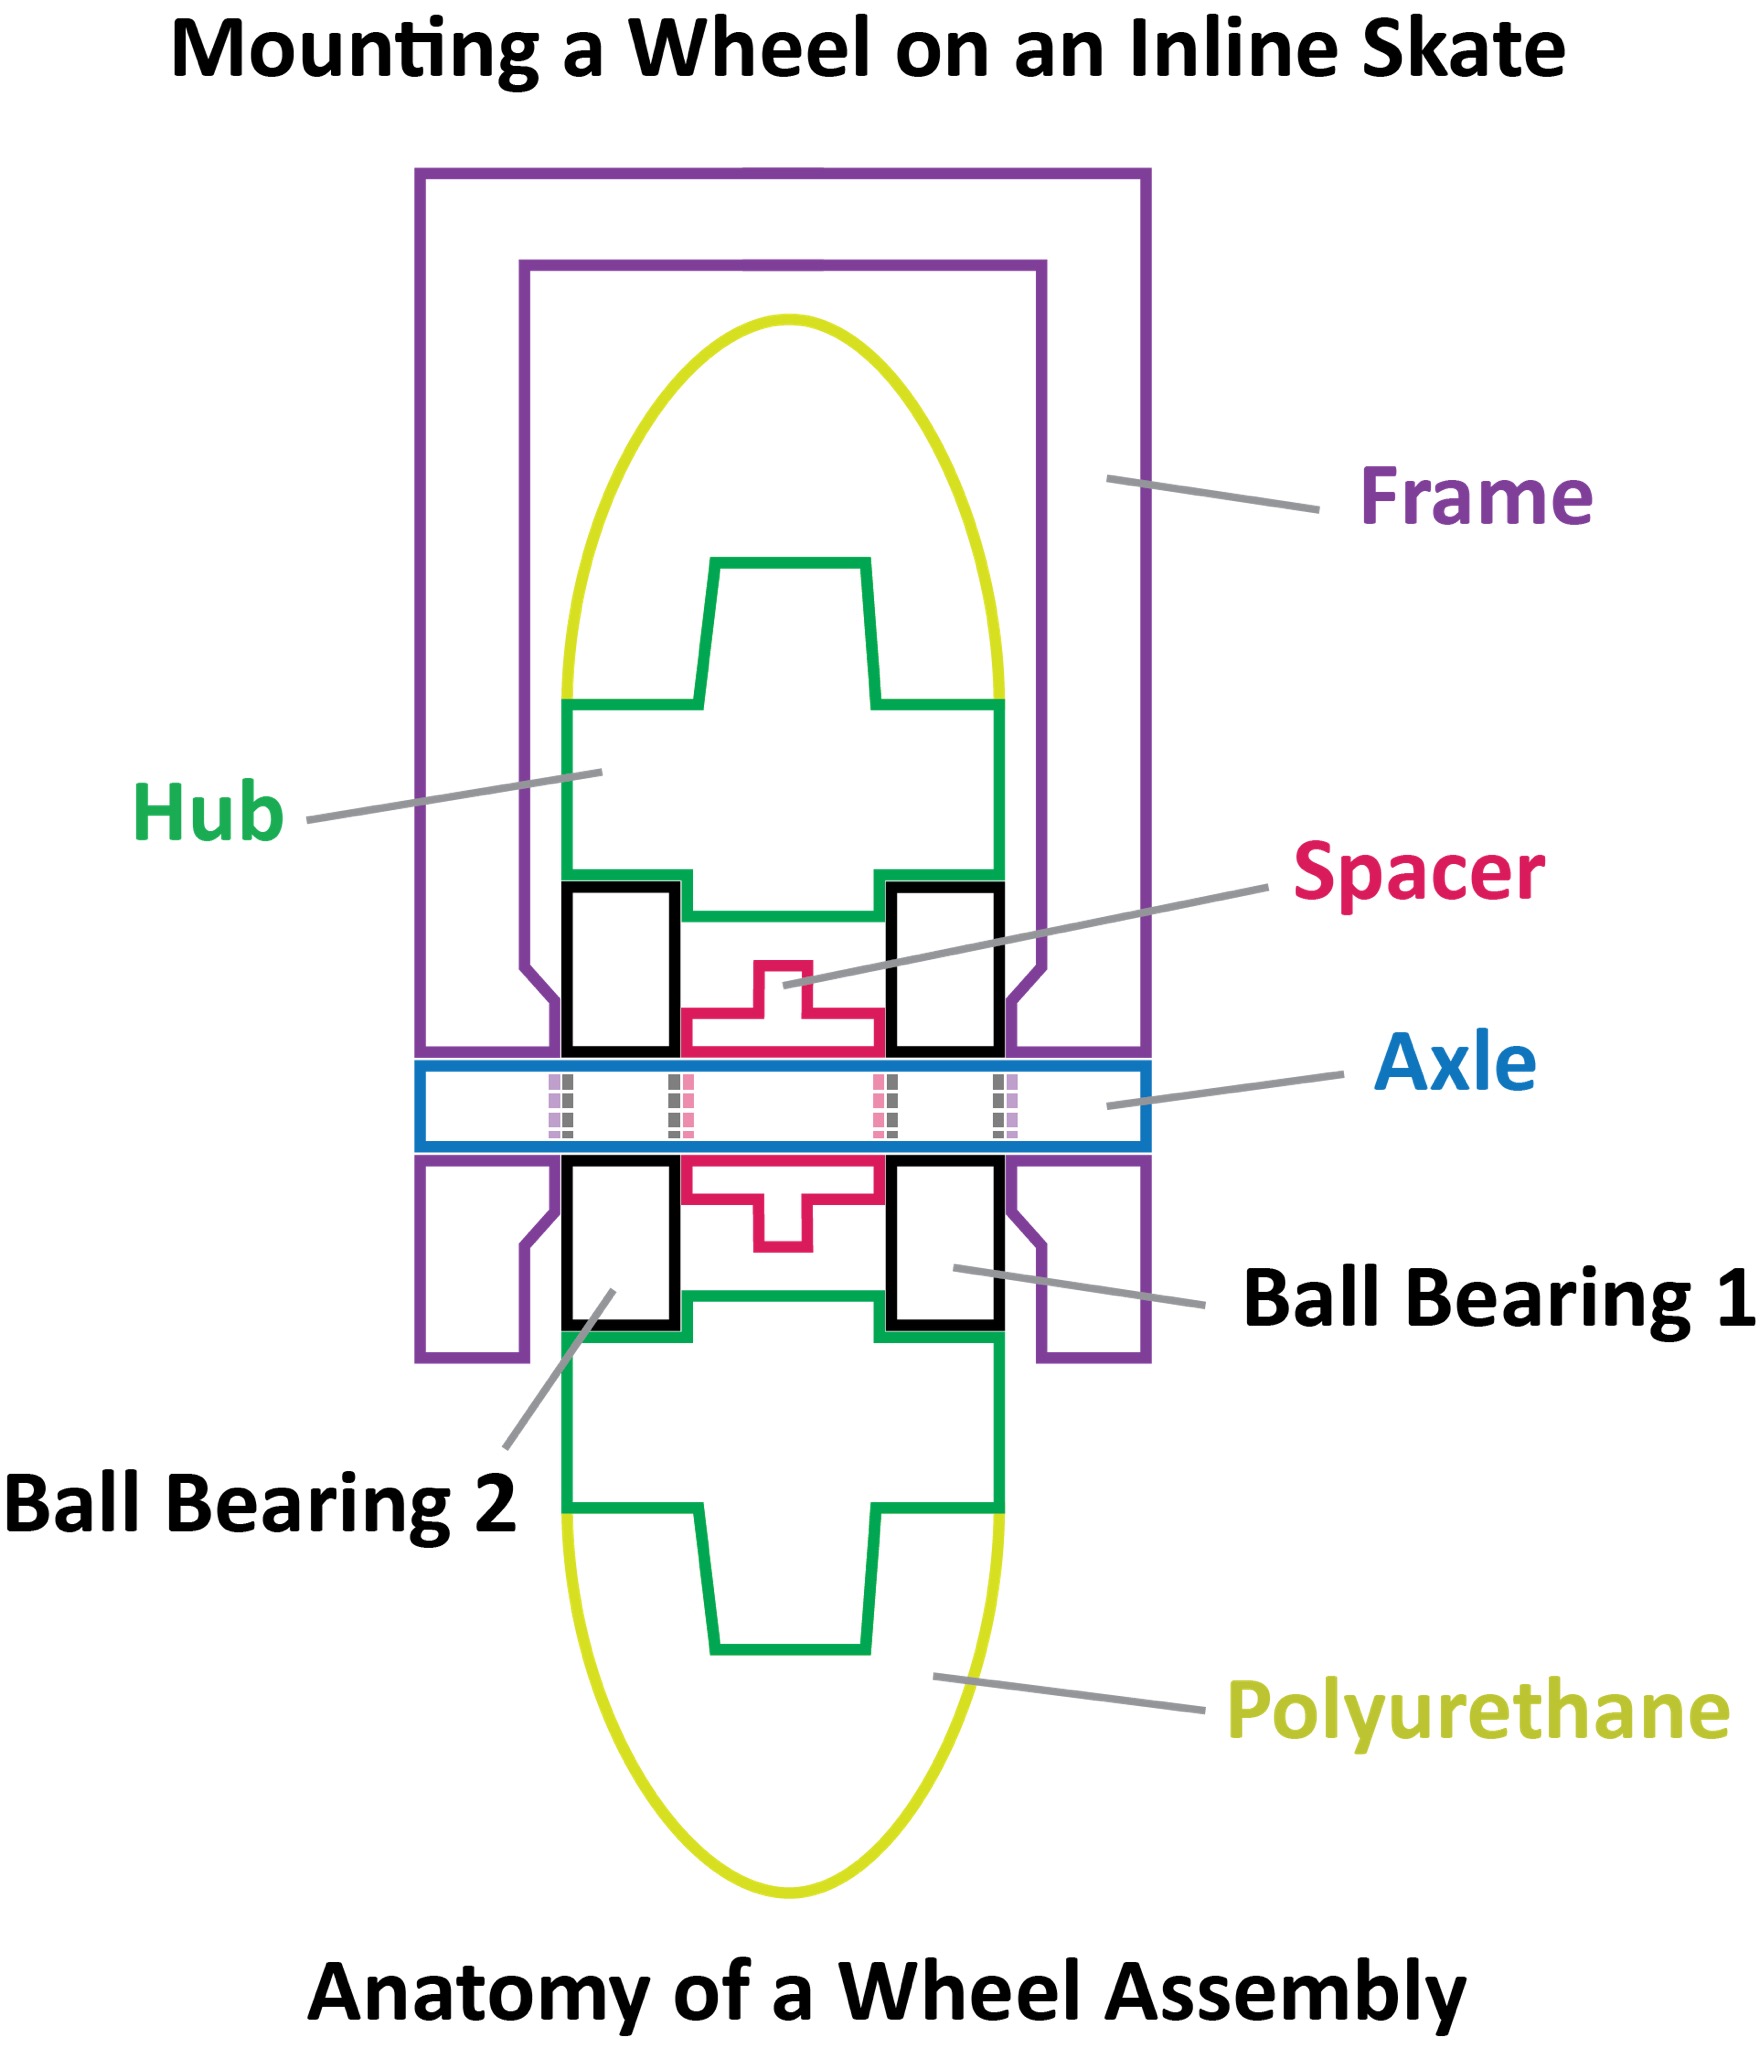
If we shine an X-ray on the bearings, we then expose additional components. Each bearing includes an inner race, a bunch of balls, and an outer race. The bearing assembly is covered on two sides by shields. The outer race abuts the hub in a “friction-mount”, also known as “press fit”. That means that the outer race becomes physically a part of the wheel hub, and rotates with the hub. The axle bolt is threaded into a side of the frame. The inner race abuts the spacer, the axle, and the frame. You would use a wrench tool to screw the axle bolt into the other side of the frame, until the bolt stops turning. This cages the wheel in between the two sides of the frame.

Bearing spacers and preloading
If you are like the version of me from a few weeks ago, you may believe that the inner race should spin freely around the axle bolt. After all, the axle bolt looks perfectly tubular and smooth. What is it for, if not for spinning bearings around it?
But it turns out that that is not how skate bearings ought to work. You actually screw the axle bolt tight, such that the two sides of the frame pinch the two bearings tight. And the bearings in turns pinch the spacer immobile. More specifically, each side of the frame has a washer-like protrusion which pinches only the inner race part of a bearing. And this inner race part is what abuts and pinches the spacer immobile. When done right, the axle bolt causes the two inner races and the spacer to become transfixed with the frame itself.
The illustration below colors all parts thus immobilized in pink. The only things spinning are the hub and polyurethane tire. Actually, the balls inside the two bearings also spin. These balls should be the only moving parts in between the hub and the frame. Nothing else in the wheel assembly shall move.
The job of the axle is thus not that of a axle around which something spins. The job of the axle in a skate wheel assembly is that of a bolt. This bolt may as well have a square cross section instead of a circular one. And it would still work. In fact it would do its job even better. This pinching function is known in the bearing industry as “preloading” bearings.
So, what if you don’t screw the bolt tight? What if you let the inner race spin around the axle? After all, you paid for this perfectly spinnable axle. Why not take advantage of it? Maybe you will make the wheel spin even better, by adding two more rotating actions, from those two inner races of the two bearings? While we are at it, why don’t we make the spacer spin around the axle too?
You can try this yourself. Just turn an axle bolt loose, and see if your wheel spins for longer. What you will find is that, now the spacer rattles, and the inner racers skid too. If you try to skate this way (don’t – it’s dangerous), your wheels will be making lots of noises. It’s because the clearance gap between the axle and spacer/inner races is fairly large. The entire wheel will also bounce left to right within the frame. All of these rattling, bouncing and skidding only do one thing, other than making noises – they turn the rotational energy in a spinning wheel into heat, and slow it down. This is why “preloading” bearings is a thing.
In order to achieve the most efficient spin, the width of a spacer should be identical to the middle bump in the hub. So, what happens if a spacer is too long?
With a long spacer, you will not be able to push two bearings completely into the hub. If you are lucky, your bearings are installed fairly straight, parallel to each other. They are seated upright, matching the orientation of the wheel hub. But there will be gaps between outer races and the middle bump in the hub. You will still be able to pinch inner races and the spacer immobile, achieving proper preloading. But as you skate on this setup, this wheel may shift sideways.
A spacer that is too short is a big issue, however. If you screw the axle bolt in, only until the wheel stops being able to bounce between sides of the frame, then you have not achieved preloading. The middle bump in the hub stops the outer race from being pushed further in. This is why you feel a light resistance turning the axle bolt with a wrench. But the inner races do not yet touch the spacer – recall that the spacer is too short. Thus you effectively have a loose bolt, and the whole thing rattles as you skate.
If you are determined to achieve preloading, you then force the bolt to go further in than normal. You will deform the bearings as you coerce the inner races further in. At some point, you will transfix inner races and the spacer, to the frame. But the shields and cages of bearings would be so deformed that the balls no longer spin well. And thus the hub is now locked up, and turned into a transfixed part of the frame as well.
This is what happens to folks who don’t even know to use spacers. Some install bearings onto wheel hubs without spacers at all. Their wheels will barely spin when axle bolts are tightened. Then, puzzled skaters would loosen axles, until wheels start to spin again. But this is quite dangerous, because these axle bolts may be shaken loose as one skates, and eventually drop out completely when one least expects.
Factory bearing spacers too short
Reign Ares 100 came with Powerslide Trident wheels. These are indoor wheels, so I never skated on them. But I did notice that 2 out of 6 wheels didn’t spin well. They only free-spun for half the time, compared to the rest 4 wheels. If I loosen axles on these two wheels, then then spun almost as long as everyone else. This prompted me to dive into the art of spacers, a rabbit hole. And the result was the preceding paragraphs.
So now I know these factory wheels were installed with some spacers that were too short, for this particular Wicked bearing / Trident wheel combination.
There are no perfectly-machined parts
Just a month ago with my new Powerslide Tau, as reported in Big Wheels on Carbon Hockey Skates, I had sheer luck stumbling across the right combination of cheap Bones REDS bearings, good Undercover Team Blank wheels, and some random floating spacers I found in my bag of spare parts. I installed these bearings by hand without a bearing press at that time. I slotted these wheels onto an Endless frame, and turned the wrench tool on each axle until it refused to turn anymore. Despite all kinds of opportunities for screwing up, I ended up with perfectly spinning wheels that refused to stop when spun by hand. And the pairs of skates worked like a dream on biking trails. For the first time in my skating life, I could coast on street skates as if I were on ice.
This is when expert caution that freely-spinning wheels mean nothing. It’s their performance “on load” that counts. I agree, of course. A wheel that spins well without load doesn’t always spin well on load (aka when you skate on them). On the other hand, a bering with contact seals packing heavy grease doesn’t spin well without load. But I also know better now. I am using a Swiss-style bearings packing light oil. If a wheel with these bearings can’t even spin well without load, then you should never bet on it performing well, when you take the trouble to lace your skates and skate on them.
I have a hunch that those random spacers were the common Powerslide Aluminum 10.2mm spacers. So I order a bunch of them this time, with the same cheap bearings, good wheels, and the same Endless frame. As an insurance, I ordered a bunch of wider spacers just in case I needed them: Sonic Floating 10.3mm, and Powerslide Black 10.35mm.
I can’t vouch for the accuracy of my caliper. But the 10.2mm spacers consistently measured around 10.23mm, plus or minus 1mm. Both Sonic 10.3mm and PS Black 10.35mm consistently measured 10.33 plus or minus 1mm.
I tried to find out which of these two spacers (10.2mm or 10.3mm) gave me consistent flush bearing mounts in the wheel hub. I could not find a consistent pattern. To be sure, 10.3mm almost always yielded a raised mount. More often than not, 10.2mm gave me a flush mount. But sometimes 10.3mm produced a flush mount, and 10.2mm a recessed mount.
It dawned on me to take a look at the wheel hub. While unseating bearings from the hub, I found injection molding debris trapped in the unshielded side of a bearing. This now prompted me to always inspect and clean up the hub hole, before I install any bearings on a hub. Looking at all of the imperfections left by the injection molding process, and by the manual cleaning of injection molding artifacts, I am now amazed that the resulting mounting variations were so small.

So, now I know. Even with wheels, bearings, spacers and frames of the same brands, one isn’t going to get consistent experiences and results. There are too many components involved. Even if all of them are each made to very small tolerances, the gross variation on each axle will still be significant. A perfectionist will have to find the right spacer width, for every single wheel.
Finding the perfect spacer for the best spin
Simply start with a short spacer, and mount the wheel. If it doesn’t spin freely forever, then try a wider spacer until it does. Use a wrench tool to tighten an axle bolt, until it stops turning. Then loosen it counterclockwise for a full turn. Now, spin the wheel, and listen for noises. Re-tighten the axle slowly until rattling noises turn into a whispering white noise. Usually the bolt will stop turning almost immediately after this happens. When perfected, the only noise you hear is mainly produced by the air spun by hub spokes.


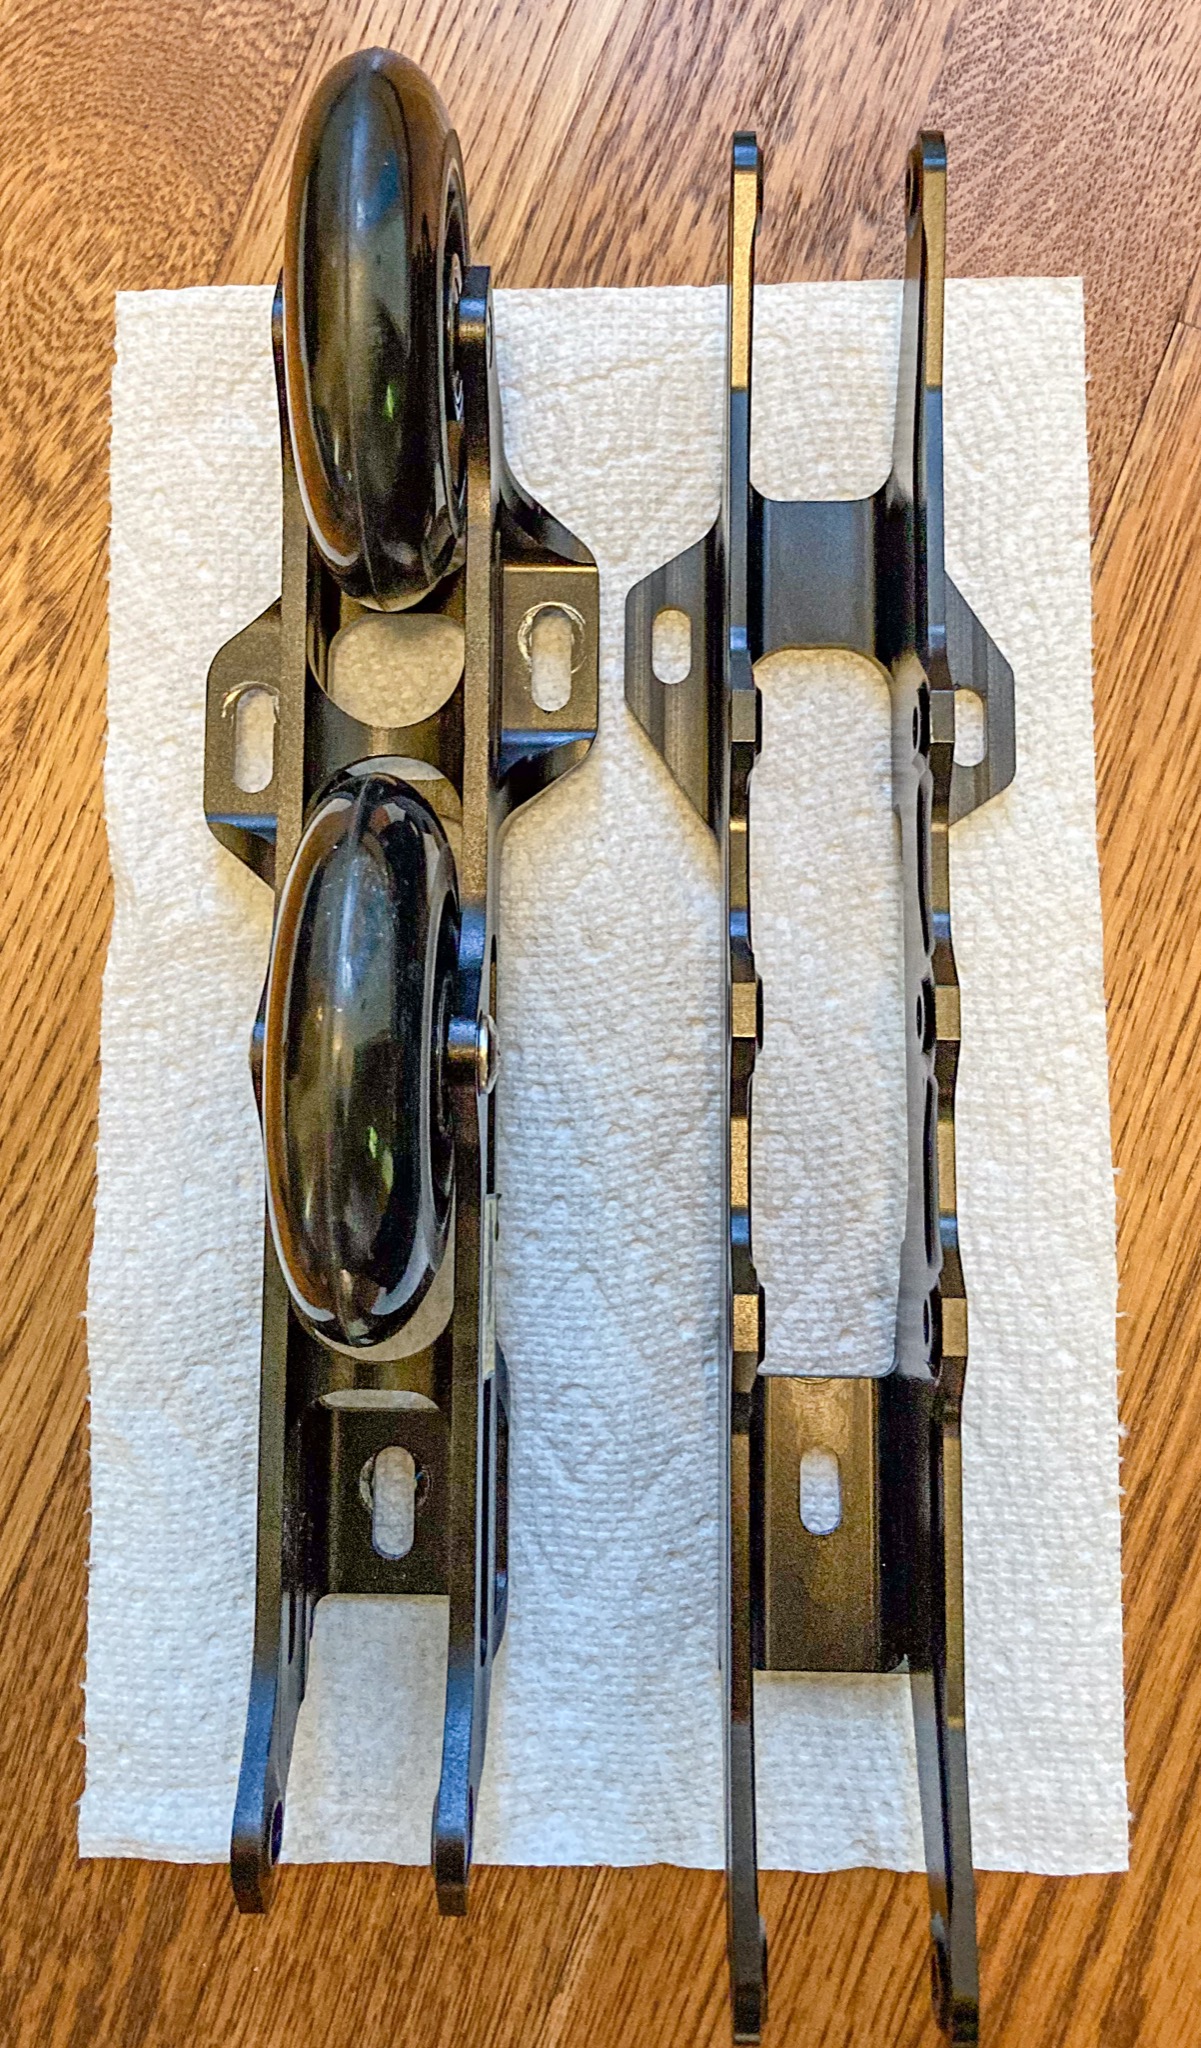
Even the best frame can’t guarantee consistent gaps between built-in washers for each axle. I found that the same wheel will slide into a washer pair more easily than other pairs. I think the sides of a frame are designed to yield a little, to account for these small variations, and to accommodate the wide variety of wheels and bearings you may end up buying and using. I was able to tighten every wheel just fine after all.

Compared to the factory Ego SL frame, the Endless frame is made to a much higher precision. The built-in frame washers are just slightly smaller than the inner race of bearings. It perfectly squeezes just the inner race, applying preloading pressure on the whole axle assembly. The wheels too, need to be made to a high precision. See the tiny clearance between the polyurethane and the washers of unused holes on the Endless frame.

Learning from shredders
It turns out that the skateboarding community do pay close attention to the issue of spacers. There are quite a few detail-oriented videos on spacers and preloading, from this community. There are people measuring spacers with a caliper, like I just did. I wish I had searched for information in shredder forums earlier. Here are two videos that I found particularly useful.
Adjusting frame placement and orientation
Trinity mount allows for fairly large amount of adjustments in the X-Y plane of the sole. The forward and backward movement of a frame is enabled by the three oblong holes on a frame. The sideway movement is enabled by the metal mounting nut encased inside each of the three mounting decks on the sole of a boot.
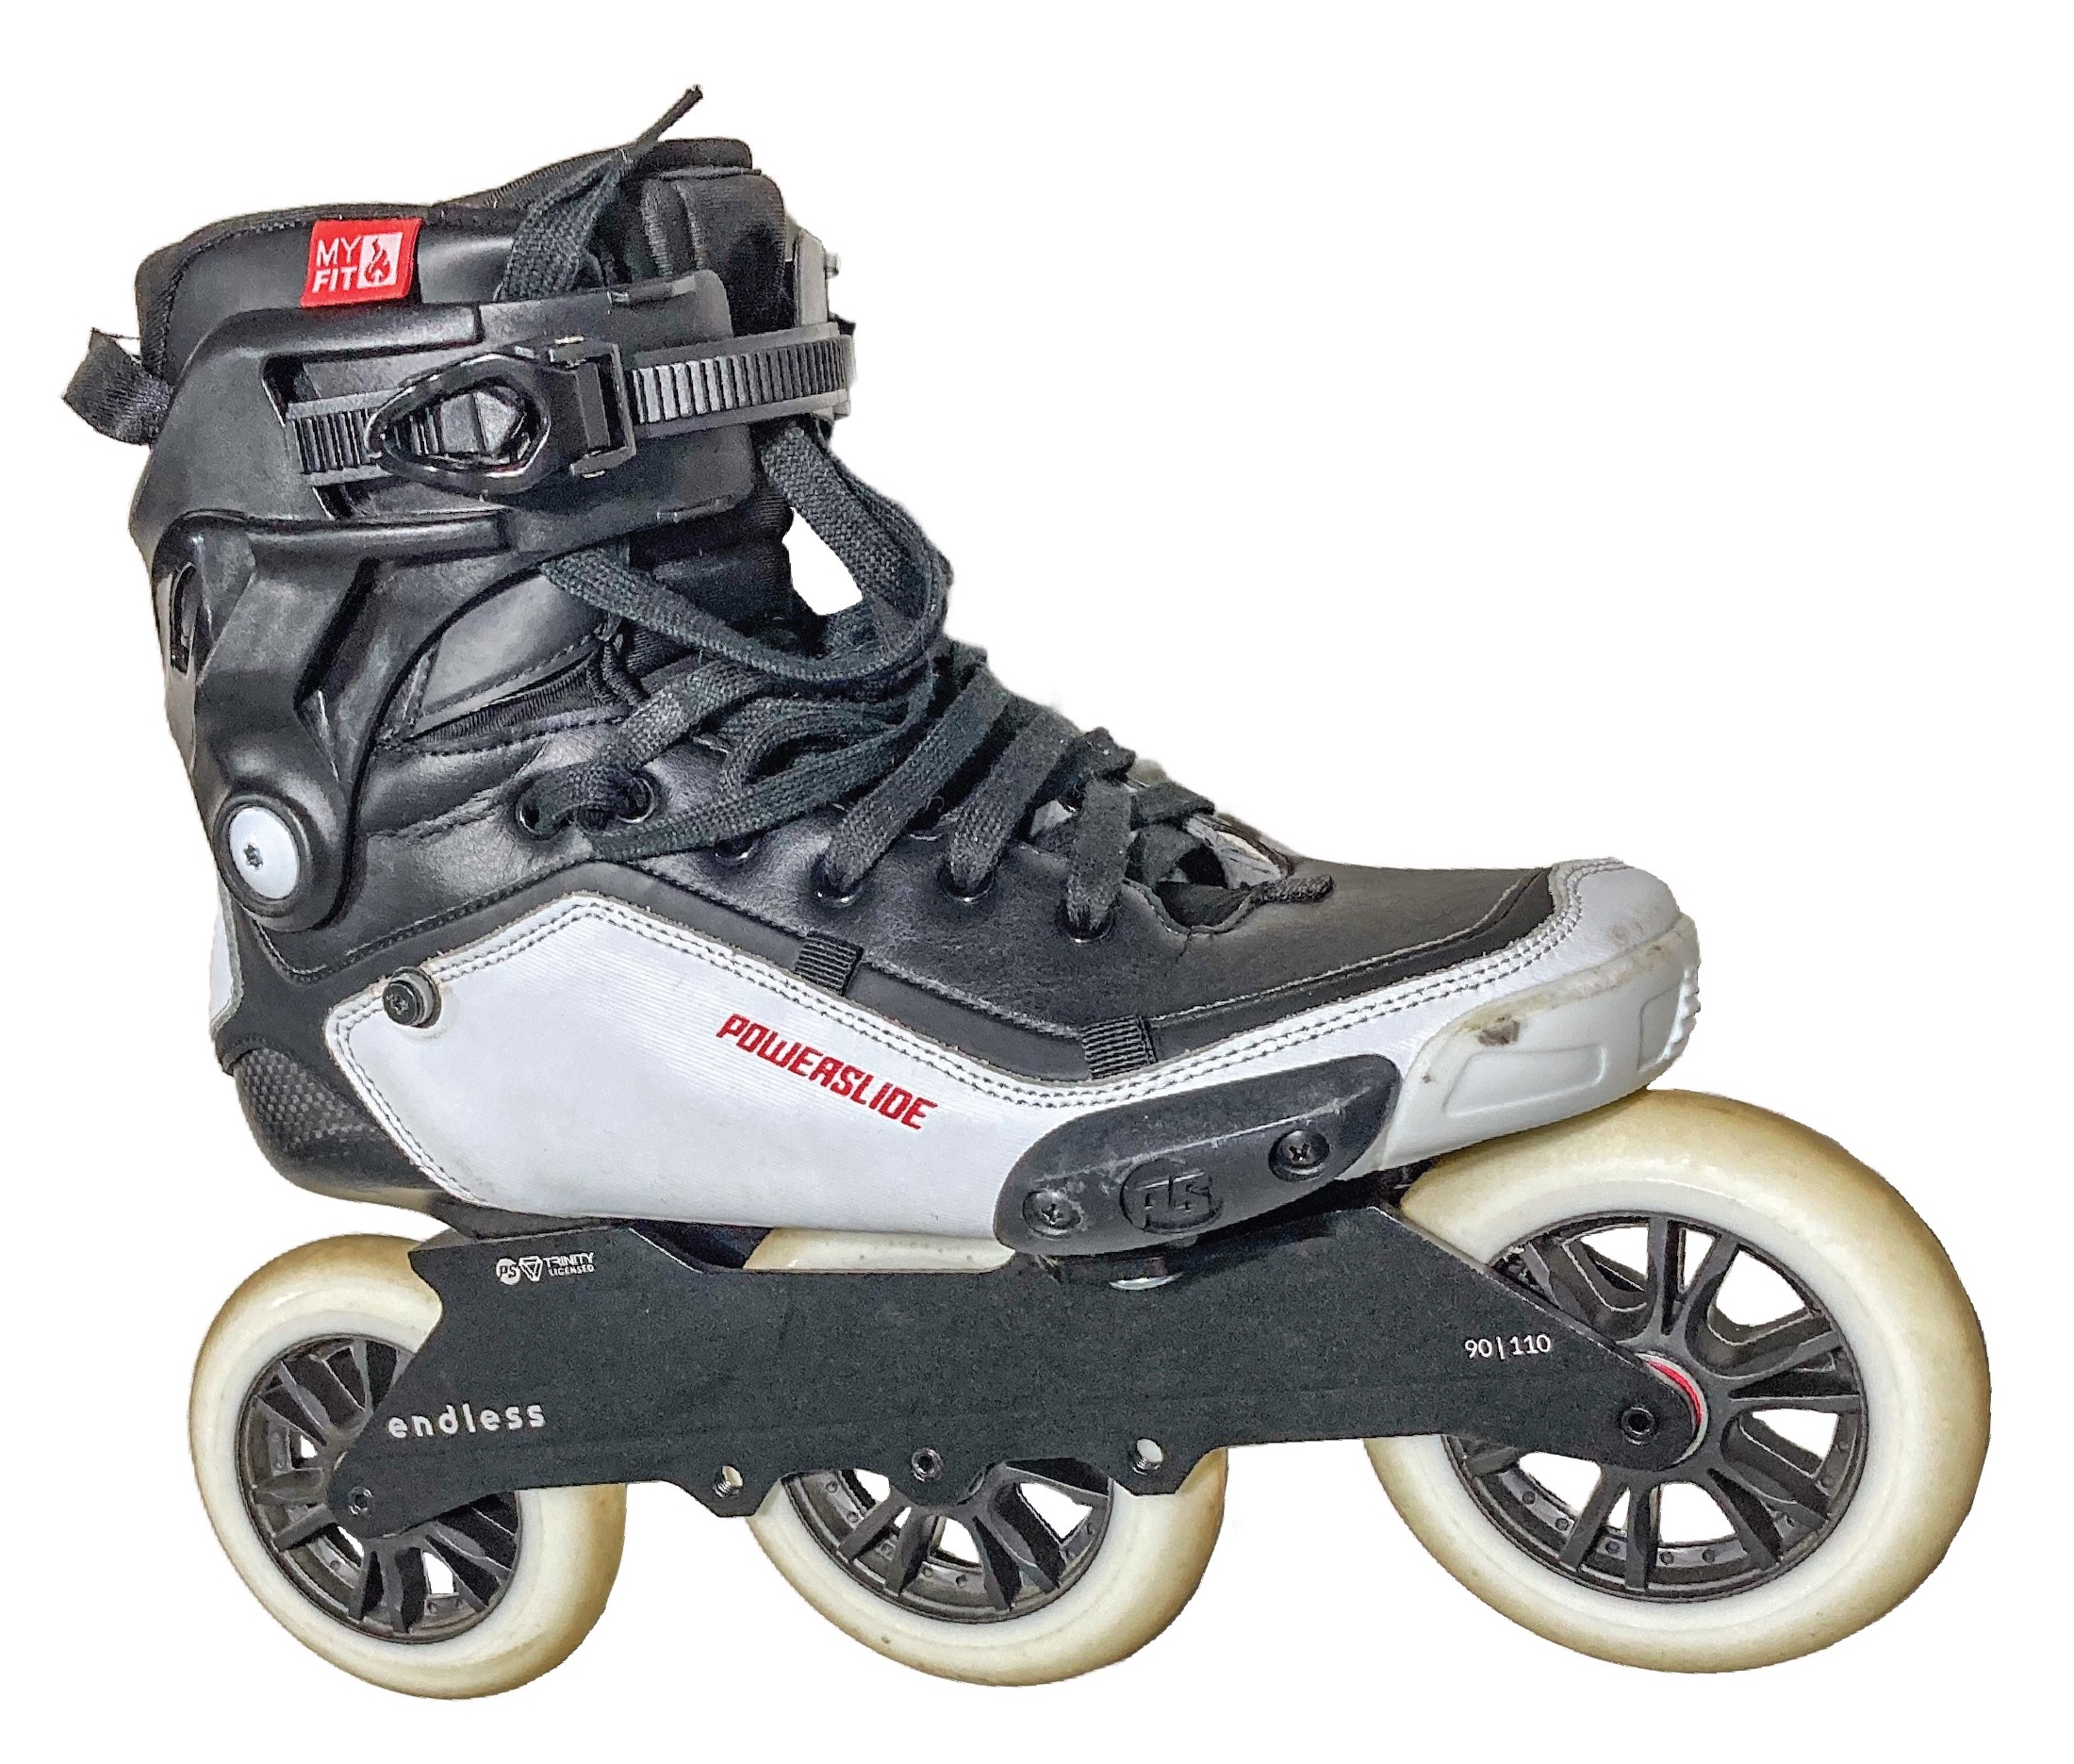
I don’t have a picture of the sole of Reign Ares without a frame. I have by now found the perfect placement and orientation for frames on my Ares skates. I am not going to remove these frames just to take a picture of the bottom sole. See the picture of Tau instead, above. The sole of Ares is identical to that of a Tau, including the two venting patches.
Both Tau and Ares sport the Trinity X mounting system on the boot. Trinity X means wider slot (X-slot) for the metal nut to move sideways, compared to classic Trinity decks.
This freedom of movement in all three mounting bolts allows precise placement and orientation of each frame, based on your needs. But if you are like me from a few weeks ago, you would attempt to get perfect placement and orientation, at home, by trying to stand on your skates. You would stand on it, and assess the inward or outward pronation. Then you would move the frame inward, if pronating inward. You move the frame outward, if you pronate outward.


Don’t do that.
Terse and confusing instructions on frame adjustment
Most people unfortunately go by the terse instruction that came with their Powerslide skate, designed for absolute beginners. The frame adjustment guide tells you to move frames inward, if you pronate inward.

This way of adjusting the frame may work for some people, especially for beginners who cannot yet glide on a single skate. Beginners almost always pronate inward, on two skates. This recommendation may make a beginner feel better, but is really like crutches. This adjustment doesn’t fix the root cause of a beginner’s pronation. I think Asha explains it best:
She recommends that one not blindly follow these basic instructions for beginners. That is, don’t blindly move frames to compensate for beginner pronation. Instead, they should first learn to skate and glide without pronation, before they can adjust frames to their advantage.
Adjusting frames based on single-skating gliding
In my mind, the purpose of frame adjustment is to give me the ability to glide on a single skate, in a straight line, for as long as my best spacer choices allow my skates to free-glide. In order for this to happen, the frame needs to be upright, with respect to the straight line formed by my leg, my knee, and my ankle, WHEN I balance my whole body on a single skate.
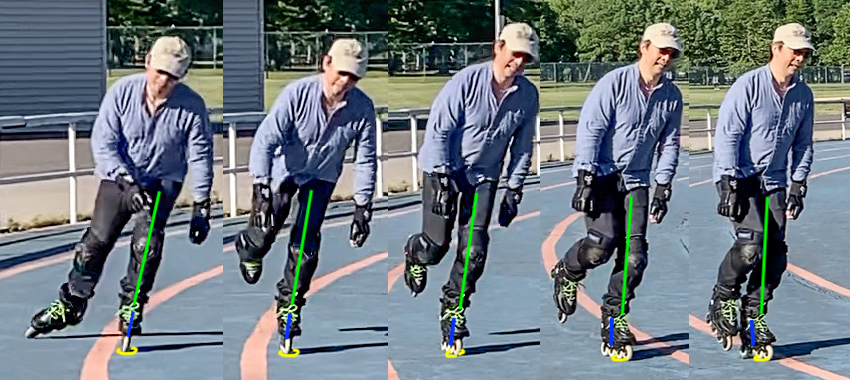
For someone who can glide on a single skate, the frame adjustment recommendation should be opposite of that printed on the Powerslide user manual. I can’t say this is universally true for everyone who can glide on single skates for an extended period of time. But I find this to be true for me.
Take the picture above. Say I am gliding on the left skate as pictured. Imagine that I freeze my posture midway, maintaining the gliding stance illustrated by the middle skater, and glide for 5 seconds. With a properly set-up skate, I can glide with an upright skate. If I find that my left foot must pronate inward in this extended glide, that means my body is consciously shifting body weight to compensate for a non-centered frame on my left skate. Contrary to the beginner instruction, I need to move the frame outward.
This means that you should carry the wrench tool that came with your skates, when you go out to skate. You have to adjust your frames at the field, not at home.
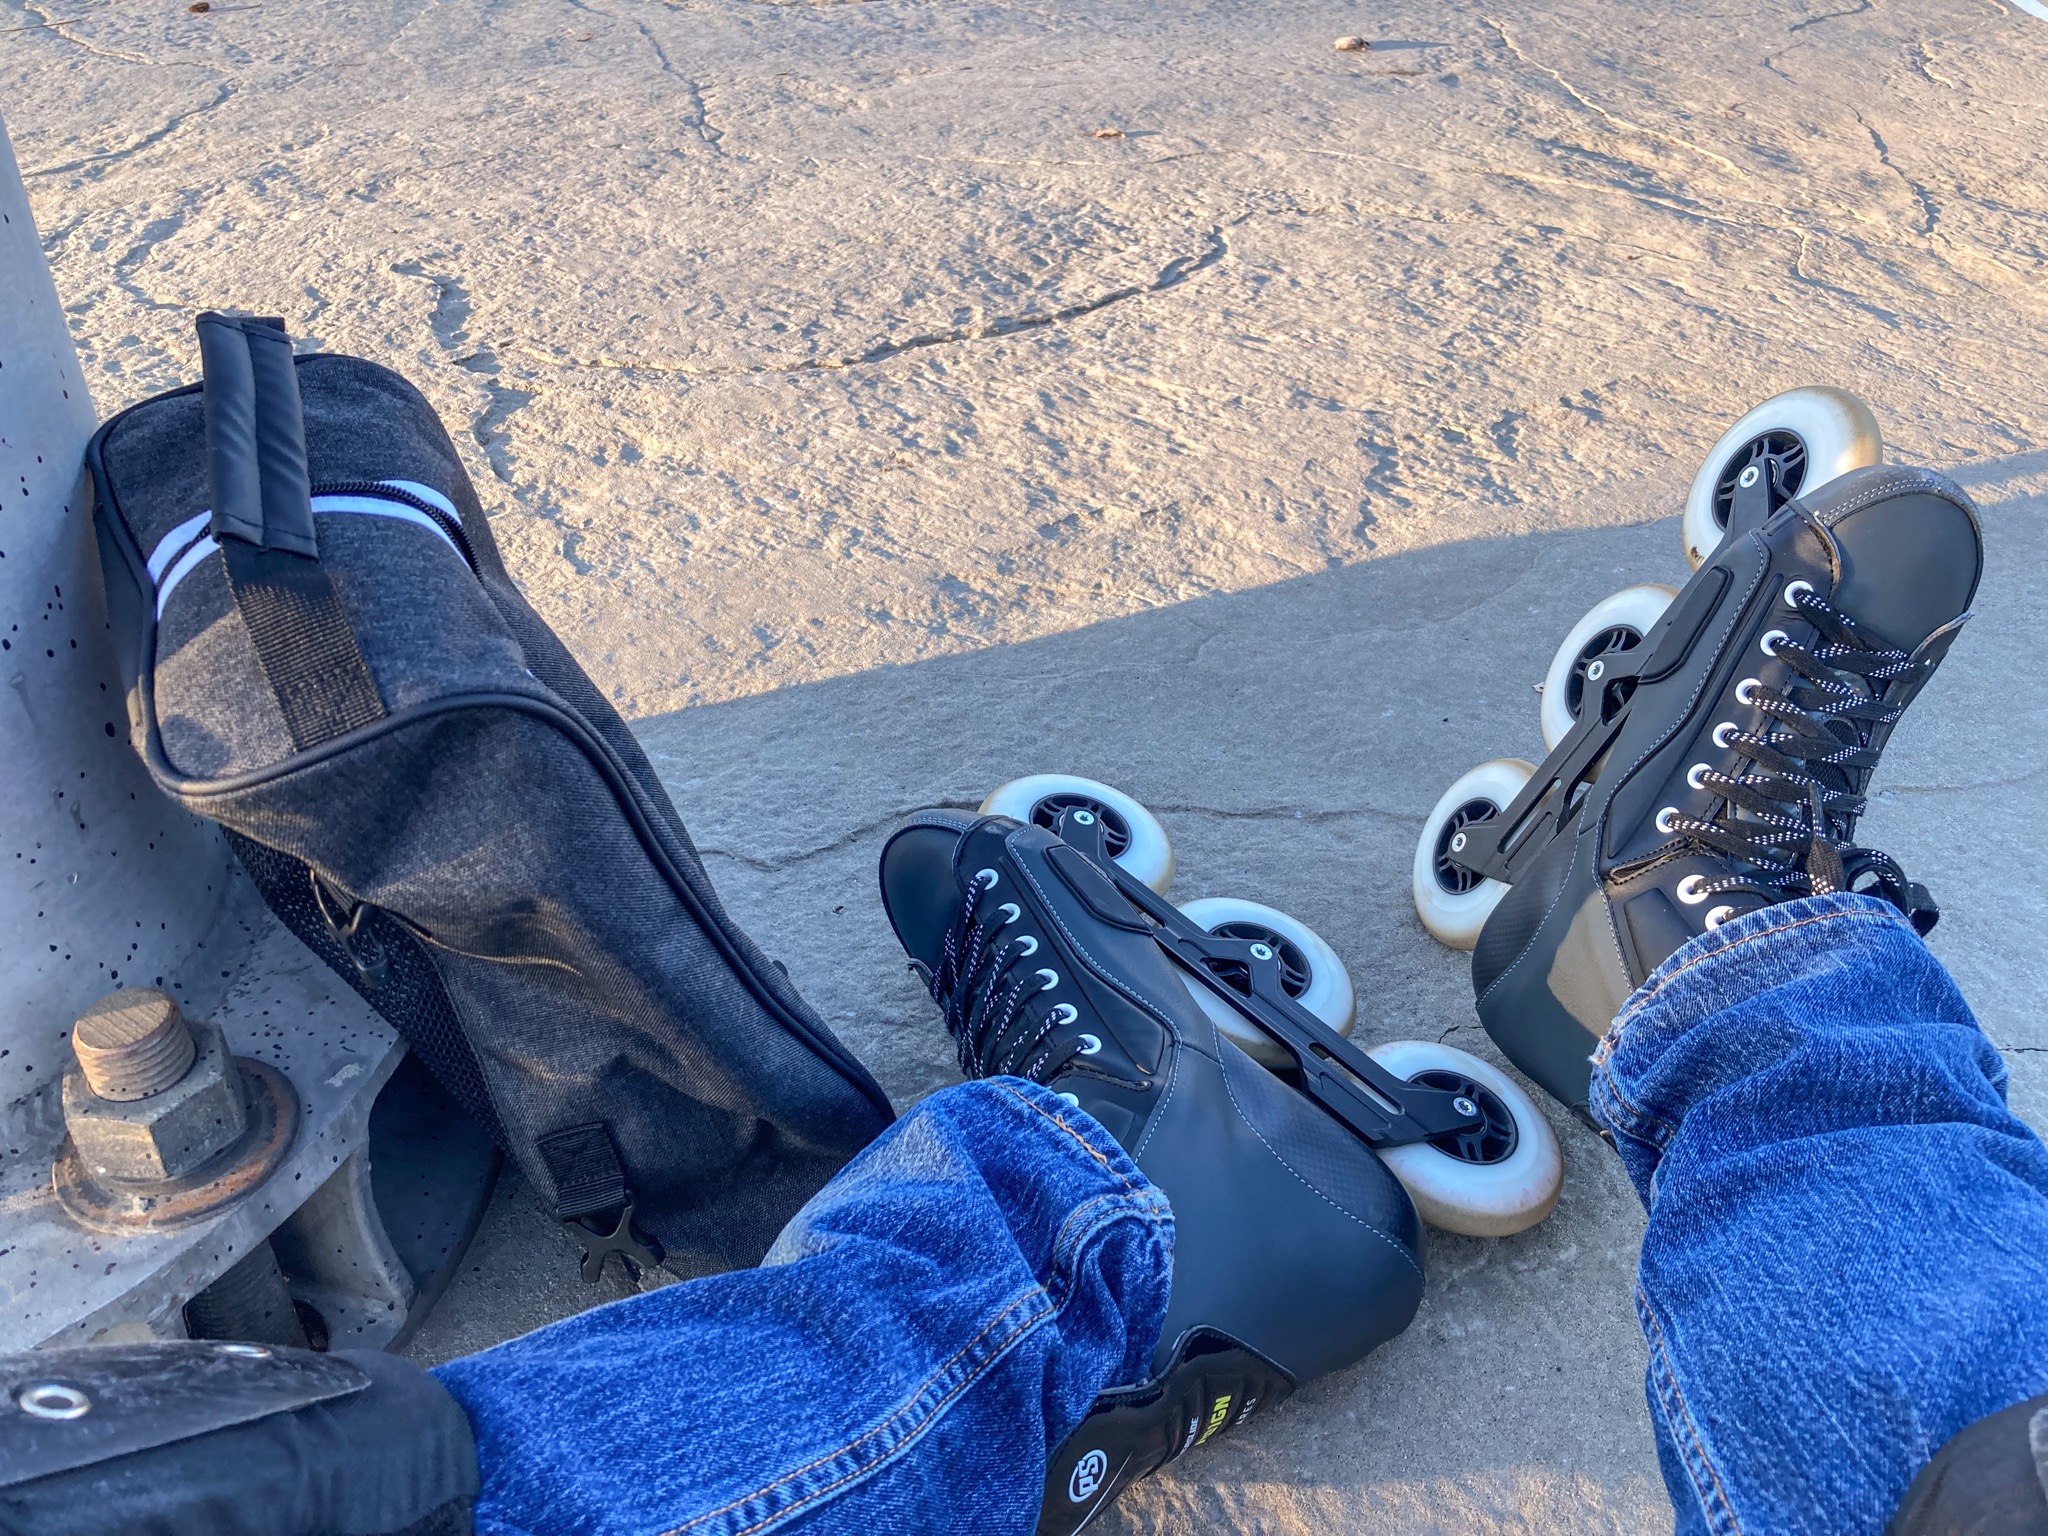
I move frames all the way to the back of boots, as you can see from pictures shown below. That’s just me. I hear that having the frame shoved all the way forward gives you better strides.


Lastly, there is the issue of frame orientation. I found that orientation adjustment became more straightforward, if I first focused on getting the sideway placement of frames right. That allowed me to glide on an upright skate. Then, I assess my single-skate gliding. If I tend to glide outward, then I pivot the frame inward a bit. If I glide inward, then I pivot the frame outward.


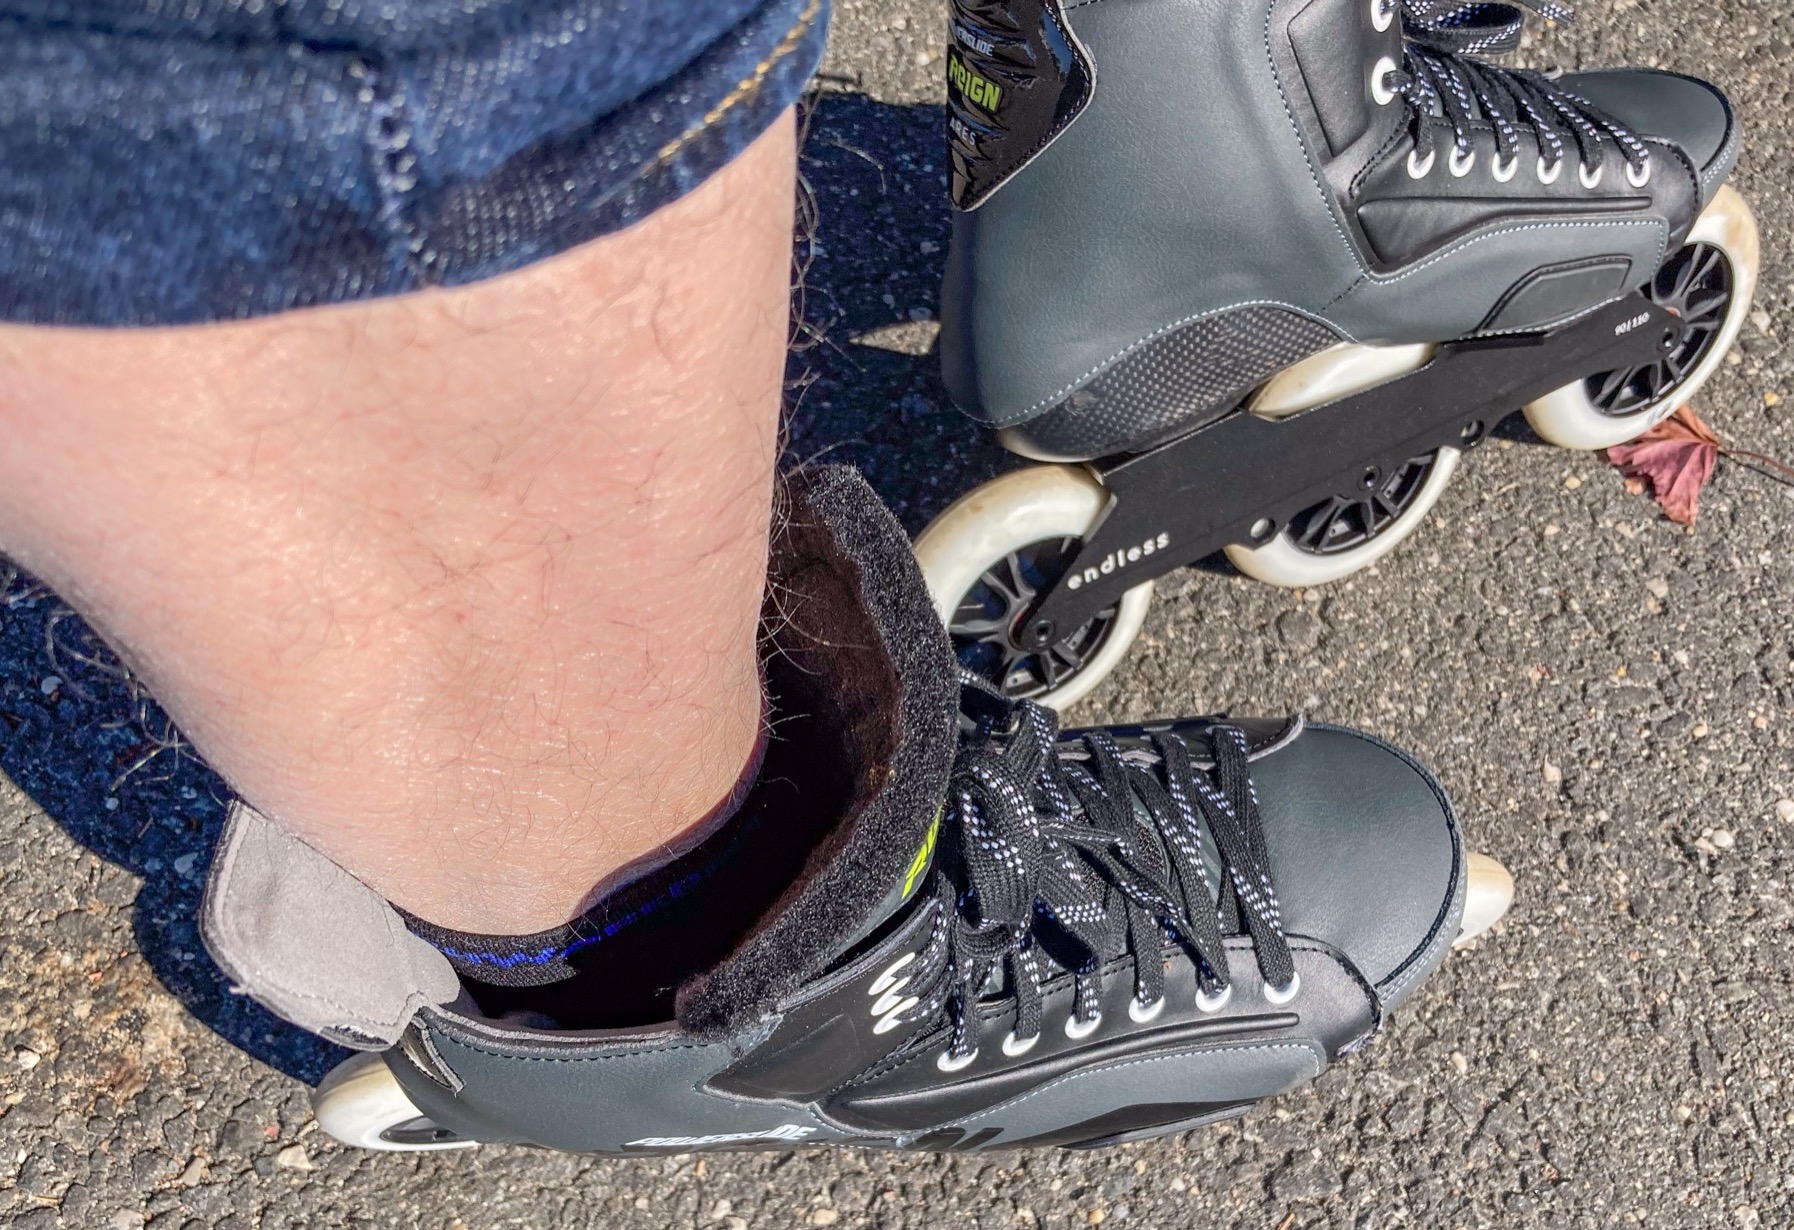
Blisters and loose cuffs
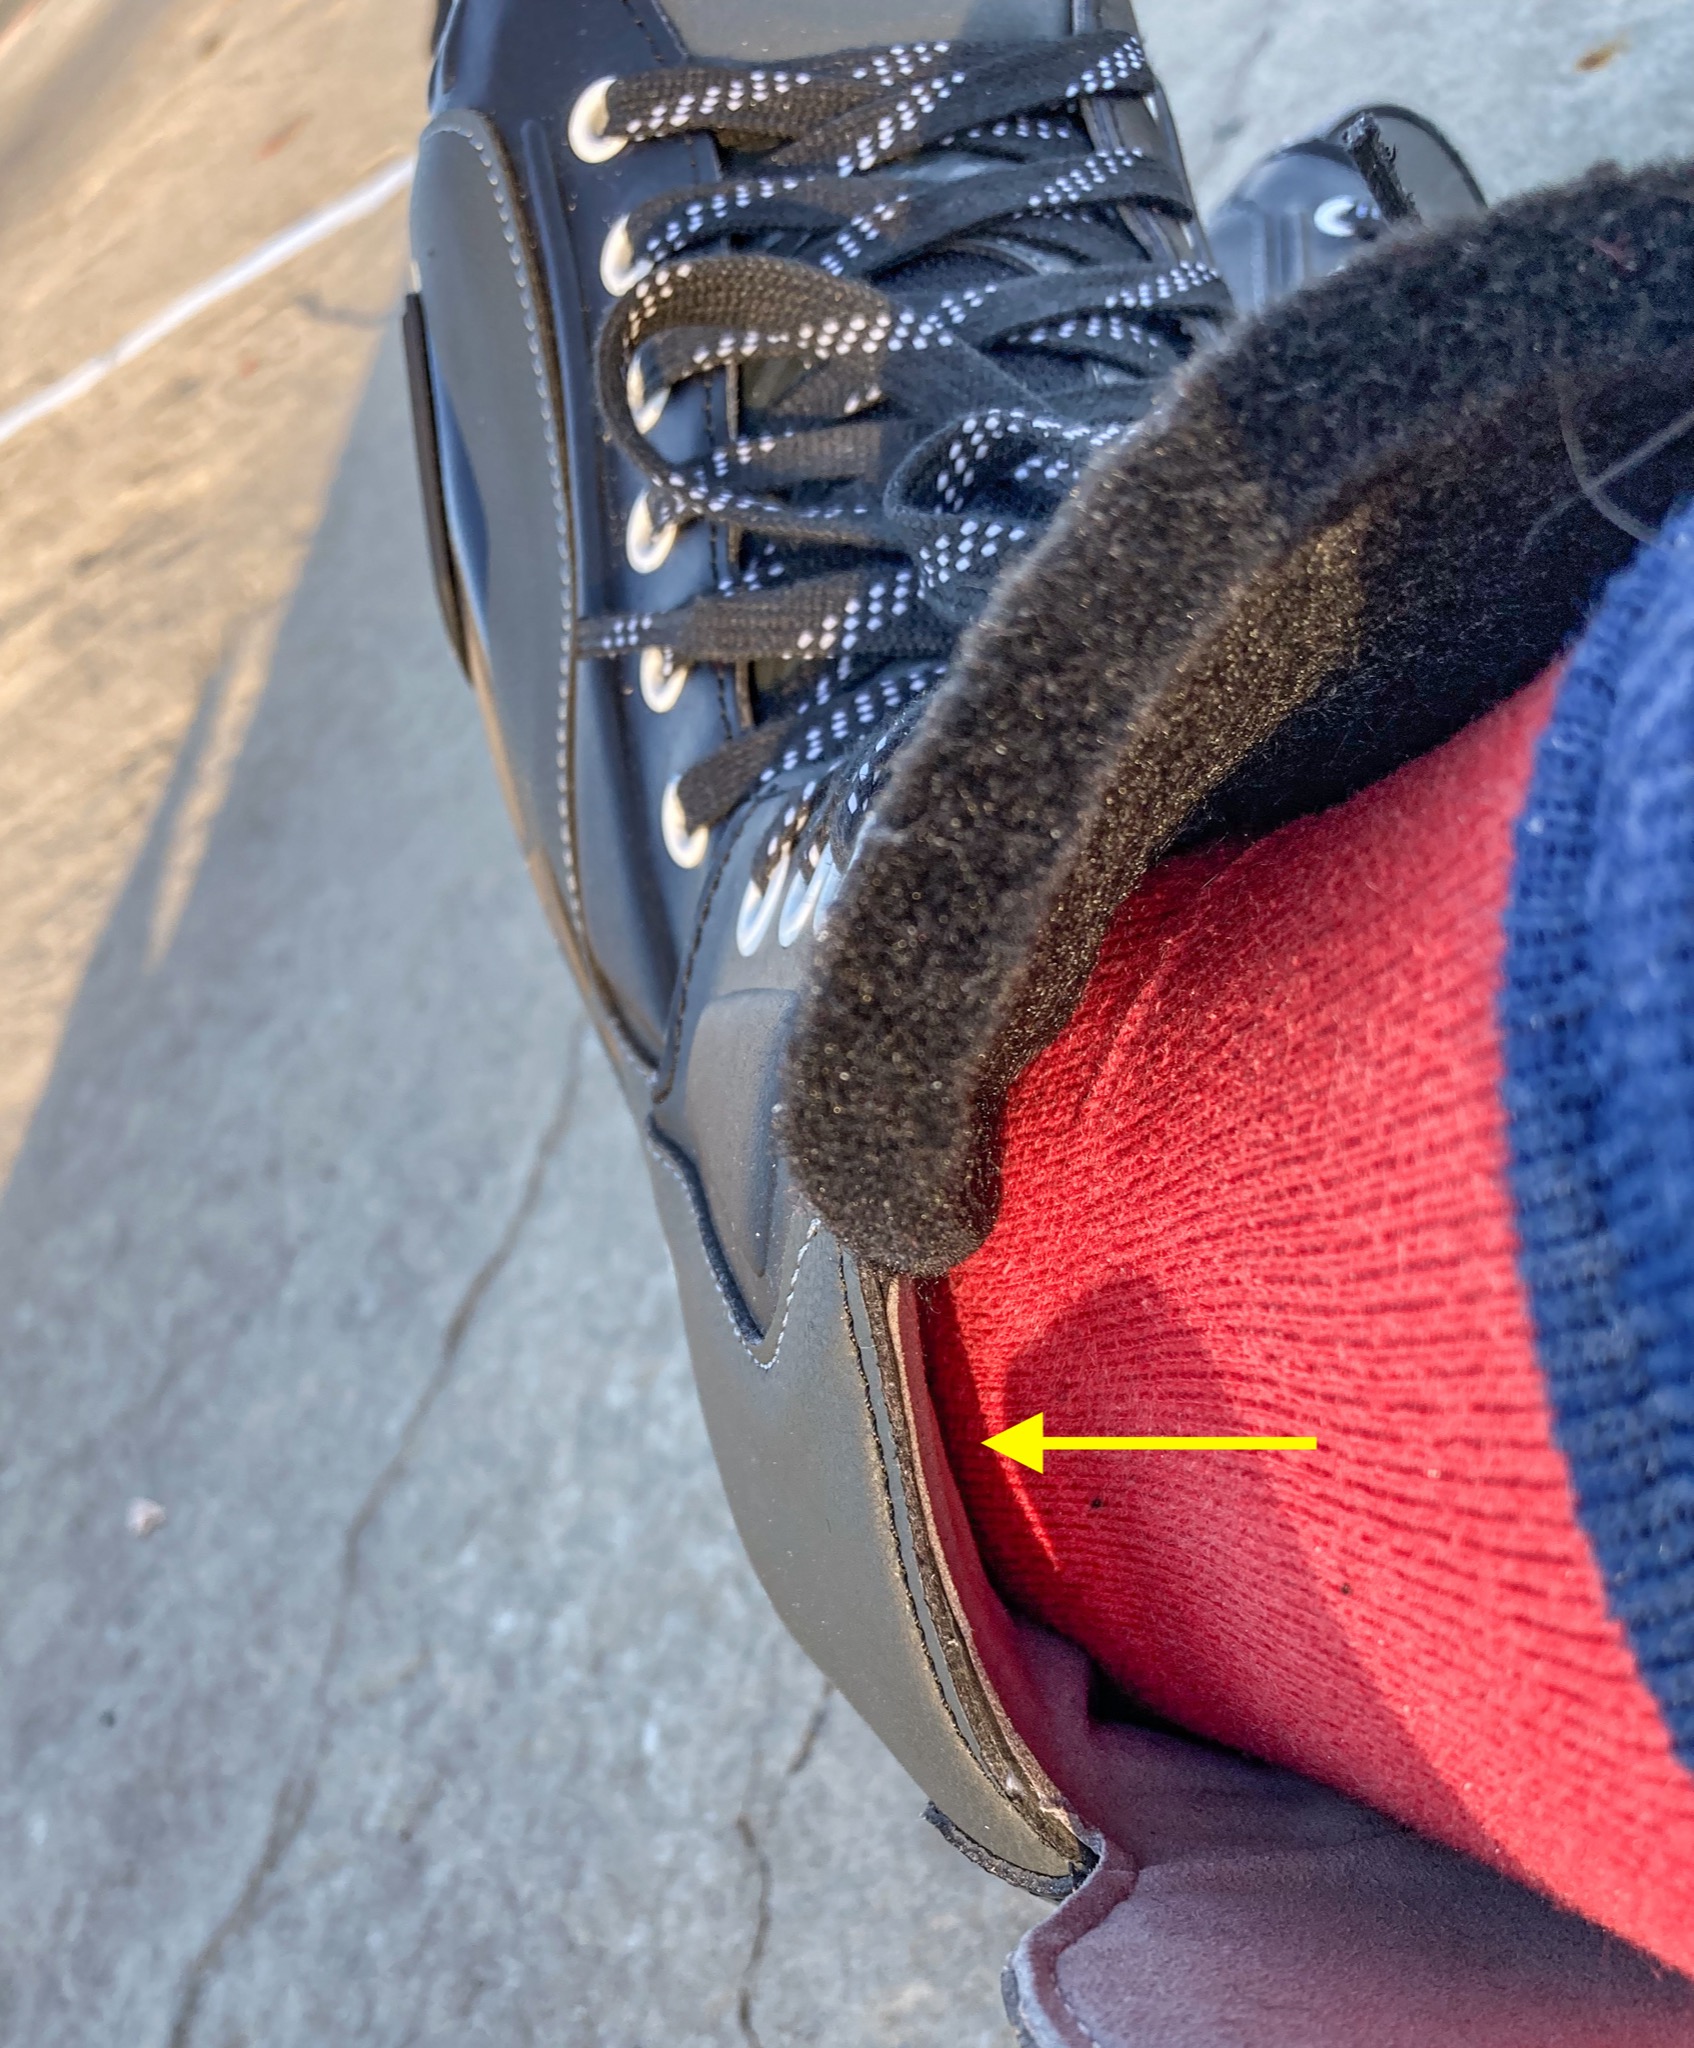
Unlike my immediate prior experiences with the Tau, I encountered no pressure points, skin chafing, or blisters around the usual suspects (bunions and ankle bones), with Reign Ares. However, after I skated for an hour on Ares, with well-adjusted frames, I came home to find plasma pooling on two new spots on my feet. They were minor and not painful. They were not yet full-blown blisters. Thus I had no idea they formed until I got home and took off my socks.


This is a type of blister I’ve only heard before, from other skaters. I’ve never gotten blisters on these spots before. The two blisters happened to the same inside spot, on my two feet.
Ignore bruised areas around and immediately below ankle bones – they were scars left from severe blistering from Tau. I also fixed my Tau. But that’s for another article.
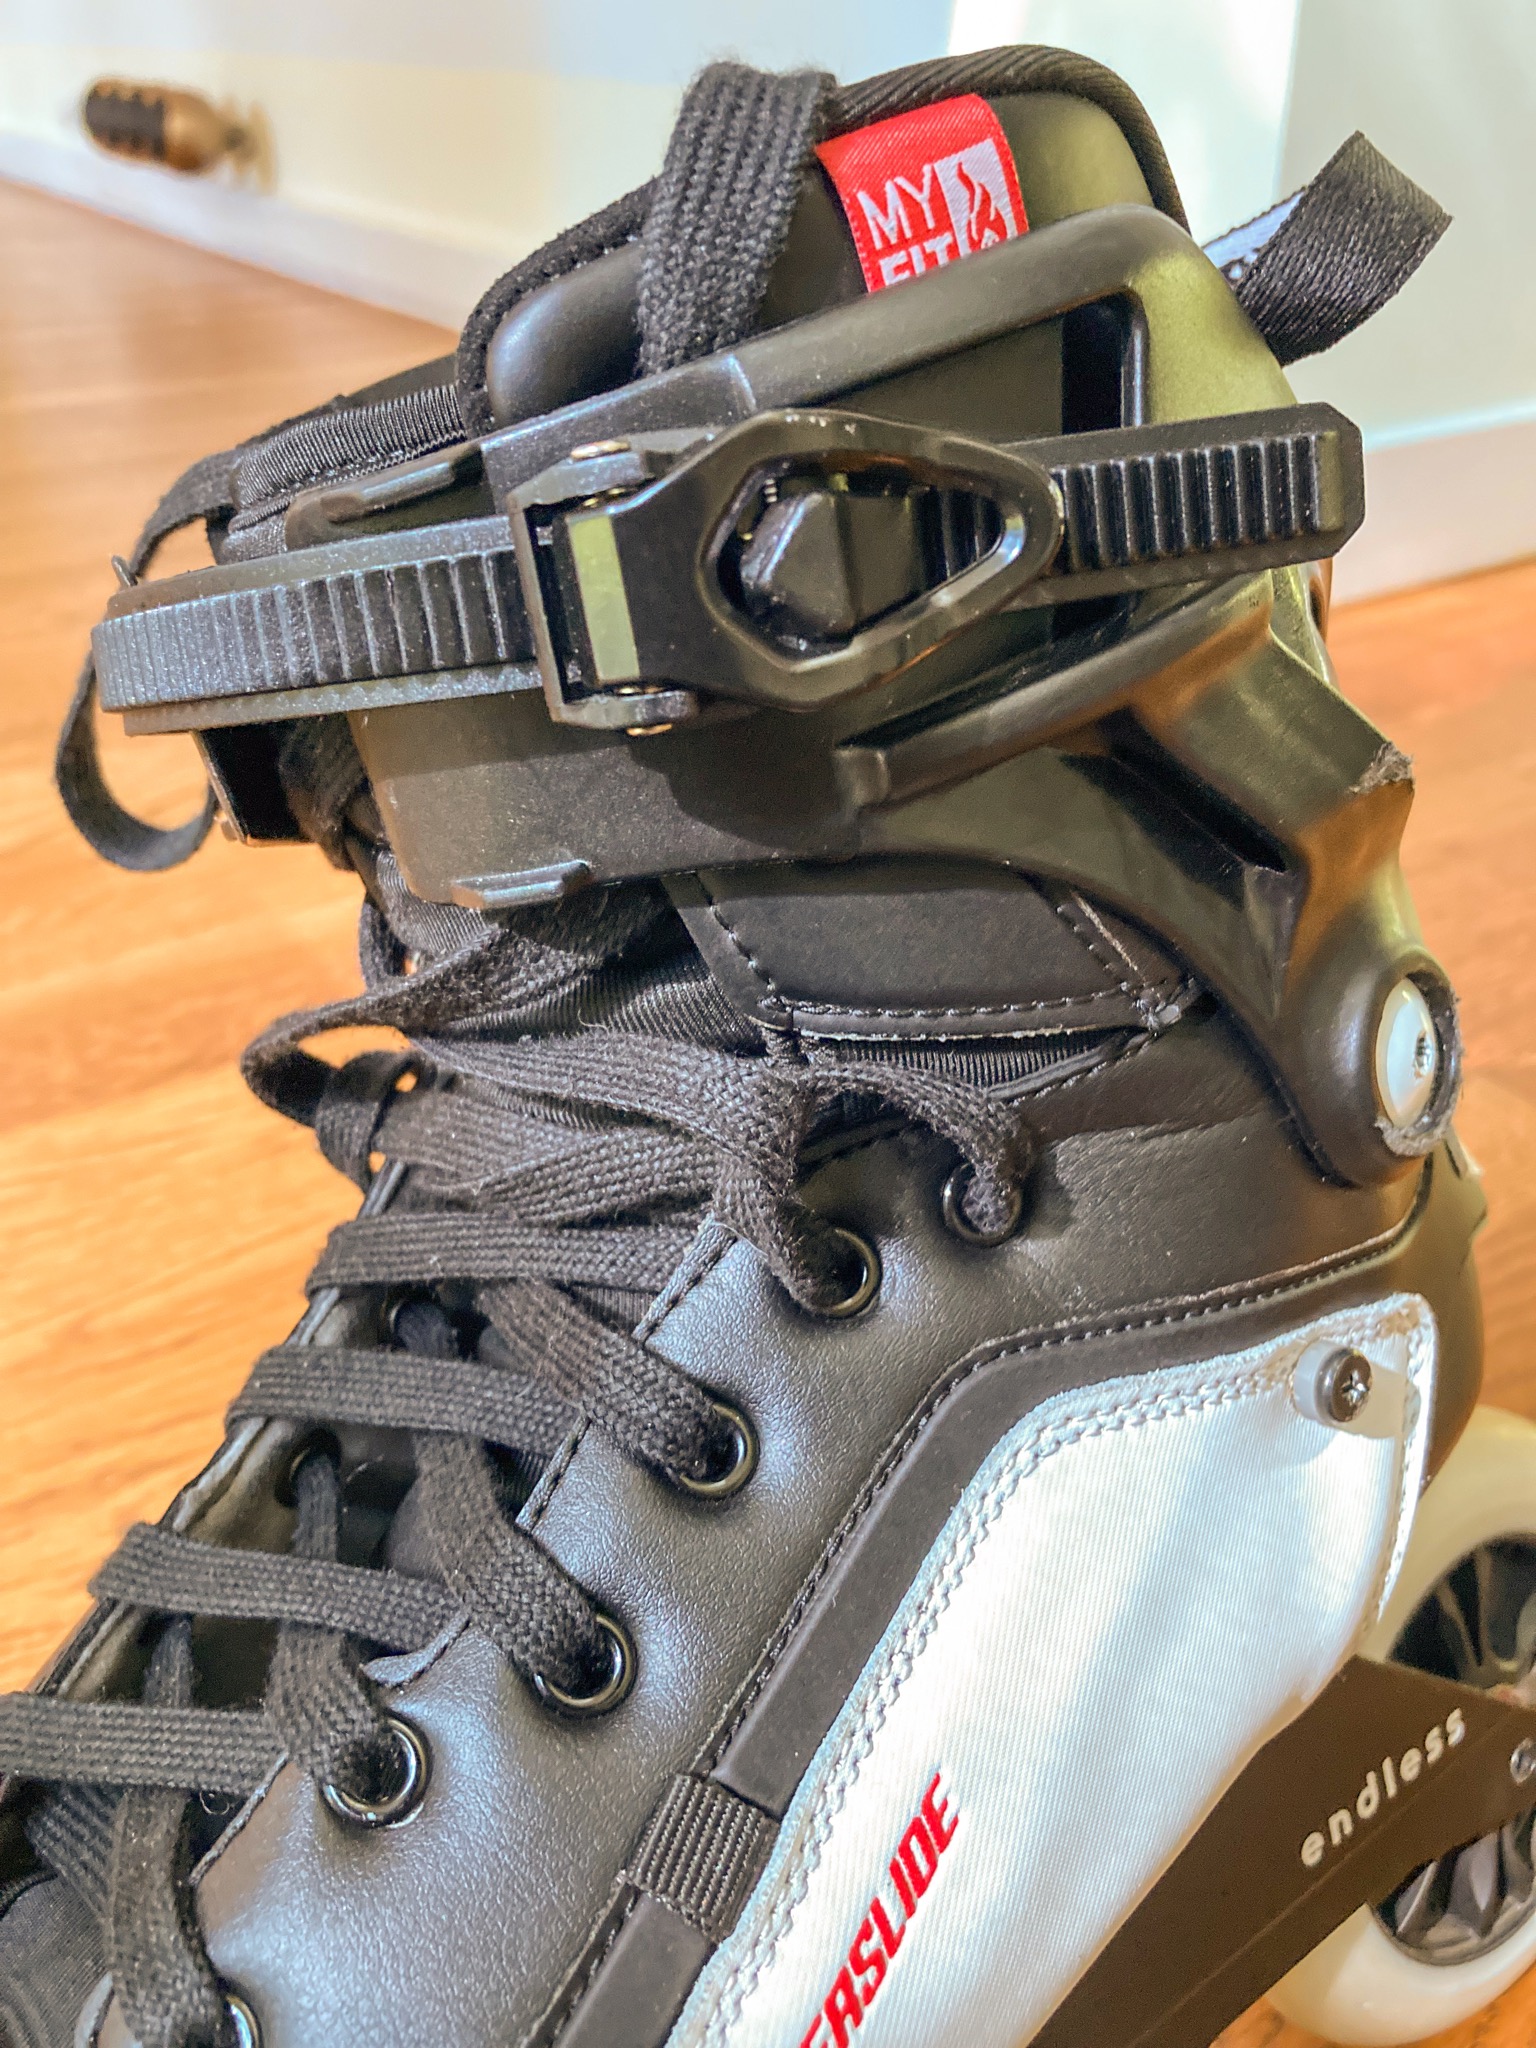
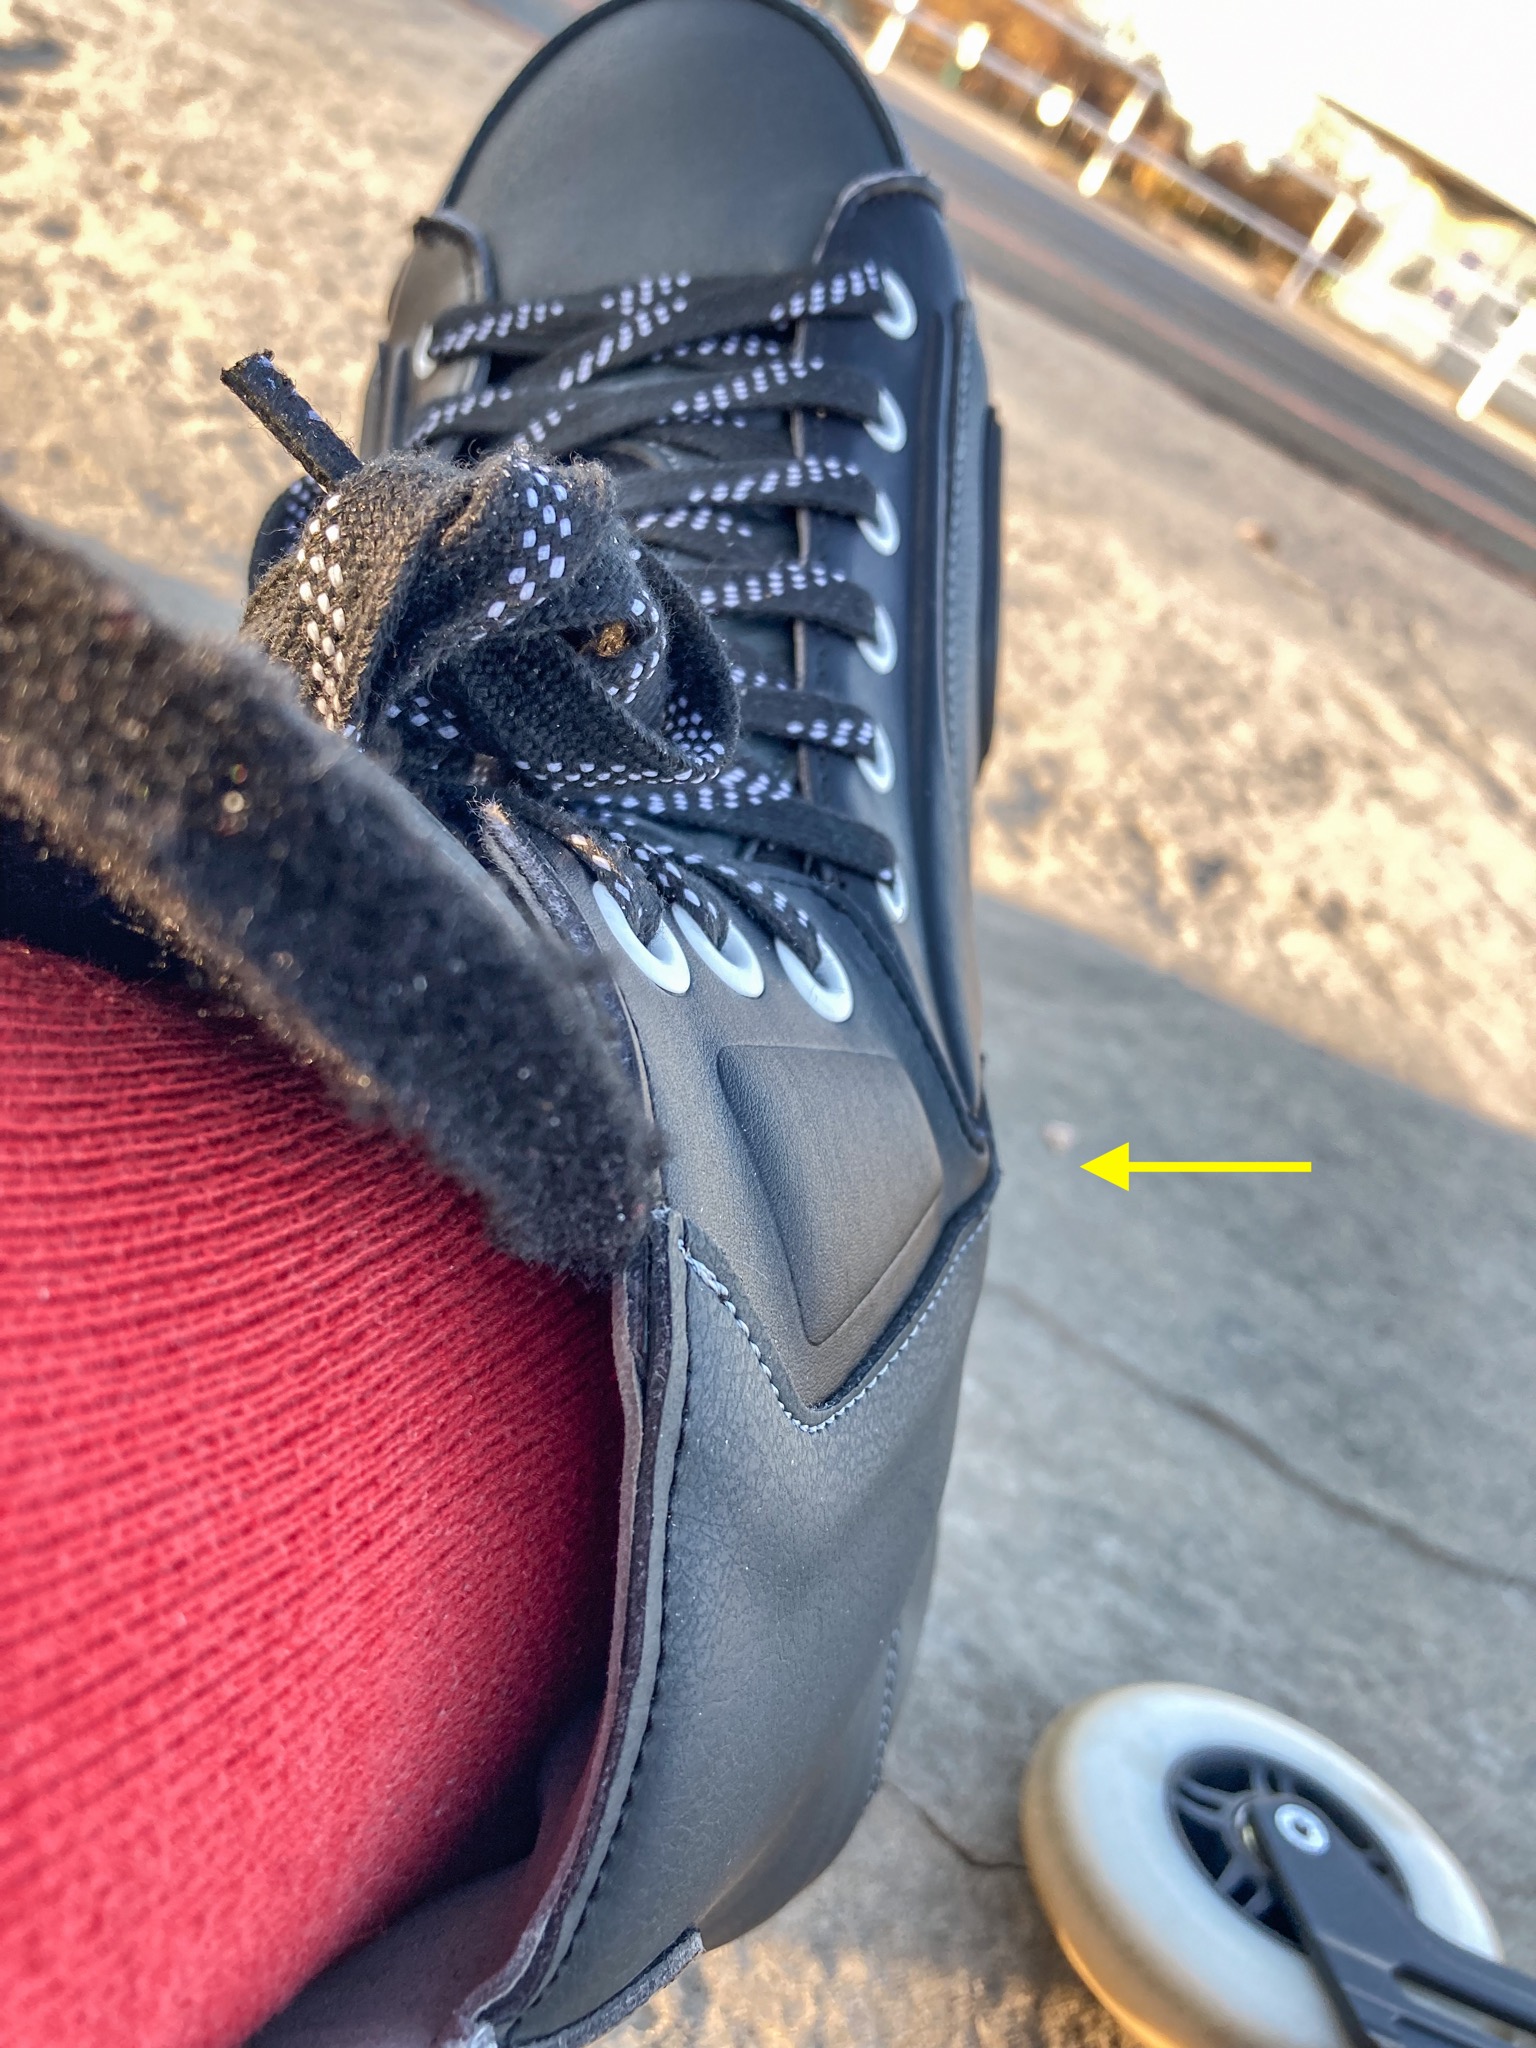
I couldn’t help but notice a crease on the boot by where the blister happened. This crease was caused by two parts of the upper assembly being crimped by lacing and by foot movement. The red arrow shows the crease on the right skate. The yellow arrow shows the same on the left skate. That spot is where the 45° buckle would go, in a urban skate. There is a volume of empty space inside the boot at that spot, where upper materials flex and shift around, as I skated. It didn’t help that I wore regular socks, and not compression socks.


What I needed was a way to make eyelet tabs around the 45° buckle area tighter. This would eliminate the empty space inside that caused irritations to my skin. And at the same time, I wanted the top eyelet tabs to be loosened, so I could lean my shin forward more.
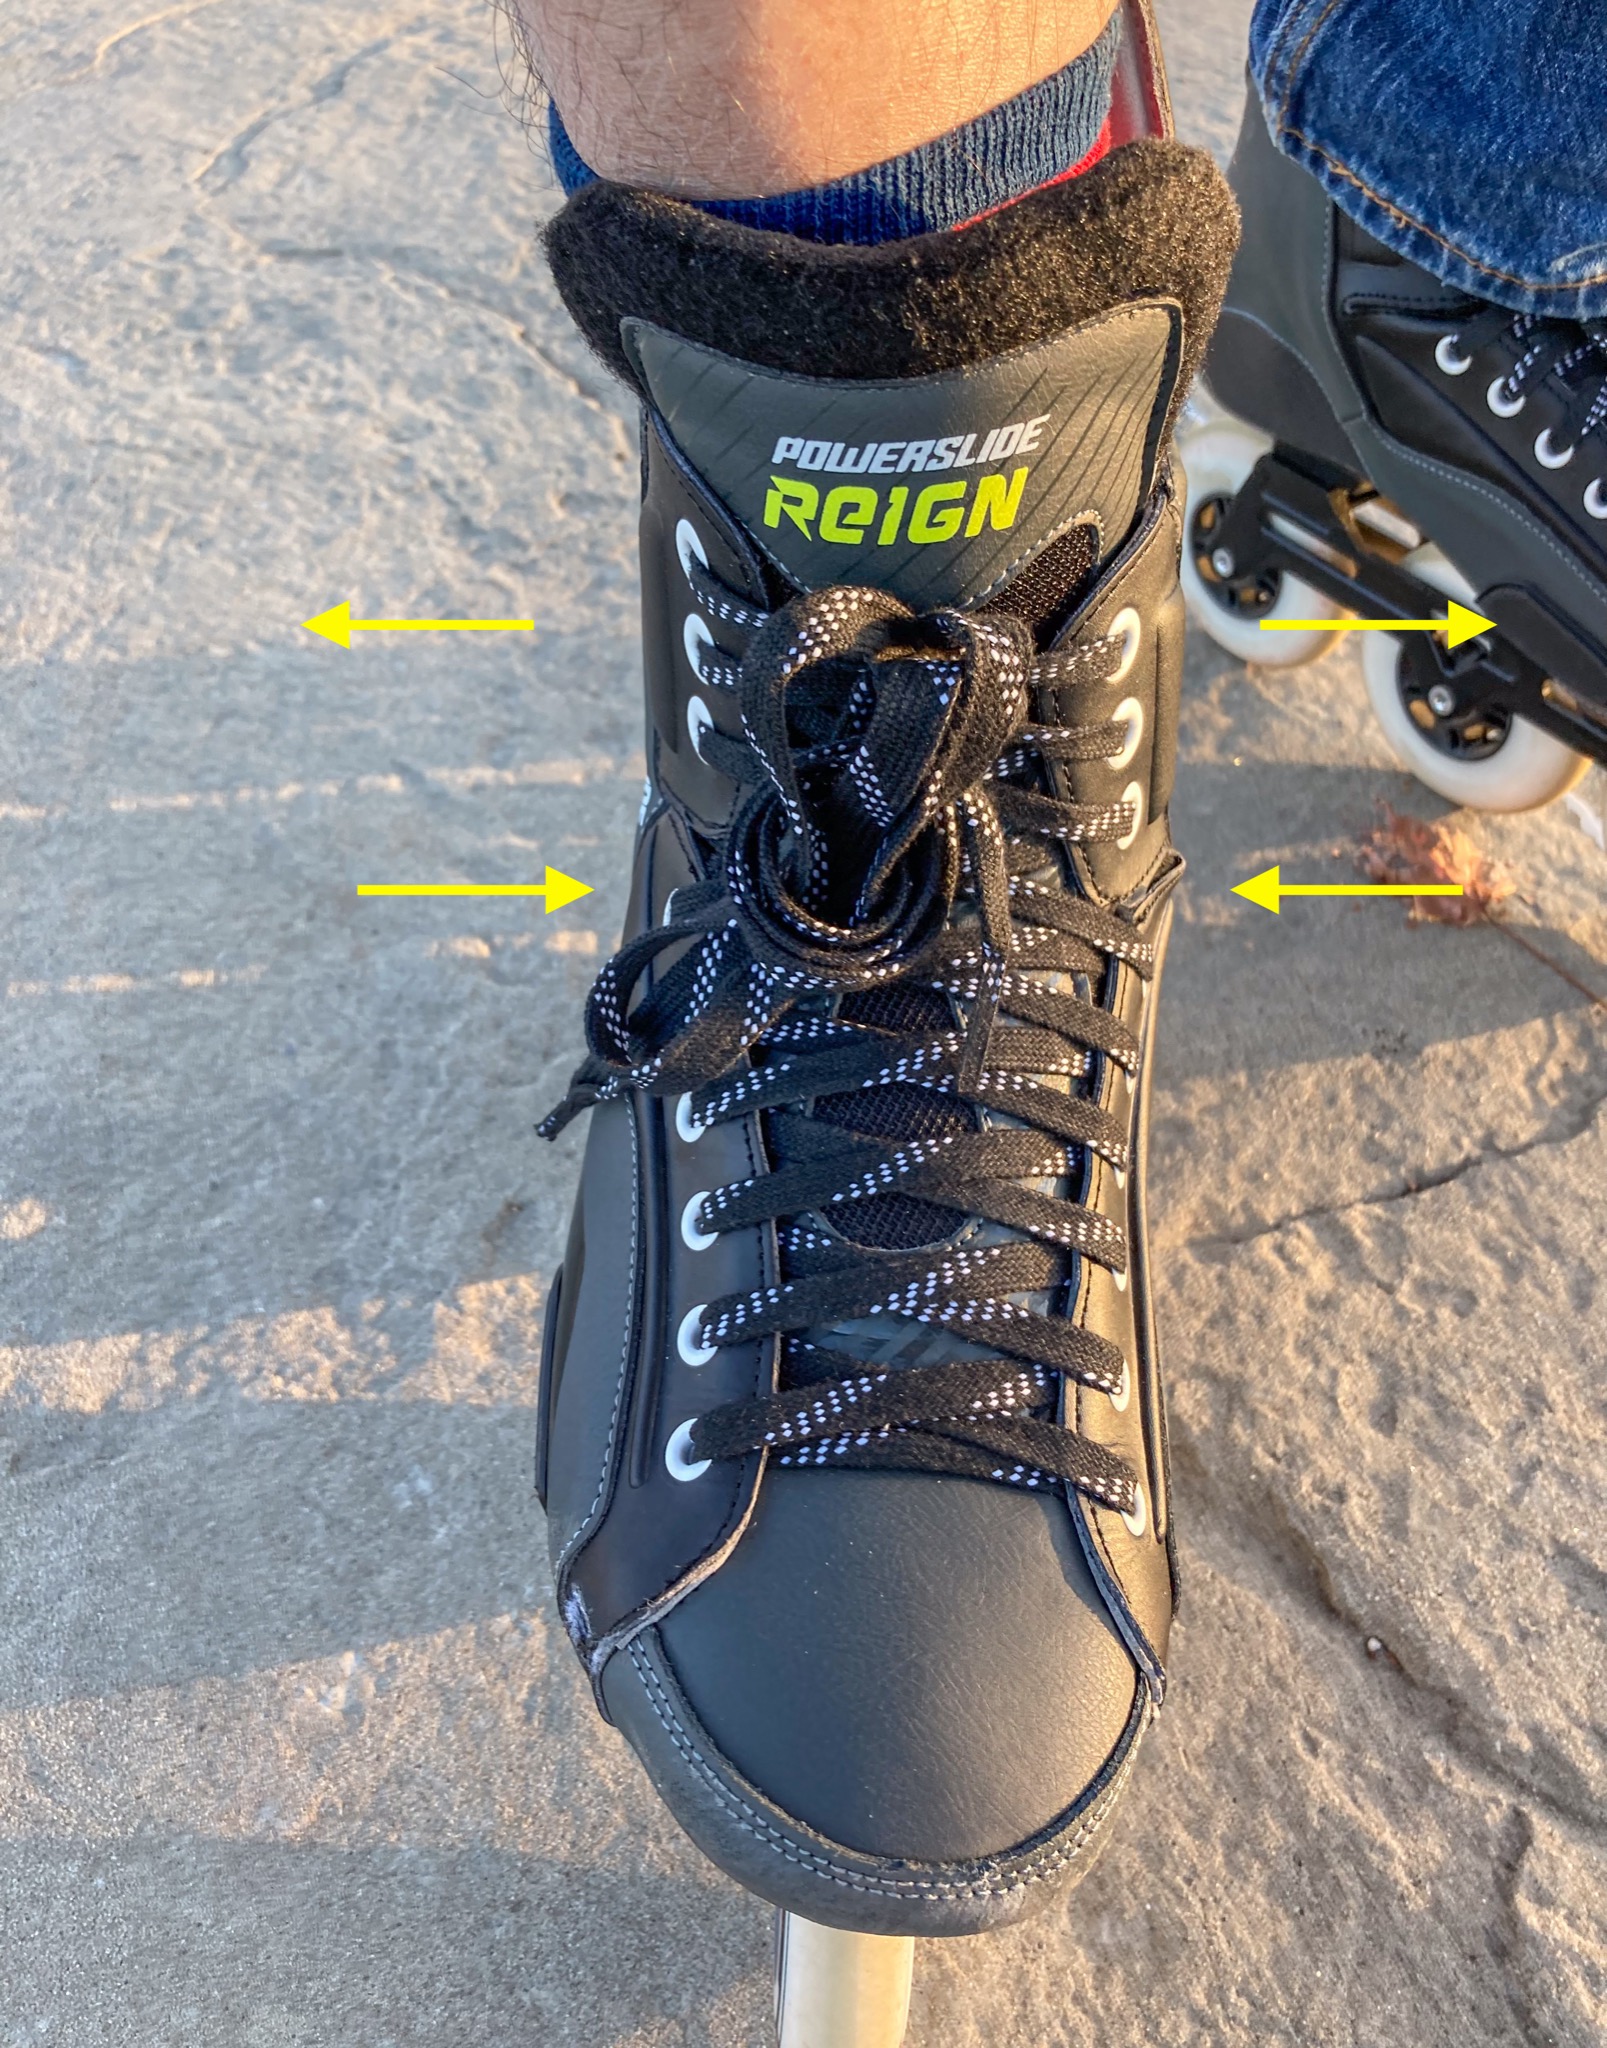
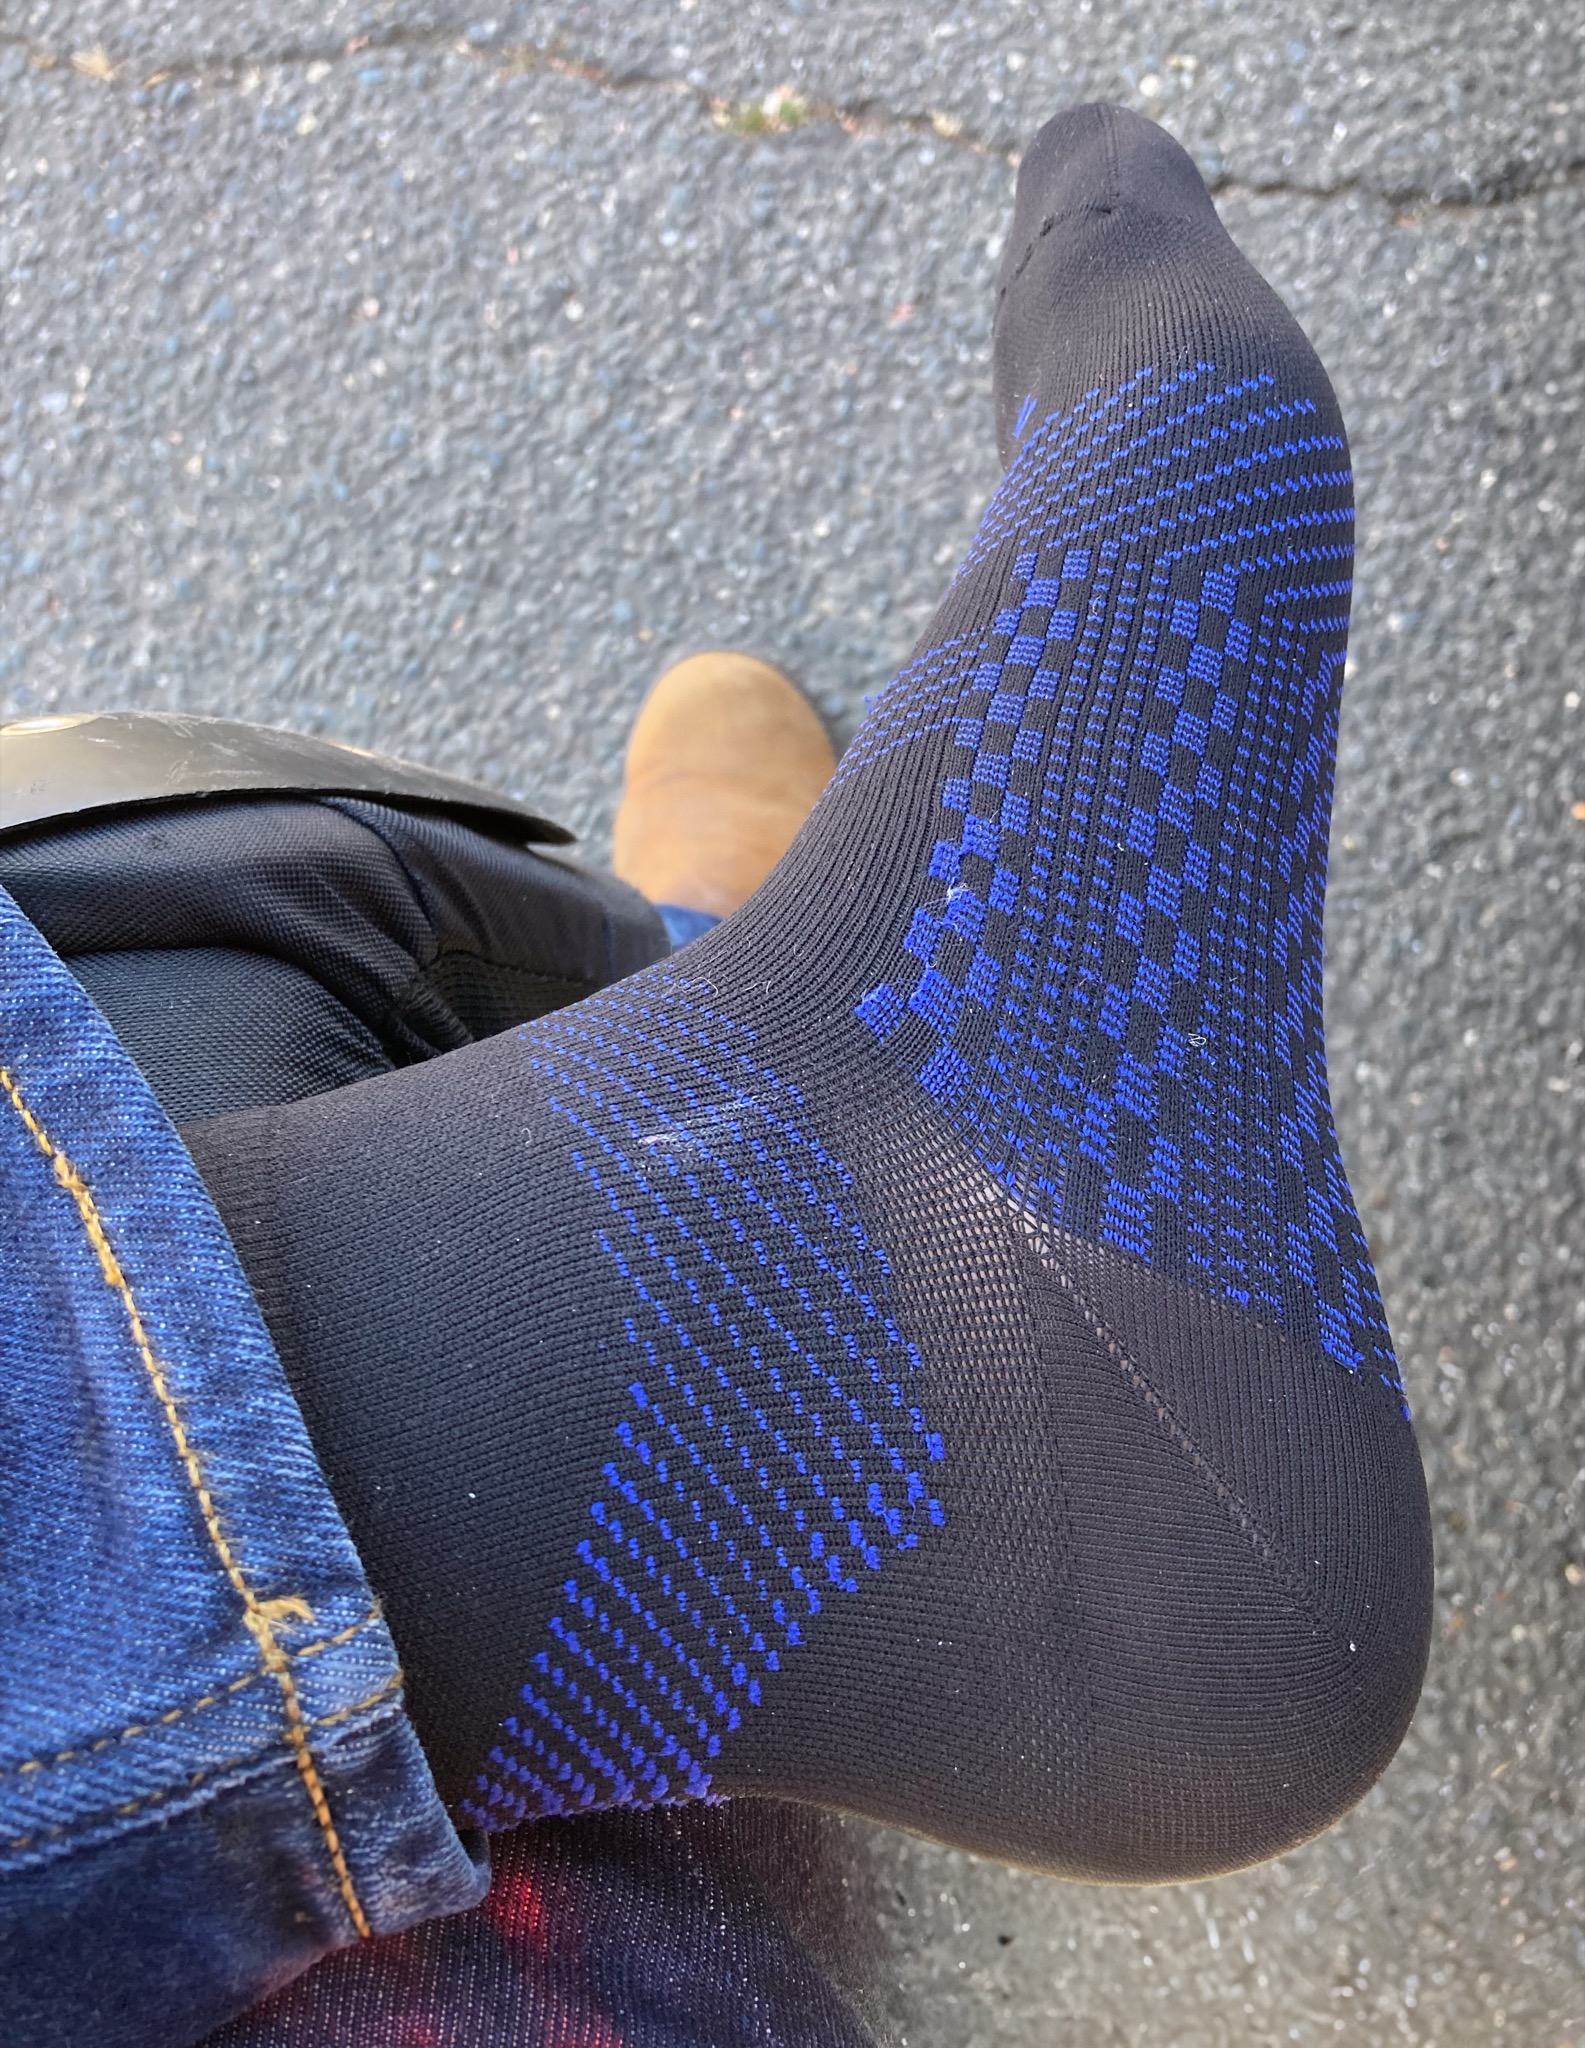
But if I tightened the lace at top eyelets anymore, I would not be able to bend my shin forward at all, and I won’t be able to skate with proper squatting posture. As mentioned earlier, even with tight lacing on upper eyelets, there are still gaps between the boot and my leg. In the pictures below, I shifted my left leg to lean on the outside cuff. Notice how this created a wide gap on the inside cuff.

I had always used the common and simple lacing scheme on my hockey boots. With this lacing on Areas, the lace pools around the 45° buckle area, as I skated. Squatting causes upper materials in that area to bulge out. Standing straight flattens that bulge. That area kept stealing lace from top eyelets, pulling the top eyelets closer to each other, and locking me into an ankle-cast posture.
Runner’s loop lacing
Fortunately, a lacing scheme exists that helps fix this issue. It’s called the Runner’s Loop lacing. The Tau actually sports an extra side eyelet, designed specifically for optional runner’s loop lacing. But this runner’s loop can be applied to any two adjacent eyelets, anywhere in the eyelet tab.


I applied the runner’s loop lacing to the two eyelet holes straddling the trouble spot. This allows the lace to pull the two eyelet holes closer permanently, preventing the two parts of the upper assembly from flexing and shifting during skating. It also serves the function of a 45° buckle, locking in my heel, by keeping the lowest part of my shin from shifting forward.

The waxed lace keeps this virtual 45° buckle transfixed in place. The runner’s loop effectively separates the front lacing from the top lacing. Now I have two sections of lace that I can adjust independently.
I also started to wear compression socks. I skated for one and half an hour on Ares, with compression socks and runner’s loop lacing. So far so good.


Well, that’s it for now. It’s been a long post. The internet’s dead, and now flooded with either product pages or AI garbage. Google yields mostly junk nowadays. I couldn’t find information I needed during this journey. Now you can.
Updates
Update 2025-01-29: I am sharing pictures taken and illustrations made for this article on Wikimedia for the Wikipedia article on Inline Skates. Update 2025-05-25. I have spent the first half of year 2025 rewriting the entire Inline Skates article. I am getting close to the finish line. Update 2025-08-04: the rewritten Inline Skates article has been classified as a good article, and now serves as a summary linking to several child articles including history, types, frames, wheels, bearings, tuning, and wheel setup.
Last updated: 2026-03-30


Nice review!!!!
If the shells are the same, how can the ares be wider than the tau?
Is the shell in the Helios the same as in the Ares?
Thanks a lot! greet from Netherlands.
They are “not identical”. They are “similar in design”. This is true of all carbon-sheel-based skates from Powerslide, as far as I know. But each skate has its own shells made from new molds.
Even “Tau” itself underwent a carbon shell change in 2022. This this official video talking about the 2nd generation of carbon shell for Tau: https://www.youtube.com/watch?v=2qxEVgzXxsU. Powerslide is usually tight-lipped about its carbon shells, but in this video they unprecedentedly showed both the old shell and the new shell.
So be careful when reading reviews on the previous version about fit
Other parts of the skate/boot also change over time. At some point the mounting inserts were upgraded. See the two pictures in this post: https://www.reddit.com/r/rollerblading/comments/sddwda/powerslide_tau_frame_mounting_points/. The first shows metal inserts (previous version of Tau), and the second shows the carbon insert (new version).
I didn’t find anything on Ares’ shell when I wrote this article. If you find them please share. I can only tell you from my own experience skating it, getting blisters, and feeling around the seams, that it seems to have a carbon shell very similar in shape to Tau and the rest of them. I also spot-heat the quarter panel area as mentioned in my article. When everything else was heated and softened, I could more clearly trace the contour of the shell with my fingers. One day I may be willing to cut the boot open if it wears down enough. That’s the only way to find out.
I don’t know anything about Helios.
Hey, you should go talk to Ivo Vegter of “Thisissoul” fame. He’s flagship store is in Amsterdam. Ask him to make a video on these carbon shells. https://www.youtube.com/@Thisissoul/videos
Hello, thank you so much for this great write up. I appreciate all the homework and testing you have done. I began searching the internet with the exact thought in mind. For context, I am an endurance athlete.. with an college ice hockey background. I will begin doing long distance skates of 50+ mile duration. It is clear that 110 wheels are a must, but i really dislike the boots and cuffs of current market skates.
To get straight to the point, i am last minute trying to setup this exact pair of skates for a skate across austria, which is 1 week away. i need to order everything and I can not make mistakes. Will the endless 90 276mm work on a size 46eu? in theory, would any trinity frame work? Really, any frame that can fit 110s on this skate would work for me. I appreciate any, and all assistance!
Trinity Mount has one exact configuration for the three holes. Any Trinity frame will fit any Trinity boot. The Endless Trinity 90 frame only comes in one size regardless of shoe sizes. As you know the wheelbase is long enough that I believe it’s perfectly fine for your large shoe size.
But don’t get the Reign boot unless you really want its simple laced design. I’ve finally been able to skate outdoors now that spring is here. I still got skin chafing on that same spot I showed in pictures, when I skated for two hours. This time I didn’t wear compression socks nor did I apply Compeed pads. I will forever need to use these with these boots, because that fold on the upper still flexed as I skated. It’s a design flaw. You may want to get the PS Next boots. I am probably going to do the same.
Wow thank you for that detailed write up!
It was very interesting to see how the urban “shell” differs from the true hockey shell.
I also love the hockey style boot with big wheels and bought a Reign Ares 100 – but also have an issue with the lack of ankle support.
Do you think its possible to punch a hole in the shell and introduce a cuff similar to how the Tau does it?
That question crossed my mind. But I bought the Reign to get away from the Tau cuff which I really don’t like. Lacing the top eyelets is a pain with that cuff and its top buckle/strap in the way. And it looks really bulky.
Ah yeah that makes sense, its really too bad its not a full shell.
I have the previous model as well (Reign Helios) and that one is more solid in the ankles. Not sure if its different materials in the upper or if the shell extends higher, but there is a noticeable difference in that model.