
A few weeks ago I set out to write a short article on my quest to get Big Wheels on Carbon Hockey Skates. I organized pictures taken during the quest for illustrations. And I realized there were enough materials to address all topics on which I found no information online, during my quest. So here is the first installment. It’s quite long. Enjoy.
- What’s a one-piece hockey boot?
- What’s a two-piece, traditional hockey boot?
- Three types of carbon skates
- Your foot in a carbon hockey skate
- Parts of a leather work boot
- Parts of a hockey boot
- One-piece vs two-piece hockey boots
- Patent on one-piece hockey skates
- Making carbon-fiber hockey skates
- Ice vs. street carbon hockey skates
- Your foot in a carbon urban skate
- Carbon urban skates vs. carbon hockey skates
- Patent predecessor to one-piece urban skates
- Hybrid vs hard vs soft boots
- Making carbon-fiber urban skates
- Updates
What’s a one-piece hockey boot?
Most carbon-fiber skates today are advertised as a one-piece boot construction. That’s a bit misleading, because clearly the entire skate boot is not formed from a single piece of anything. All that has happened is: manufacturers took two or more parts of a boot, and turned just those parts into a single, one-piece shell, made of carbon fiber-reinforced polymer.
For hockey-style skates, the construction of this one-piece shell is similar for both ice hockey and street hockey (with inline wheels). Following is an illustration of this shell with respect to the other parts of the boot.

What’s a two-piece, traditional hockey boot?
Before the advent of one-piece carbon shells, parts of the traditional quarter package, and the outsole would have been made separately. These were then pinned, nails or otherwise glued together with more parts, into a full hockey boot. Nowadays folks refer to this traditional construction as a two-piece boot, because you build the quarter package and the outsole independently. But of course, the entire boot isn’t made from these two pieces alone. But now you see how the “one-piece” and “two-piece” terminology arose from combining the outsole with parts of a quarter package.
To better understand one-piece boots, it helps to first understand how traditional skates were made before the advent of today’s carbon fiber boots. The following video details the process of making traditional skate boots. The same boot is used for both ice hockey and street hockey.
Three types of carbon skates
There are at least three types of carbon-fiber inline skates on the market. So far we’ve been talking about hockey-style skates, hereafter referred to as just hockey skates. Both ice hokey and street hockey share the same carbon shell construction. The picture shown bellow illustrates a typical example. This is from TRUE Hockey, and they call their one-piece carbon shell a monocoque shell, leveraging a well-known term from the car industry.

I refer to the second type of carbon-fiber inline skates as urban skates hereafter. They are widely popular with people doing slalom skating, freestyle skating, and urban street navigation. For these activities, direct power transfer and firm support for the foot and the ankle is key. These goals are not too different from those for hockey. But for reasons I will elaborate in a future article, the market diverged in the 1990s into two separate design directions. Today, the carbon shell for urban skates is exemplified by the Powerslide Tau shown below. This type of urban skates are referred to as hybrid soft boots, to differentiate them from hard boots and traditional soft boots.

As you can clearly see, these two types of shells are not equal. One covers a lot more areas around a foot, compared to the other. In one, eyelets are punched through the single-piece shell which covers parts of the shin and instep. In one, all of the ankle and parts of the calf are firmly supported by the same single-pice shell. That’s of course the hockey carbon shell. As for the urban carbon shell, only the heel and the sole are supported.
There is a third type of carbon-fiber inline skates, the speed skates. They are in many ways like hockey skates. For one, the same carbon shell construction applies to both ice speed skates and inline speed skates. The shell covers a larger area of a foot, like hockey shells. For instance, eyelets are punched out of the shell directly. In fact, it seems that carbon shells originated with speed skates, before other skating disciplines adopted the same. But you will notice that speed skates don’t have a shaft at all. The collar of the boot barely covers parts of the ankle of the skater.
At the moment I don’t care about speed skating. So this article will cover only hockey shells and urban shells. One would not cruise urban streets on speed skates. And only the crazy would attempt to slalom around cones on speed skates.
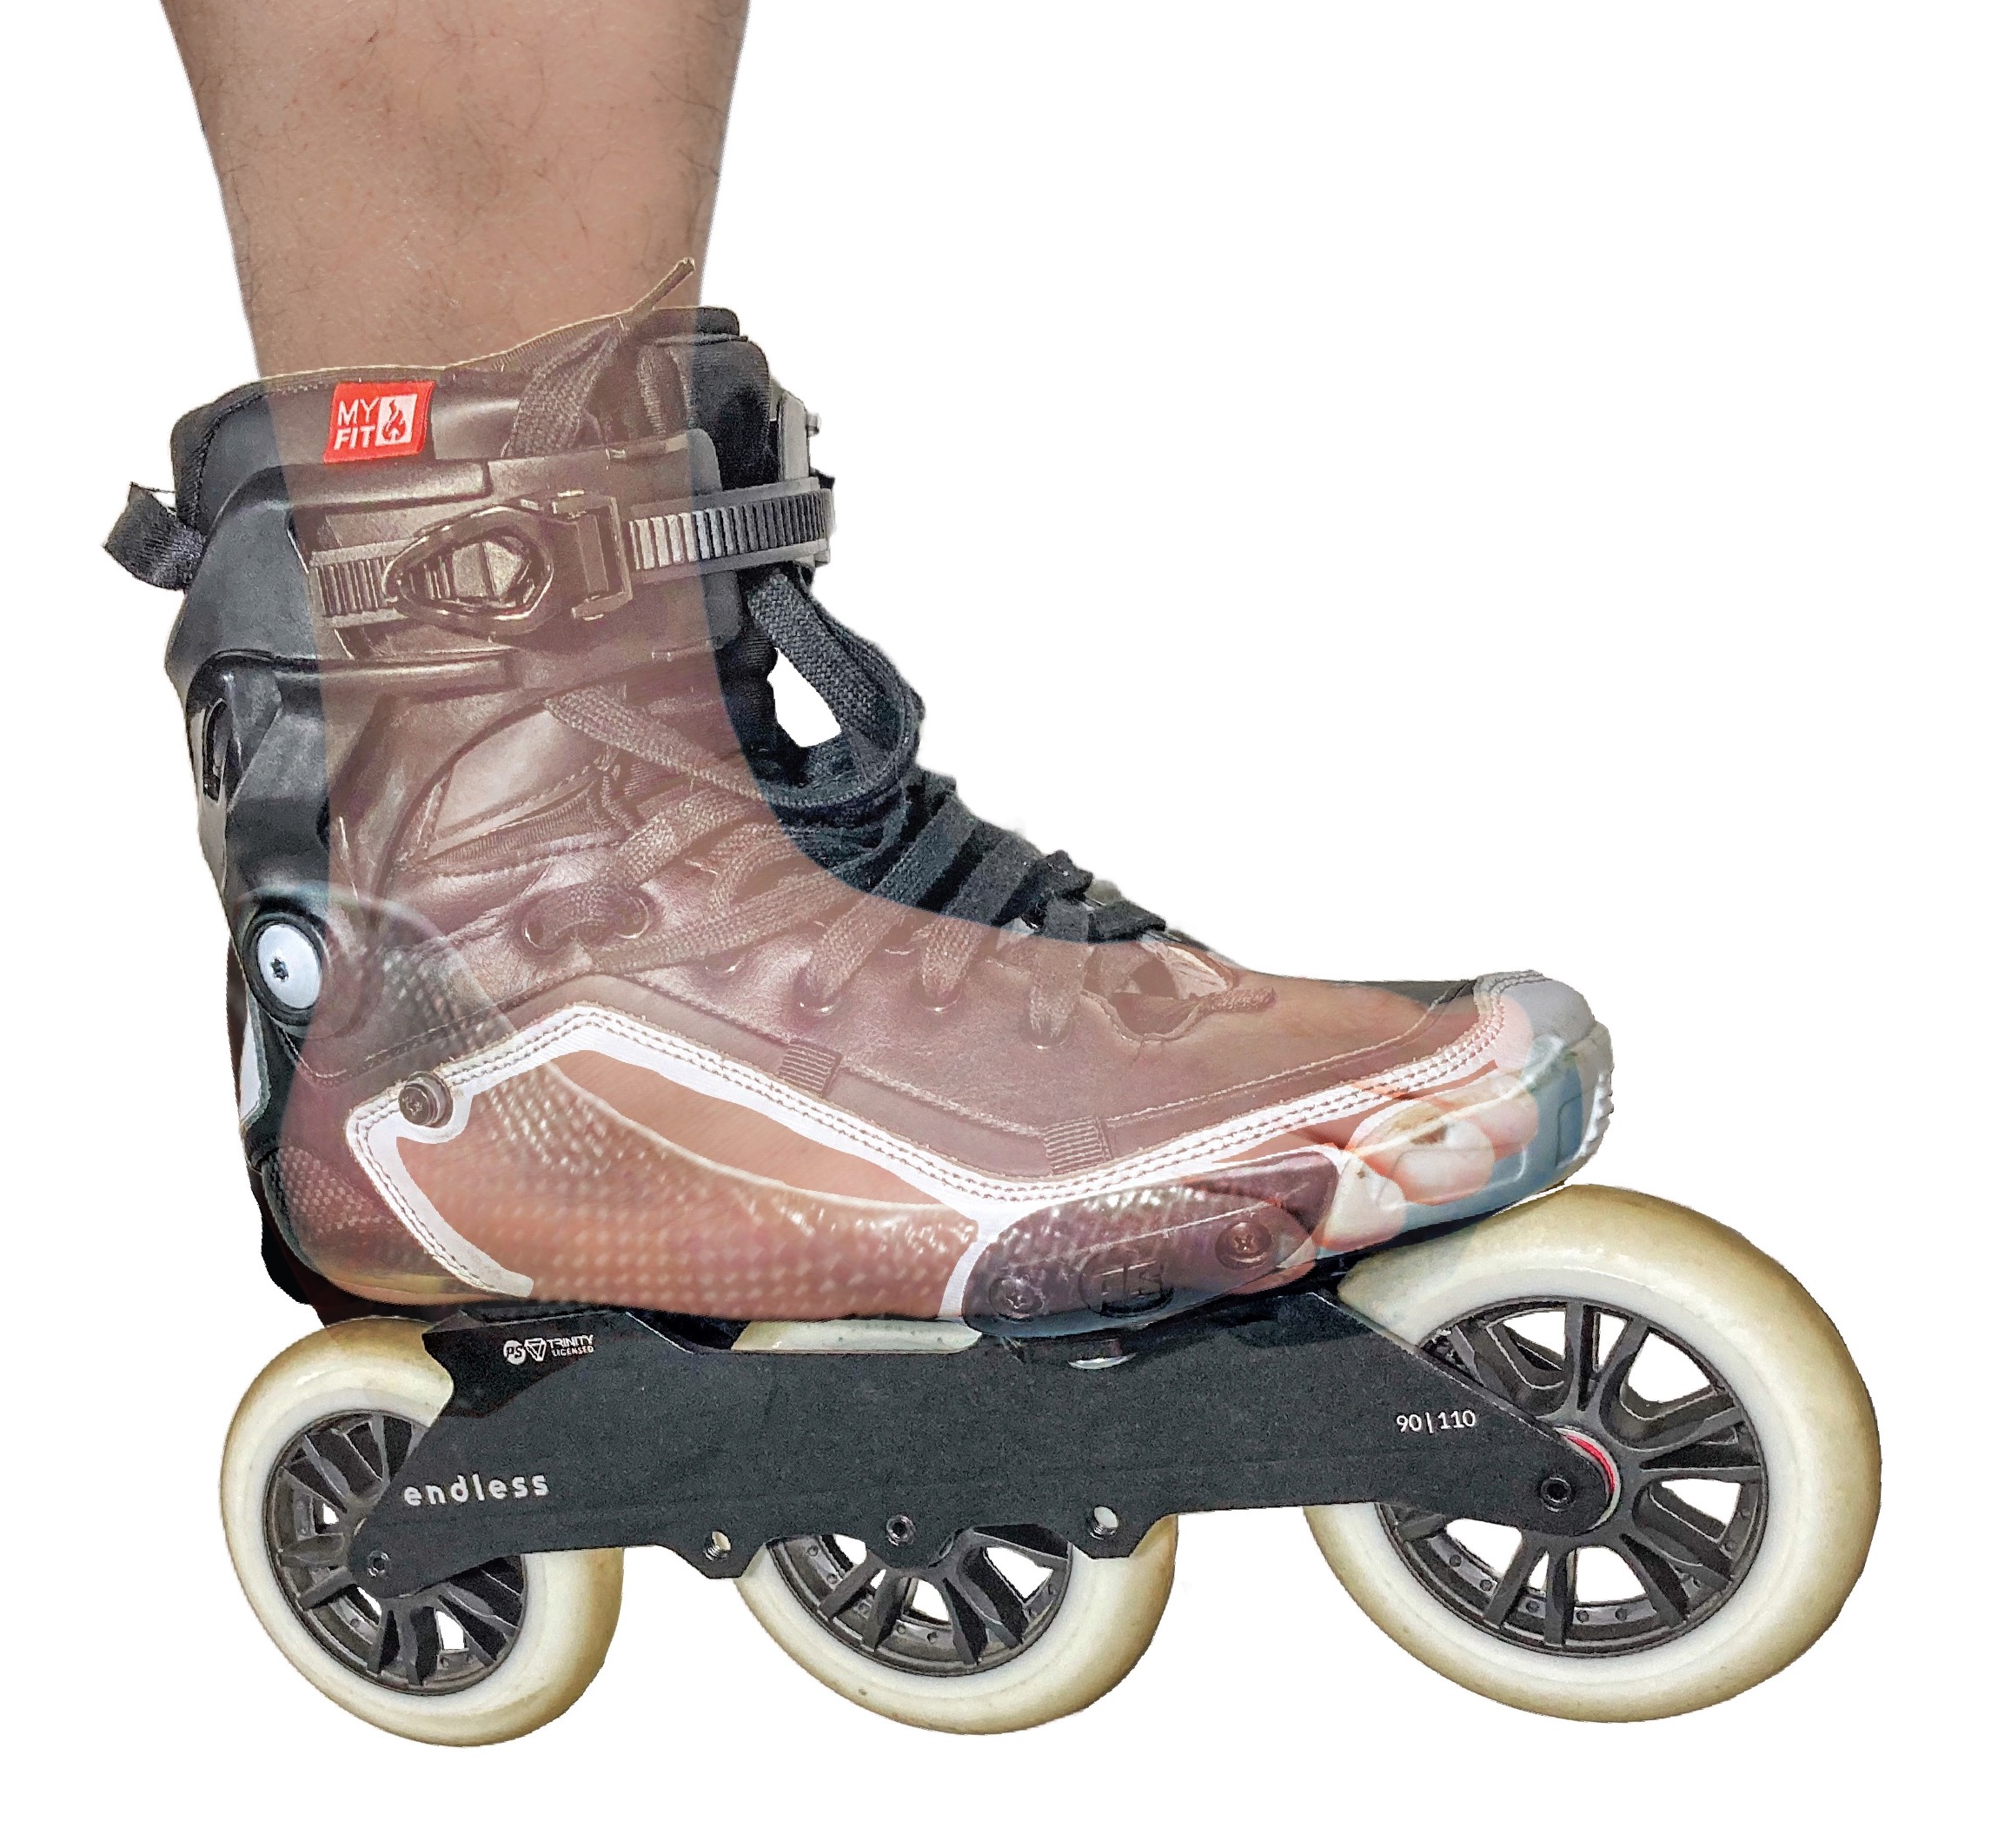
Your foot in a carbon hockey skate
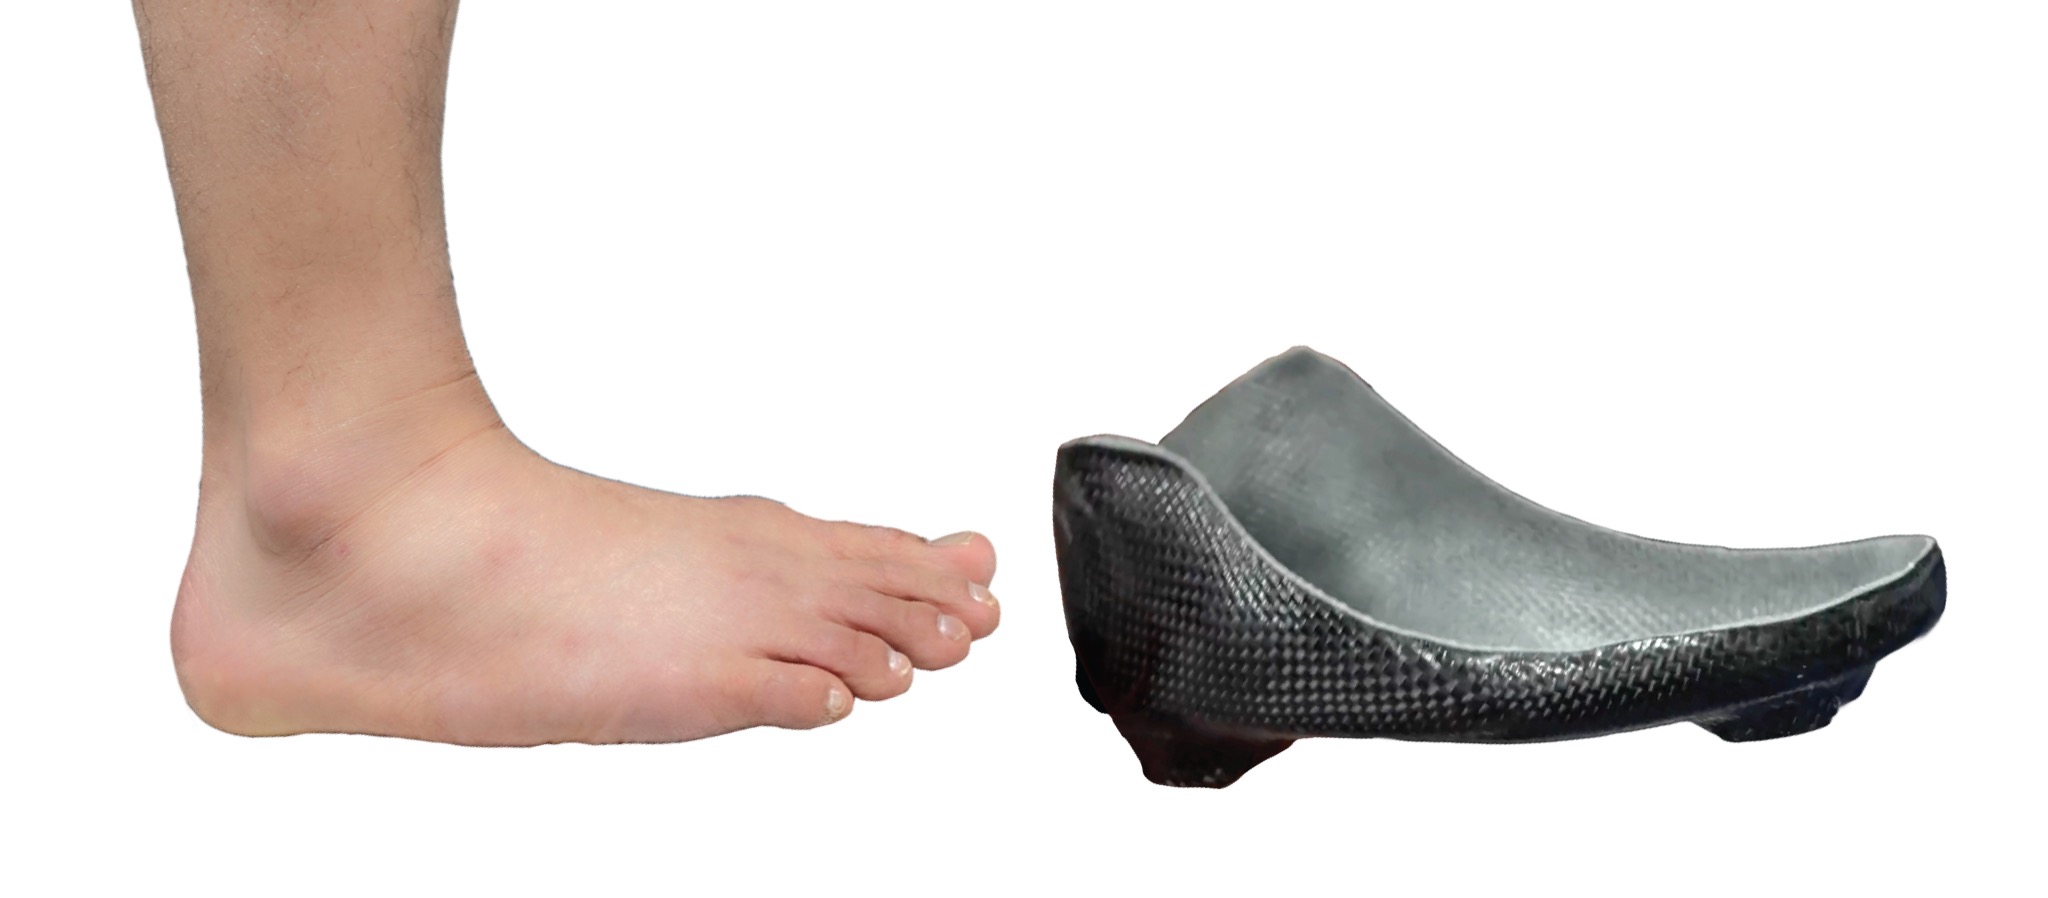
This is your foot. Meet your carbon-fiber hockey shell.

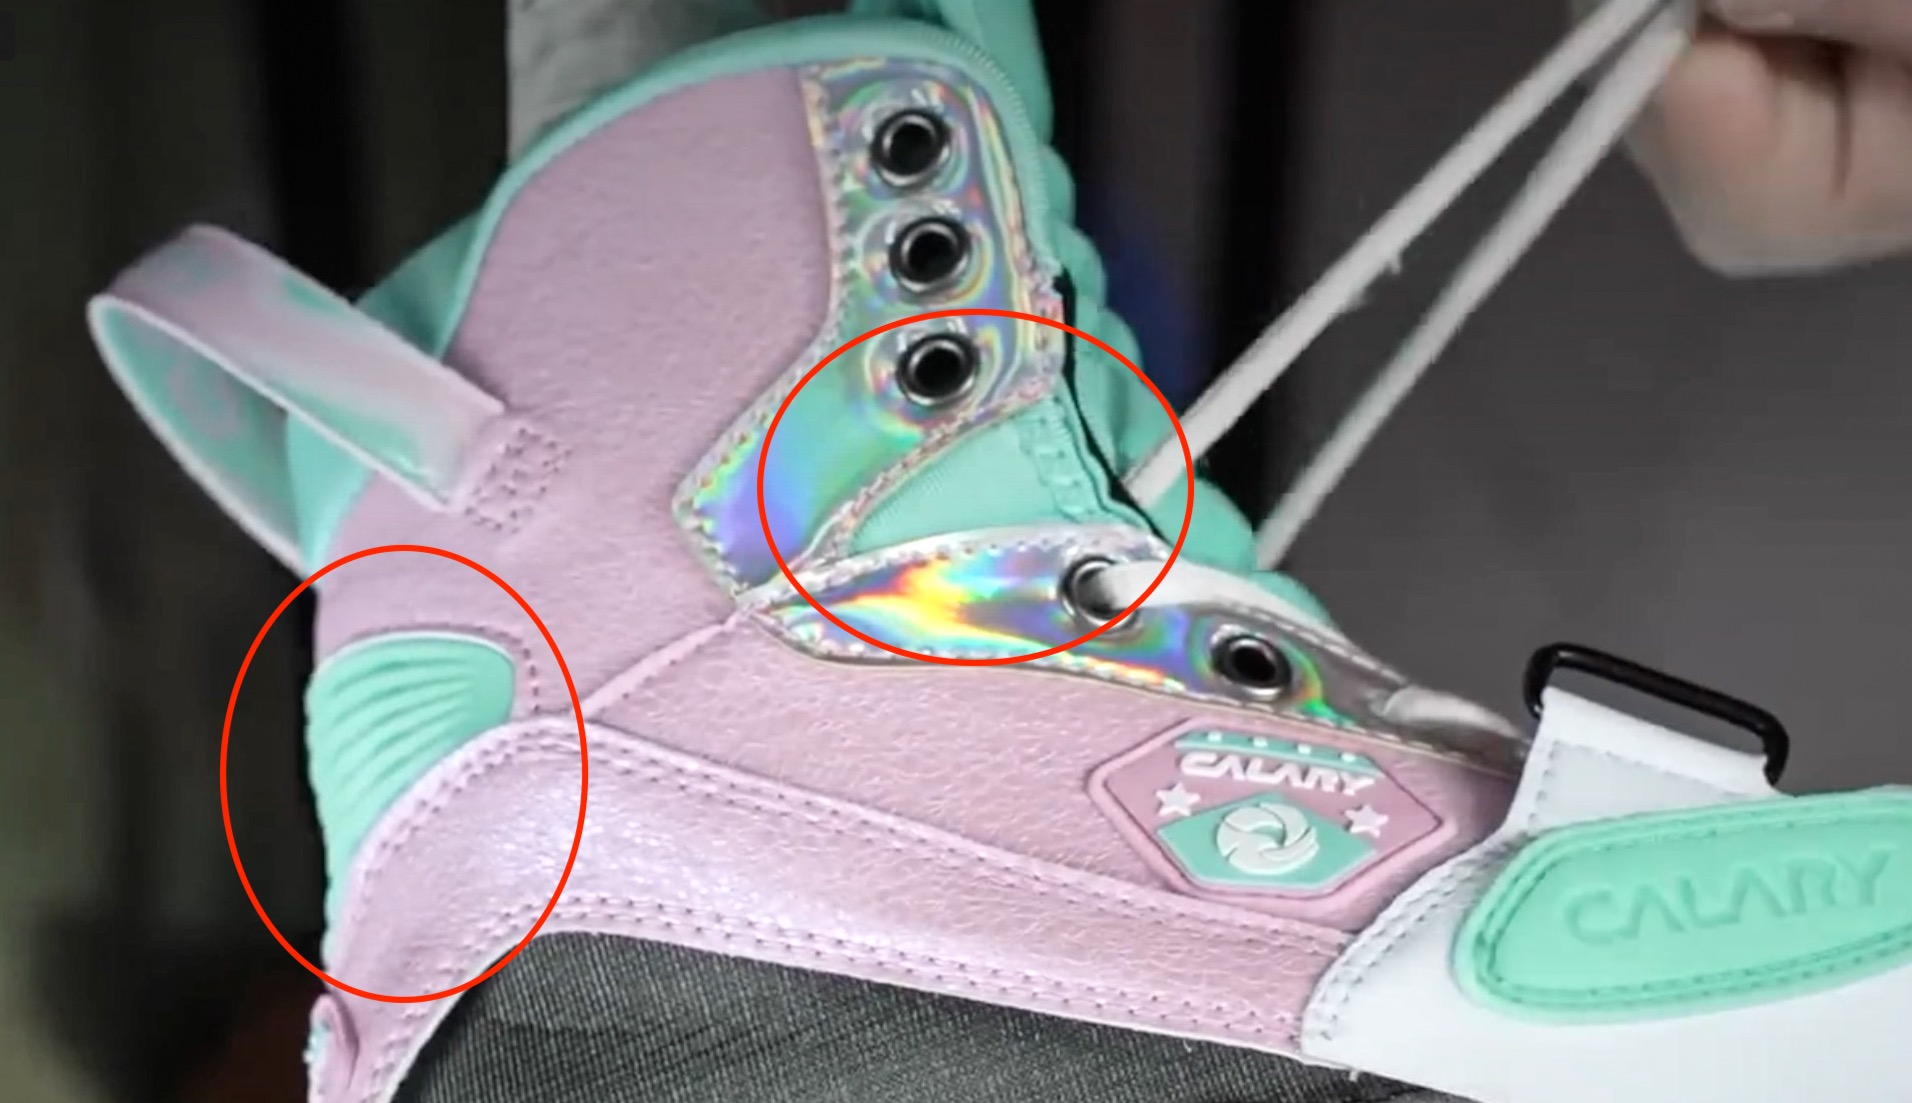
This is your foot inside a carbon hockey shell. The second picture illustrates how the shell is almost the entirety of the skate boot, minus top part of the toe cap, tongue, and tendon guard. All eyelets are punched out of the one-piece carbon shell. You can never tear eyelet washers from this skate. The lower shin, the ankle area, and the instep are completely locked in by the carbon eyelet tabs, as long as you lace your boot properly.


In most skating situations, one would adopt the athletic stance, bending the shin at the ankle by some 15° forward, as shown below. The ankle bones may shift a little between the straight stance and the athletic stance. The ankle area of the carbon hockey shell accommodates for this by punching out the ankle areas into domes. In the case of TRUE skates, they are molded roughly to your 3D model, and made perfect by heat-molding after you receive your skates. As a skater pivots their legs at their ankles, there are no other parts interfacing with the leg, except for the carbon shell, through its heat-molded liner.


One can almost entertain the idea of skating on a carbon shell without bells and whistles. It is almost possible to attach a frame to a carbon shell, and then skate on it with just eyelets and lacing. Of course, lace bites will make the experience somewhat painful, seeing how there is nothing cushioning the shin and the instep.


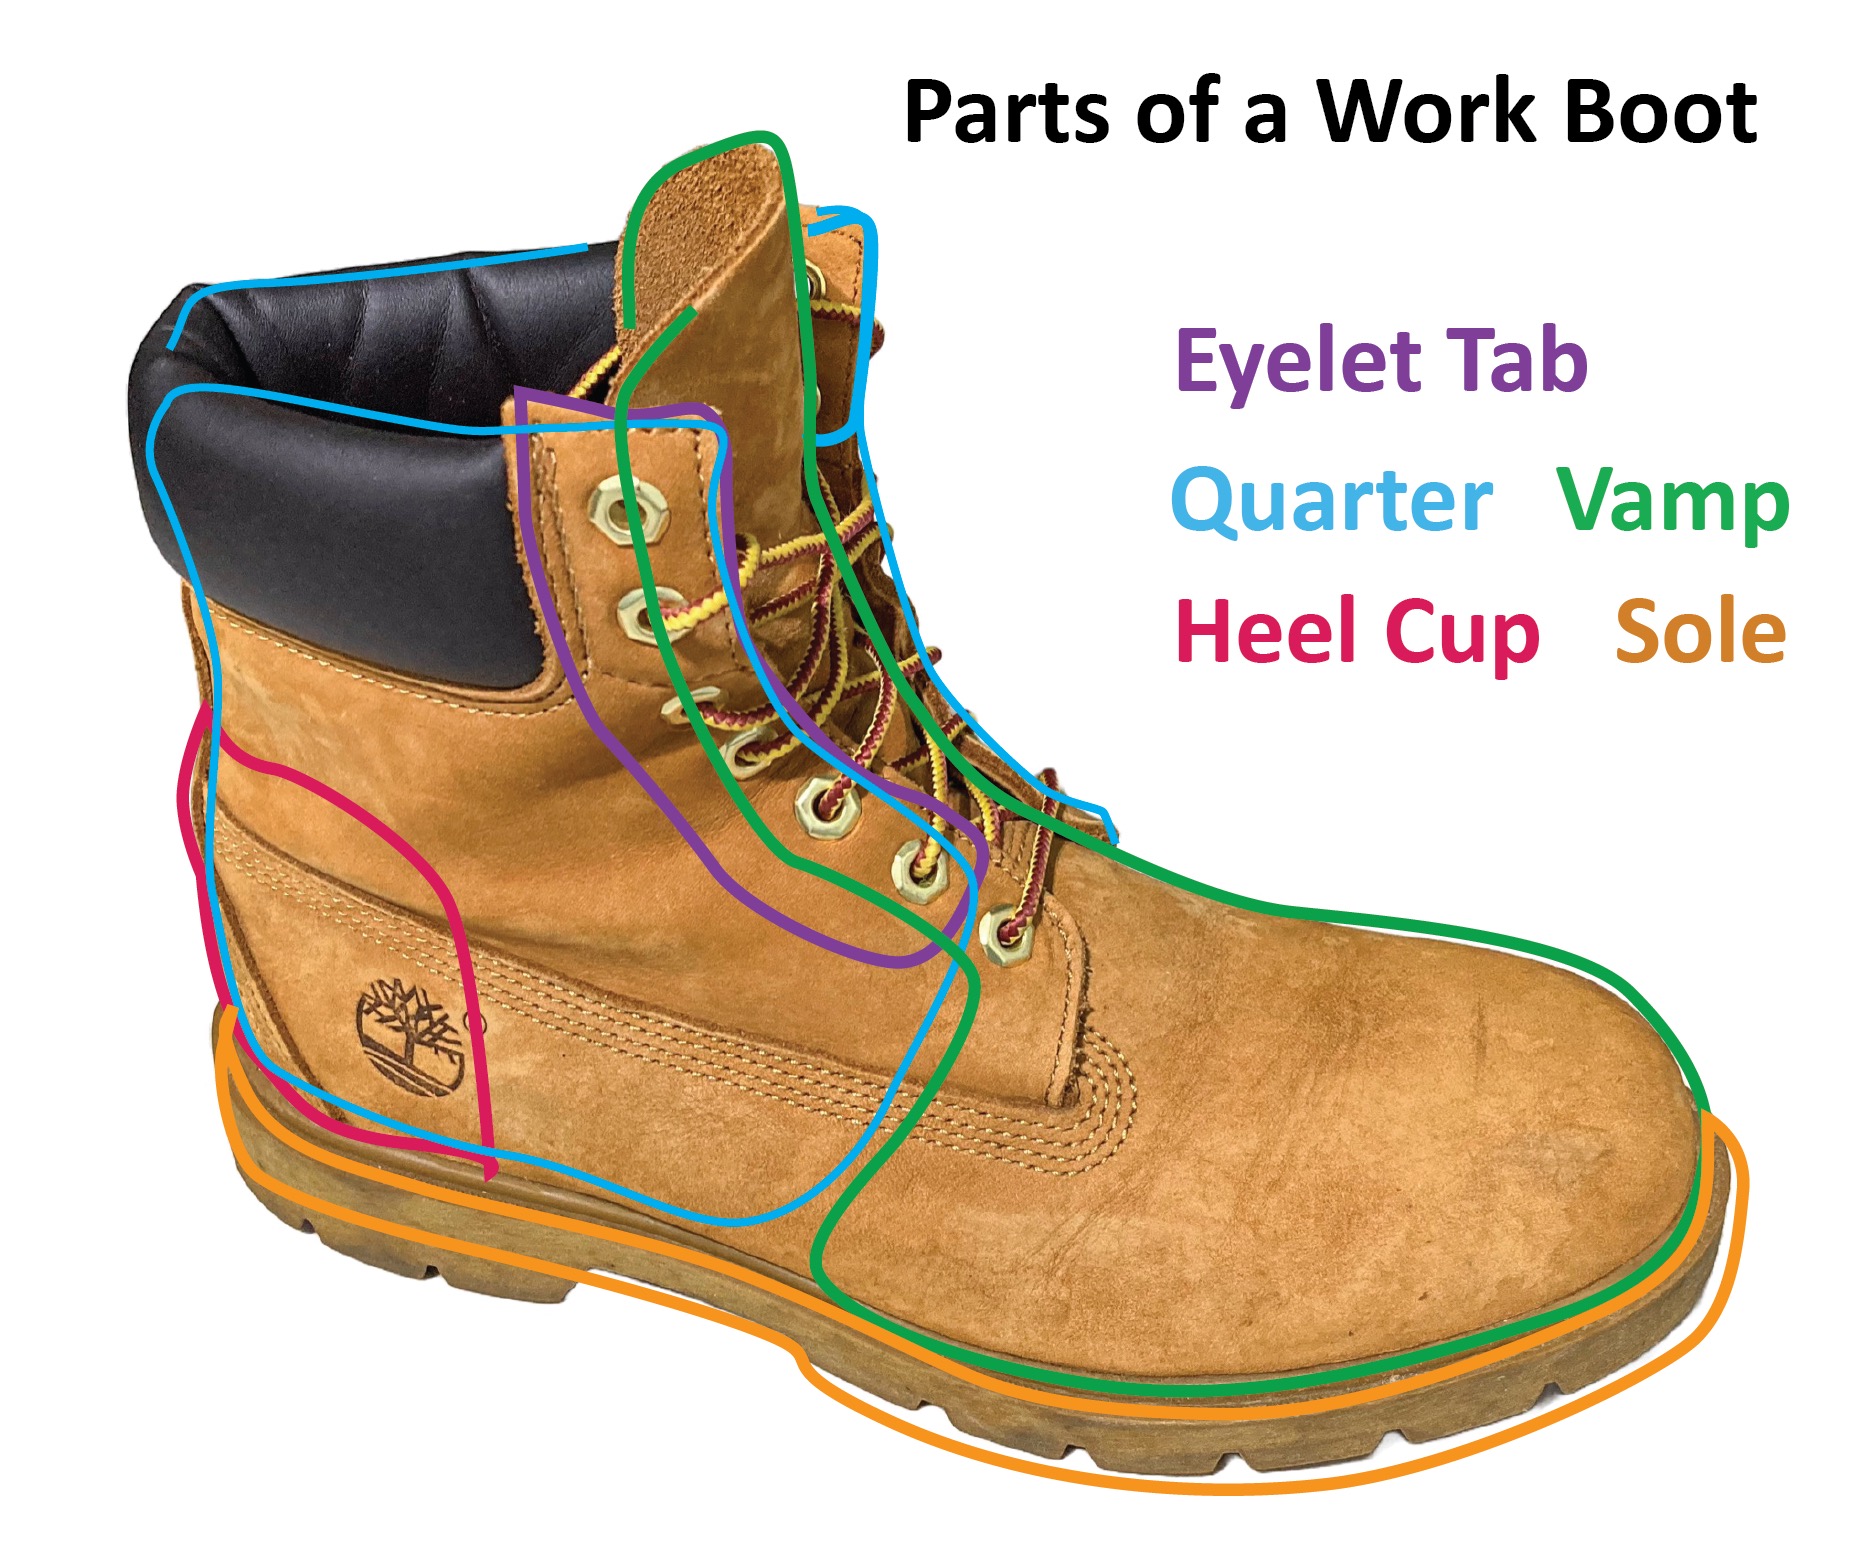
Parts of a leather work boot
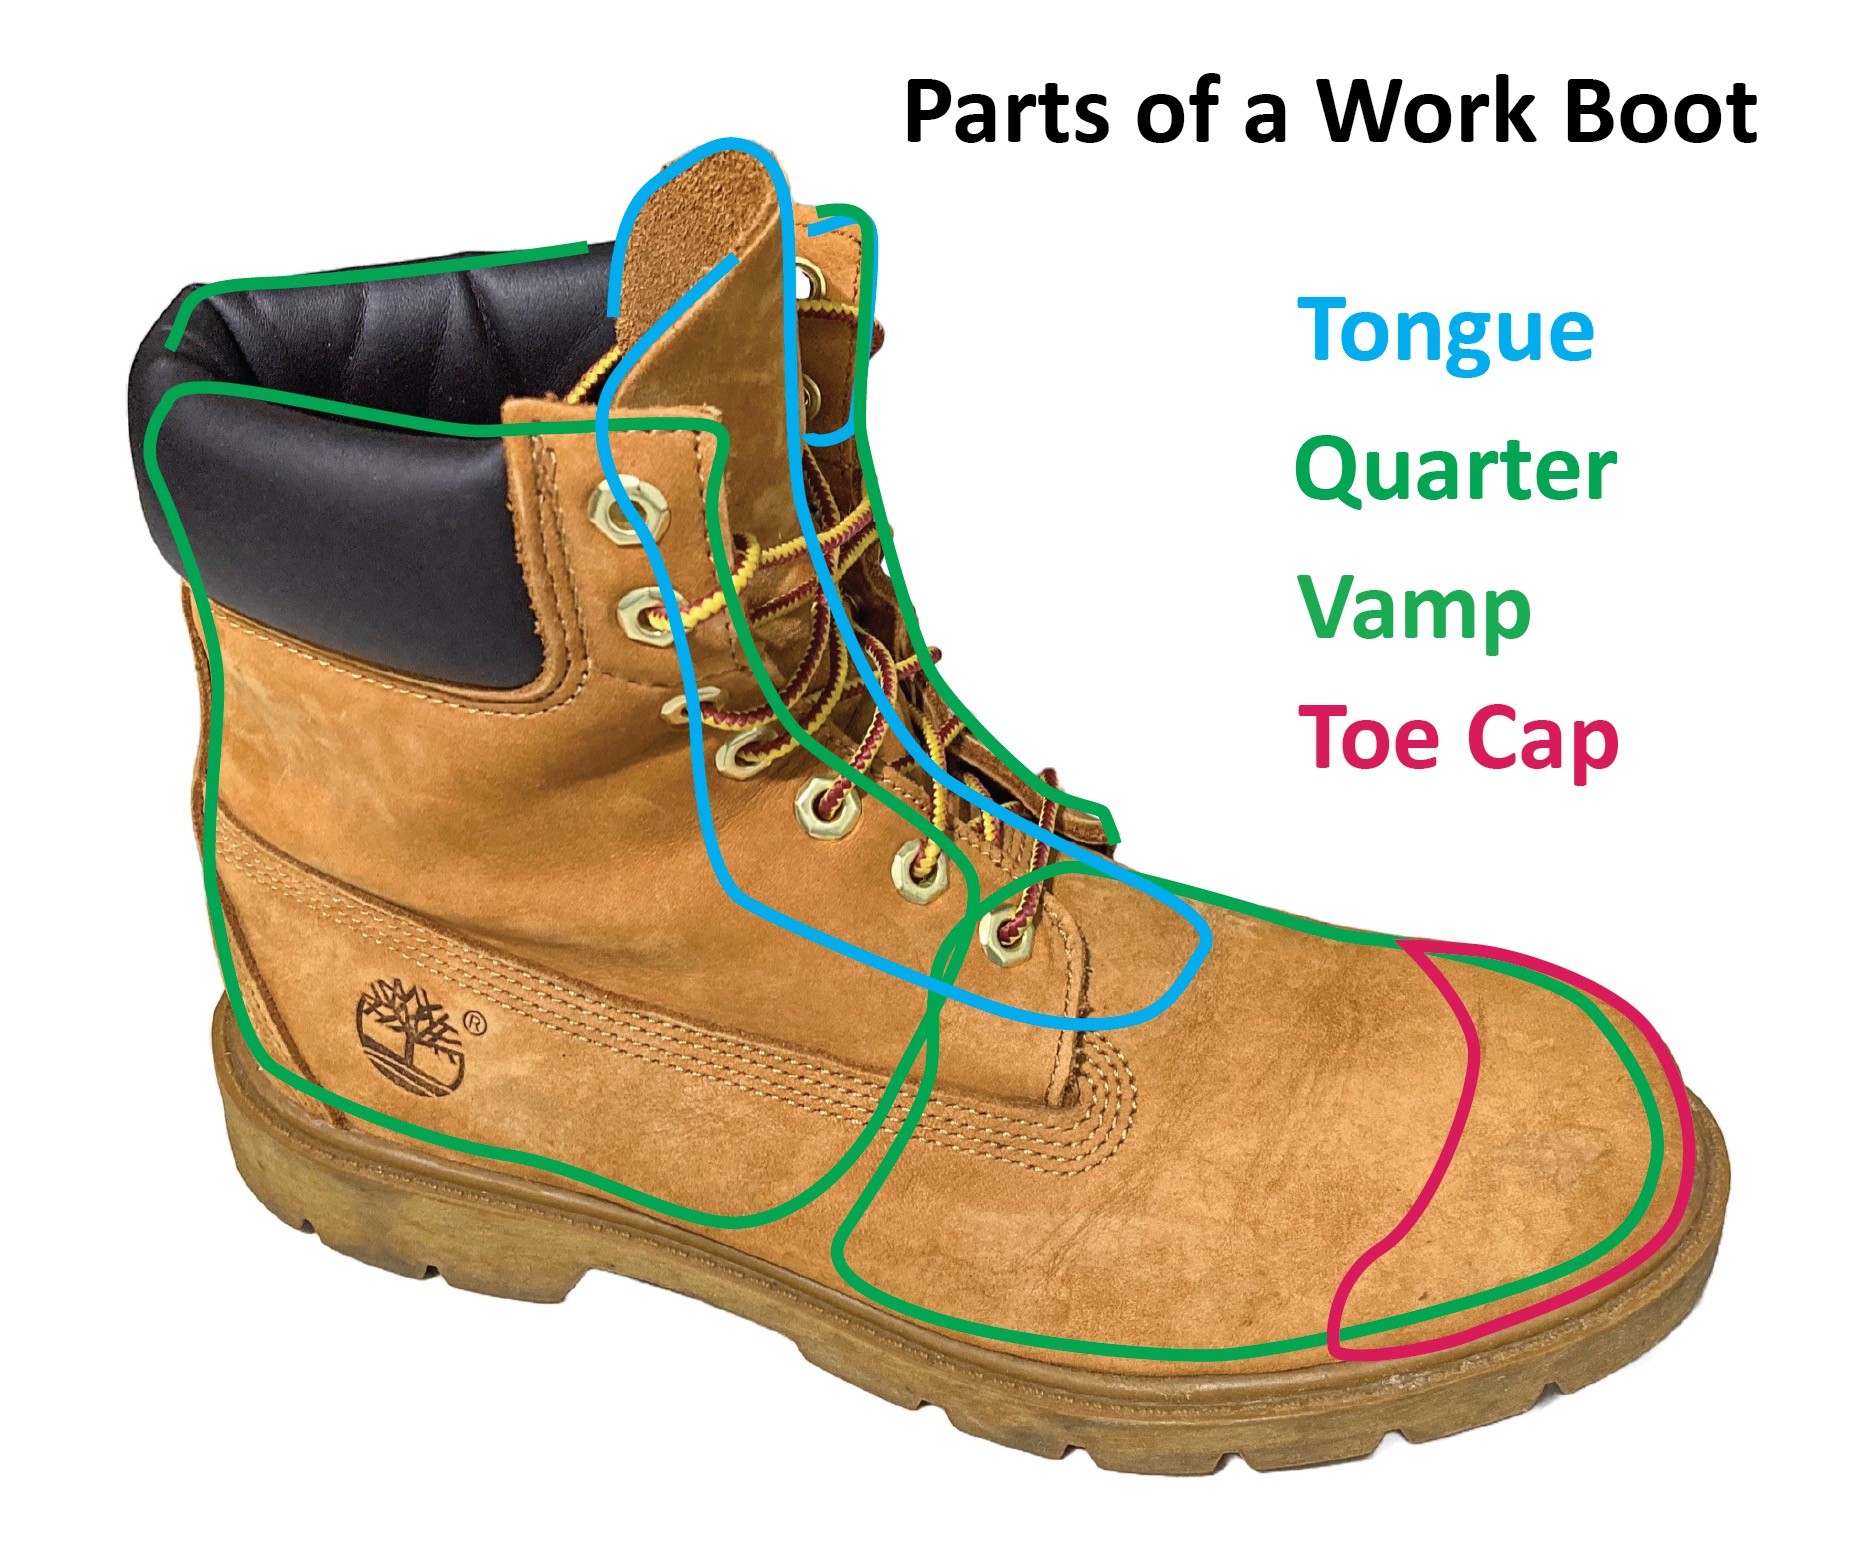
Skate boots are clearly inspired by shoes which people have been making for millenniums. Both are made by similar processes, and share common terminology for naming components. In general, there are two main parts to a shoe: the upper and the sole. Sometimes people refer to the heel piece touching the ground as a separate part.
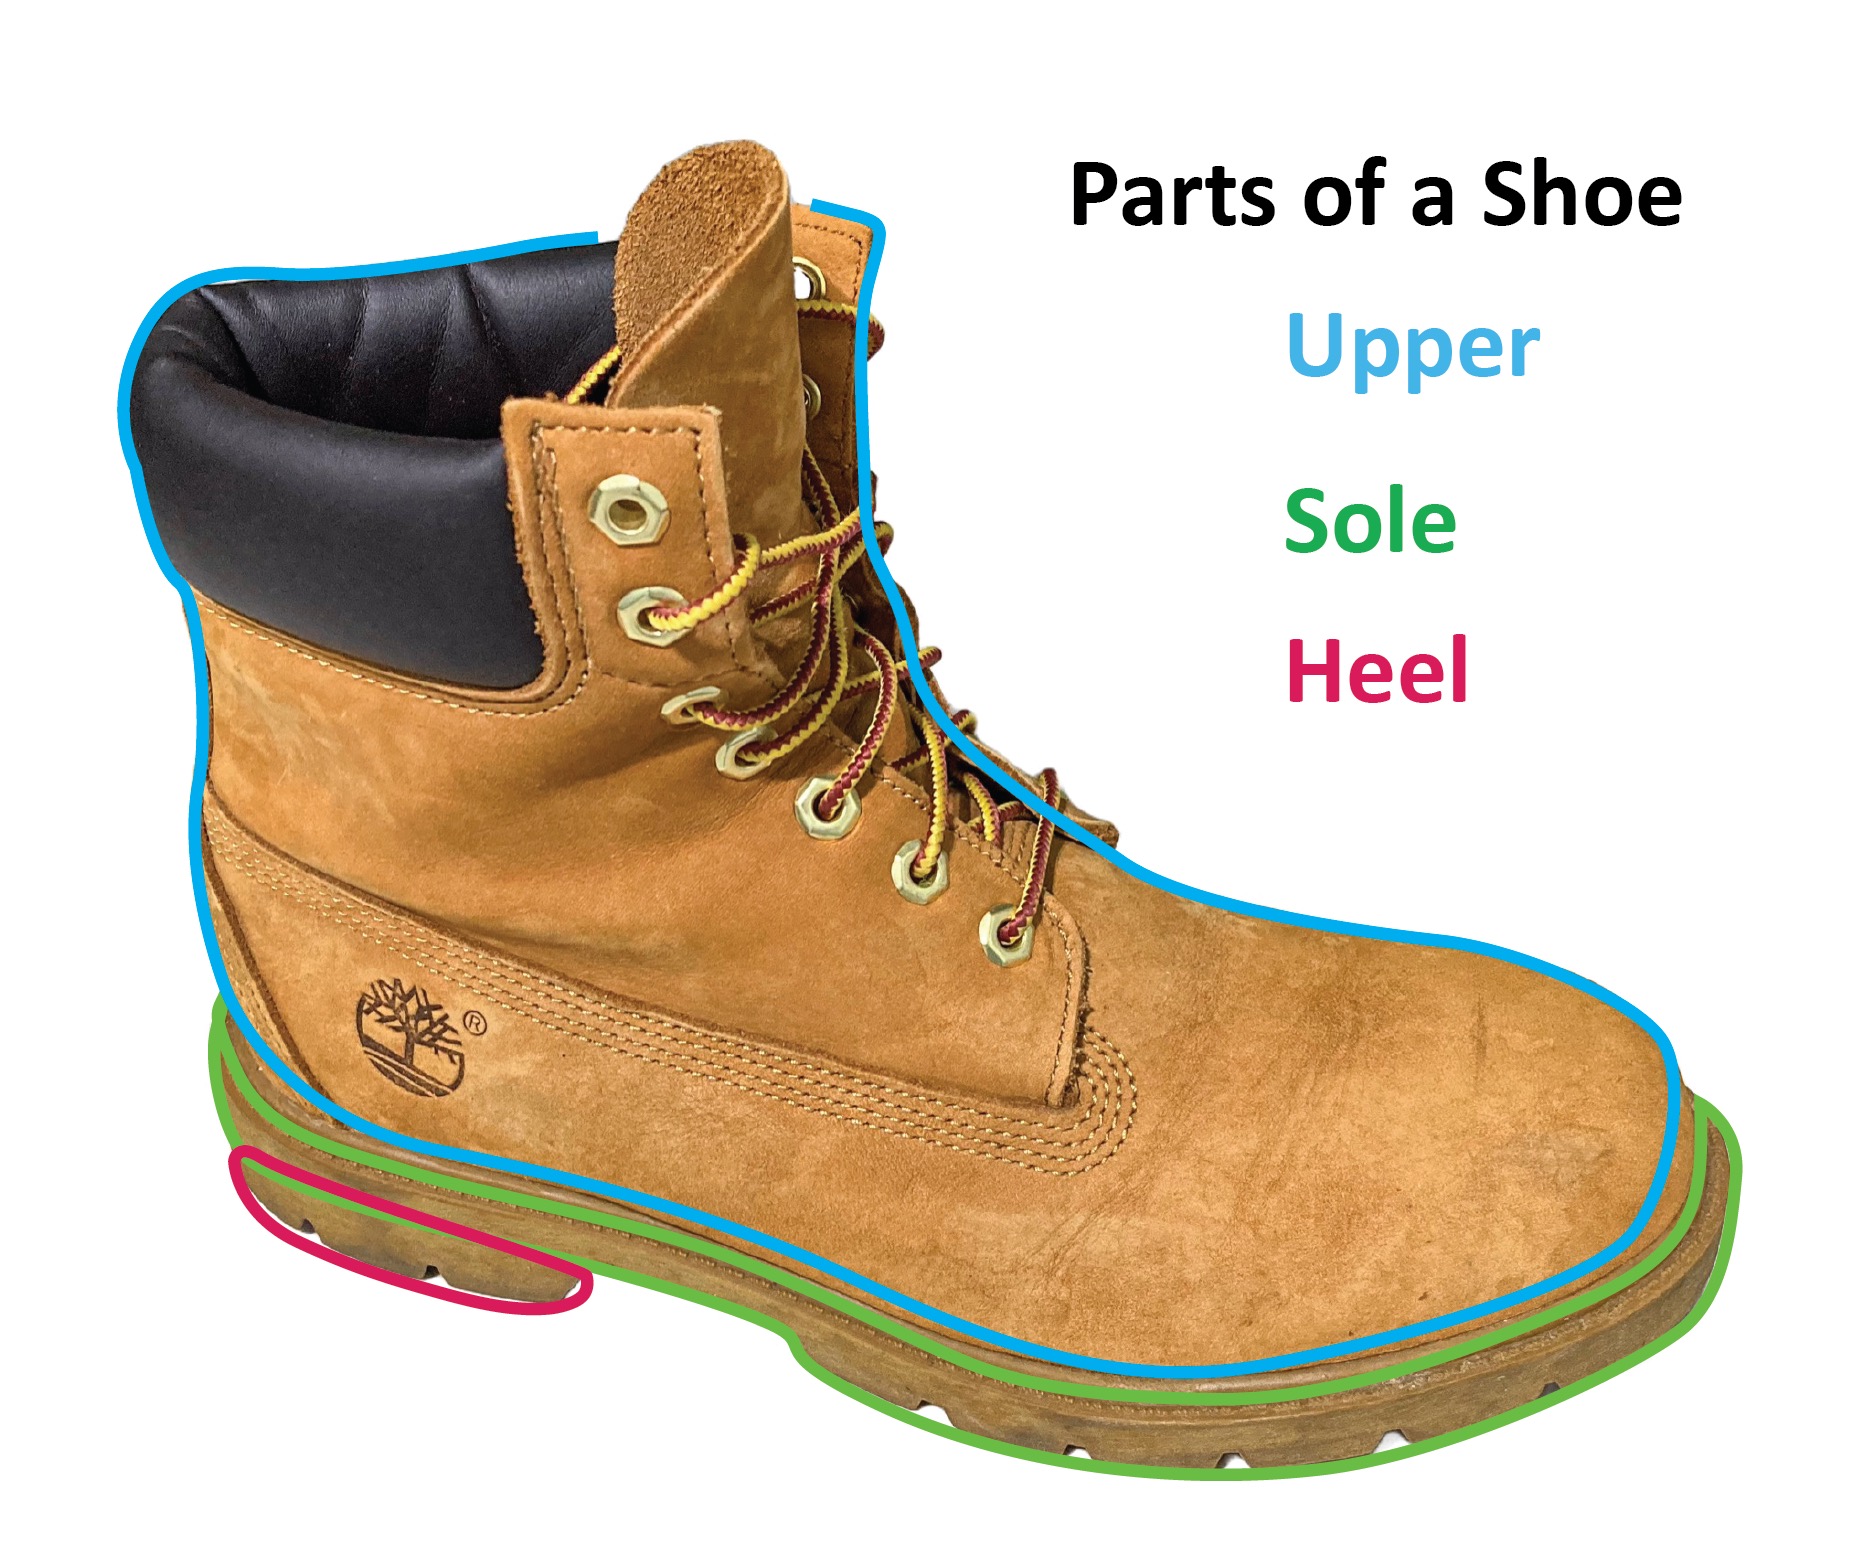

The “upper” comprises a vamp, and two pieces of quarters that are connected at the heel. In general, the vamp refers to the front half of the upper. Each quarter piece forms one side of the rear half of a shoe. Two quarters together form the back of the shoe.
The “vamp” forms mainly the front half of the shoe. But it technically includes the tongue which covers the instep and the shin of a foot. Some eyelets may be stitched onto the vamp. There may be a toe cap as a structural reinforcement for this vulnerable area.

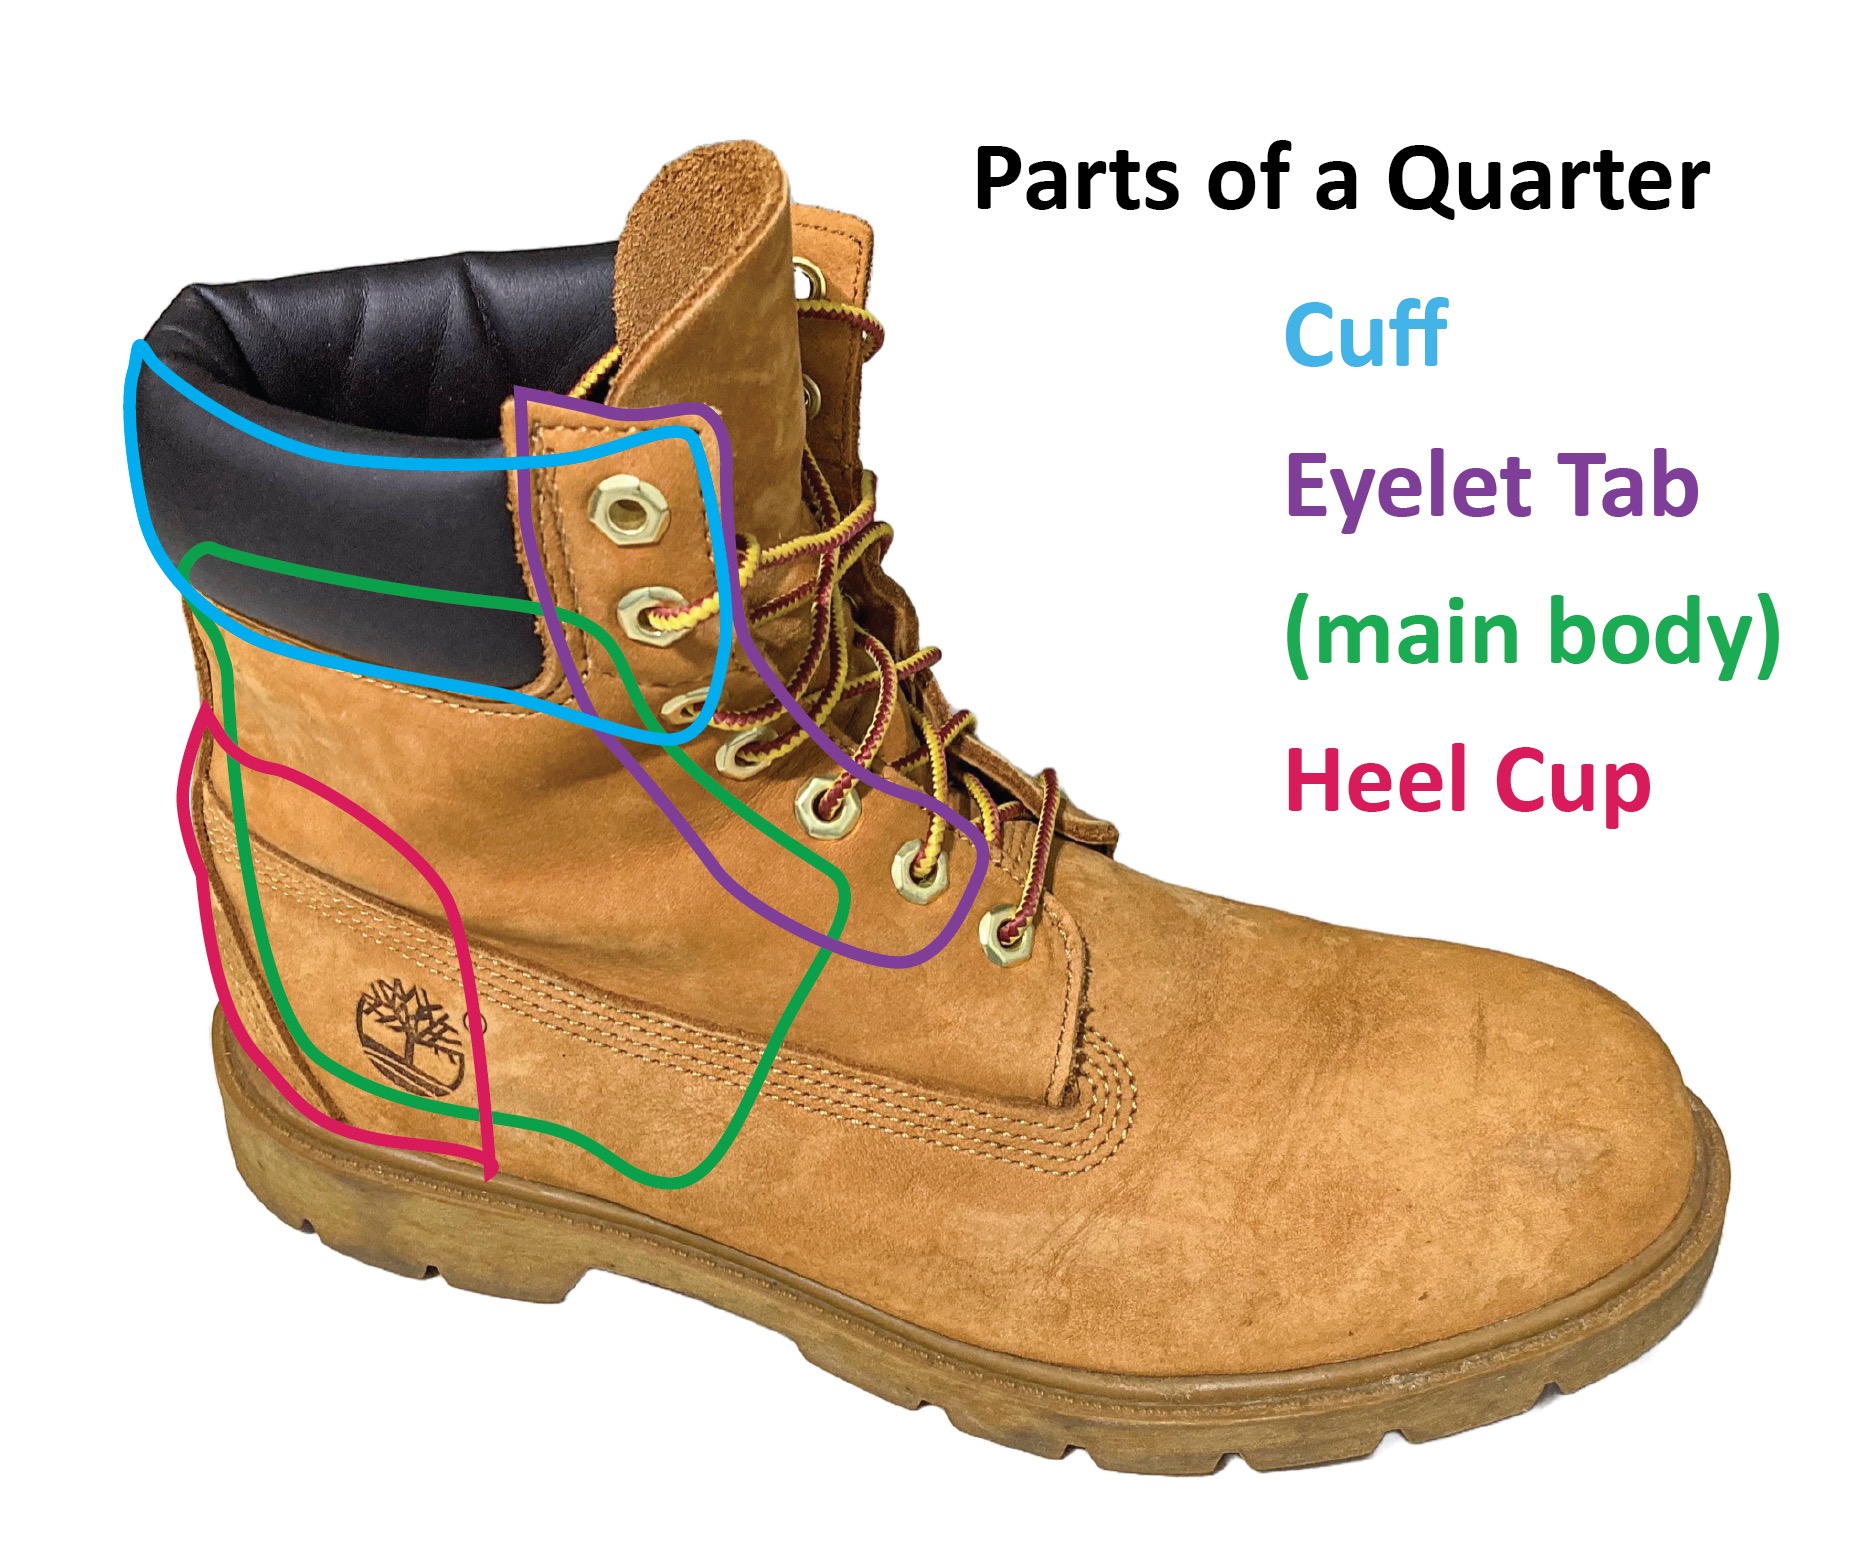
The “quarters” form the two sides and the back of the rear half of the shoe. Some components are stitched onto it, including the cuff, eyelet tabs, and a heel cup. The heel cup is a structural reinforcement to stabilize and secure the heel of a foot.
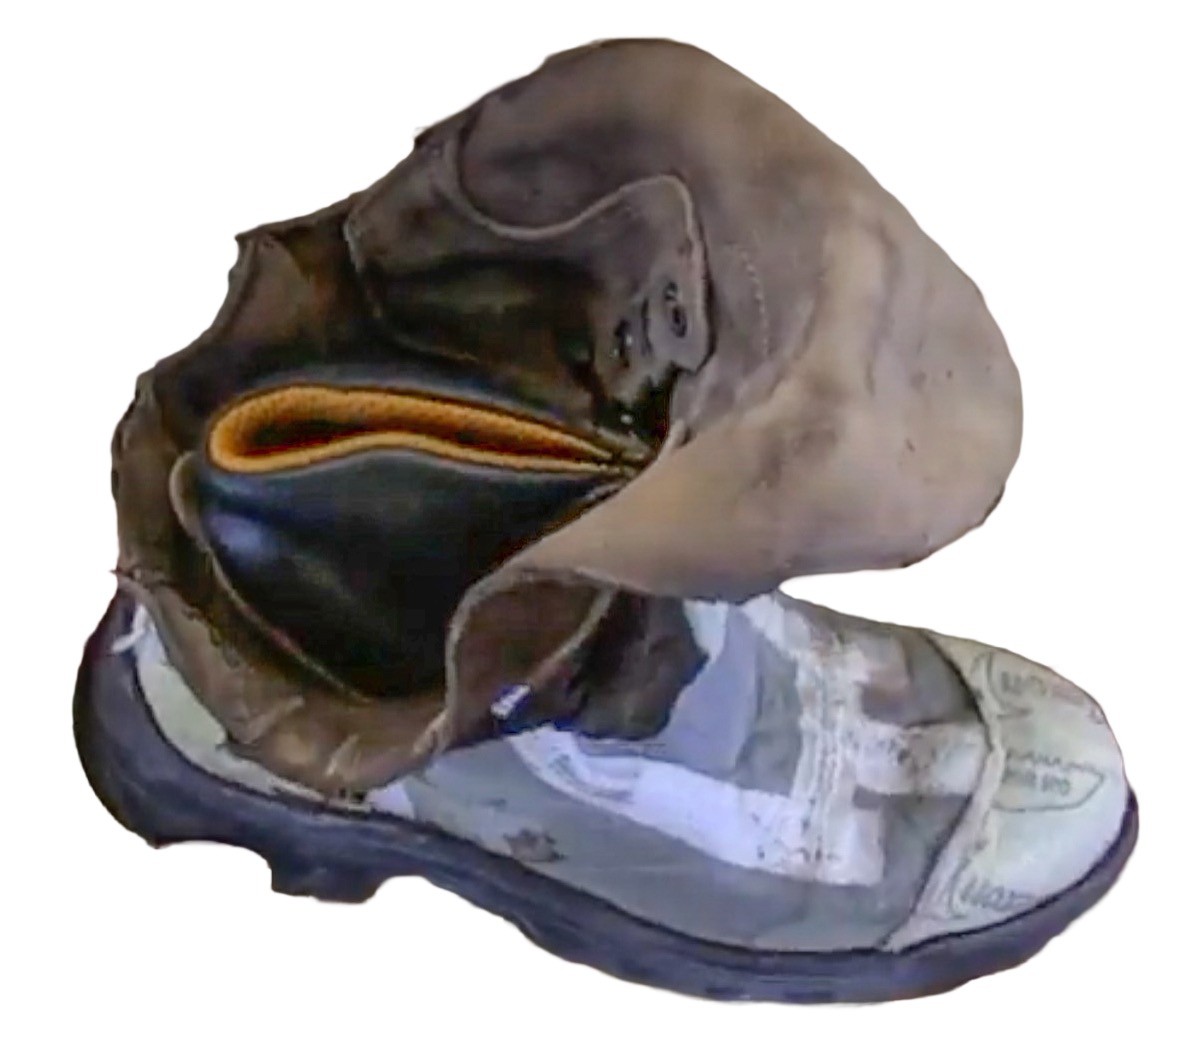
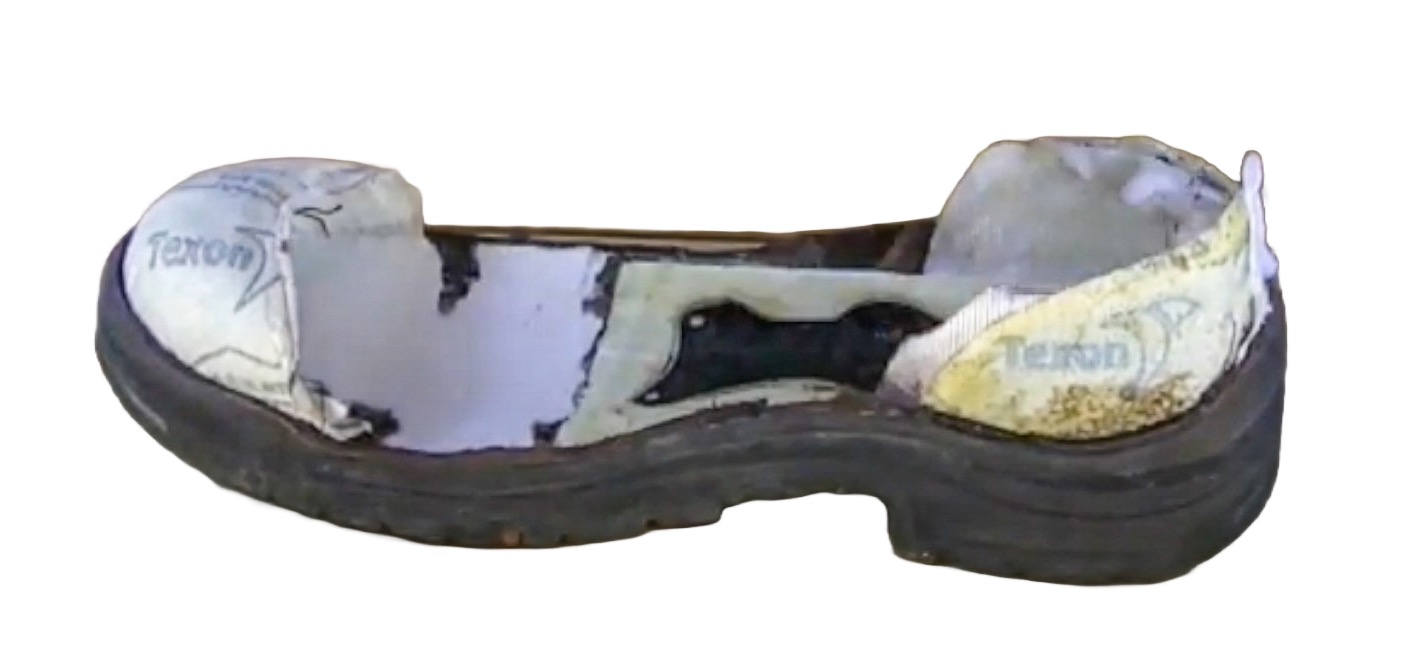
If one slits the upper along the edge of the the sole, to release the upper, the inner liner (or the inner boot) reveals itself. Following are screenshots from a deconstruction video featuring a Timberland work boot being dissected back into three parts: upper, inner liner and sole. The host left the toe cap and the heel cup on the sole.


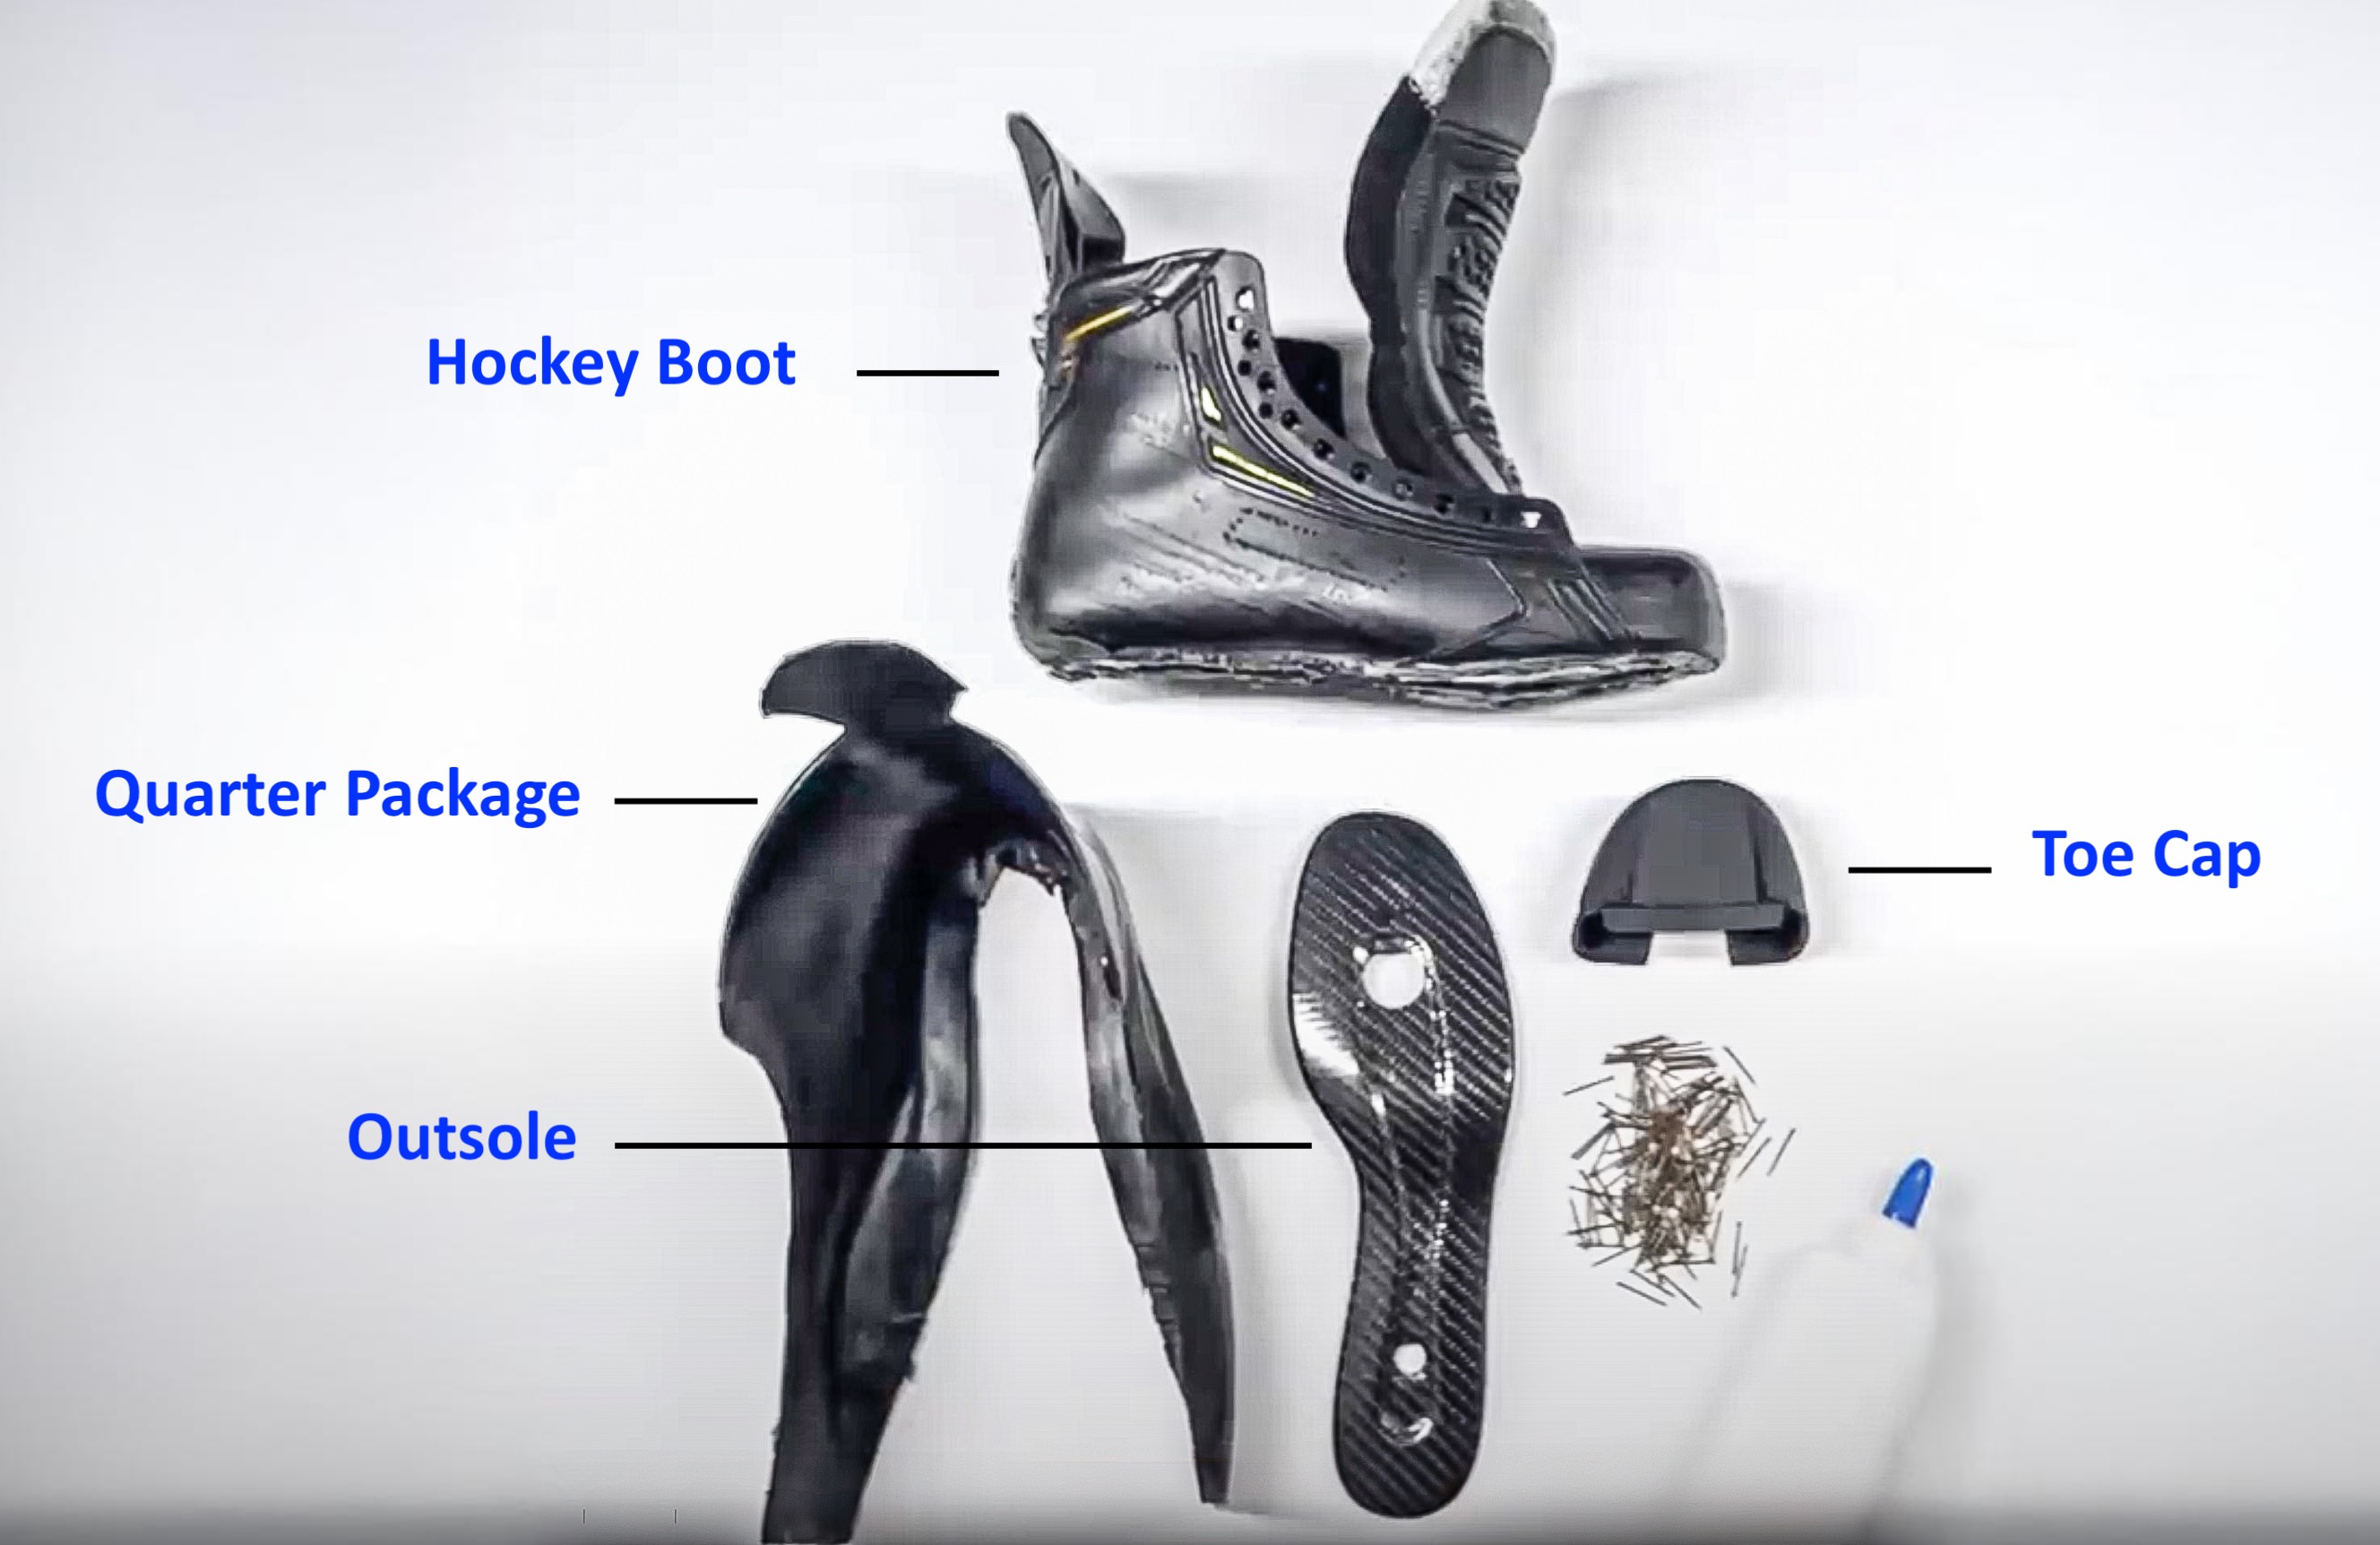
Parts of a hockey boot
There are ground-contact parts in a skate. In an inline hockey skate, these are the frame and wheels mounted on the frame. The part that a foot inserts into is generally referred to as the boot. In fact, manufactures also make and sell hockey boots alone. Plenty of compatible aftermarket frames can be attached to these boots. The boot, the frame and wheels roughly correspond to the upper, the sole and the heel of a normal shoe.
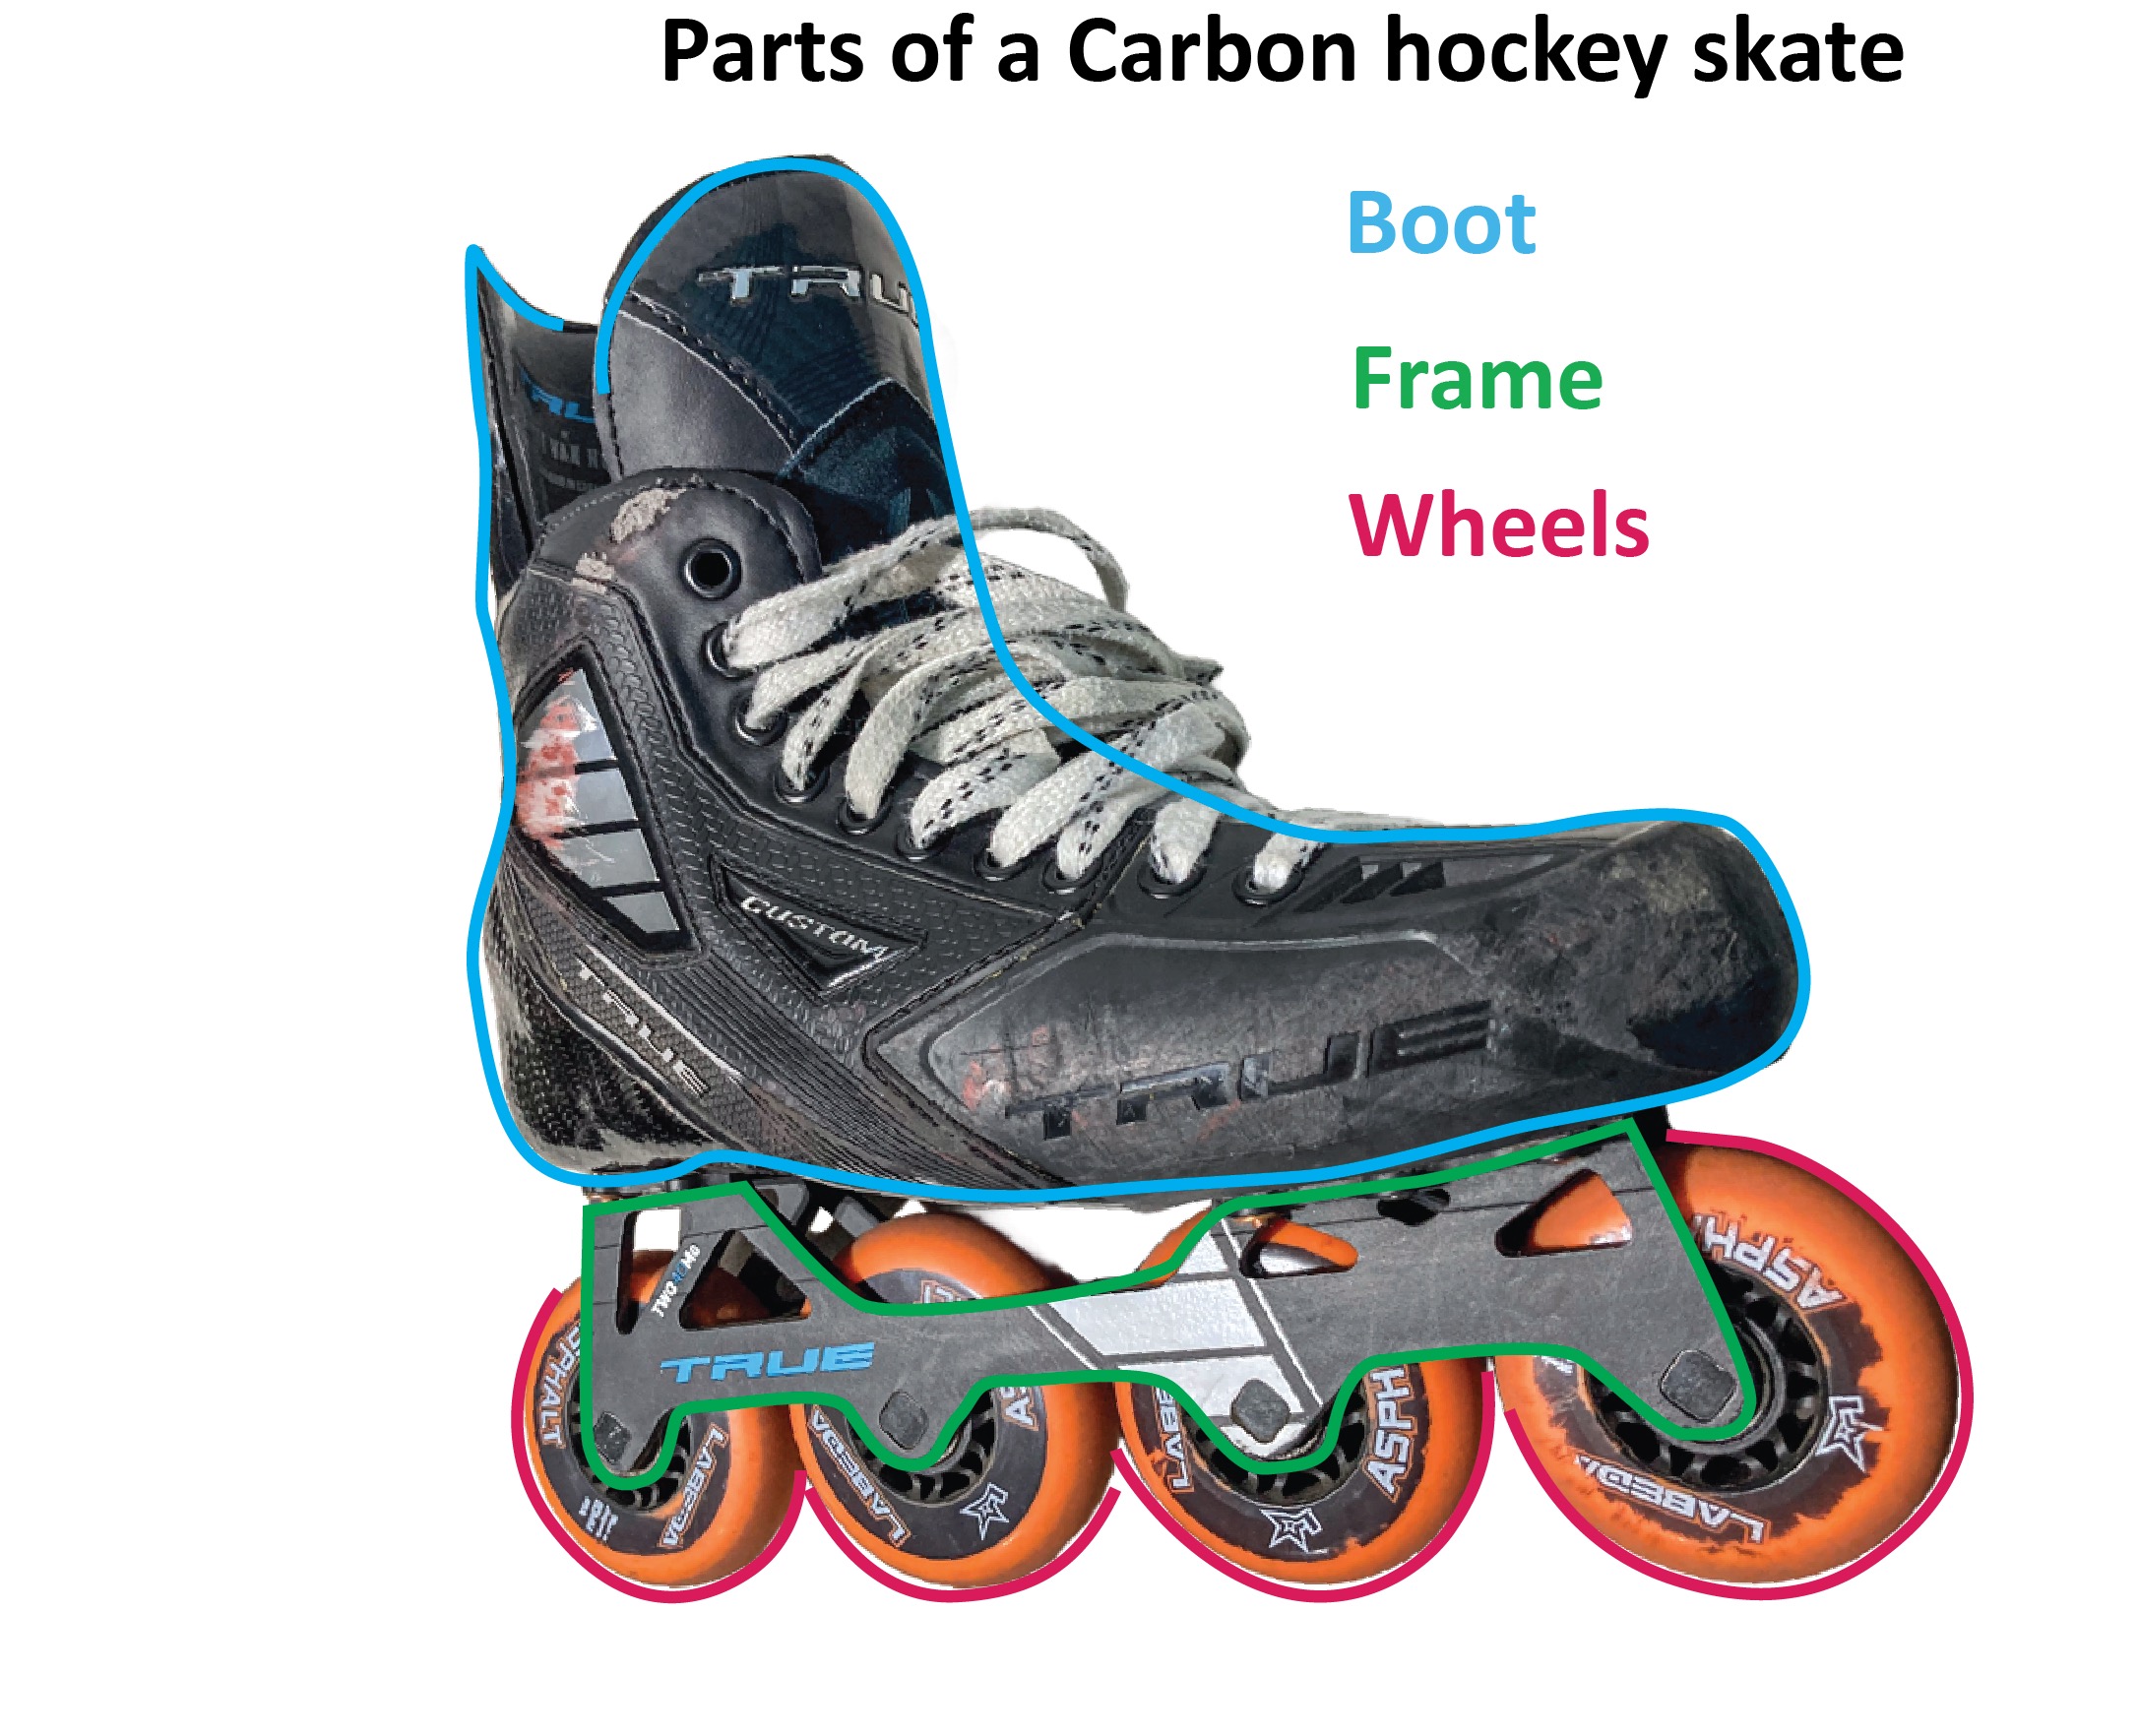
Not surprisingly, parts of a hockey boot are also named after shoe parts. A carbon hockey shell alone replaces two entire quarters, and forms a large part of the vamp. The rest of the front foot is protected by a toe cap in a hockey boot. The tongue clearly serves the same function, and is even more critical in a hockey boot. This sport relies on the skater taking a hard athletic stance at all times, resting a part of their body weight via their shins, on tongues.

Names of finishing components, too, take from the shoe industry. Carbon hockey boots have integrated liners which are permanently glued onto the inside of the shell. Eyelet tabs, laces and decoration are applied just like they are on shoes. Hockey boots don’t have cuffs, unlike urban skates. More on cuffs on urban skates later. Hockey boots do sport its signature tendon guards, for protection from flying pucks, and for assists in pushing-offs.


It should be evident that the one-piece carbon shell does multiple duty. It singlehandedly serves as the sole, houses the entire heel cup, forms two entire quarter panels, provides tabs for all eyelets, and surrounds the toes as side walls of the vamp.

One-piece vs two-piece hockey boots
See this video which explains the key differences visually.
Patent on one-piece hockey skates
In 2016, True Temper Sports (TRUE Hockey) acquired VH Footware Inc. from Scott Van Horne. Today, custom TRUE hockey skates are made basically to the specification Horne wrote in his 2017 patent. Horned described these as “monocoque body” skate boots. Drawings from the patent illustrates this way of making carbon-fiber hockey skates.


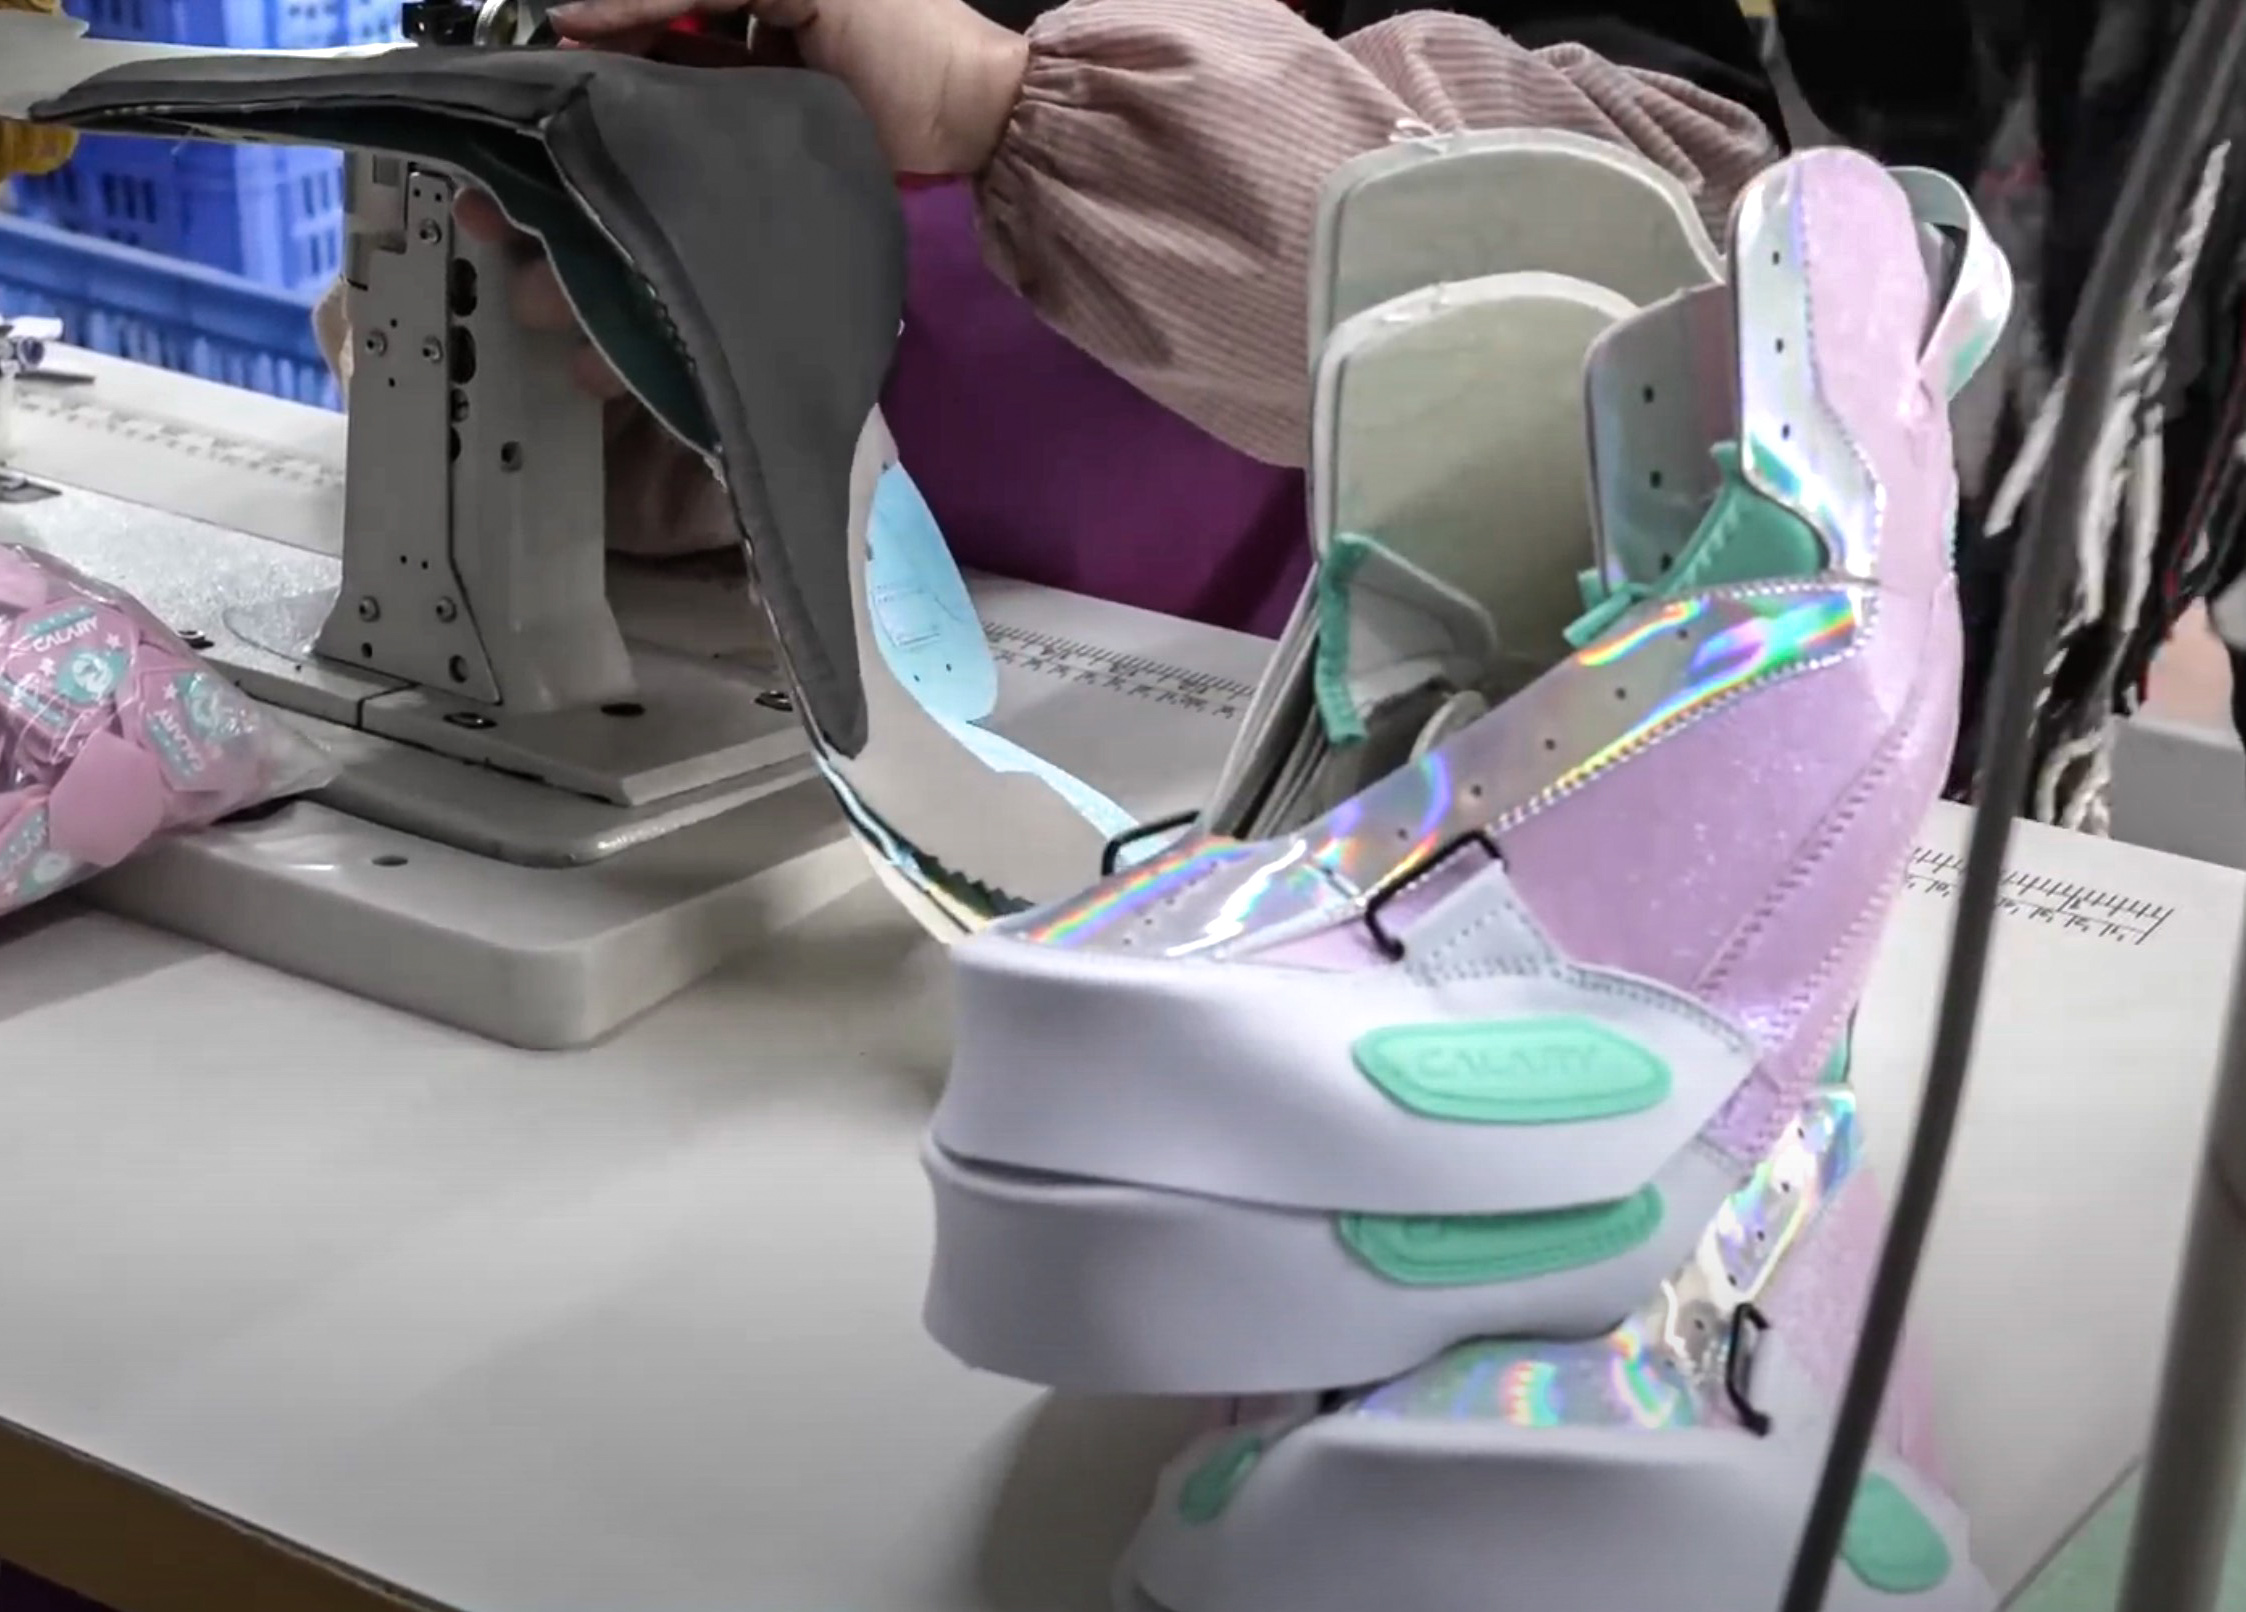
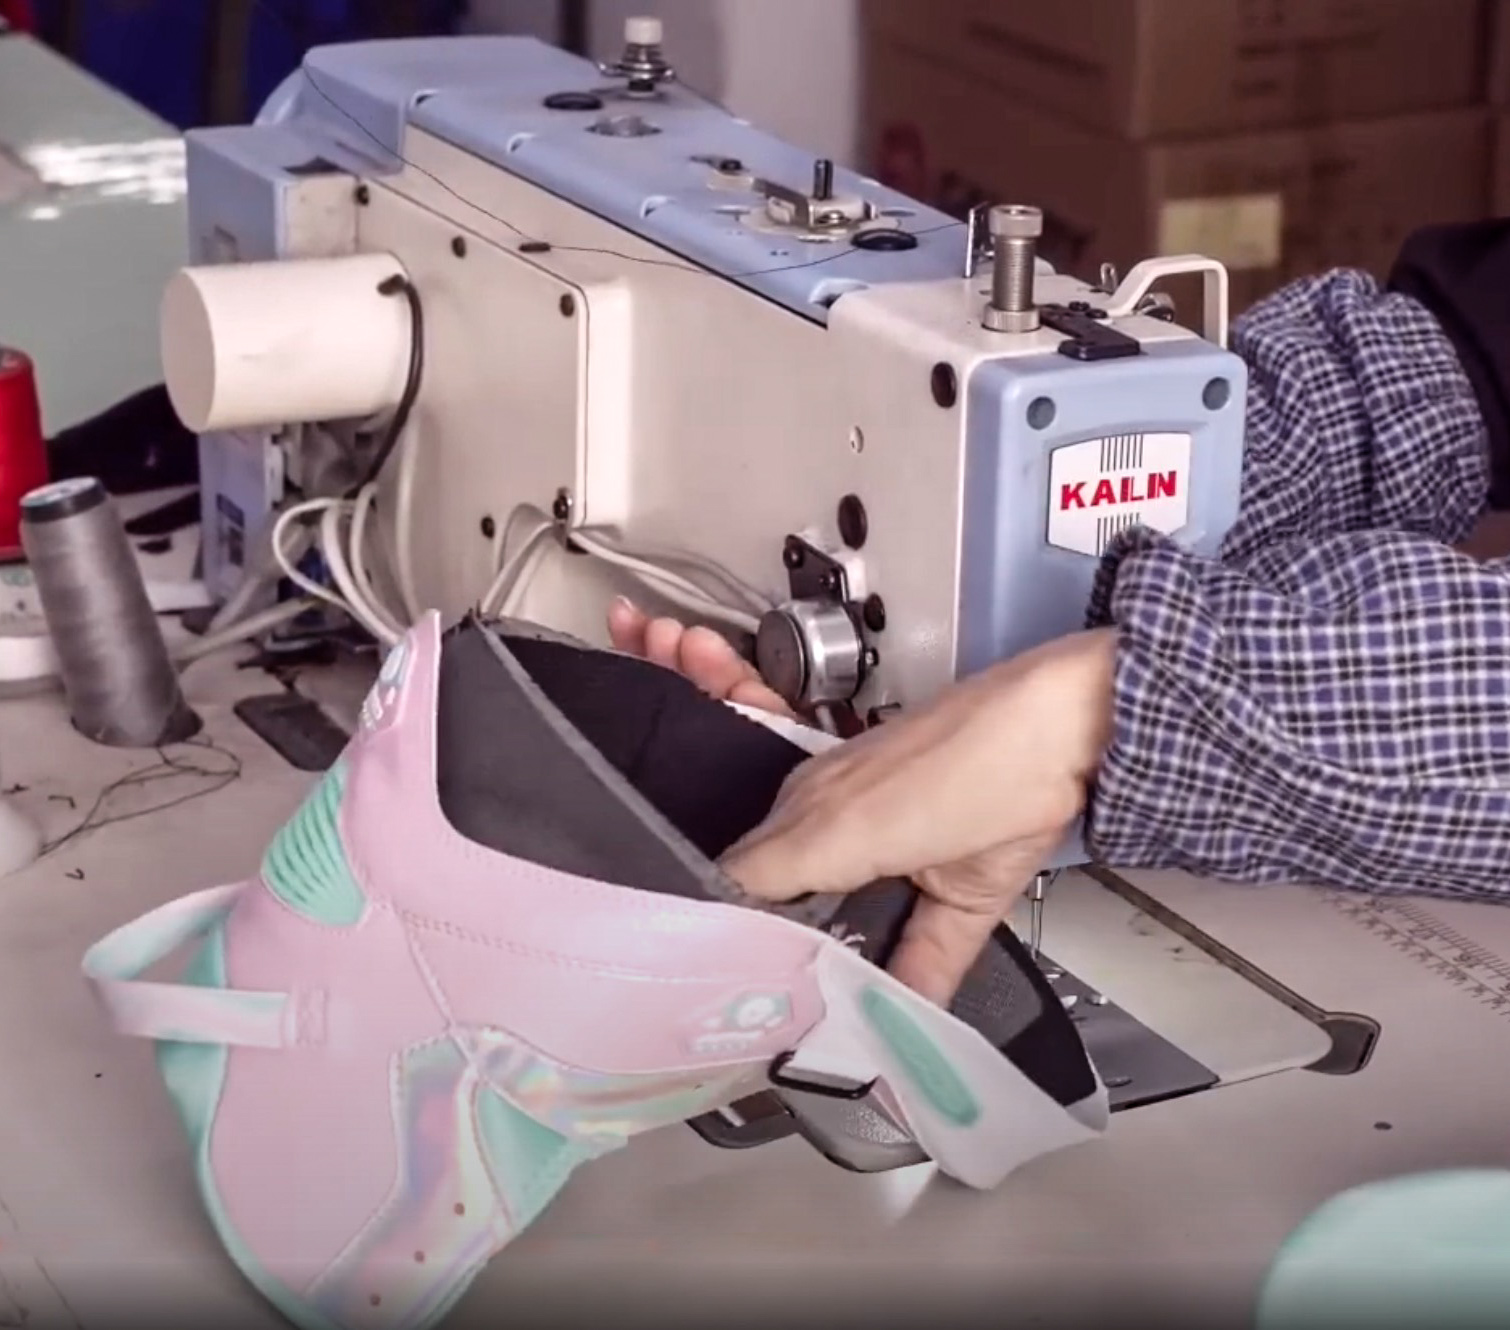
Making carbon-fiber hockey skates
I have taken some screenshots from an excellent video from the good folks from Ice Warehouse. This is the same company as Inline Warehouse from whom I’ve been buying my inline equivalent for a while. I really like how informative their product pages are. And they also make informative videos like the one I reference. This video walks the audience through the entire production process of a pair of TRUE carbon hockey skates. Shown here are “ice” skates. But their “street” skates are done the same way, with almost the same riveting patterns on boots, but with an inline frame attached instead.
Some carbon shells are made today with compression molding. Others are done with more traditional hand lay-up. In this video, the shell is made with layered molding.

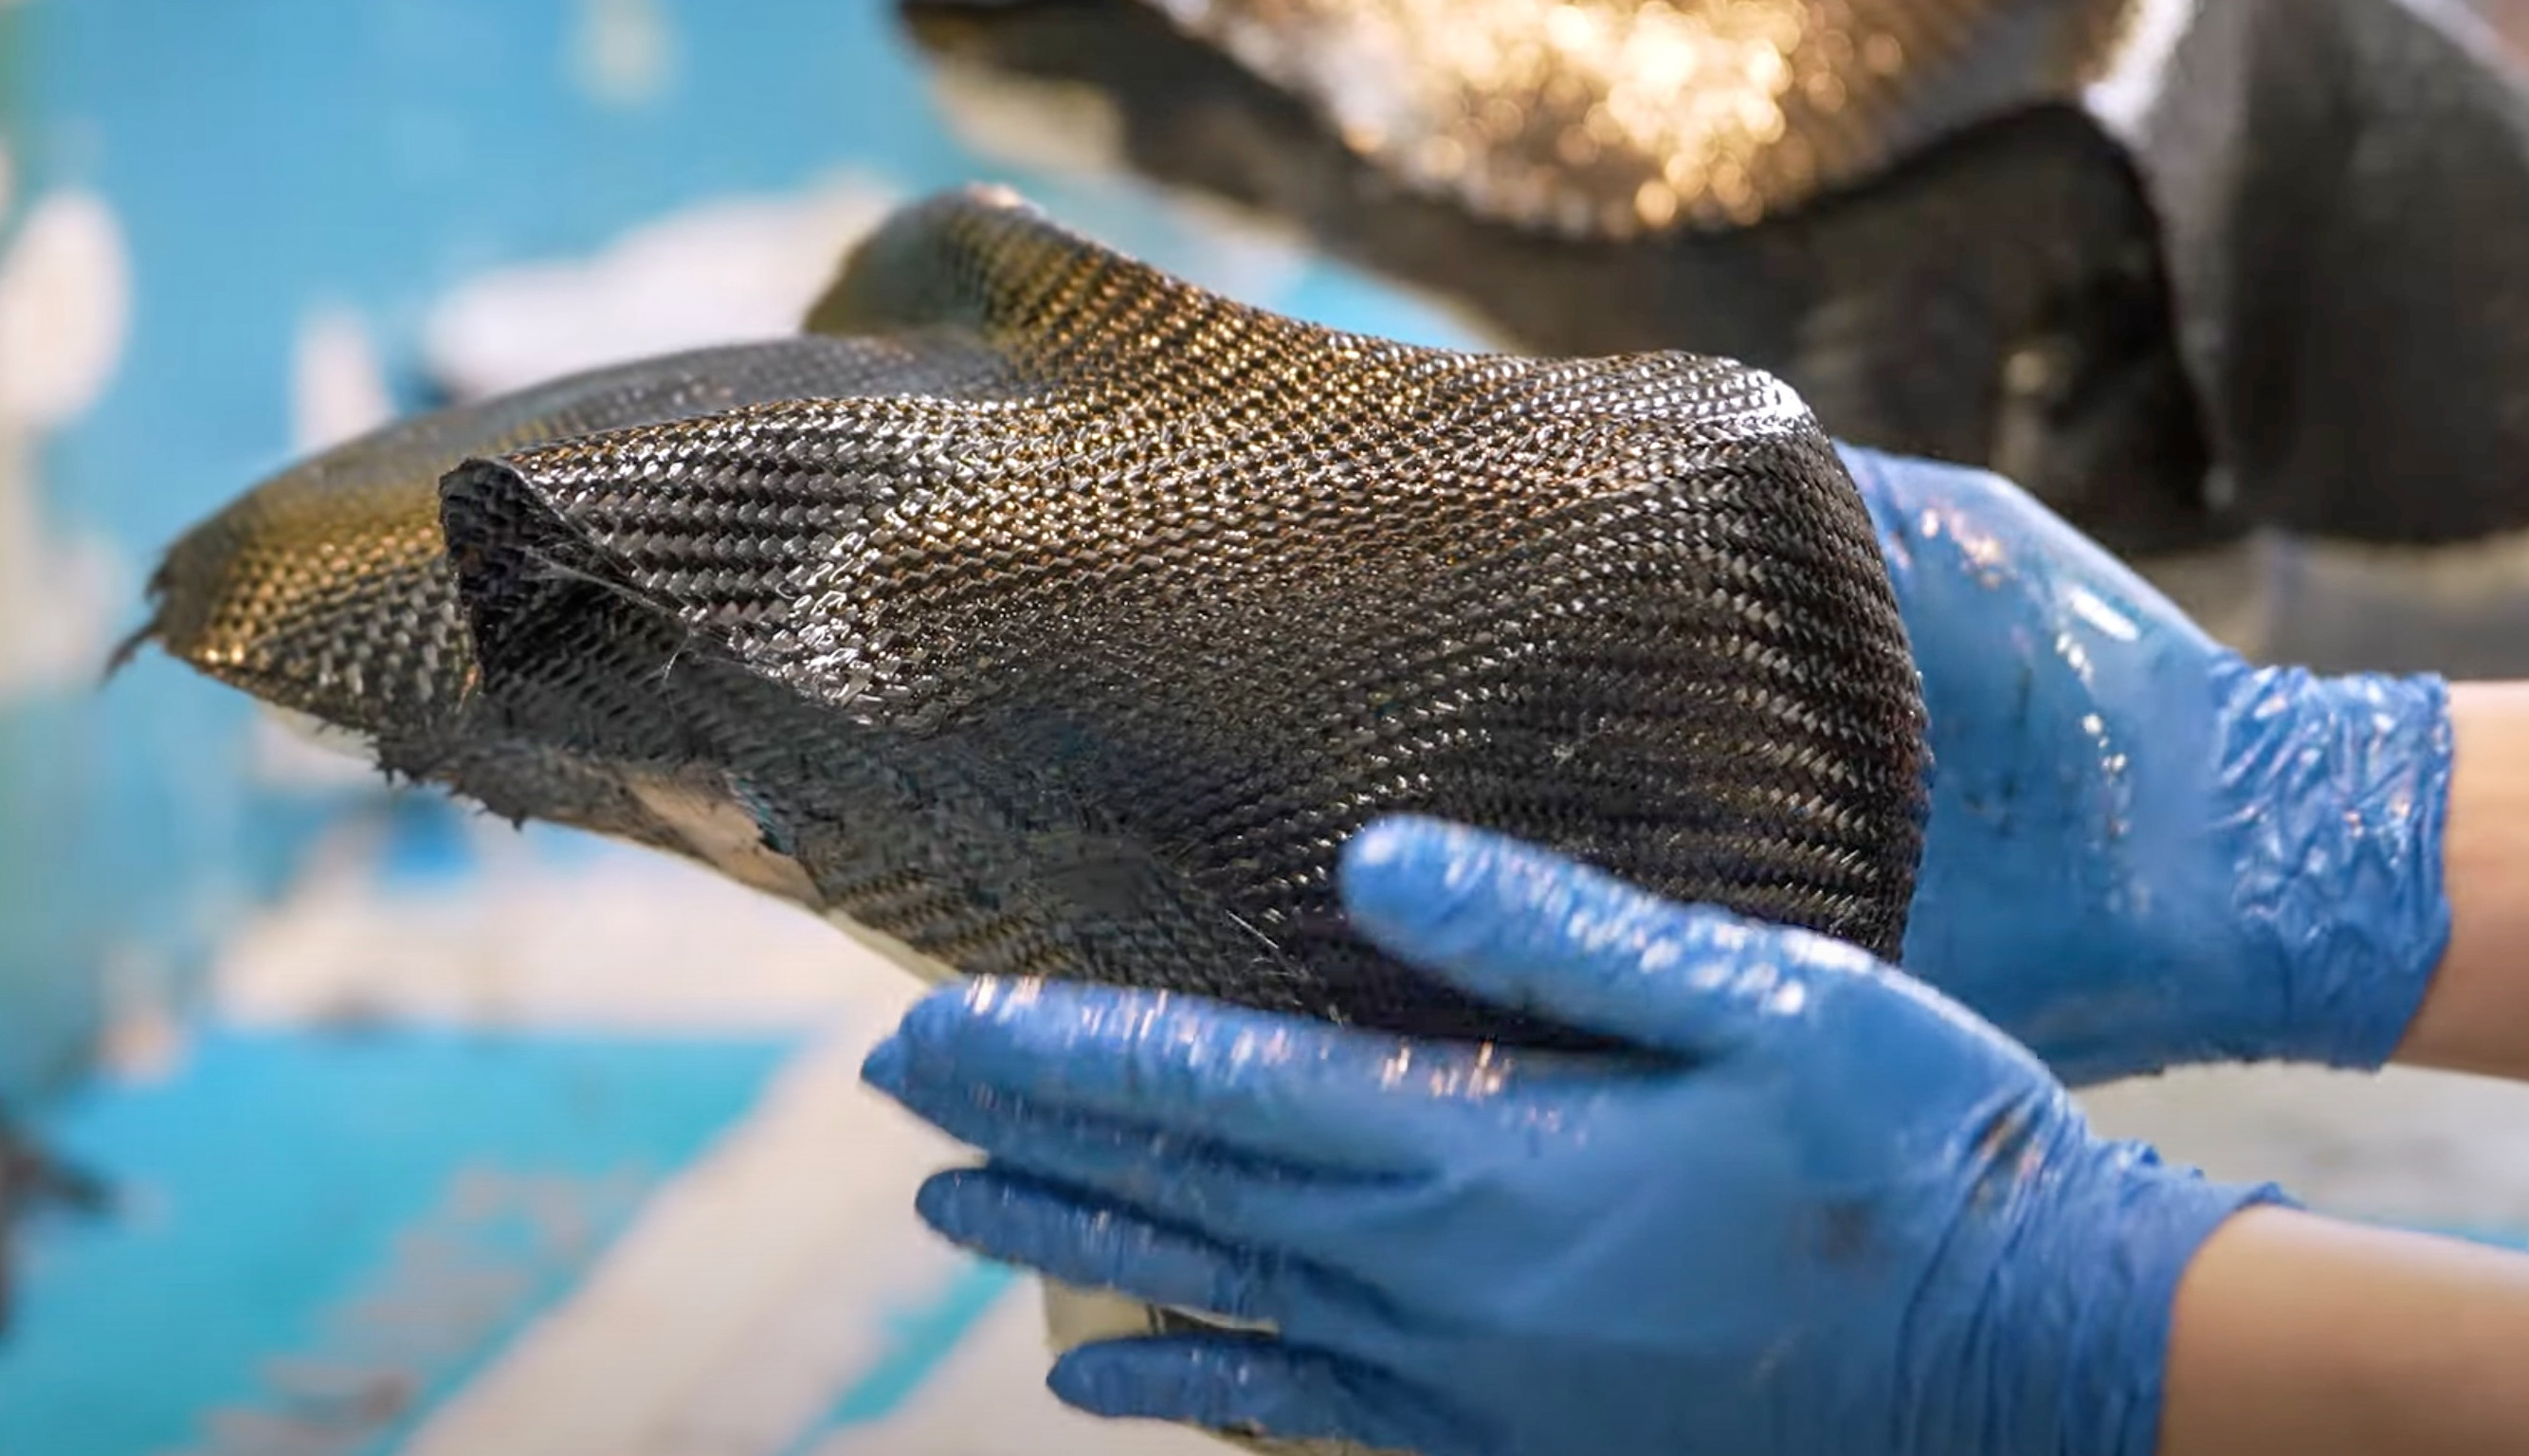
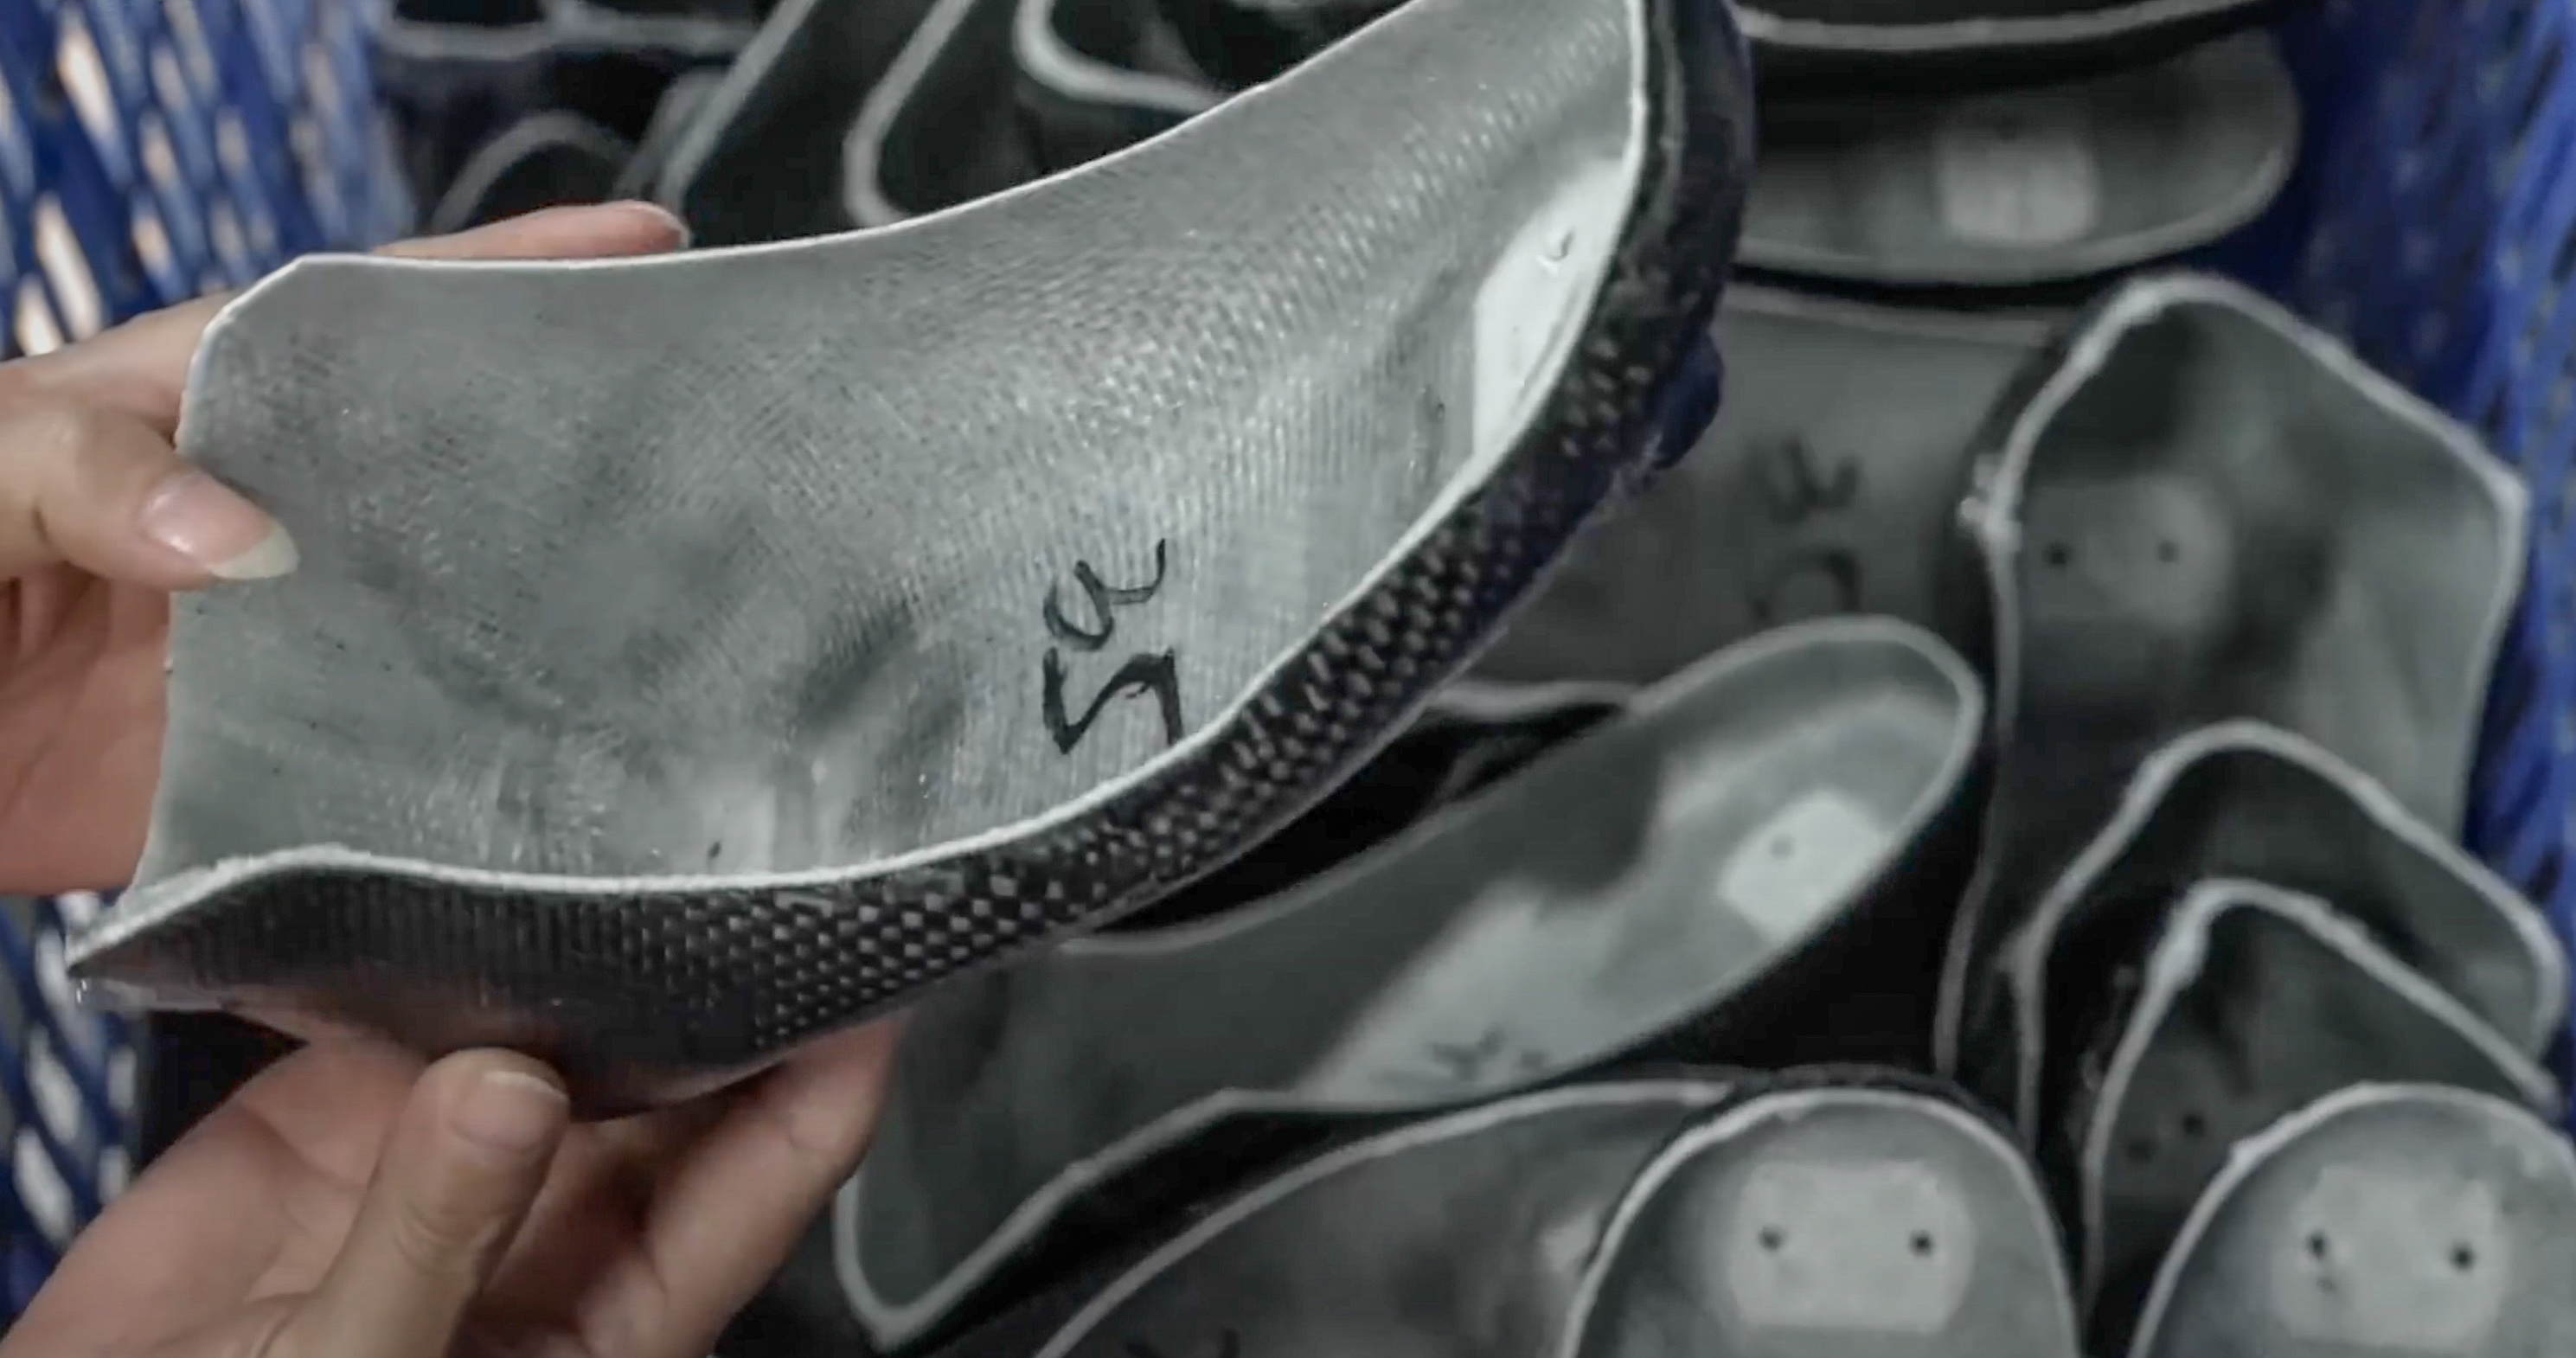
Air pockets are carefully squeezed out of the polymer bag. A fully-formed carbon shell is now ready for heat-curing.

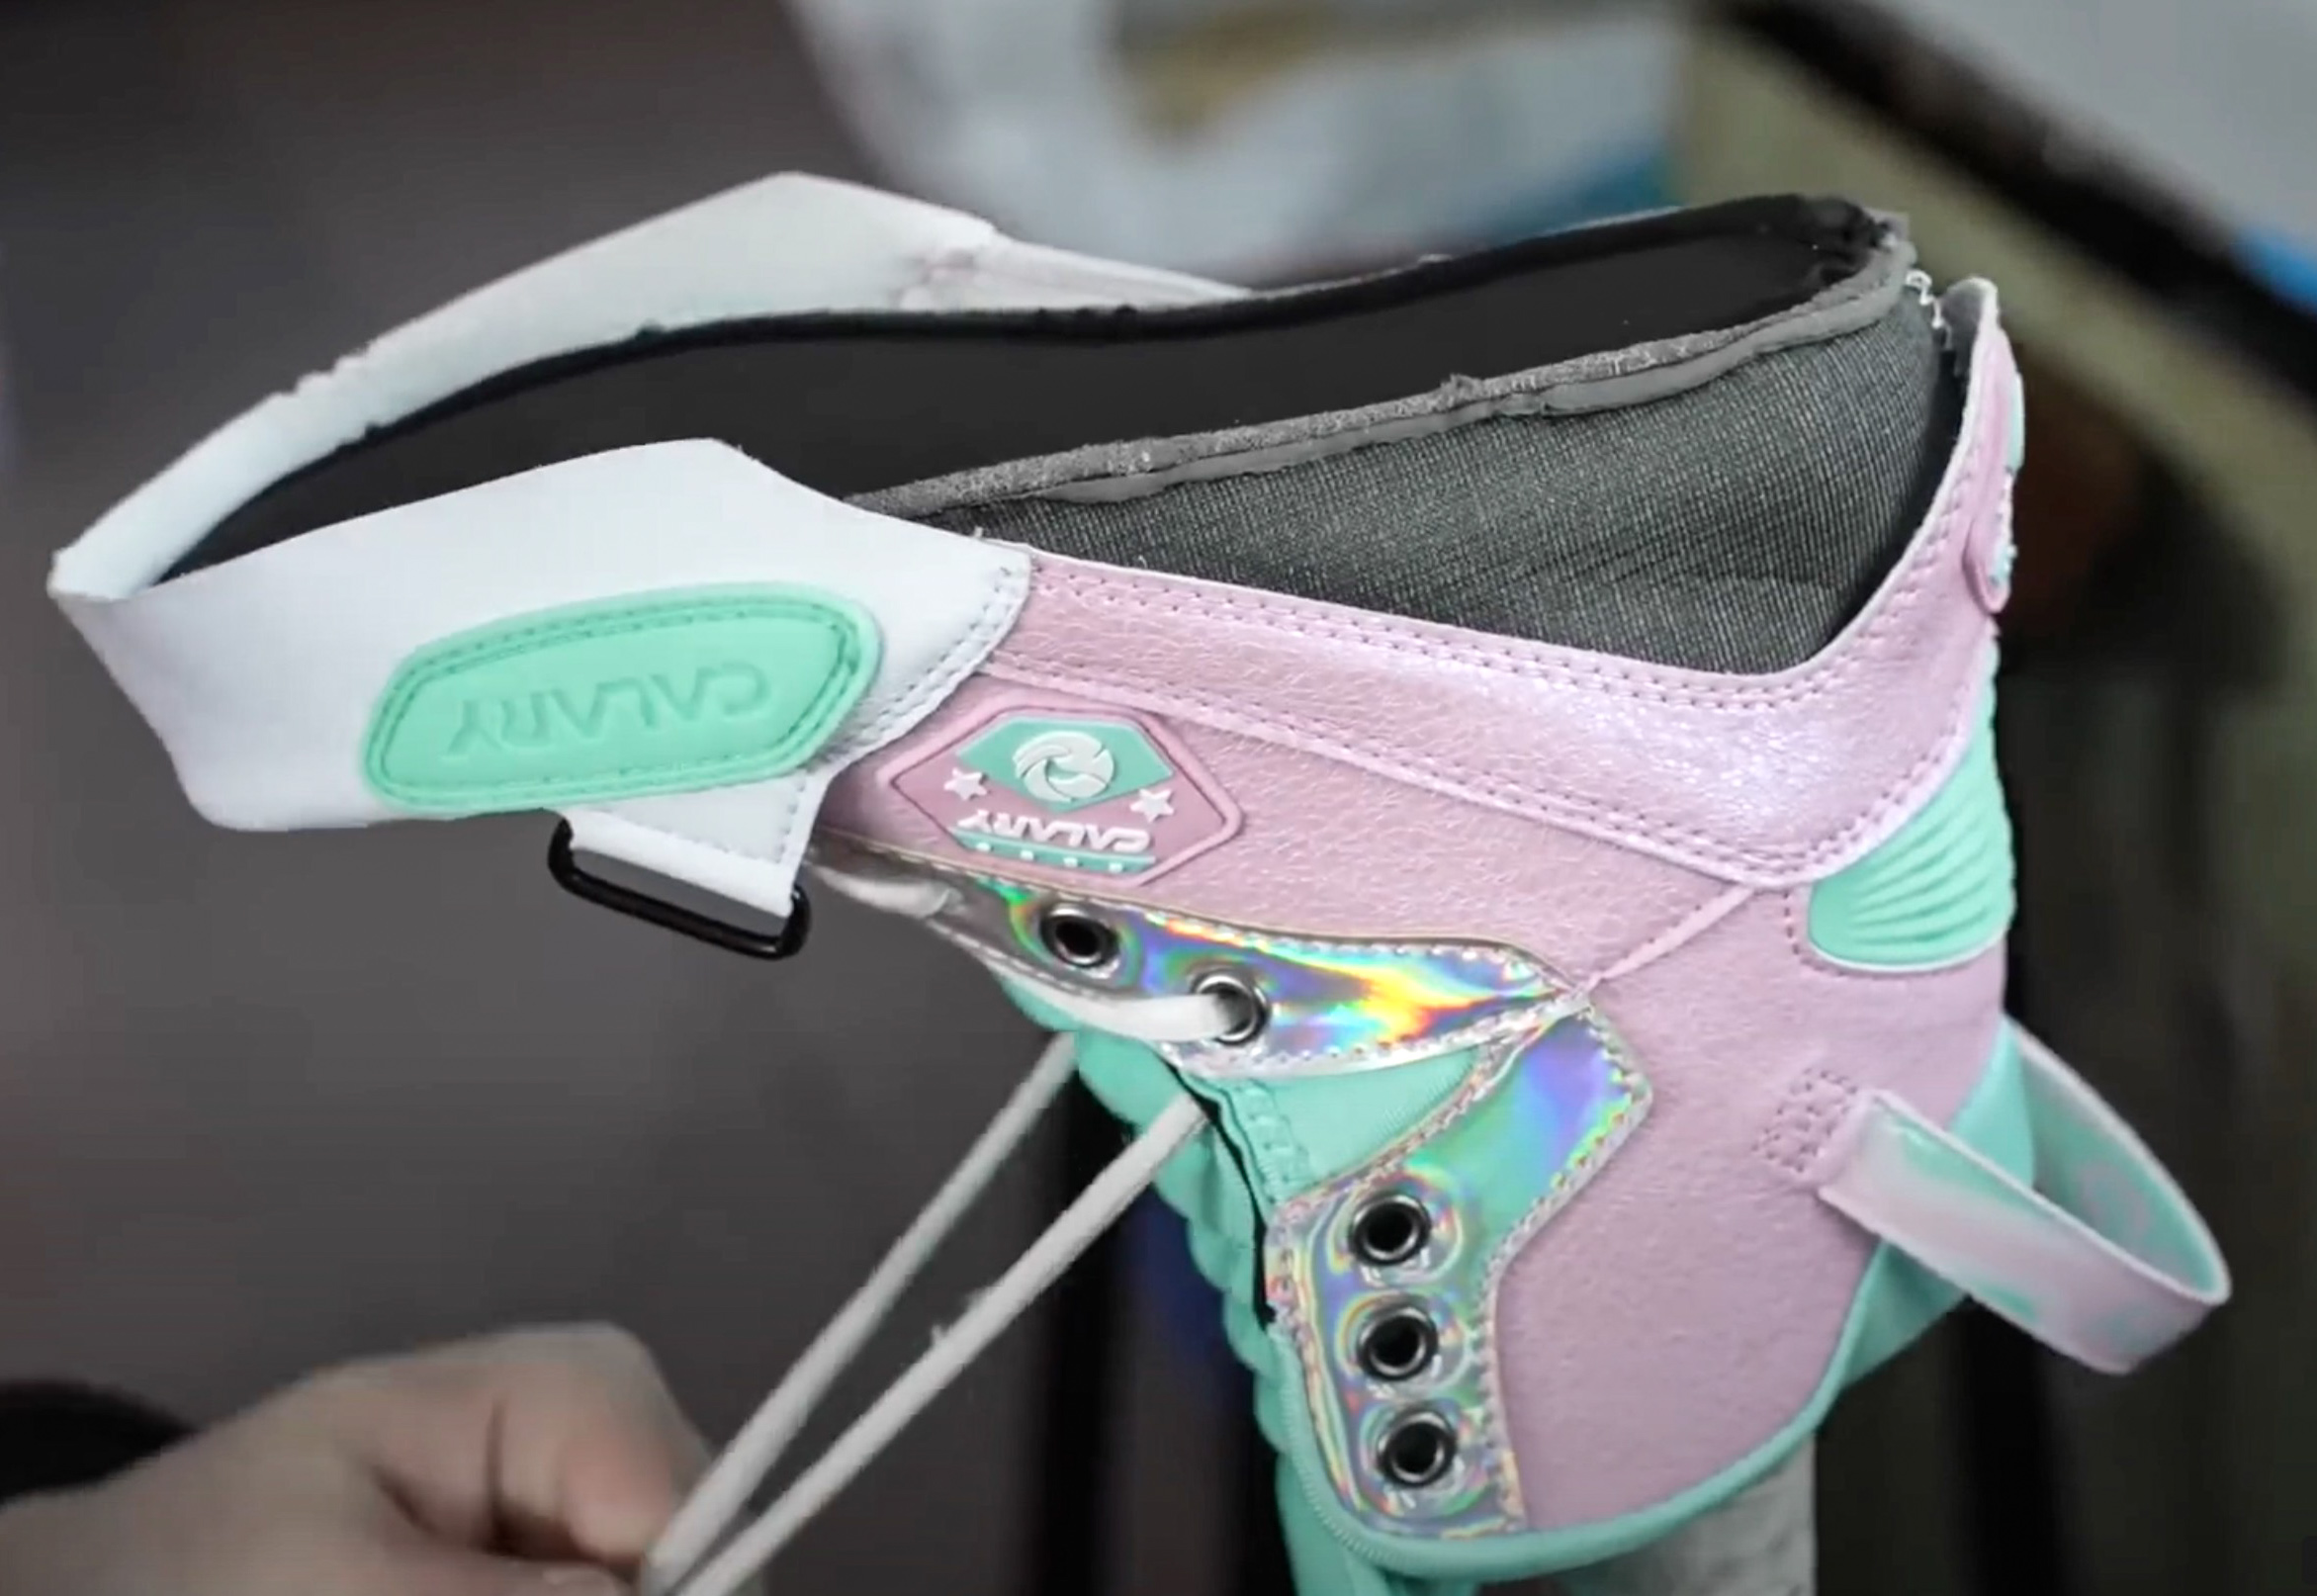
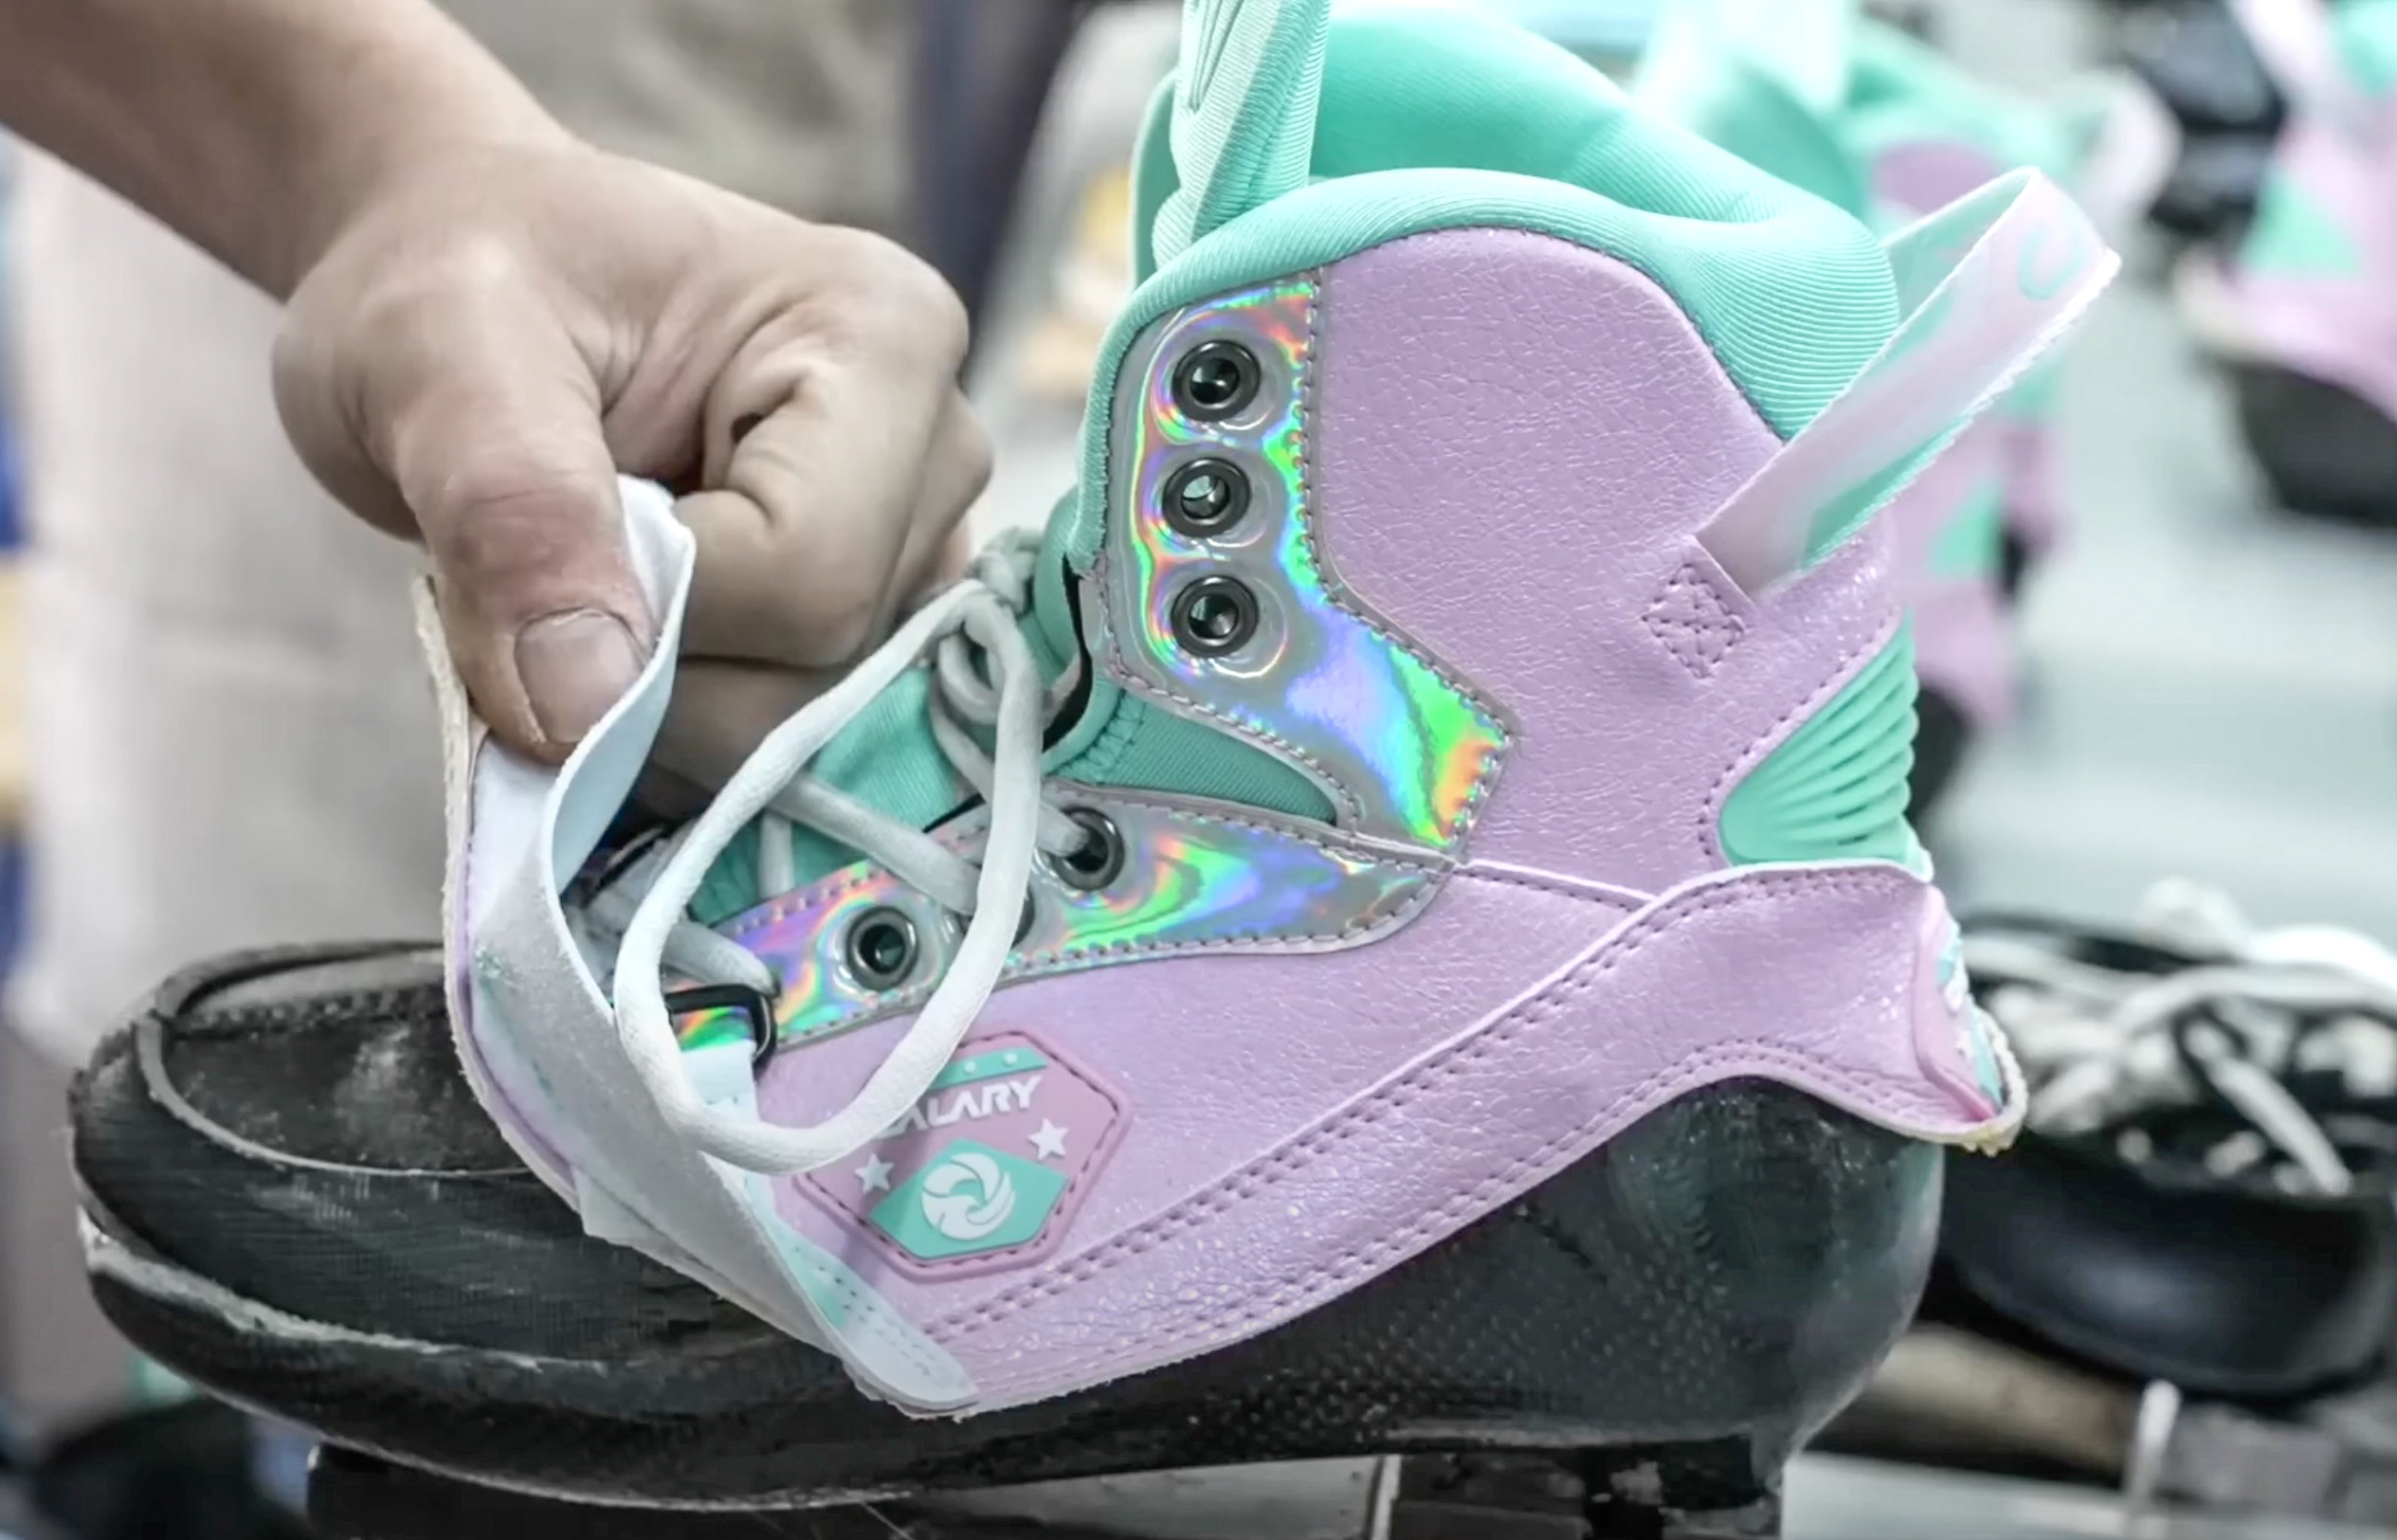
The cured carbon shell is trimmed. Note how the one-piece shell covers not just the sole and heel of a foot, but also entire ankle areas, plus eyelet tabs and lower side walls of the toe cap.
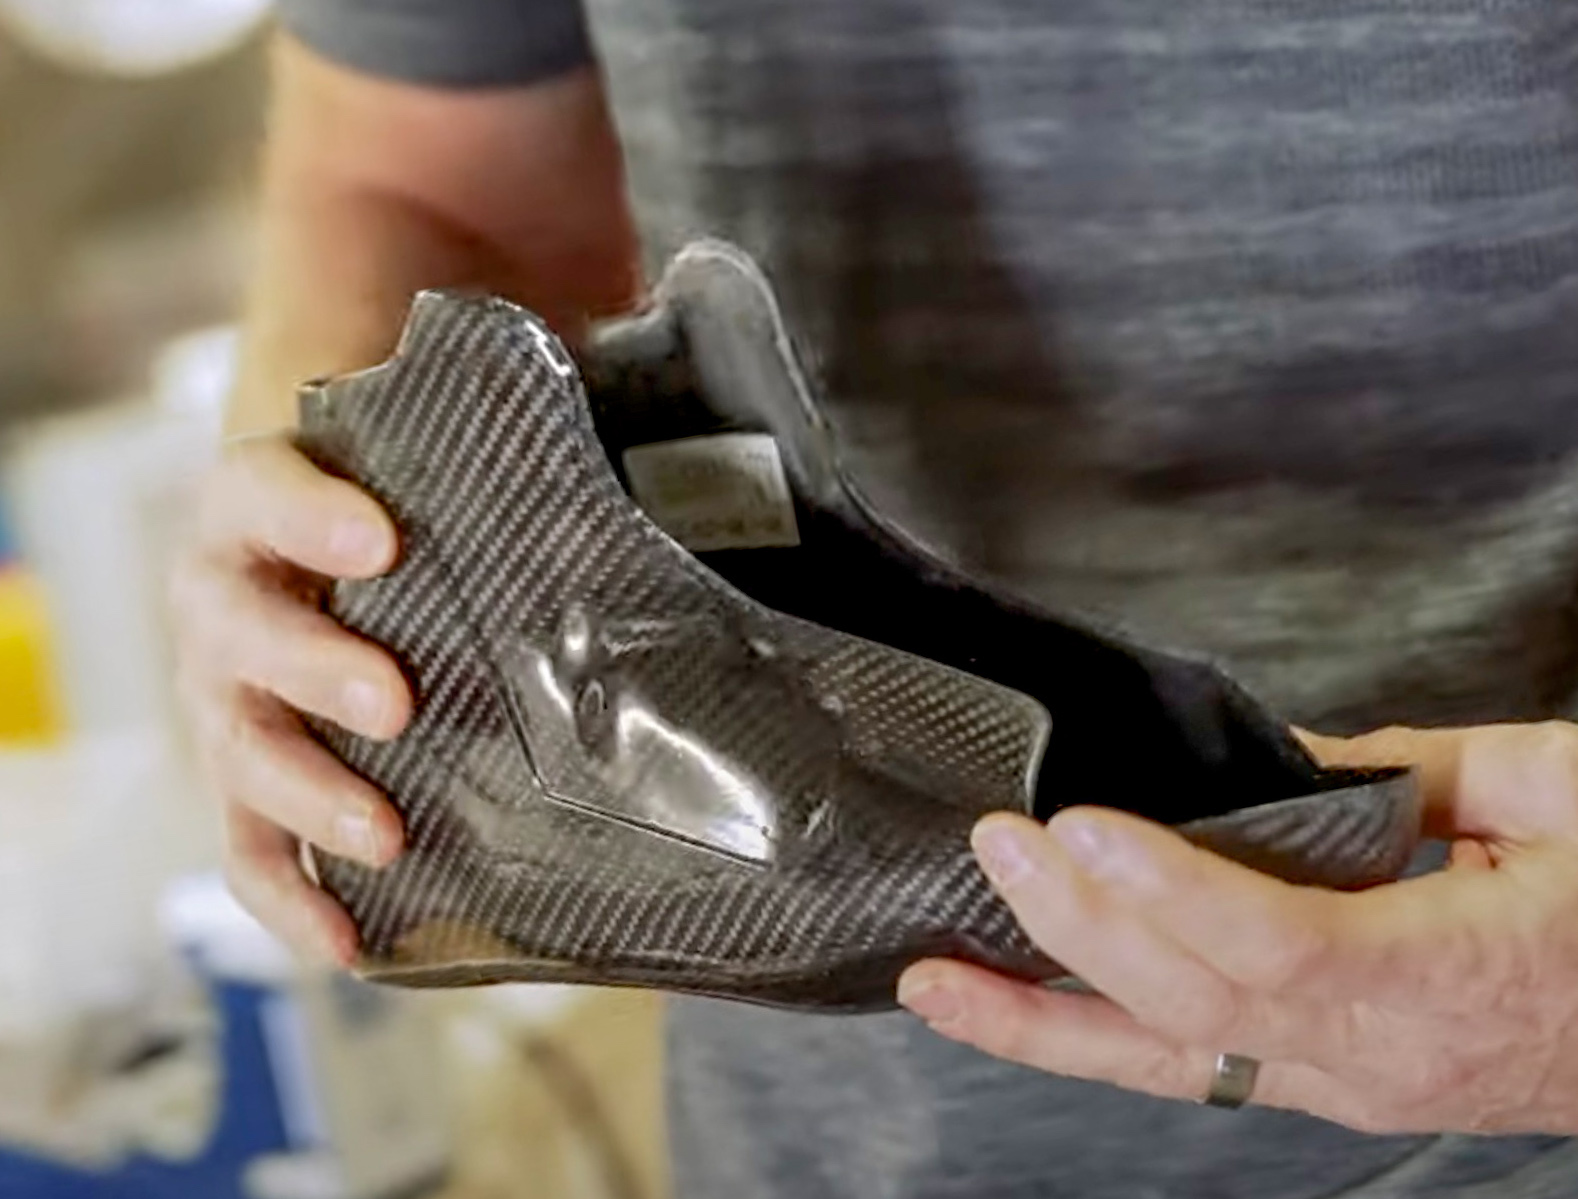
An engineered liner is glued onto the interior walls of the shell. The two parts are pressed to form proper bonding. Unlike hard-boot inline skates, carbon hockey skates have no replaceable liner. This is usually referred to as an integrated liner.
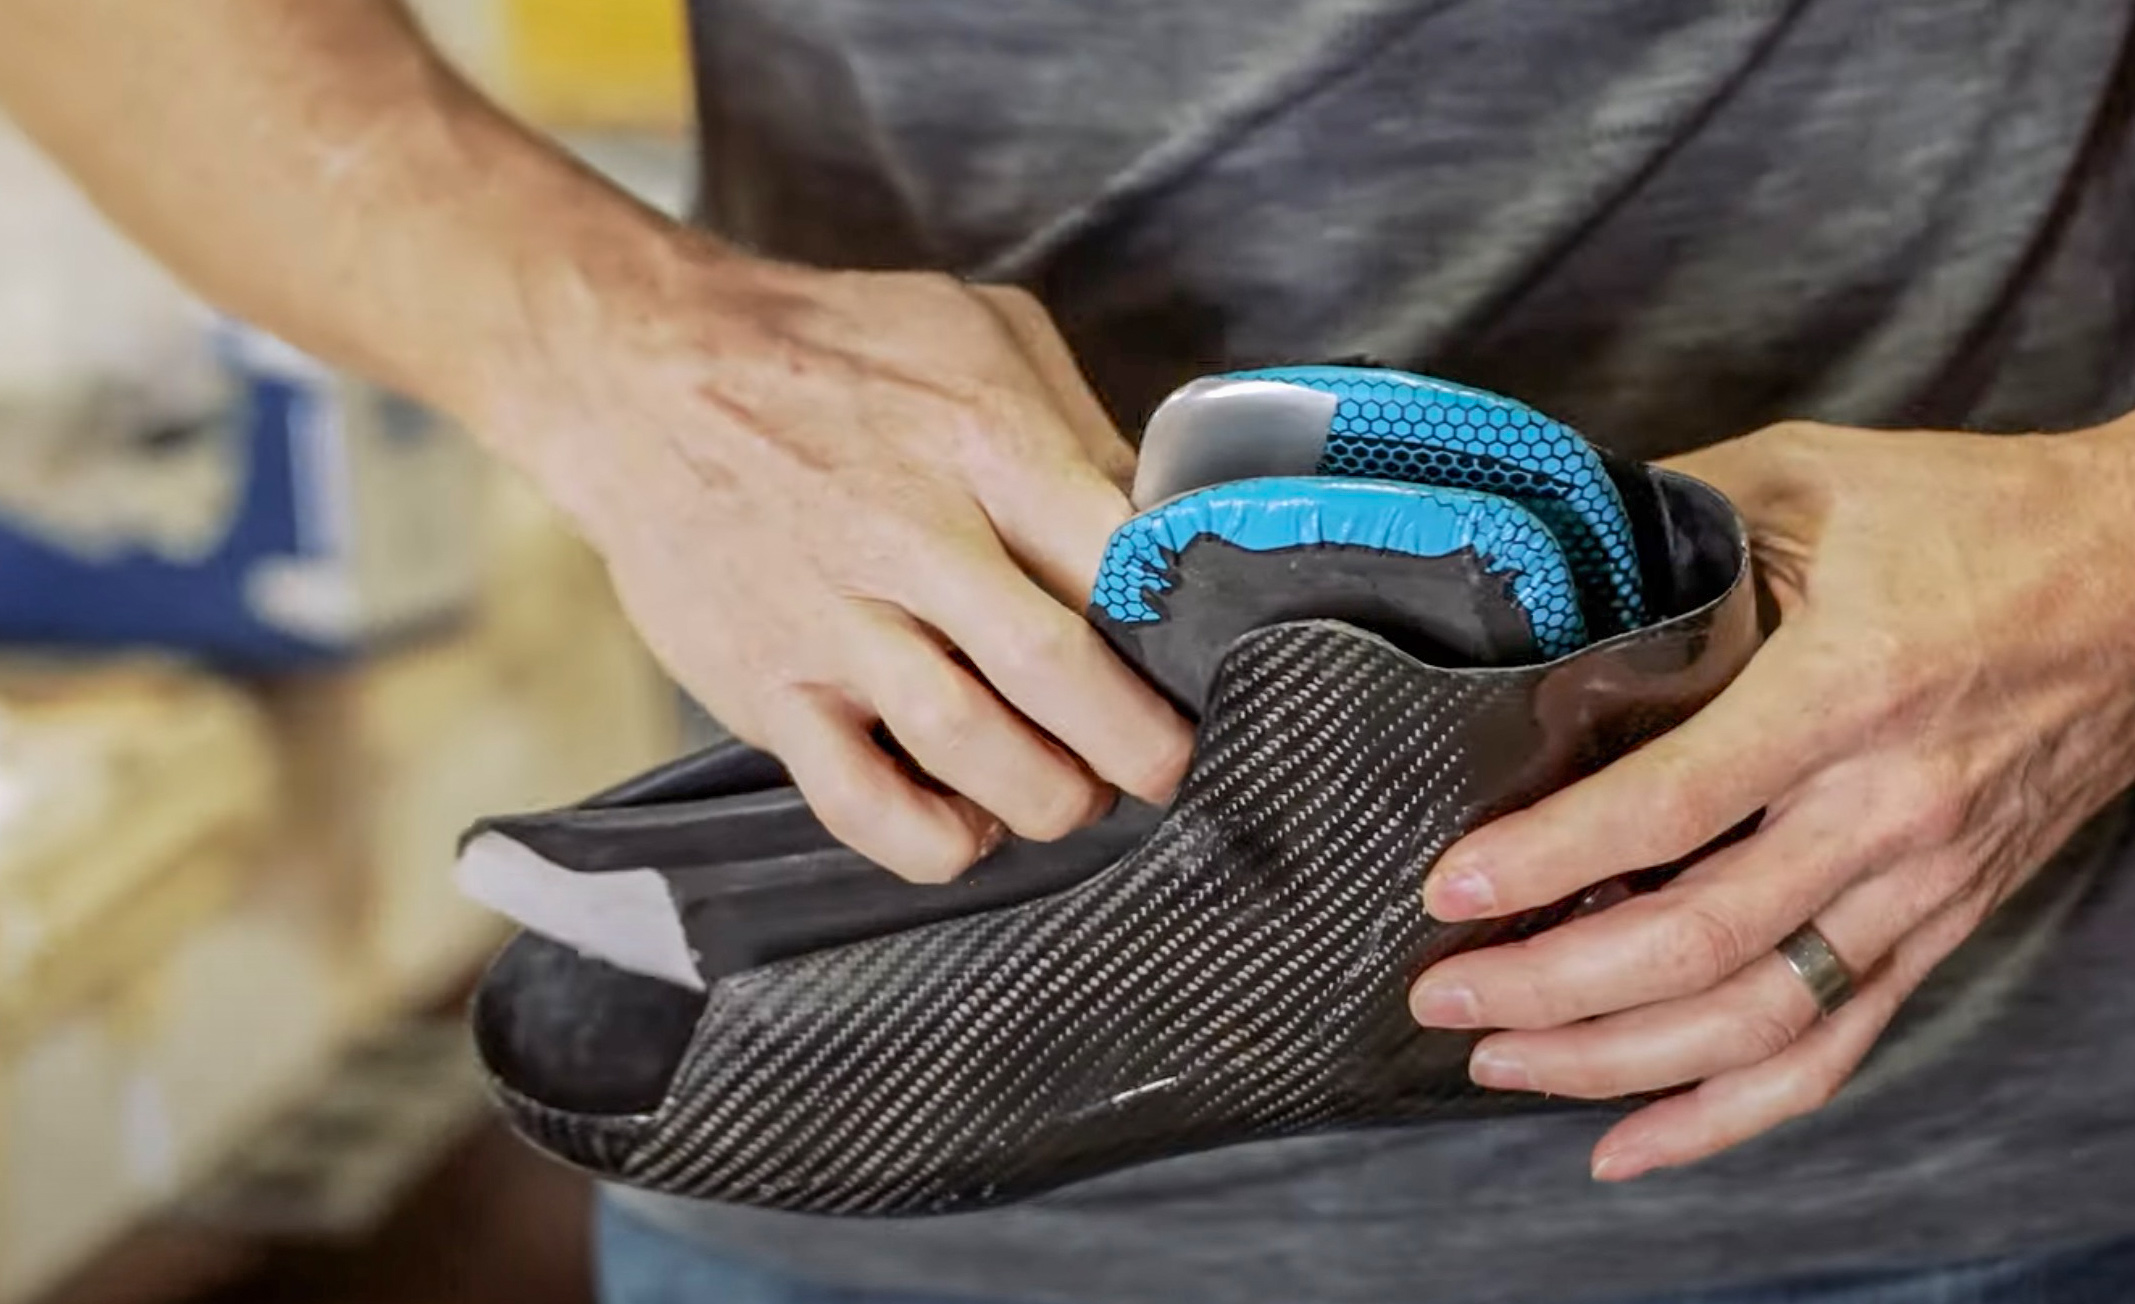
In this skate, the toe cap and decorative side panels are stitched together as a single part. This part is glued onto the one-piece shell. These parts are pressed again to form proper bonding.


At this point, the carbon hockey “boot” has both an interior liner surface, and an exterior decorated surface. Now the finishing process starts, including eyelet making, tendon guard attachment, blade holder riveting, and tongue stitching. Shown here are “ice” skates. But their “street” skates are done the same way, as previously mentioned.


The tongue is stitched in. And the boot is laced up. This completes the process of making a pair of carbon-fiber hockey skates.

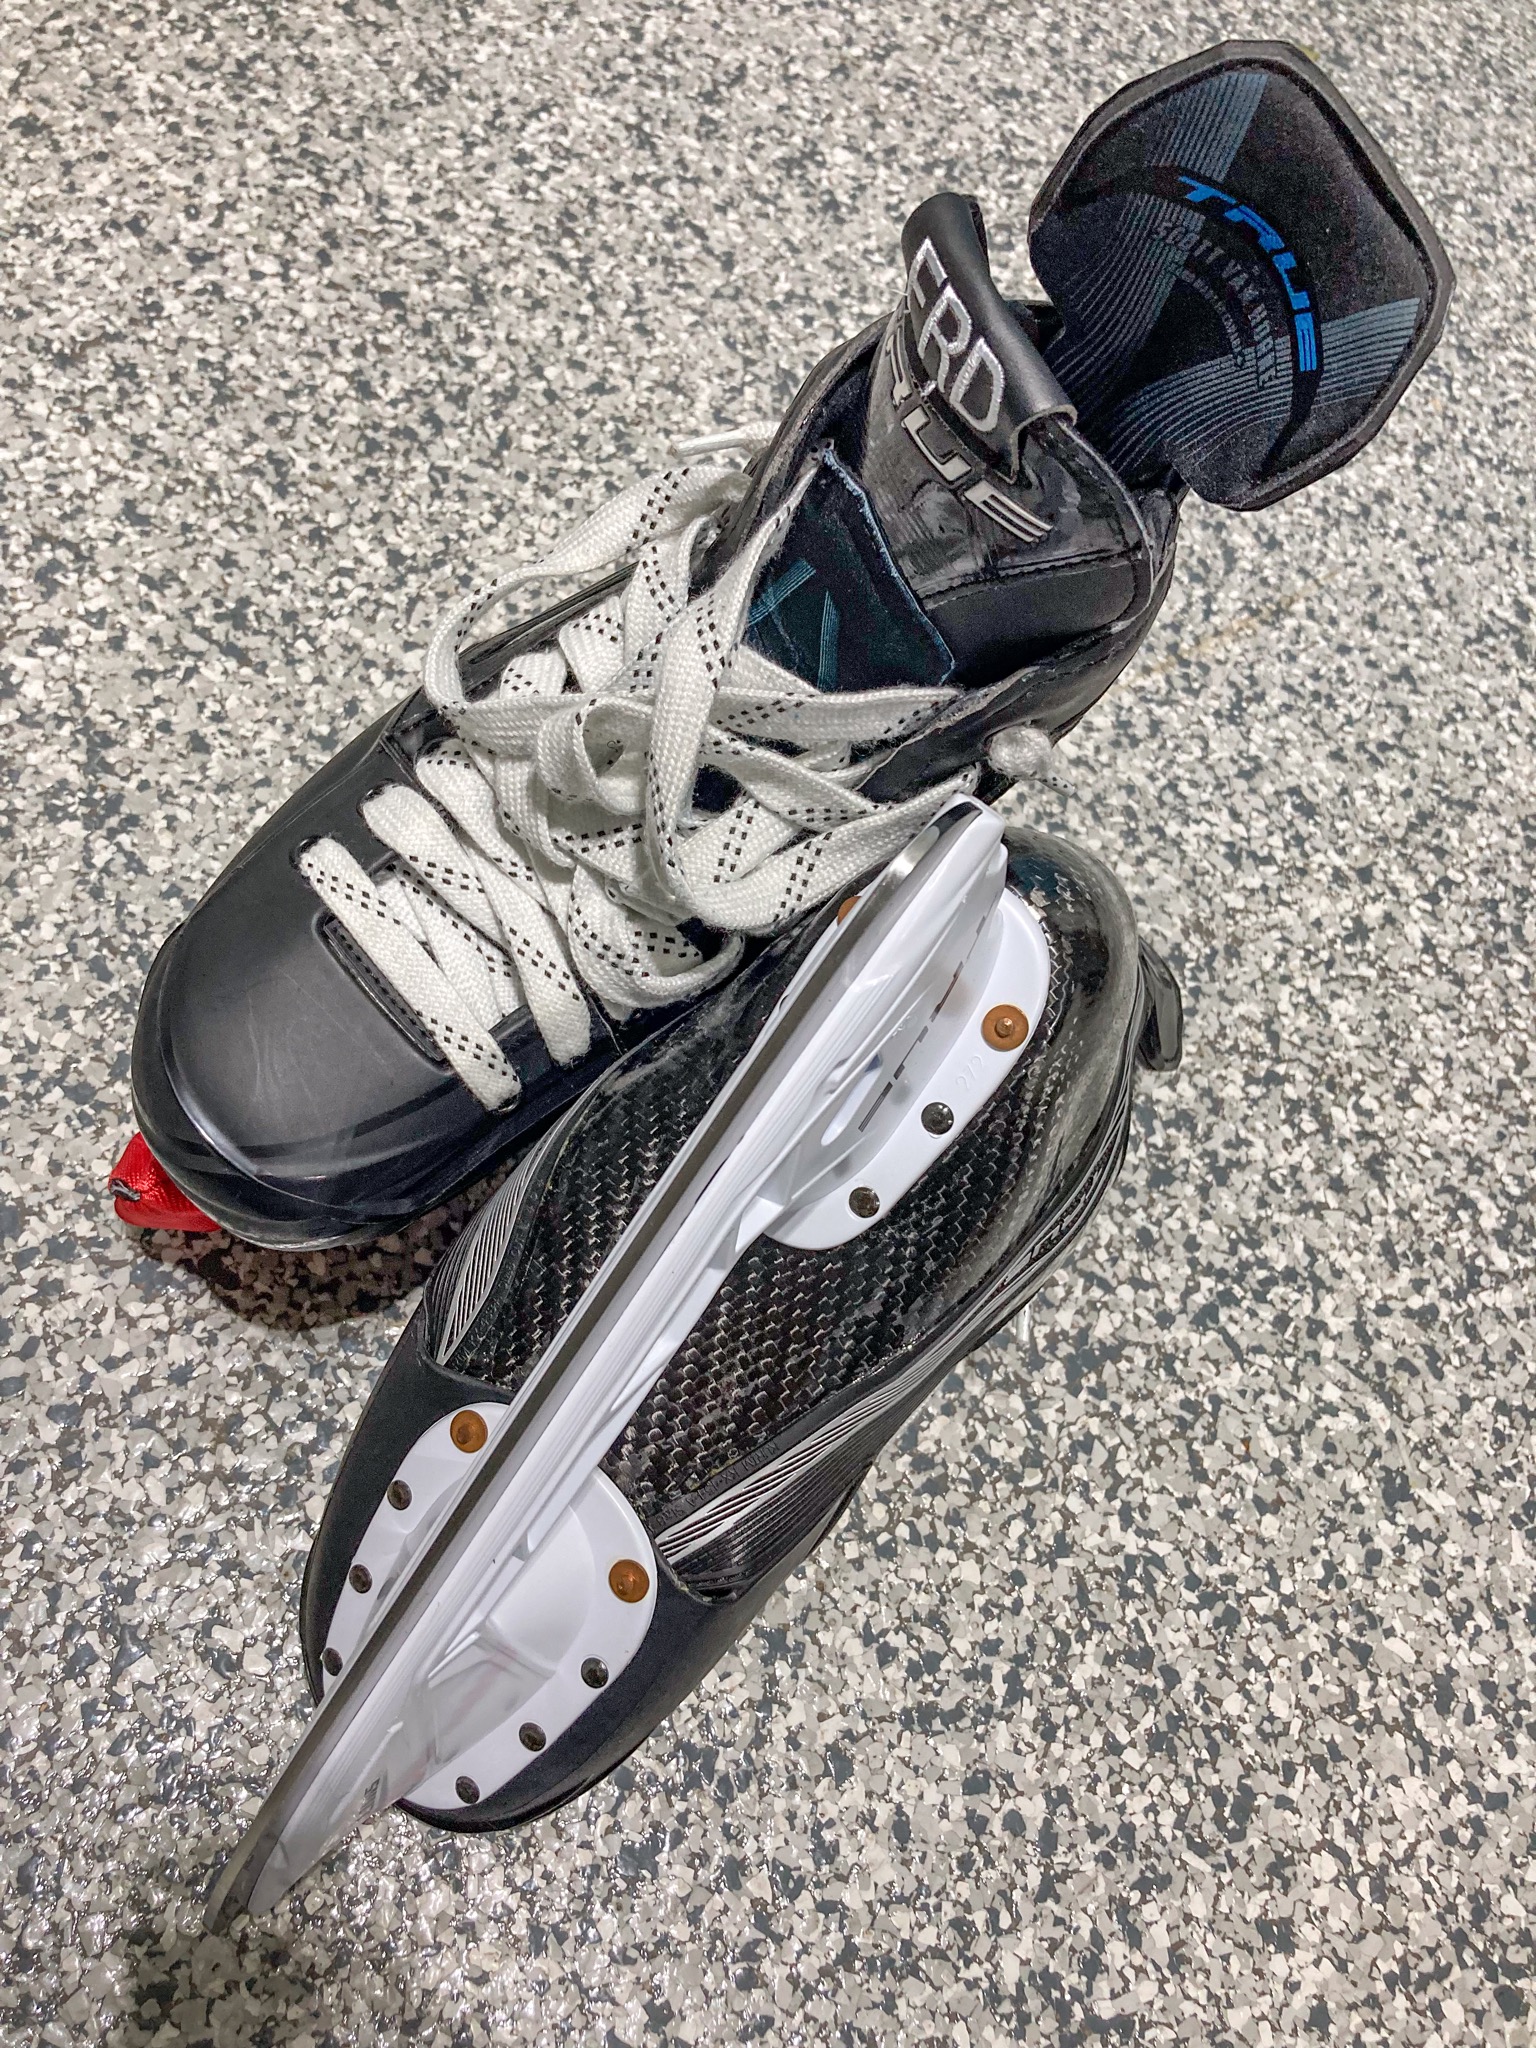
Ice vs. street carbon hockey skates
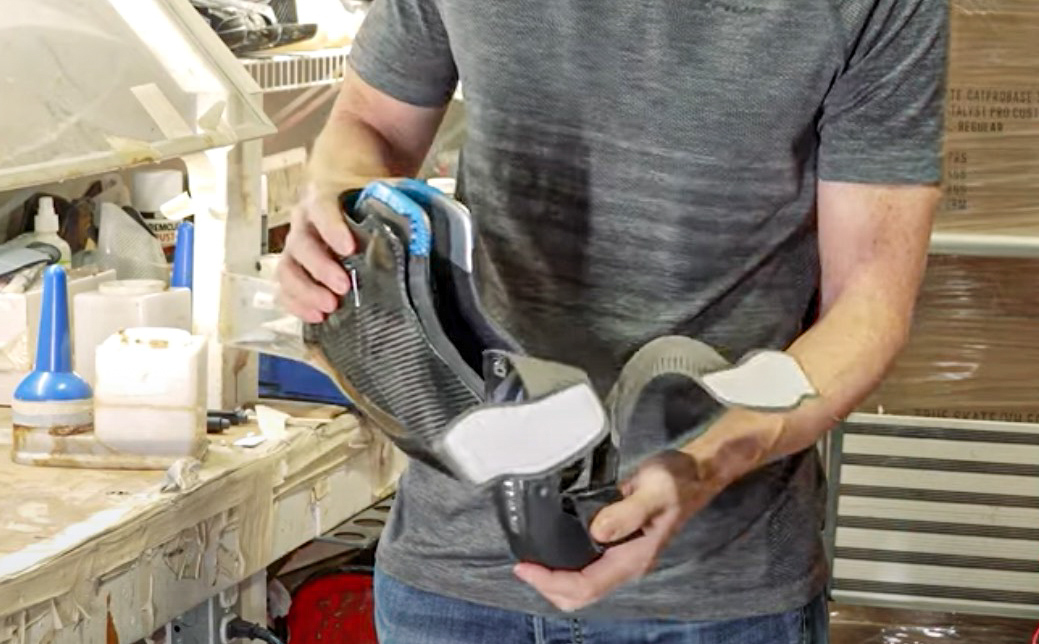
Shown below are TRUE carbon skates made to the same 3D models. These two pairs of boots are identical. They even have the same foot arch issues on the left skate. I had to cut out parts of the insole, and fill in another part, to stop my left arch from hurting. I think it was due to me posing with a deviated athletic stance, when my left foot was 3D-scanned.

I ordered the “street” hockey skates first. The arch issue did present itself, but wasn’t causing too much pain. Otherwise these skates fit me like foot gloves. In fact, inserting my feet into them proved impossible at first, until I figured out a trick. I ordered the “ice” hockey skates later, and asked them to simply use the previous scan. The boots came out identical. But when I skated on ice, for whatever reason, the arch issue drove home harder. So I ended up applying the same insole fix to both pairs. No more issues since then. I should probably write a whole article on that, one day.
The point of these pictures are to illustrate how the two pairs of boots are identically-made. Only blade holder and wheel frames are different. They are even riveted in almost the same ways. See how the two pairs have the same sole profile.


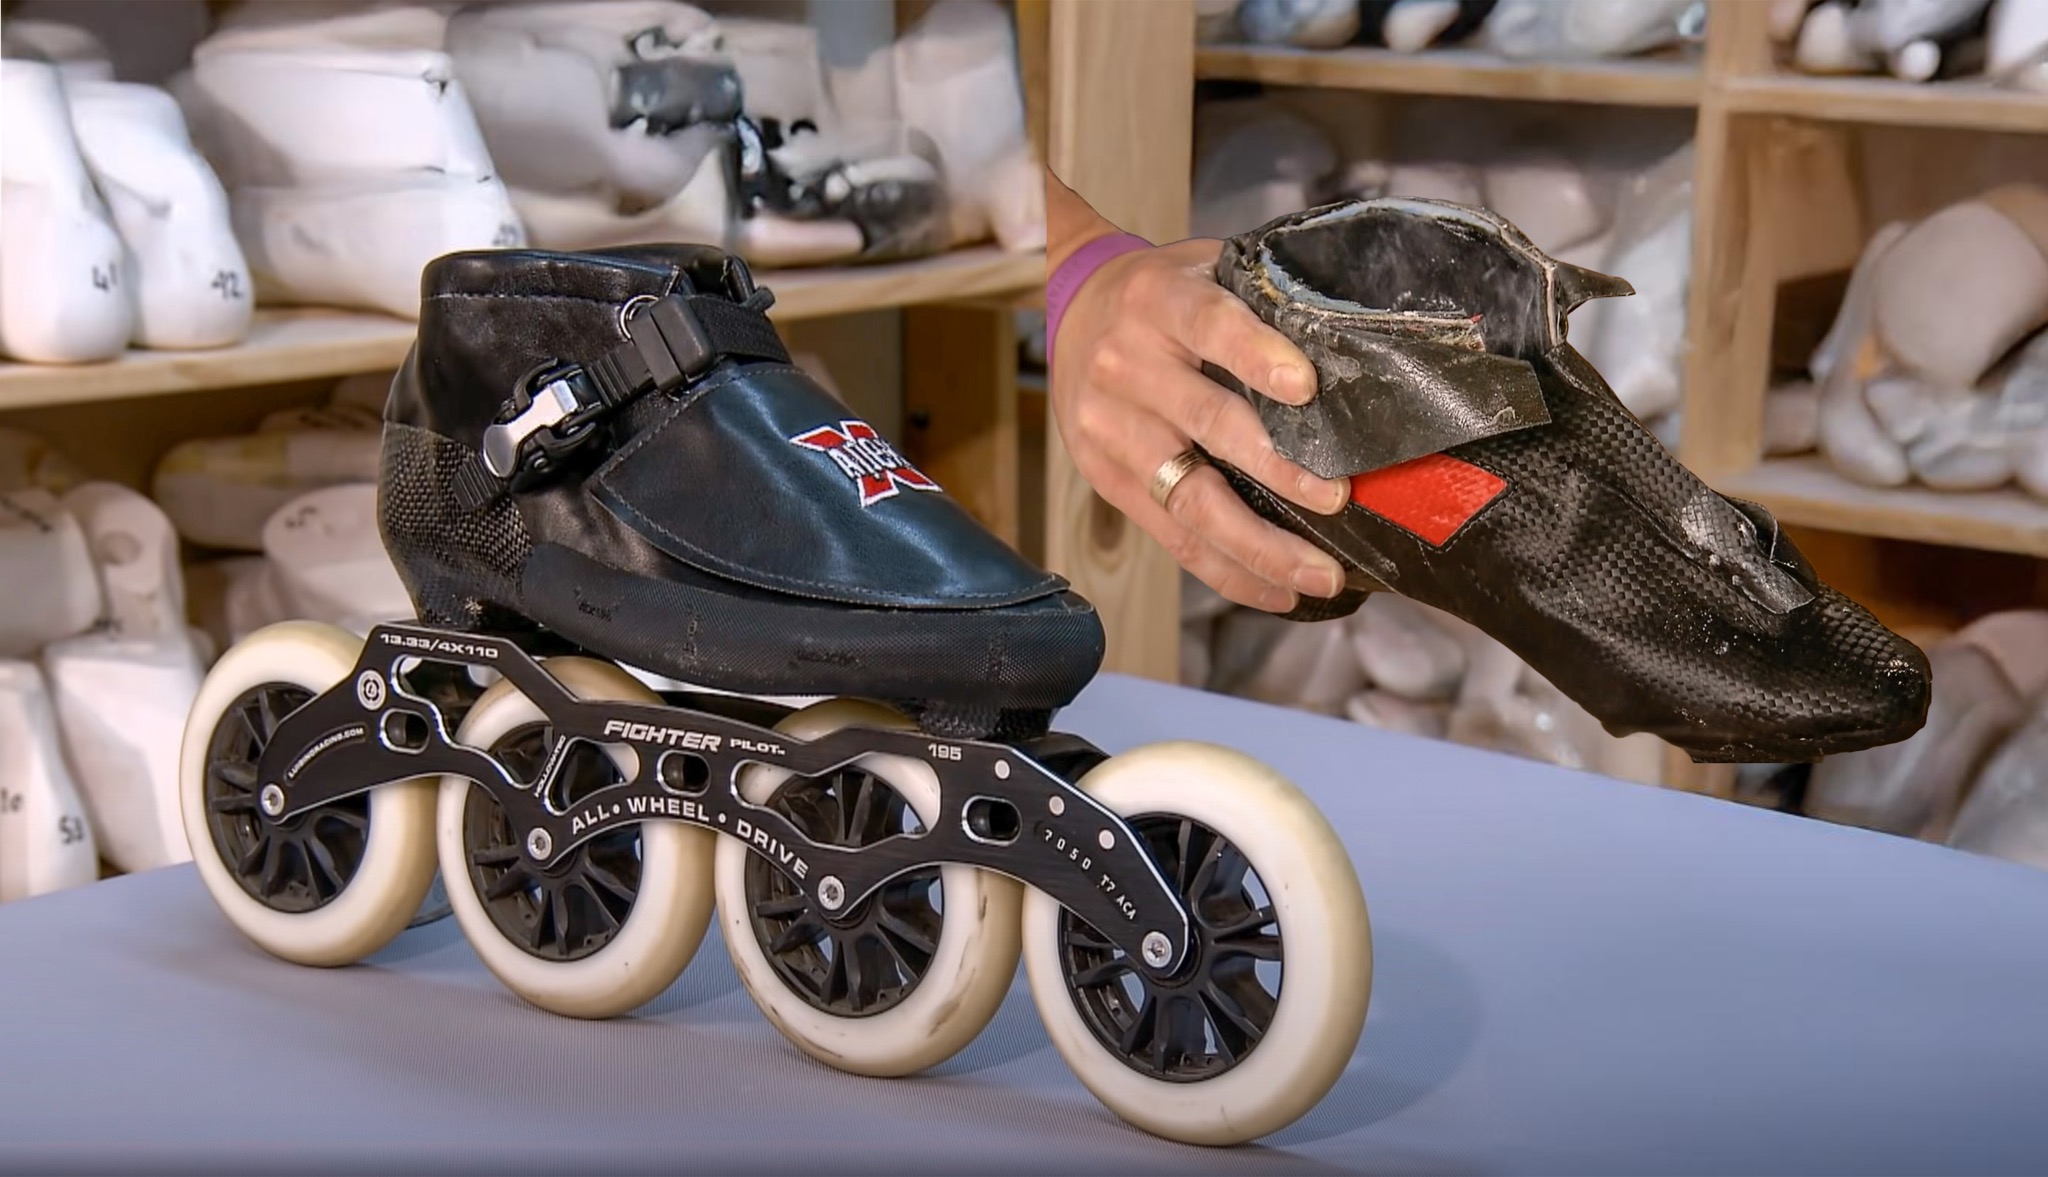
Your foot in a carbon urban skate
Now let’s switch to another type of carbon skates, the urban skates. Shown below are Powerslide Tau urban skates. They are lesser-known cousins of the evermore popular HC Evo skates.

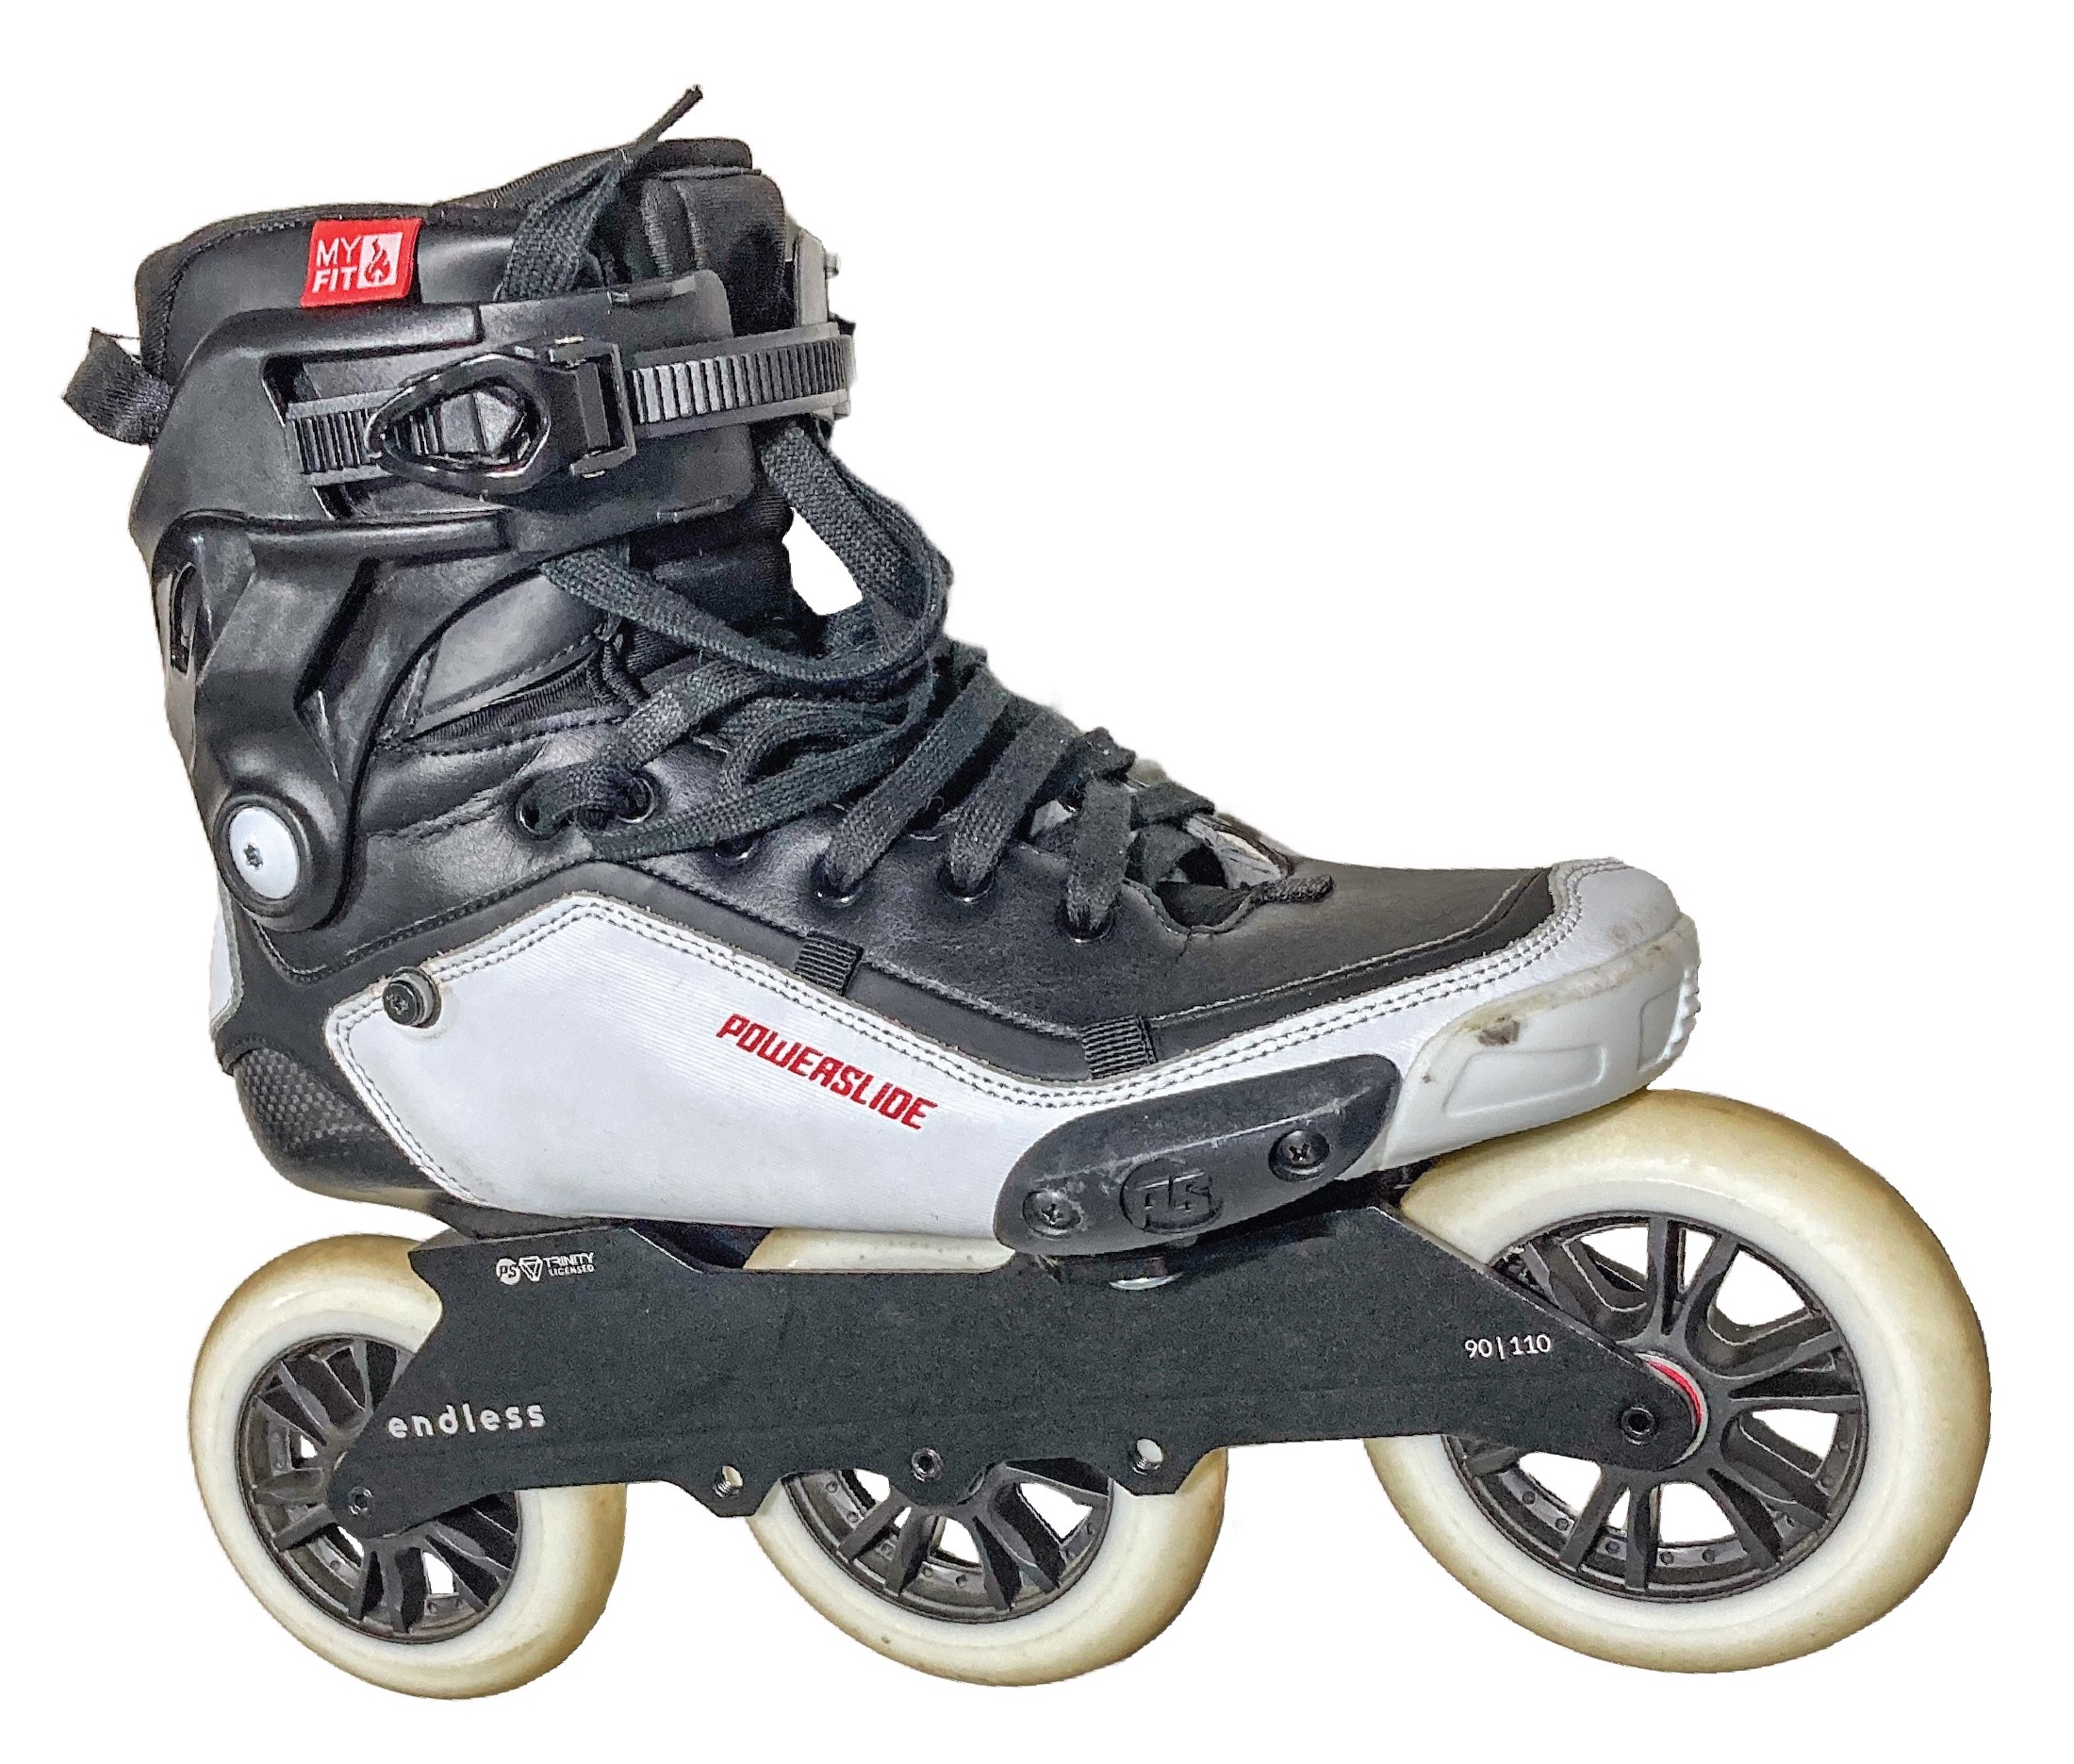
As mentioned in Big Wheels on Carbon Hockey Skates, I put Endless 90 Trinity Frames on them, and mounted three 110mm wheels on these frames. I love that the Tau does not come with annoying front straps. I also removed the 45° buckle on my boots. I lace my boots with runner’s loop instead. That locks in my knee firmly, without the pains that those 45° buckles brought me. More on this skin-chafing issue later.
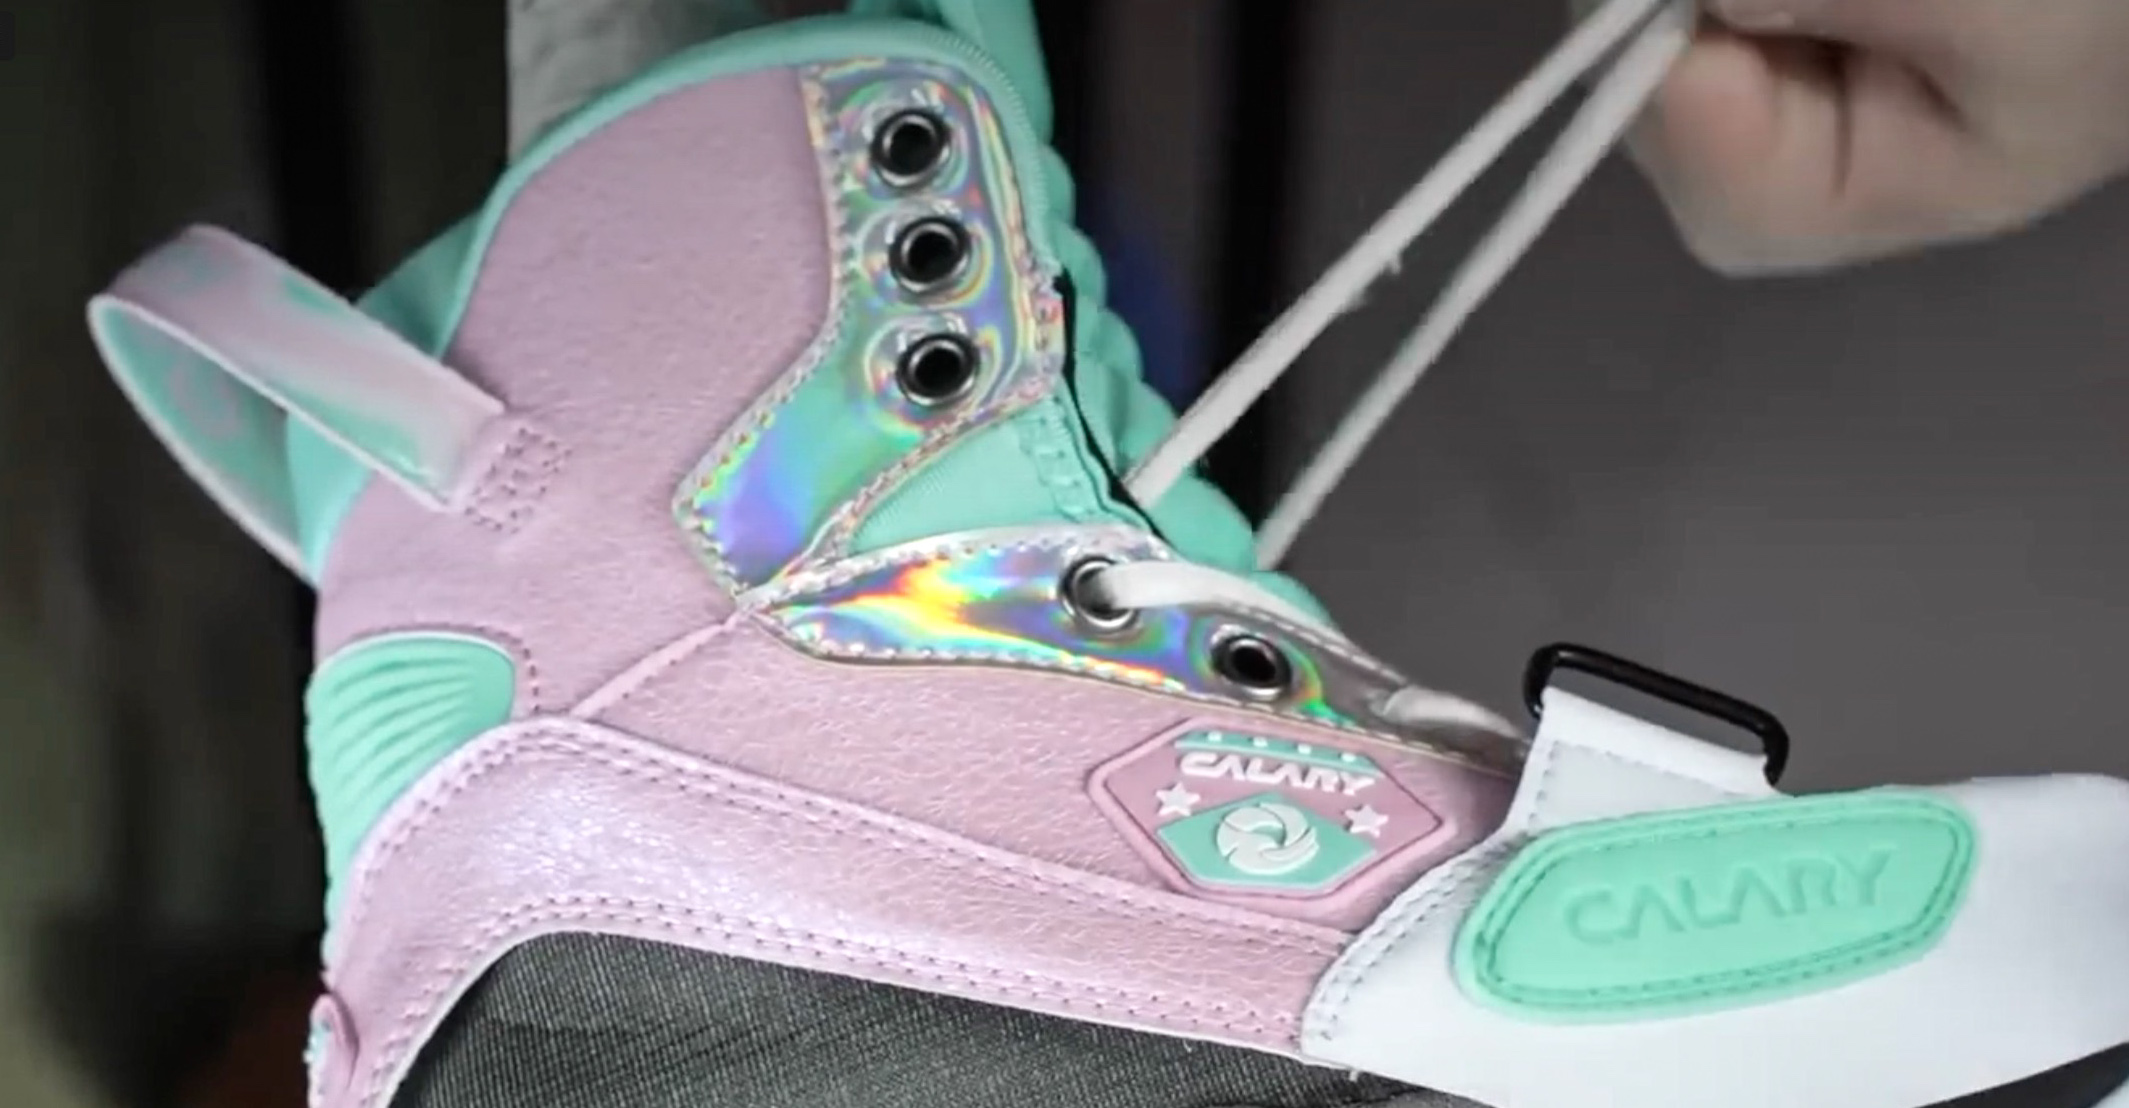
This is your foot. Meet your carbon-fiber urban shell.
This is your foot inside a carbon urban shell. Compared to hockey skates, this carbon shell only cover the heel and the sole. By itself this shell can’t lock your foot in it. Instead, the “upper” of an urban skate does the heavy lifting, and locks your foot inside the boot. This is because closure mechanisms are stitched or screwed only onto the upper, and not to the carbon shell.


Different people find that rigid carbon shells hurt them in different ways. Some people can’t get used to wearing carbon hockey boots. Others have their skin chafed by carbon urban skates, usually around the ankle bones, or below it. One common cause for this chafing is the edge of the carbon shell. Notice how the hard edge of the carbon shell goes through the ankle bone protrusion. When skating, a skater would move between the straight stance shown earlier, and the athletic stance shown below. Muscles and bones work together to bend the shin forward, or move the calf backward. These muscles change shape, and the bones shift. That unrelenting shell edge is not kind to them.


When a skater leans a skate on either its inside or outside (wheel) edge, this problem is exacerbated. The whole weight of the body now comes to rest on this hard shell edge. No amount of generous liner, even heat-moldable ones, can help. They will just be compressed to a thin nothingness by the sheer pressure on such small edge surface. I call this the “shell edge bite”. The Tau came with 45° buckles. When tightened, those buckles made the issue even worse. I’ve since removed these buckles, and adopted runner’s loop lacing instead.
Carbon urban skates vs. carbon hockey skates
Earlier I showed how one could punch eyelet holes in a carbon hockey shell, then simply lace it up, and skate. This is not possible with a carbon urban shell.

In an urban skate, the structural integrity of the upper relies on itself, as much as it relies on the carbon shell. The pivoting cuff presumably provides support to the two sides of the lower leg. But it can only do that if the cuff buckle is strapped every tight. Similarly, eyelet tabs keep their shape only when laced tightly. Otherwise, the entire plastic cuff can twist and bend in ways other than the intended pivoting rotation. As discussed earlier, in a carbon hockey skate, the shell is the upper – it comprises all key parts of the upper involved in locking a foot in.


While an urban skate usually have much taller cuff support, my experience is that tall cuff does not actually provide greater support for the sides of a foot during aggressive edging (body leaning). Even thought a hockey skate has a lower topline, its integrated carbon shell walls completely surround the lower part of the leg. This allows the entire surface of the lower leg (including ankle areas) to distribute body weight over the entire supporting shell wall, thus eliminating pressure points.
With an urban skate, there is only soft leather covering most of the area around the ankle bone. This is the center of the traditional quarter package in a skate. In a urban skate, the eyelet tabs and leather in the quarter package area simply bend and stretch, when a skater leans on wheel edges. No amount of liner will stop the leather from yielding. The plastic cuff gets bent. This leaves only the rigid carbon shell to push back unyielding, against the side of the leg. Thus the whole weight of the leg rests on just the single edge of the carbon shell. This is why shell edge bites are often reported by skaters. But clearly, this issues doesn’t bother most urban skaters. Perhaps only certain types of feet are susceptible.
For those afflicted, the issue can’t really be heat-molded away. If you punch out that shell edge, your foot will simply slide further outward, until it gets edge bites again. As mentioned, the 45° buckle that came with the boot exacerbates the edge bite, by bending and forcing the edge inward.
Patent predecessor to one-piece urban skates
Scott and Brenan Olson founded in 1982 what would later become the Rollerblade company. And the rest was history. The Olsons did not invent inline skates, however, despite what you may have been told. They licensed/bought/perfected what was described in patent US3287023A from Chicago Roller Skate Co. And the Chicago patent was in turns based on many prior inventions with inline wheels.
Scott Olson did file and obtain many patents of his own. Most of these were focused on adjustable frames for wheels, better heel brakes, frames with interchangeable ice blades/roller wheels, etc. Near the end of his tenure at Rollerblade, he did work finally on the “boot” part of inline skates. His name showed up on a patent on “size-adjustable athletic boot”. He truly was obsesses with creating “one skate” to fit all foot shapes, foot sizes, and ground-contact media. Here is an exploded view of this “adjustable boot” from his patent US5794362A:


After the advent of globalization, nobody cared about adjustable boots anymore. Skates can be made en masse cheaply, anywhere in the world, in all sizes. Some even support half-sizes. These can be shipped to the US in container ships for pennies. The many parts that form the bottom of a boot in FIG. 2 could be simplified into only a piece or two, and injection molded with plastic.
However, drawings in this patent shows some design features of urban boots that have not changed in 40 years. For instance, Olson obsessed over interchangeable ground contacts in these boots. See drawings from the 1998 patent. Then look at the Tau boot on the right, with the interchangeable Trinity Mount from Powerslide. Many urban skates now come with interchangeable wheel frames.


Crucially, the overall design of urban skates remain eerily similar to Scott’s drawings. The pivoted cuff, the cuff buckle, and the 45° buckle continue to be the standard in urban skate designs.

Figure 13 shows a boot liner with slits 264 and 266. These slits allow the upper part of the boot shaft to tilt as a skater goes into an athletic stance. Now look at today’s integrated upper assembly of a carbon urban skate, on the right. These two slits continue to feature prominently today. They are covered by flexible green cloths stitched onto the upper.

Hybrid vs hard vs soft boots
What I called urban skates so far are what in 2024 are known as “hybrid” boots. This is in reference to the previous hard boot and soft boots. While soft boots have an exoskeleton, hybrid boots have an endoskeleton. See this video from Powerslide for details.
Making carbon-fiber urban skates
Compared to hockey skates, the production process of carbon urban skates seems several times more complicated. The key parts of this process include: molding a one-piece carbon shell, stitching the upper assembly, forming the inner liner, stitching and gluing padding, liner, tongue and insole onto the upper, and gluing the decorated upper onto the carbon shell. Then cuff, top buckle and 45° buckle are attached to the upper. And finally, the frame is installed, and wheels are mounted. Following video shows a typical process for making carbon urban skates.
First, a carbon-fiber shell is formed. This process is similar to that for hockey shells already discussed earlier. But the shape of an urban shell is not the same as that of a hockey shell.

An urban shell covers only the heel and the sole of a foot. It has a low profile from toes through instep (bridge). The wall of the shell only rises near the ankle bones (malleoli) to cover the heel.

Unlike a carbon hockey shell, an urban shell has hole punched through its side walls, in order for the cuff and the 45° buckle to be secured through them later.
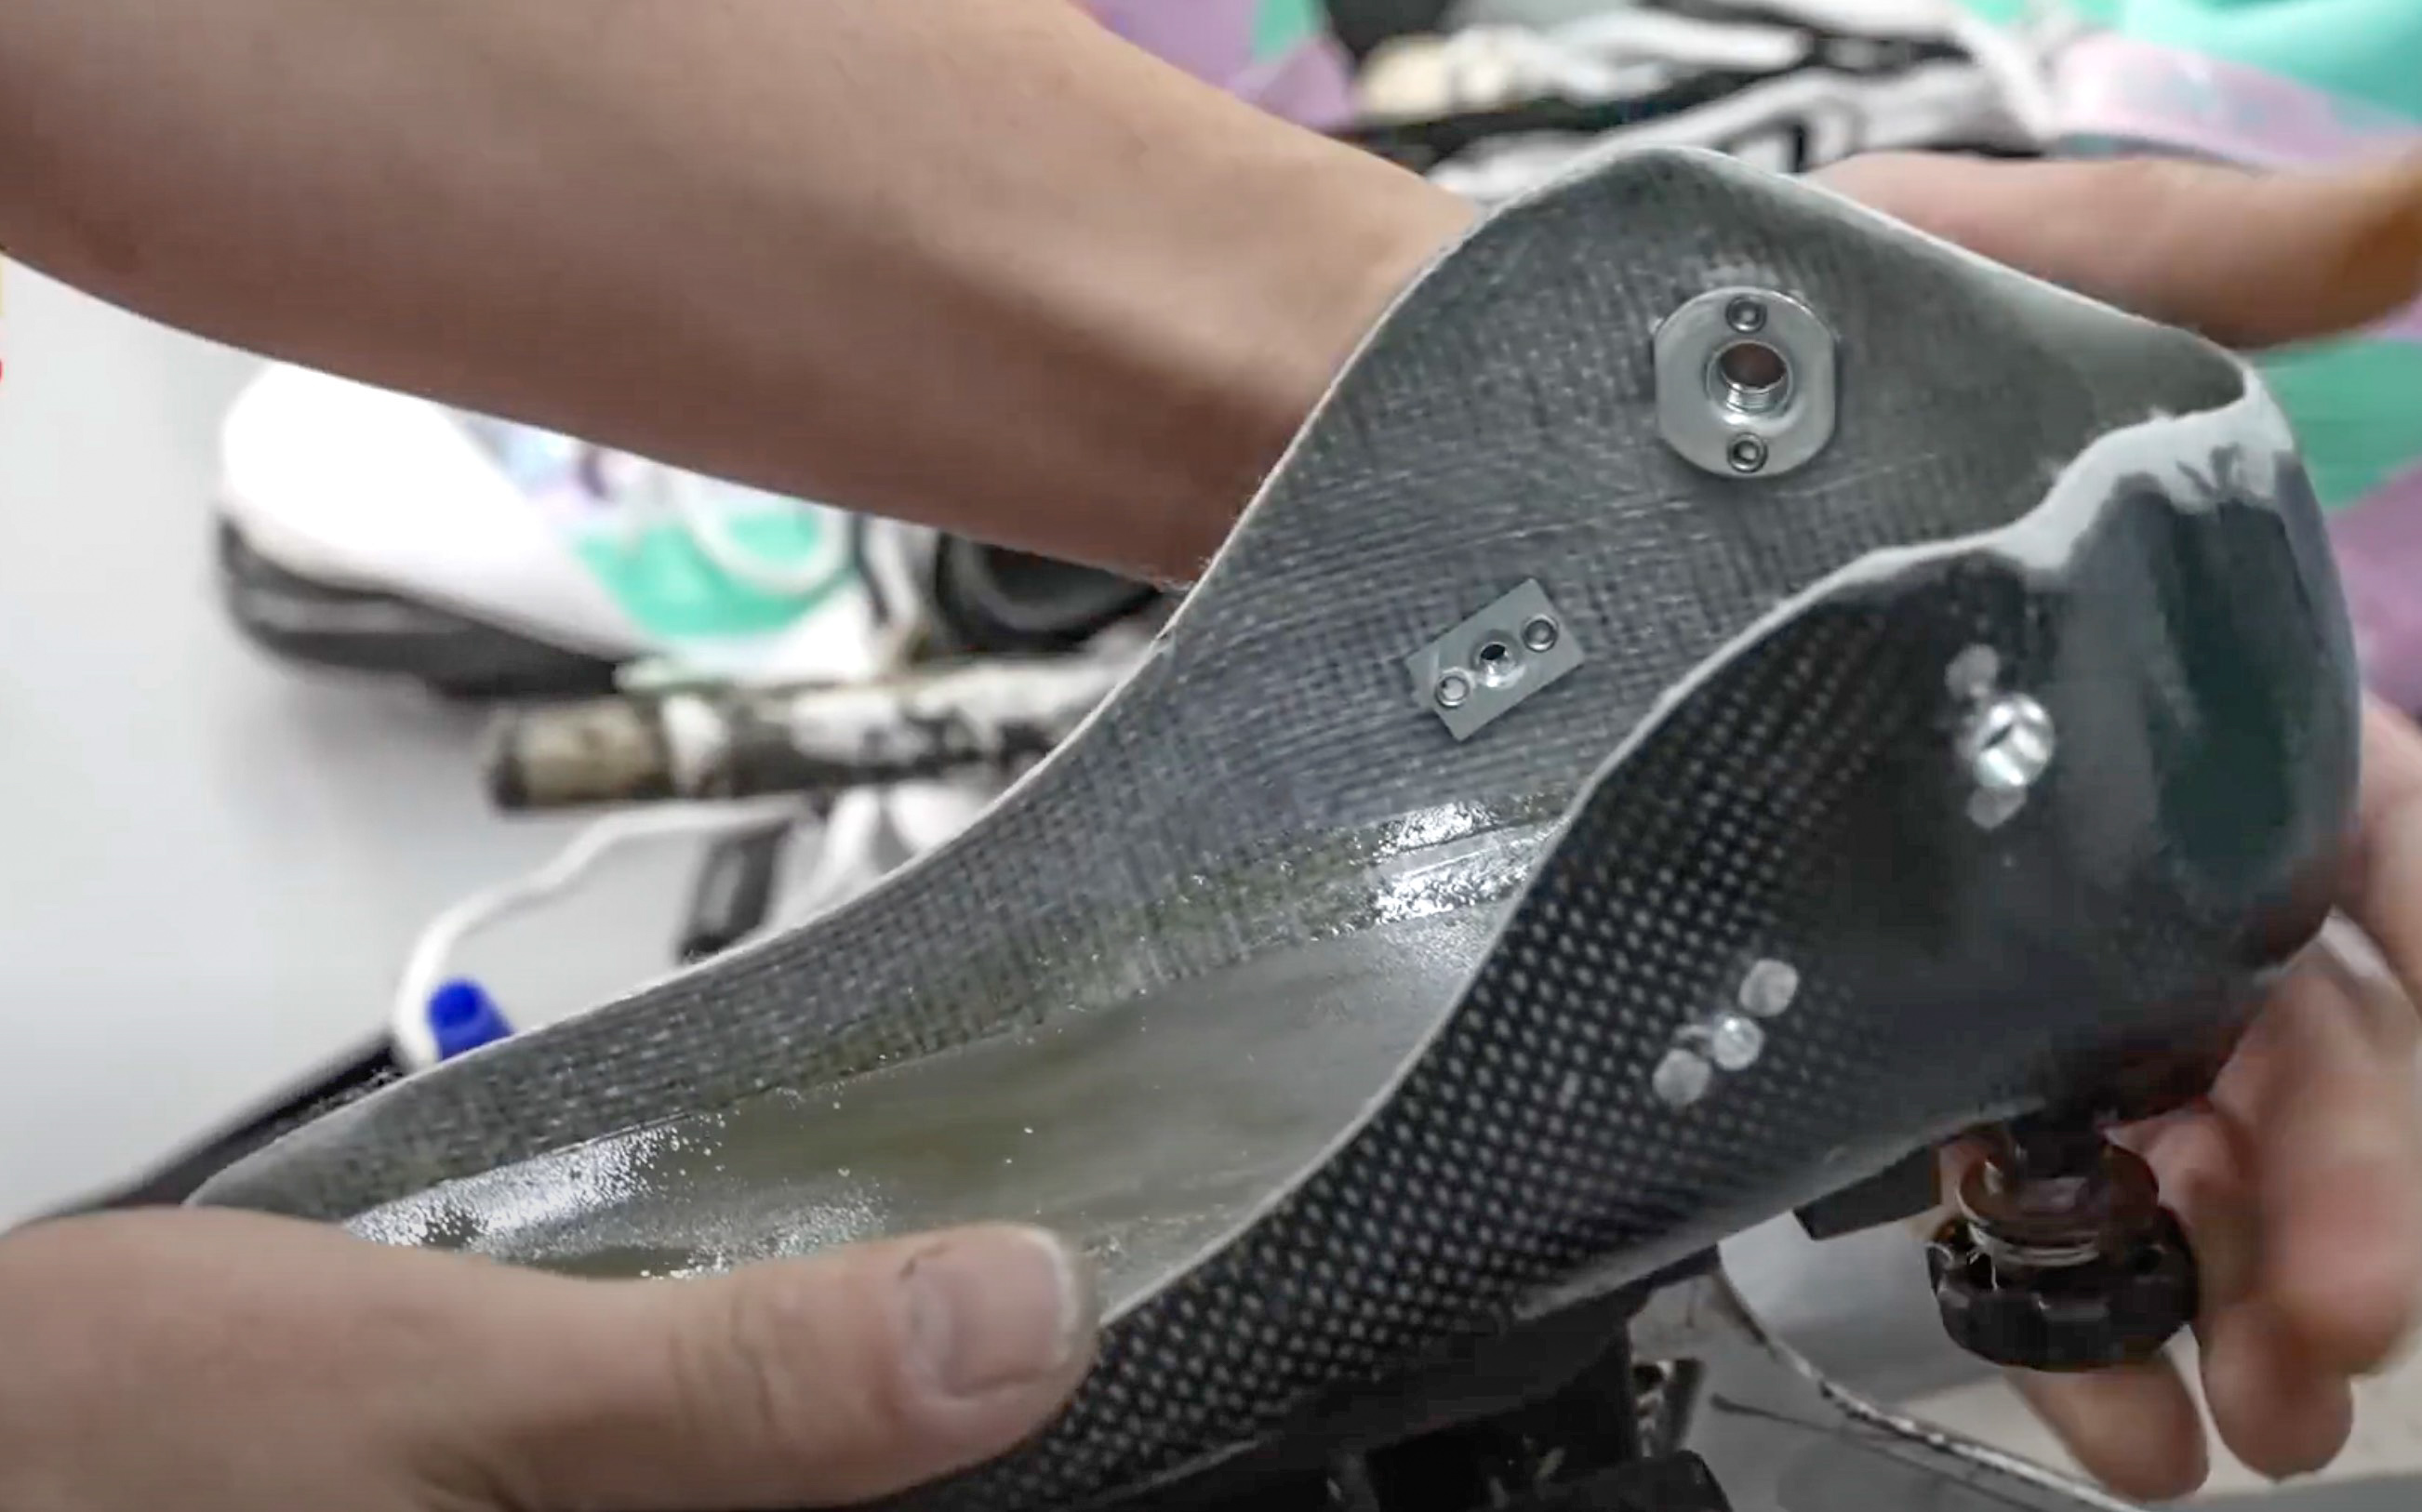
Unlike a hockey shells, an urban shell usually has mounting plates built onto the bottom of the shell, for mounting removable frames.


Unlike carbon hockey skates where almost the entire upper is already parts of the carbon-fiber shell, an urban skate has a separate upper assembly built through an elaborate process. An urban skate upper assembly incorporates many more individual parts than a hockey skate. For instance, eyelet and eyelet tables are formed only on the upper assembly, and are not parts of an urban shell. Following shows the upper assembly at the start of its manufacturing journey – as a vamp that includes two rows of eyelet holes.

Two quarter parts are attached to the vamp. Each quarter part houses its own addition row of eyelets. These two quarter parts are connected by a heel cup.

Now we have a shoe-looking upper. Note the green triangular piece of cloth that bridges a quarter part to the vamp. This cloth allows the two parts to separate from each other when a skater stands tall, and pinch together when a skater squats in an athletic stance.

Urban skates usually come with a toe strap, making precision lacing less important. In this step, strap retainers are stitched onto the upper, together with a flexible toe guard.
Paddings and inner liner are glued onto the interior of the upper, to form an integrated liner.


A thick tongue is stitched onto the vamp. And a foam insole is stitched to the liner wall to complete the upper assembly. The assembly includes the exterior upper, and the inner boot. The upper assembly can now be laced.

Now the upper assembly is attached to the carbon shell. This is not as simple as just gluing the insole onto the sole of the shell. Both inside and outside walls of the shell are primed with glue. Then the upper assembly is lowers onto the shell, with the integrated liner stuck to the inside walls of the shell, and the upper stuck to the outside of the shell.


Much stretching follows. All parts of the upper are carefully stretched and measured against edges of the shell, to ensure proper fit. The toe cap area is reinforced with TPU-like materials.


The flexible toe guard piece is stretched taught, and folded over the carbon shell. This piece is carefully secured to the shell with glue.


At this point, the boot provides firm support for the sole and the heel. But the entire ankle area and the lower part of the leg and the shin are only covered in soft liner and upper cloth. This is where the cuff and the buckles come in.
Pictured below is a boot with the 45° buckle installed through two of the four holes punched on the shell earlier. A cuff is installed, to complete the closure mechanism. The cuff is one of the most important part of an urban skate – it gives the entire shaft of the boot structural support, including ankle, shin and lower parts of the calf. With the cuff, the 45° buckle and the toe strap, there is no need to actually lace any eyelets. The eyelets on an urban skate are provided only as a backup closure, and for nostalgic reasons.
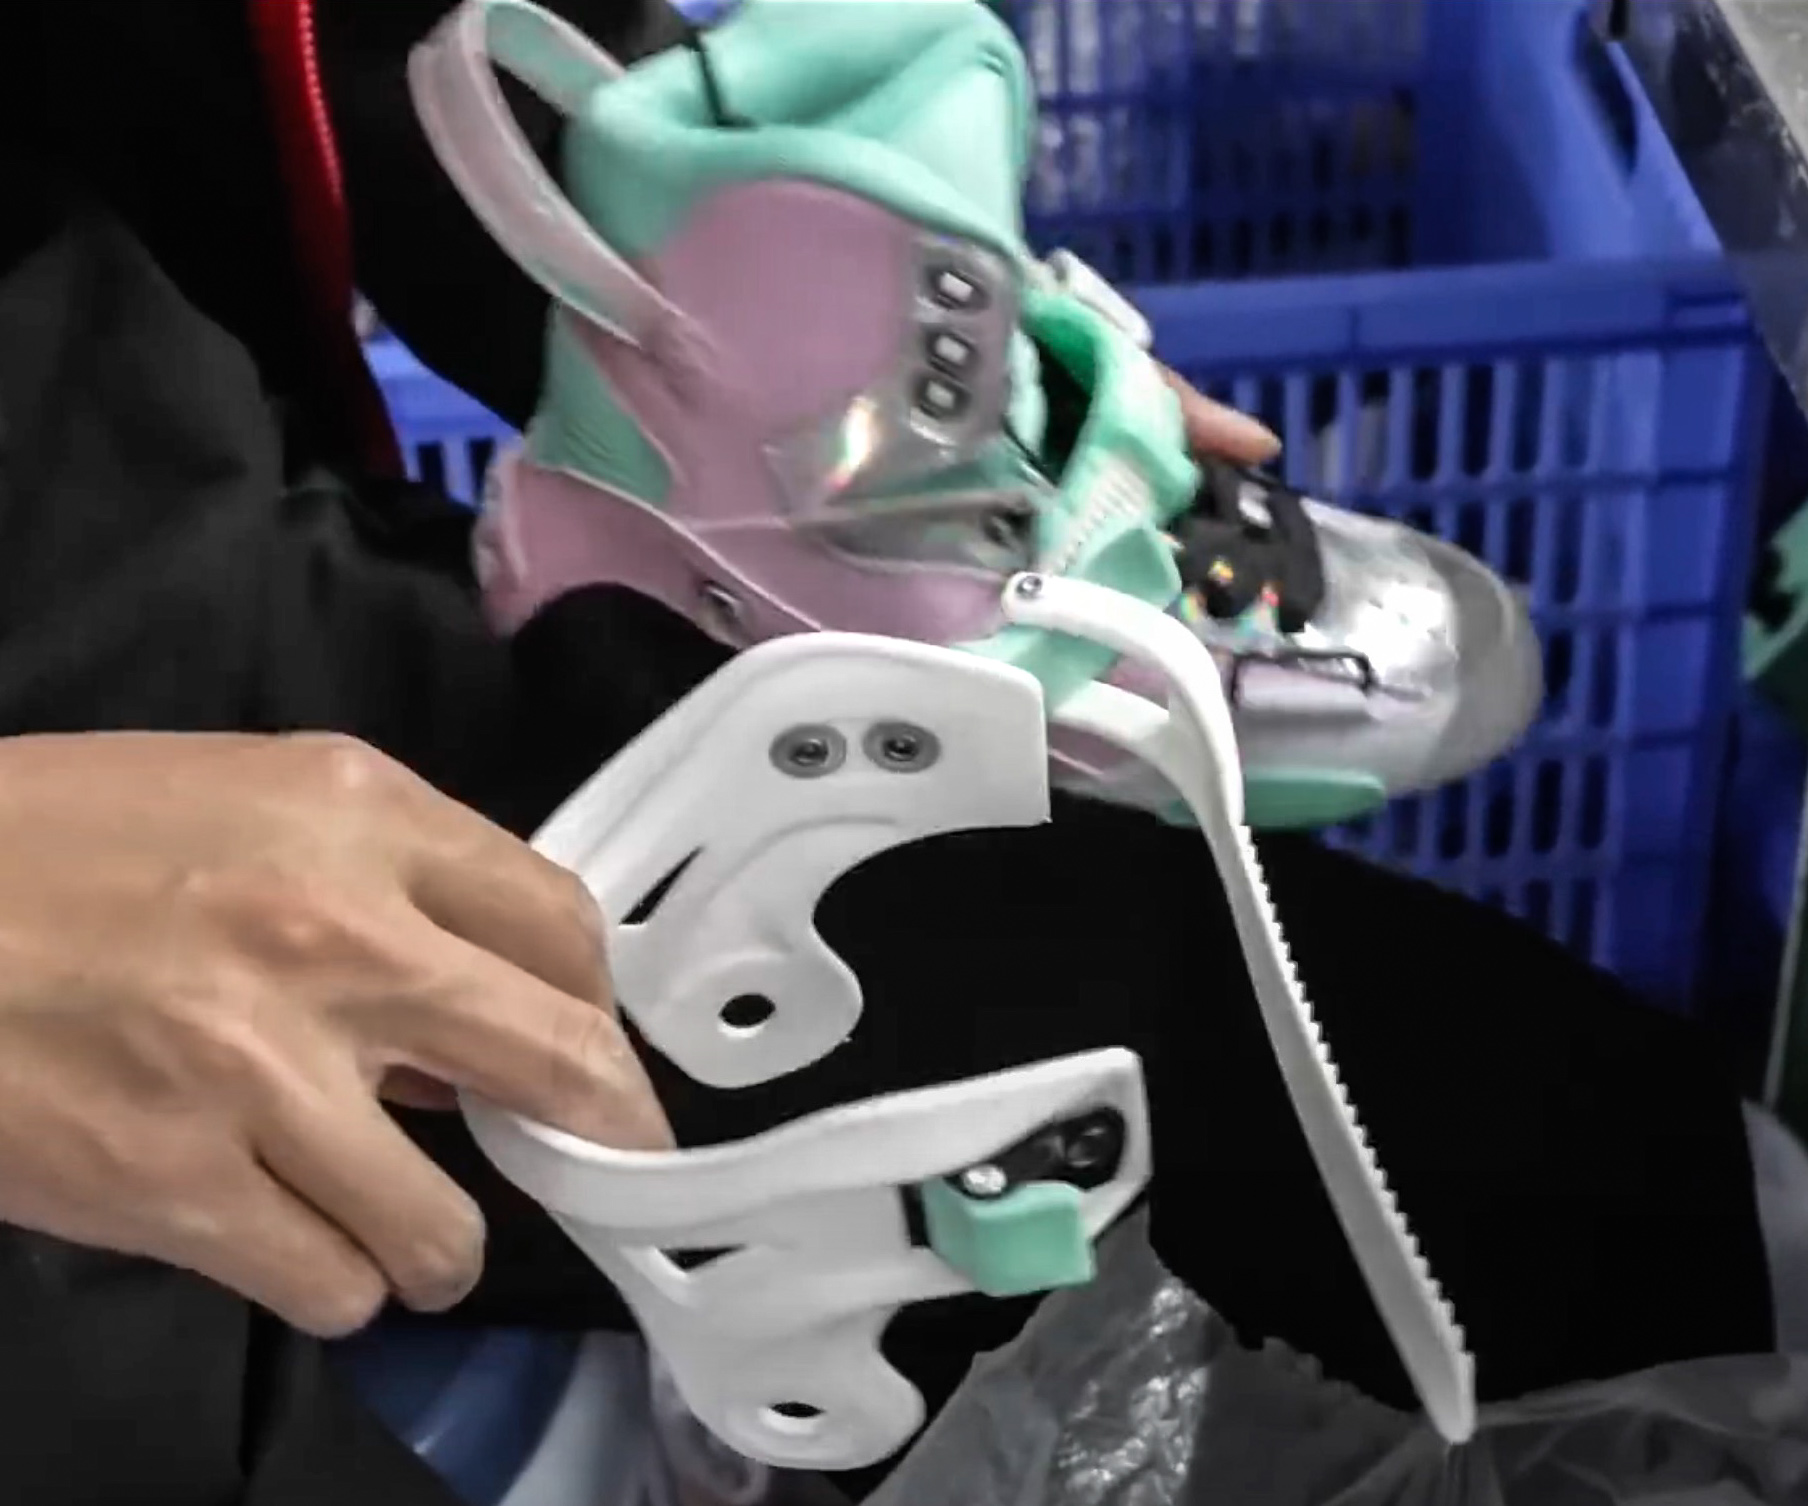
Note how the cuff is the only moving piece in an urban skate. It pivots around the hinge shown, for up to some 15°. It is instrumental in enabling a skater to take the athletic stance when skating, and to shift pressure from the heel to the shin. With the ankle bent forward, the shin rests on the thick tongue. This allows the skater to keep her center of gravity on the balls of the feet.

Here is a view from the other side of the cuff. Note the small green triangular piece of cloth between the cuff buckle and the 45° buckle. I pointed this out earlier. Also note the according-shaped green cloth covering the achilles tendon. These are flexible clothing, to allow the shaft part of the upper assembly to pivot with the plastic cuff.

Here is an annotated view of those two flexible pieces of clothing that allow the upper shaft to pivot.
Finally, a frame is installed on the boot. Then wheels are mounted to the frame. Almost all middle-end and high-end urban skates now come with replaceable frames. This is one great advantage of urban skates over hockey skates. In contrast, street hockey skates come with permanently riveted frames, even the custom-modeled pairs that cost over $1,300.


This completes the process of making a pair of carbon-fiber urban skates.


Updates
Update 2025-01-29: I am sharing pictures taken and illustrations made for this article on Wikimedia for the Wikipedia article on Inline Skates. Update 2025-05-25. I have spent the first half of year 2025 rewriting the entire Inline Skates article. I am getting close to the finish line. Update 2025-08-04: the rewritten Inline Skates article has been classified as a good article, and now serves as a summary linking to several child articles including history, types, frames, wheels, bearings, tuning, and wheel setup.
Last updated: 2026-03-30

